Category: Recipes

Nutella Viennese Biscuits

Nutella Viennese Biscuits

I think there’s something very British about biscuits. We’ve got to the point in our culture where we have very little cuisine we can call our own other than that which we’ve appropriated from other cultures. But for some reason the hearty biscuit with a good cup of tea feels well and truly British. That said, alas, one of my favourite biscuits is the crumbly almighty Viennese biscuit, which guessing by the name is Austrian. I first came across these when I made them at school way back when. I remember them being a pain to pipe as the mixture was so solid, but they tasted divine. The other day I was re-acquainted with these in Sainsburys, this time sandwiched together with some chocolate, and I was reminded of just how good they are!

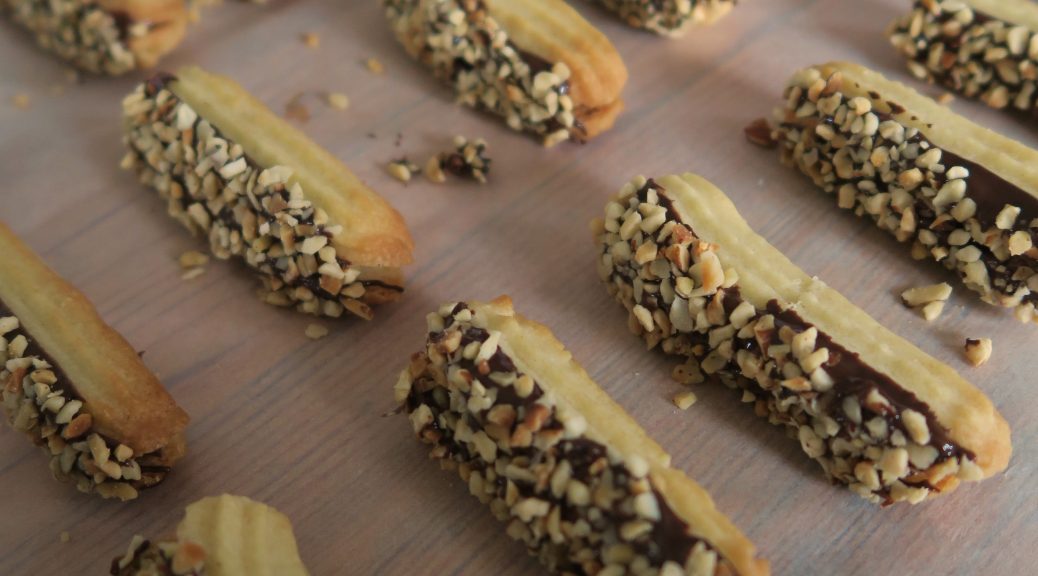
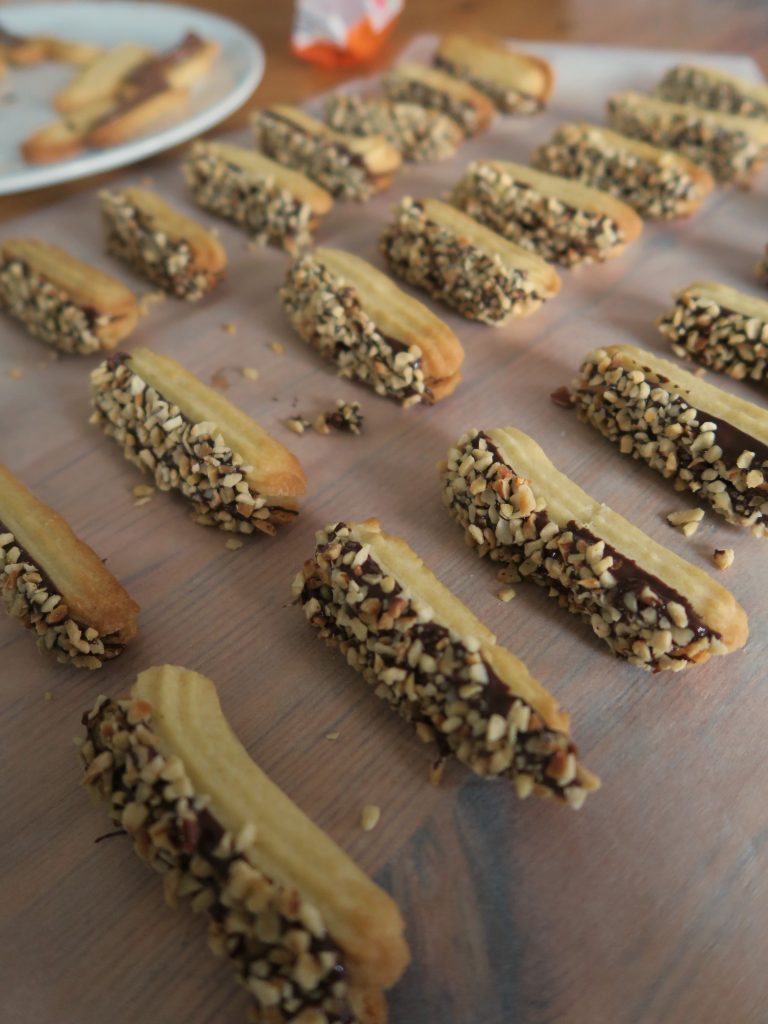
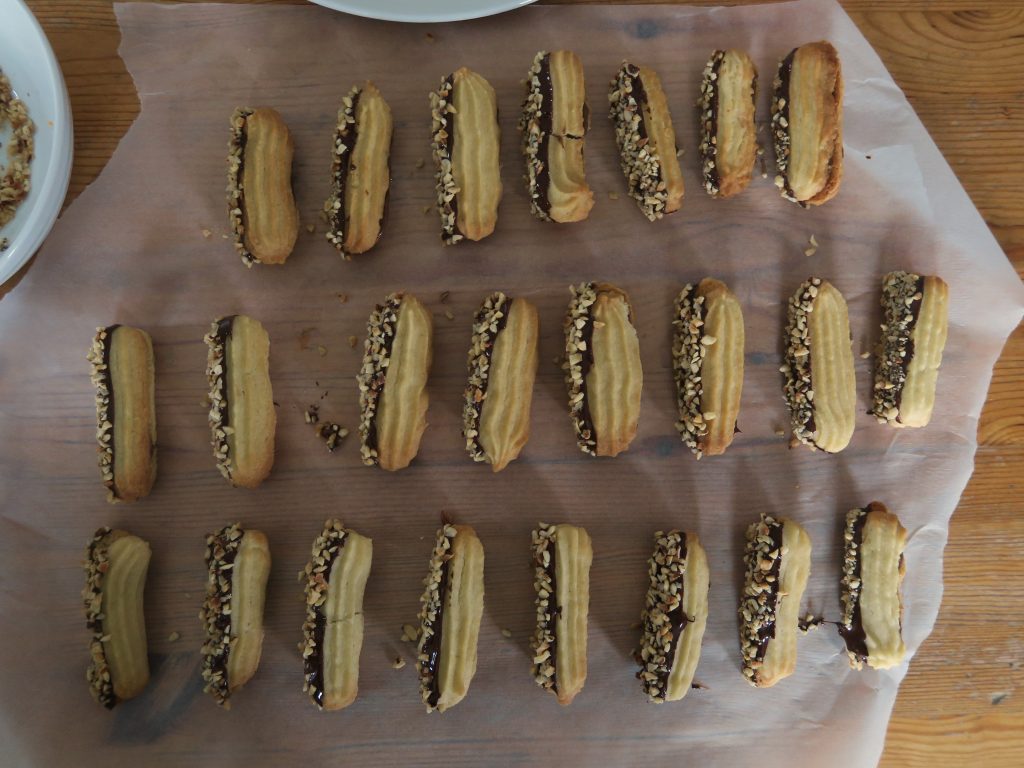
These are kind of like a more crumbly, lighter shortbread smothered in chocolate and hazelnuts – kinda like the biscuit equivalent of that perfect friend who not only is perfect but is also really nice so they’re impossible to hate. Simply put, these look amazing, taste incredible and have a texture to die for. As long as you don’t over work the mixture they’ll be as crumbly as an archaeological dig through a wet sand pit. They are a little hard to pipe to begin with, but persevere and the mixture will eventually warm up enough to pipe smoothly. If it’s really hard to begin with you might need to use scissors to chop the sticks of dough off the end of the pipping bag! I used Nutella in these as I was looking for something tasty and sticky to act as a ganache substitute in the middle (as I really didn’t want to have to bother with making something else to sandwhich them with) and it worked so so well!

Recipe

Makes 24

Time: 2 hours

Ingredients

  • 200g Butter
  • 50g Icing sugar
  • 2 tsp Vanilla extract
  • 200g Plain flour
  • 2 tsp Cornflour
  • ½ tsp Baking powder

For the filling

  • 4 tbsp Nutella
  • 100g Dark chocolate
  • 50g Chopped hazelnuts

Method

  1. Pre-heat the oven to 180C. Line two baking trays with baking paper. Take a ruler and draw 24, 6cm lines on each sheet to act as your guides for later. Then turn the paper over so the lines are on the other side.
  2. Put the butter and icing sugar into a large bowl and beat until pale and creamy. Add the vanilla and whisk again to combine.
  3. Add the flour, cornflour and baking powder into the mixture until everything’s combined.
  4. Spoon the dough into a pipping bag with a star shaped nozzle and pipe lines of the dough, using your lines you drew earlier as a guide.
  5. Put the biscuits into freezer for about 10 minutes to set the shape. Then bake the biscuits for 10-12 minutes until pale golden and slightly crispy. Leave the biscuits to cool.
  6. Spread or pipe a little of the Nutella over the base of half the biscuits. Then sandwich the covered biscuits with the non-covered biscuits.
  7. Melt the chocolate in a bowl over a pan of gently simmering water. Dip the edge of the biscuits in the chocolate and then dunk the biscuits in a bowl of chopped hazelnuts. Leave on some grease-proof paper to set and repeat with the rest of the biscuits.

Thanks for reading!

Emma x

Gingerbread Cake with Lemon Curd and Cream Cheese Icing

Gingerbread Cake with Lemon Curd and Cream Cheese Icing

This might just be the most Christmasy thing I have ever made. Ginger is without a doubt the poster spice for the festive season and so ginger cake topped with a ginger bread house, little trees and a good dusting of icing sugar is pretty much an edible version of Lapland. This was really fun to make but it wasn’t without it’s faults. For example, I learnt things like:

  1. Sometimes gingerbread can be too thick.
  2. Don’t pipe icing that’s too runny onto a sloped surface. As much as you tell yourself it will succumb to the laws of gravity and drip sadly off the sides of your house, forming a pool of sugar tears next to it.
  3. Even if your cakes are completely cool make sure your kitchen isn’t too hot when icing your cake. Those of you following my Instagram may have seen the effects of heat + cream cheese frosting with the image of my cake ‘rustically deconstructed’ across my kitchen table, where it slid whilst I was washing up.

So yeah, this didn’t go entirely to plan, but it still tasted amazing and I managed to get a few decent photos before it self deconstructed! As with all big cakes this can feed an army so it’s perfect for any Christmas parties or celebrations coming up.

Recipe

Serves 12

Time: 2 1/2 hours

Ingredients

For the cake

  • 150g Butter
  • 300g Self raising flour
  • 1 tsp Bicarbonate of soda
  • 4 tsp Ground ginger
  • 2 tsp Ground mixed spice
  • 1 tsp Ground cinnamon
  • 150g Muscovado sugar
  • 280g Golden syrup
  • 300ml Whole milk
  • 1 Large egg

For the gingerbread house

  • 175g Dark muscovado sugar
  • 85g Golden syrup
  • 100g Butter
  • 350g Plain flour
  • 1 tsp Bicarbonate of soda
  • 1 tbsp Ground ginger
  • 1 tsp Ground cinnamon
  • 1 Egg, beaten
  • 200g Icing sugar

For the icing

  • 150g Cream cheese
  • 300ml Double cream
  • 3 tbsp Icing sugar
  • 1 tbsp Stem ginger syrup (optional)

For the decoration

  • 4 tbsp Lemon curd
  • 2 tbsp Caramel
  • A large pinch of Sea salt
  • Icing sugar for dusting

Method

  1. Heat the oven to 180˚C. Grease and line 3, 20cm round tins with butter and baking paper.
  2. Put the flour, bicarb, ginger and mixed spice into a large bowl. Add the butter and rub it into the flour with your fingers until there are no lumps.
  3. Put the sugar, golden syrup and milk into a pan and heat gently until the sugar dissolves, stirring occasionally. Bring the mixture just up to the boil.
  4. Pour the warm mixture into the dry mixture and whisk together. Add the egg and then mix in. The mixture should resemble a thick pancake batter.
  5. Pour the mixture into the three lined tins (about 400g into each tin) and then bake in the oven for 50 minutes – 1 hour until baked all the way through. A skewer inserted into the middle should come out clean. Leave to cool until needed.
  6. Now make the ginger bread house. Put the sugar, syrup and butter into a pan. Bring to a gentle simmer whilst stirring until the sugar has dissolved. Leave to bubble for 1-2 minutes and then leave to cool for 5-10 minutes.
  7. Put the flour, bicarb and spices into a bowl. Add the egg, syrup mixture and stir together to form a soft dough.
  8. Wrap the dough in cling film and leave in the fridge for 30 minutes to firm up.
  9. Take the dough out of the fridge and roll out between two sheets of clingfilm. You want it to be about half the thickness of a £1 coin. Using the templates (below) cut out the pieces of the house you need.
  10. Place the pieces onto a lined baking tray and bake in the oven for 10-15 minutes until starting to slightly brown at the edges. Leave to cool before icing.
  11. Mix the icing sugar and 2 tbsp water in a small bowl and then transfer it into a piping bag with a small round nozzle.
  12. Pipe icing around the edge of your gingerbread pieces. Then join the four sides of the house together. Add the roof to the house and then decorate each panel how you want. Leave the house at room temperature for a couple of hours so that the icing has time to set.
  13. Now make the filling. Put the cream cheese, cream, icing sugar, and ginger syrup (if using) into a big bowl and whisk together until it starts to hold its shape and is smooth. Then spoon the mixture into a piping with a large round nozzle. Keep chilled until needed.
  14. When the cakes have cooled completely and your house is ready you can start assembling. Place one of the cakes on a plate or board. Spread over ½ the lemon curd and then pipe blobs of the icing over the sponge. Then drizzle 1/3 of the caramel over the icing.
  15. Place another sponge on top and repeat with the icing and caramel. Then finish by putting the last sponge on top.
  16. Pipe the rest of the icing in blobs over the top of the cake. Spoon the rest of the caramel over the icing, letting it drip over the edge.
  17. Top with the mini ginger bread house, any Christmas decorations you like and a sprinkling of icing sugar!

Thanks for reading!

Emma x

Gingerbread House Template:


Mince Pie Bread Snowflake

Mince Pie Bread Snowflake

As you can see from the photo below, baking in a little student kitchen is more problematic than my little naive brain could have ever thought of. Before I got to uni I went on a full out shop, buying everything (within reason) I thought I would need to be ready to cook at uni. Oh boy was I wrong. Lacking in scales, space, ingredients and an oven big enough to actually fit the loaf of bread I made it was a wonder it came out looking like this and not a blob on a plate. I even resorted to using a golden syrup bottle to roll out my dough before realising I had a rolling pin after all (fyi, a bottle that has a curvy shape may be pretty but does not function as an effective rolling pin!).

Anyway, a bit of guessing with the measurements, some careful squishing onto the baking tray and 4 hours of time I probably should have spent studying later, this beauty appeared from the oven… and was then eaten in about 5 minutes. The two things I love most about baking is sharing the outcomes with others and, of course, the hands on process of making whatever it is. In particular there’s something very therapeutic about making bread and it’s a great way to calm yourself and get out your anger at the same time. I actually made this in the midst of the ‘I have no idea what the hell I’m doing, should I switch to an art degree or will I regret that in three years when I’m living in a cardboard box?!?’ crossroad in my life, and just getting the head space to actually think by doing something hands on was just what I needed at the time. I’m also 98% sure that mincemeat is a mood booster. Shove a jar of that under my nose and you’ll fool me into thinking it’s Christmas so I’ll perk up a lot!

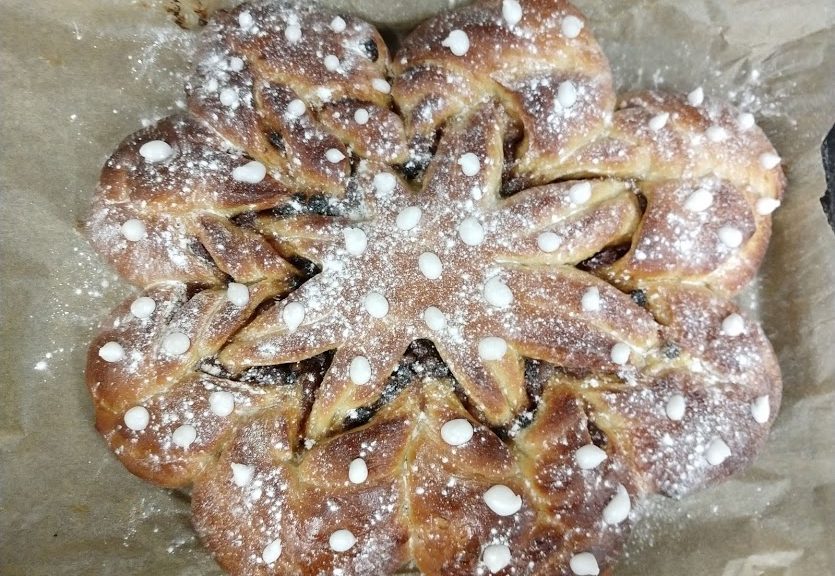
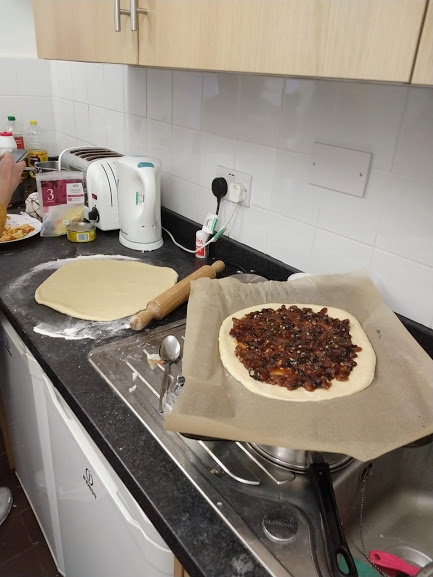
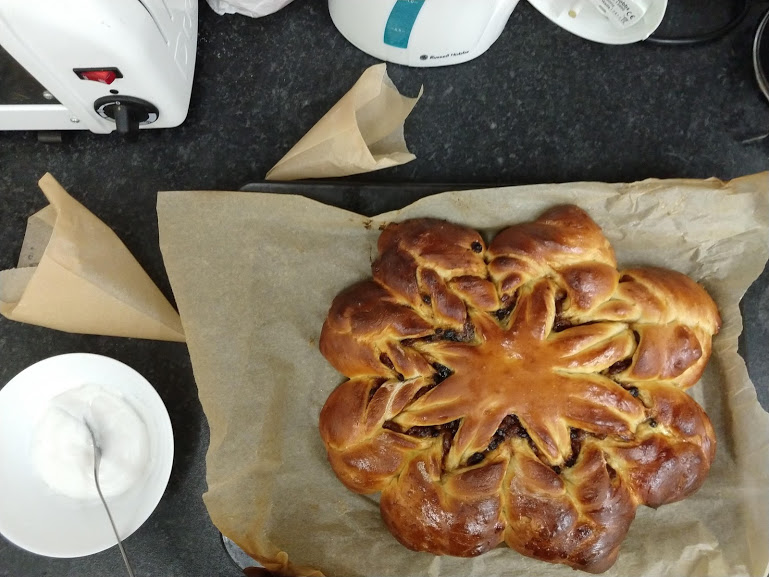
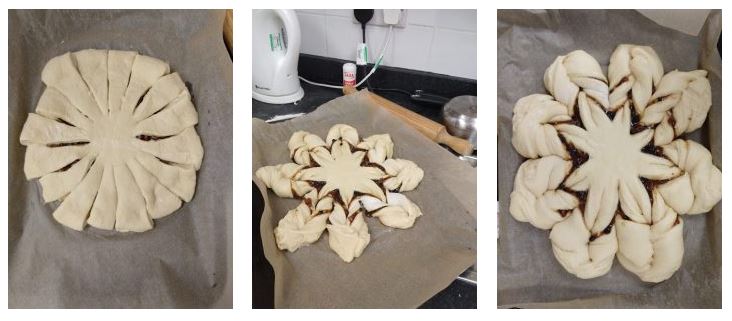
One of the other fun things about making bread is the cool shapes you can twist the dough into! I first came across this way of shaping a loaf whilst watching Bake Off a few years ago. It’s so simple to do and yet messes with everyone’s head so they go ‘ooo, how’d you do that?’. It also makes the loaf really easy to share as each person can  rip off one of the snowflake branches!
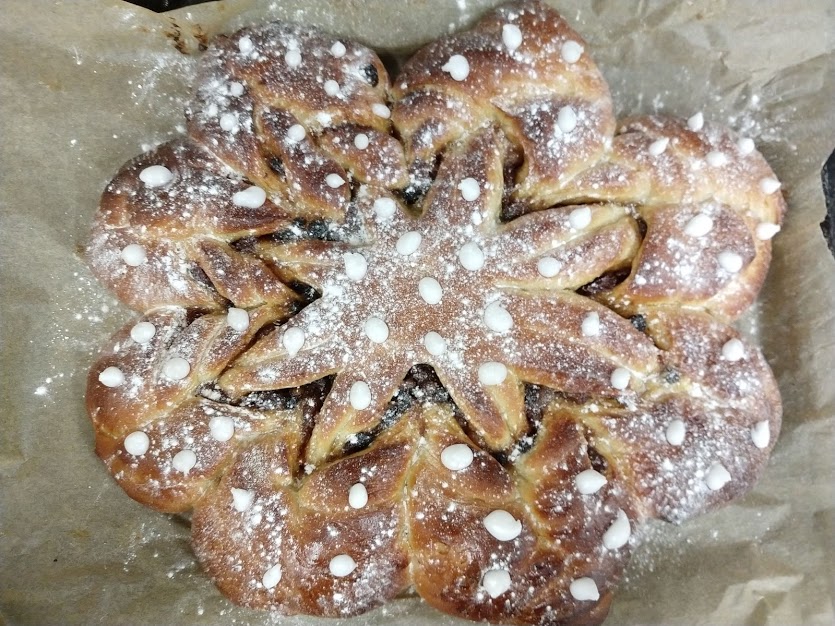
Recipe

Serves about 8 hungry students

Time: 1 hour (plus proving and baking time)

Ingredients

For the Dough                   

  • 500g Strong white bread flour
  • 10g Salt
  • 25g Caster sugar
  • 10g Fast action dried yeast
  • 30g Butter
  • 2 Large eggs
  • 50ml Milk
  • Olive oil for greasing

For the Filling/Topping 

  • 350g Mince meat
  • 1 Egg to glaze
  • 150g Icing sugar

Method

  1. Begin by making the dough. Put the flour, salt, sugar and yeast into a bowl and mix everything together. Make sure you don’t put the salt directly on top of the yeast or you could end up deactivating the yeast.
  2. Add the butter, eggs, milk and 100ml water to the mixture. Stir until combined, adding a little more water if needed to bring the dough together.
  3. Turn the dough out onto a lightly floured surface and knead until smooth and elastic (about 10 minutes).
  4. Form the dough into a bowl and then put it into a large clean bowl. Cover with clingfilm and then set aside to prove for around an hour, until doubled in size.
  5. Turn the dough out onto a worktop and knead for 10-15 seconds to knock the air out. Then cut the dough in two, wrap one of the halves in clingfilm and set aside for later.
  6. Lightly flour a work top and roll the first half of the dough out into a circle, about 30cm in diameter. The dough will resist being stretched but keep going and you’ll get there. Transfer this sheet of dough to a lined baking tray.
  7. Spread the mincemeat over the circle of dough, leaving a 1 cm boarder around the edge.
  8. Roll out the remaining dough into another 30cm circle. Brush the edge of the base with a little water and then lift the top sheet of dough on to the base.
  9. Take a knife and carefully trim the circle so it’s neat (using a large bowl or plate as a guide can help). Then cut 16, 10cm long, equally spaced slices into the centre of the bread, but not cutting all the way into the middle. Using a 10cm wide template in the middle so you know where to cut to can help.
  10. Twist each strip over twice, the first one to the right, the second one to the left and so on, until you have 16 alternating twisted strips.
  11. Take two strips and gently squeeze together the tops of the strips to join them together. Repeat with the rest of your strips so you have 8 snowflake branches.
  12. Wrap the loaf loosely in cling film and then leave to prove for about 30 minutes.
  13. Pre-heat the oven to 180˚C. Break an egg for glazing in a small bowl and beat with a fork to break it up.
  14. Brush the egg over the risen loaf to glaze and then bake for 20-25 minutes in the oven until golden-brown and risen. Set aside to cool.
  15. Mix together the icing sugar and just enough water to make a pourable but not runny icing. Transfer the icing to a piping bag with a small round nozzle and then pipe decoration over the cooled loaf. Serve!

Thanks for reading!

Emma x

Birmingham Christmas Market

Birmingham Christmas Market

One of the best ways to get into the Christmas spirit at the moment is to head over to a Christmas market and soak up all the festivity, so yesterday I did just that! My friends and I met up in Birmingham and spent the day wandering around the incredible German Christmas market there. As well as a whole range of decorations, crafts and presents in the gorgeous alpine huts stretching up and down the high streets, there was a whole range of delicious foods (of which we tried to eat as much as possible!). Whilst it was an amazing day the food there isn’t the cheapest (mostly £3.50-£4.50 a piece), so I thought I’d share my experience of the food in the Birmingham Christmas market so that you can get the best out of your time there with out breaking the bank! Below are little summaries of each of the things we tried and then at the bottom I’ve included a list of top tips so you can make the most of the market!

Garlic Butter Bread

The first thing we tried at the market was one of these delicious ciabatta breads, coated in garlic butter and cheese. These came with all kinds of toppings, from just plain garlic butter to full on pepperoni and cheese! I’m a little bit garlic bread mad, so maybe I’m biased, but oh man were these good! We shared 1 between 2 of us and that worked pretty well as a main meal so if £4 for a sandwich feels a little steep, sharing could be the way to go!

Potato Fritters

Ok, so this might be the weirdest sounding thing we tried but they were so so good! These reibekuchen are traditional German potato fritters which are apparently pretty common staples of German Christmas markets. They kind of tasted like crispy, sweet chips, which I know sounds gross but it actually works!

These were served with a variety of toppings like stewed apple, plum jam and even smoked salmon and creme fraiche! We went for plain sugar as it was the cheapest option and we were a bit sceptical over whether it’d taste good. Within a couple of bites though we realised that toppings with it would have been even more incredible, so if you decide to go for these give a topping like the stewed apple a try.

Pretzels

From the weird and wacky to the more traditional. If you’re looking for something more classic to munch on you have to try one of the delicious range of pretzels on offer. As with a lot of the stalls at the market there were 3 or 4 of the same pretzel stalls around the place, all selling a mixture of sweet and savoury ones, so if you’re crazy for pretzels this is the place for you.

As I have a huge sweet tooth I went for one of these sweet pretzels rolled in cinnamon sugar. To be honest it was more of a doughnut than a pretzel, but one of my friends had a brie and cranberry one which was apparently amazing. With these kind of things you just have to be adventurous and go for whatever sounds the best, and if you do that, at least from our experience, you’ll likely come across something you love!

Doughnuts

I have to say if you’re on a diet you really shouldn’t go to this market because everything is deep fried, sweet and delicious! I myself didn’t go for a doughnut but a friend of mine did and she said it was really good – although slightly lacking on the custard front. Even just the range of doughnuts on offer was a little breath taking, and if I hadn’t eaten about 6 deep fried treats before then I could have easily tried every one on offer. You can find everything from marshmallow to black forest flavoured ones!

Churros

From doughnuts to churros! This was the first time I had these long Spanish treats and man was I not disappointed. These ones were served with either cinnamon or sugar, and then a choice of milk or white chocolate or nutella to dip the crispy doughnut sticks into! Personally I think these were a little steeply priced, coming in at £5 for 6 churros, so if you’re looking for the better deals in the market you should probably give these a miss and going for something else. However if you don’t mind splashing out a bit for the occasion they’re well worth a try.

So there we go, a whistle-stop guide to the Birmingham Christmas market. Of course there were a lot more things on offer, like the classic German bratwursts, mulled wine, beer and schnitzels, however due to limited funds and full stomachs that’s all we got through! So if you’re looking for a festive day out with some insanely good food, some pretty scenery and a chance to do some Christmas shopping on the side then make sure you head on down there!

A Few Final Top Tips

  • Try even the weirdest sounding stuff – you’ll come across the most unusual but delicious treats.
  • We went on a week day and it had just the right number of people around, so if you want to beat the weekend crowds it might be worth thinking about going mid week instead (if you can!).
  • Take cash with you as most of the stalls don’t take card and it makes life a lot easier.
  • Share what you buy between 3 or 4 of you and then you can all try lots of everything!
  • If you can, try to be around when it gets dark because that’s when the lights come on and everything becomes 10x more magical!

Thanks for reading!

Emma x


Tiramisu Cake

Tiramisu Cake

So my first term at Oxford has come to an end and oh boy has it been a term. I’ve switched degrees, become a vegetarian and have made some incredible friends (miss you already btw!). Just before we left we had a big birthday celebration dinner thing for my friend Kat and so I made this tiramisu cake for dessert!

I love baking things for people’s birthdays as it always puts the best look on their face and you can personalise what you make to fit the person! I’ve topped this one with chocolate decorations of an elephant in a little woodland as Kat loves elephants, but you can pipe your decorations to look like anything. To make these ones I got a picture of an elephant up on my phone and then placed a sheet of baking paper over my phone so that I could see the outline underneath. Then I just piped over the top following the lines. A top tip with this is make sure that the piping is thick enough so that you can peel the shapes off the paper without it breaking (RIP too many thin elephants!).

Recipe

Serves 16

Time: 2 hours

Ingredients

For the cake

  • 240g Caster sugar
  • 240g Butter
  • 4 Eggs
  • 250g Self raising flour
  • 2 tbsp Coffee powder
  • 2 tbsp Milk
  • 1 tbsp Cocoa powder

For the filling

  • 750g Mascarpone cheese
  • 300ml Double cream
  • 3 tbsp Icing sugar

To Decorate

  • 100g Dark chocolate
  • 1 tbsp Instant coffee powder
  • 1 tbsp Milk
  • Cocoa powder to dust

Method

  1. Pre-heat the oven to 180˚C. Grease and line a square tin with butter and baking paper.
  2. Put the butter and sugar into a bowl and beat with a wooden spoon until pale and creamy.
  3. Add the eggs one by one to the mixture, whisking in between each addition until combined. Add the flour and whisk again to make a smooth batter.
  4. Put the coffee and milk into a small bowl and stir until the coffee dissolves. Add the coffee to the cake mixture and mix until combined.
  5. Pour the mixture into your lined tin and then bake the cake in the oven for 15-20 minutes until risen and golden brown – a skewer inserted into the middle should come out clean.
  6. Transfer the cake to a wire rack and leave to cool before taking it out of the tin.
  7. Now make the chocolate decorations. Put the chocolate in a bowl over a pan of gently simmering water. Leave to melt and then pour into a piping bag with a very small, round nozzle.
  8. Take a sheet of baking paper and either draw your design onto the paper with a pencil and then turn it over so you can see the design on the back, or use your phone as a light box to shine a design through the paper from underneath.
  9. Carefully pipe the chocolate over your designs and then leave to set completely (not in the fridge as it’ll go white and horrible!).
  10. To make the cream filling put the mascarpone, cream and icing sugar into a large bowl and whisk together until smooth and creamy. Spoon the mixture into a piping bag fitted with a star shaped nozzle.
  11. When the cake has cooled take a sharp knife and cut the cake in half horizontally. Dissolve 1 tbsp coffee in the milk and then brush the coffee evenly over the two sponges.
  12. Place the bottom half on the board or plate you’ll present it on. Pipe blobs of the cream over the cake. Then top  with the other cake half and pipe the rest of the cream over the top.
  13. Carefully peel your chocolate decorations off your baking paper and arrange them over the top of the cake. Finish with a dusting of cocoa powder and serve!

Thanks for reading!

Emma x