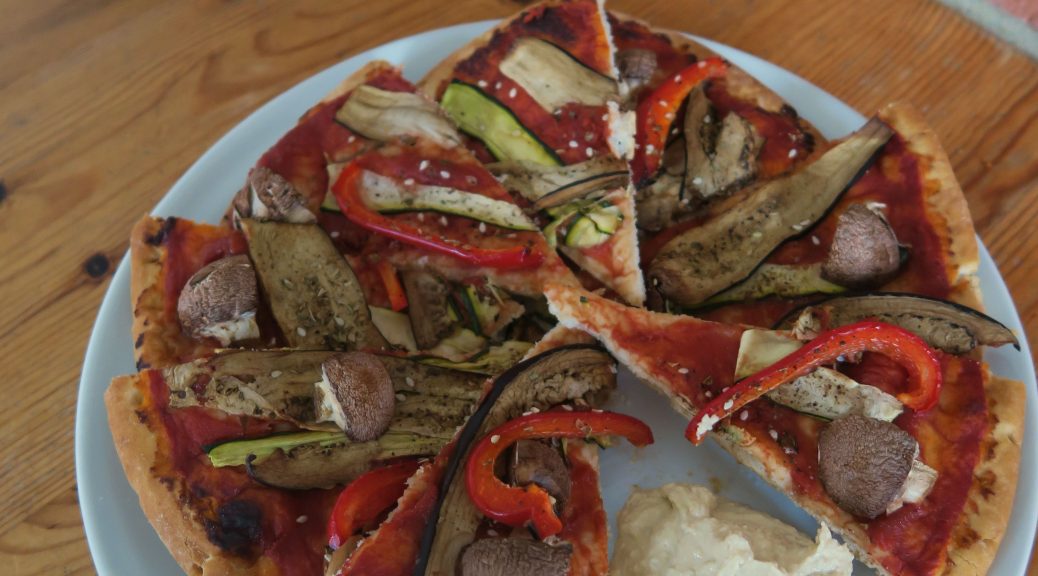
Category: Recipes

Vegan Pizza

Vegan Pizza

One of the things I’m really missing as a vegan is cheese. I’ve never been much of a cheese person but oh man do I miss a good tangy bit of cheddar or a squeaky slab of halloumi. I know it’s been less than a week but it honestly feels like a year since I started! And pizza, oh pizza, I would kill for a good margherita right now. That said, I have found a way to make a delish pizza that works well without cheese (yes it is possible!) and it’s also super quick so what’s not to like?

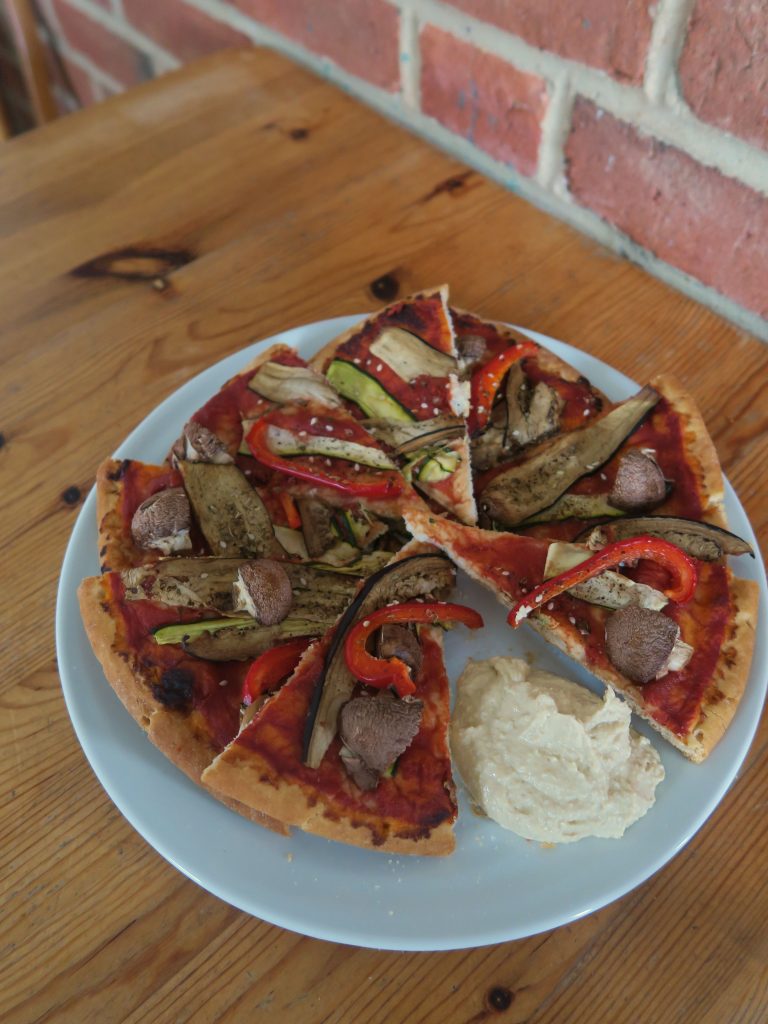
Traditionally if I were to make a pizza I’d make the base as well as I love making bread, but when you’re at uni and are over-committing yourself as usual who has time for that? So bring in the ready-made pizza bases. These have honestly saved my life so much! Simply pop on some tomato sauce, whop on your toppings and hey presto – one delish pizza! However, there is still the problem about the cheese. Now I know you can by vegan cheese, but let’s be honest, it doesn’t make up for a good cheddar does it? So what I’ve found is that a good dollop of hummus to dip the pizza in does the same kinda thing! Think of it kinda like the garlic dipping sauces you get from Dominoes, but adding a salty, tangy flavour to the whole shebang. It’s so so good you have to try it!

Recipe

Makes 1 pizza

Time: 15-20 minutes

Ingredients

  • 1/4 Aubergine
  • 1/4 Courgette
  • 1 Pizza base (most are vegan but just make sure when you buy it)
  • 3 tbsp Passata (I went for a garlic and herb one)
  • 1/4 Red pepper
  • A few Chestnut mushrooms
  • 1/2 tsp Za’tar (optional)
  • A few tbsp of Hummus to serve

Method

  1. Pre-heat the oven to 180˚C.
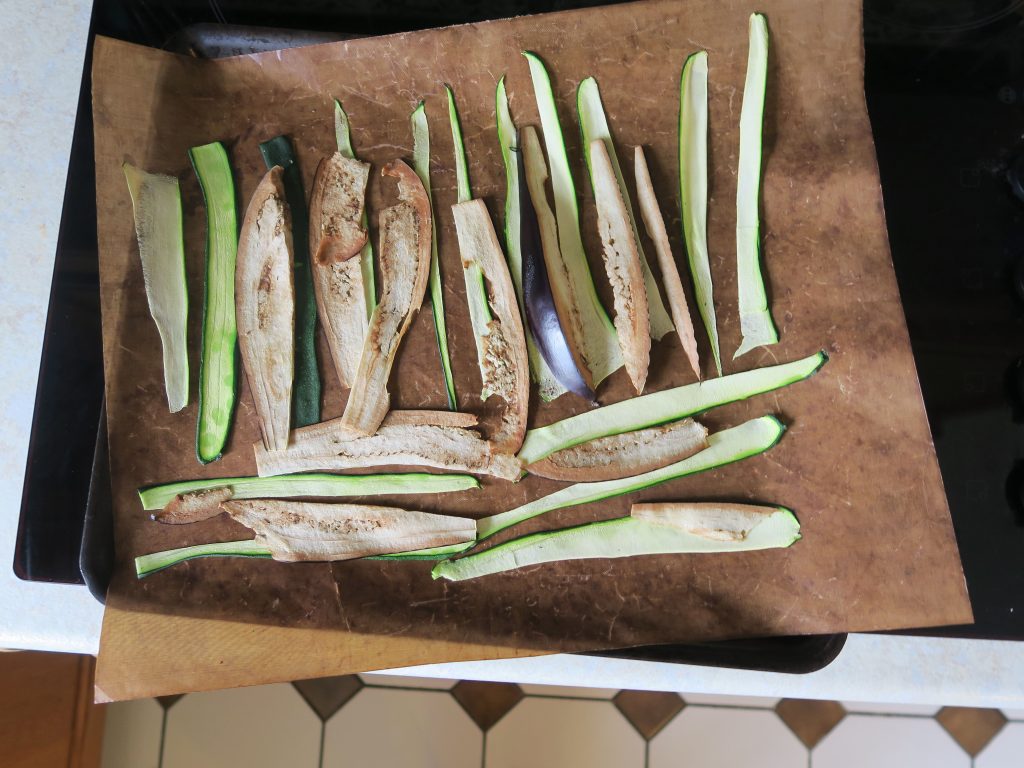
  2. Take the aubergine and courgette and use a vegetable peeler (or a knife) to make super thin strips. Lay the strips on a baking tray lined with baking paper and put in the oven to soften for about 5 minutes.
  3. Meanwhile, chop the mushrooms into ¼s and finely slice the red pepper into strips.
  4. Spread the passata over the pizza base in an even layer. Then arrange the vegetables over the top. Sprinkle with a little salt and pepper and some za’atar if you’re using it.
  5. Bake the pizza in the oven for 5-10 minutes, until the vegetables are cooked through and the base is starting to colour. Serve with lots of hummus!

Thanks for reading!

Emma x

Vegan Chocolate Cake

Vegan Chocolate Cake

It’s 2019. Everything’s squeaky fresh and everything’s vegan! (For this month at least). I have 9 delish vegan recipes coming your way and then depending on how I like the whole vegan thing I might carry on with it or go back to being a chill veggie. That said, it’s only been 1.5 days and I’ve been hungry and staring at every non vegan thing in my kitchen for most of that time. But it’s gonna be great. I’ve got hummus, I’ve got aubergines, and I’ve got some sweet wonders like this chocolate cake to keep me going!

I actually first came across this way of making a cake a couple of years ago before I even considered going vegan, and it was so good that I didn’t realise it had no milk, eggs etc in it. It also doesn’t require lots of random hard-to-find ingredients like lots of vegan foods do, all you need is just a couple of avocados and you’re good to go! I also cannot stress enough that this is a hella good cake in it’s own right – this has actually become my go-to chocolate cake because it tastes so insanely good. So if the first thing you think of when someone says vegan is a bowl full of bland vegetables try whipping up one of these!

Recipe

Serves 10-12

Time: 2 hours

Ingredients

For the cake

  • Dairy free spread for greasing
  • 2 Small avocados (about 150g)
  • 300g Caster sugar
  • 350g Plain flour
  • 60g Cocoa powder
  • 1 tsp Bicarbonate of soda
  • 2 tsp Baking powder
  • 400ml Soya milk
  • 150ml Vegetable oil
  • 2 tsp Vanilla extract

For the icing

  • 70g Ripe avocado
  • 100g Dairy free spread
  • 200g Dark chocolate (dairy free)
  • 125ml Soya milk
  • 25g Cocoa powder
  • 200g Icing sugar
  • 1 tsp Vanilla extract

Method

  1. Pre-heat the oven to 170˚C. Line two 20cm sandwich tins with dairy free spread and baking paper.
  2. Put the avocado flesh into a bowl and puree it with a hand blender. Then put the avocado through a sieve into another big bowl.
  3. Add the sugar, flour, cocoa powder, bicarb, baking powder, milk, oil, vanilla and a pinch of salt to the avocado and whisk together until smooth and velvety.
  4. Pour the mixture into the two tins and bake for 20-25 minutes until risen and springy. (A skewer inserted into the middle should come out clean). Leave to cool for a few minutes and then turn the cakes out onto a wire rack.
  5. Now make the icing. Put the avocado and sunflower spread into a large bowl and beat until smooth. Pass the mixture through a sieve and then set aside for now.
  6. Melt the chocolate in a bowl over a pan of simmering water and then leave to cool for a couple of minutes.
  7. Put the dairy-free milk into a pan and bring to a simmer. Put the cocoa powder into a bowl and pour over the milk, whisking until a smooth mixture forms.
  8. Add the avocado, icing sugar, melted chocolate and vanilla and beat again until the mixture is thick, smooth and shiny.
  9. Put one of the cooled cakes onto a plate. Spread over half the icing, then top with the other sponge and the rest of the icing. Serve!

Thanks for reading!

Emma x

Cherry and Marzipan Flower Bread

Cherry and Marzipan Flower Bread

It’s the last post of the year and so I decided to go for this fun-to-make flower bread thing to kick off 2019! Bread’s one of those massively underrated bakes that very few people make themselves, even though its pretty easy and fun to do. By making your own you can also explore breads with really interesting flavours and fillings so you can branch out from the classic plain white loaf and into the colourful world of flavoured bread. Yes it does take some time to make, but it’s more just waiting for it to rise than actually working on it constantly. So if you’re yet to figure out your new years resolutions maybe you could set out to learn how to make bread? I promise you won’t regret it!

Speaking of new years resolutions…

I’ve always been someone who’s loved fresh starts, not necessarily because I screw up so badly I need them all the time, but just because for some reason they make it easier to start something with ommph. For example I can never start a diet mid-week or start going to bed earlier on a random day. So when new year comes around it’s the perfect opportunity for me to look at everything I’m doing wrong in my life and try to sort it out a bit. Of course it never works and I hit December realising how over-optimistic I was last year about what I could achieve, but it never stops me from making them.

Recently I’ve been really getting into Ted talks and on one of them a guy listed some top tips for new years resolutions in order to optimise life enjoyment and productivity. Sounds even more optimistic than the usual gumph we put on our lists but I thought this year I’d try it and see at the end of the year if it did make things more interesting. For example he recommended that we don’t start our new years with ‘I will not do this’ or the aim to do something we’re not actually interested in doing. Yeah running everyday would be great, but if you hate running it’s not the best start to 2019.  Instead we should aim to go places we want to go, learn skills we want to learn, and spend more time with the people we want to spend time with. So if I can pass on any advice for the new year it would be to a) make one of these (it really does taste super good!) and b) start the new year with the aim of doing some fun things that you want to do!

Recipe

Serves 8

Time: 2 hours, plus proving and baking time

Ingredients

  • 150g Frozen cherries (or mixed fruit)
  • 3 tbsp Cherry jam (or mixed fruit)
  • 3 tbsp Chambord (or other fruity liqueur like crème de cassis or kirsch)
  • 200g Marzipan
  • 1 Egg, beaten
  • 2 tbsp Demerara sugar

For the dough

  • 500g Strong white bread flour
  • 10g Salt
  • 30g Caster sugar
  • 14g Fast action dried yeast
  • 40g Butter
  • 2 Large eggs
  • 50ml Milk
  • Olive oil for greasing

Method

  1. Begin by making the dough. Put the flour, salt, sugar and yeast into a bowl and mix everything together. Make sure you don’t put the salt directly on top of the yeast or you could end up deactivating the yeast
  2. Add the butter, eggs, milk and 100ml water to the mixture. Stir until combined, adding a little more water if needed to bring the dough together.
  3. Turn the dough out onto a lightly floured surface and knead until smooth and elastic (about 10 minutes).
  4. Form the dough into a ball and then put it into a large clean bowl, greased slightly with clingfilm. Cover with clingfilm and then set aside to prove for around an hour, until doubled in size.
  5. Now prepare the filling. Put the cherries into a pan with the chambord (or tipple of choice) and the cherry jam and then bring to a gentle simmer. Leave for 5 minutes, then puree with a hand blender and take off the heat. Whilst the puree is cooling cut the marzipan into 36 thin slices.
  6. Butter a 24cm pie dish with slopping sides, or a cake tin if you don’t have one.
  7. Turn the dough out onto a worktop and knead for 10-15 seconds to knock the air out. Then split the dough into 4.
  8. Place one of your dough pieces on a lightly floured surface and then cover the other pieces you’re not using with cling film. Roll the dough out to a disc about 4mm thick. Then cut out 7cm rounds from the dough. Keep the off cuts in case you need to re-roll and then repeat with the other portions of dough. You should have around 30-36 circles.
  9. Place one piece of marzipan and a little spoonful of the cherry mixture in the centre of each dough circle.
  10. Fold each circle in half, and then bring the two points of the semi-circle together to make a petal shape.
  11. Arrange the dough pieces around the edge of the tin in a circle, and then make more circles with the dough petals working into the centre. Cover loosely with clingfilm and leave to rise for 1 hour.
  12. Pre-heat the oven to 180˚C. Brush the top of the bread with a little beaten egg and scatter with the demerara sugar. Bake for 35-40 minutes until golden brown and baked all the way through. Serve!

Thanks for reading!

Emma x

Hazelnut Biscotti with a Chocolate Ganache and an Orange Curd

Hazelnut Biscotti with a Chocolate Ganache and an Orange Curd

Happy Christmas for yesterday folks! I hope that where ever you are you had a lovely day and that you found some Christmas cheer. With all the festivities going on we can sometimes forget that this can be a very hard time of year for some people, especially those coping those with the loss of a loved one or a mental illness, so if you’re finding the season a little emotional warms hugs and best wishes are being sent your way – it will get better with time! x

From one celebration to another – New Years Eve! At the moment I have this little obsession with buying foreign food magazines when I’m abroad. The different cuisines are so interesting and although most of the time they’re in a different language, meaning I can’t read the writing, I love looking at the pictures and tying to work backwards to what the recipe might be. A few years ago I came across a page in an Italian magazine with two turquoise bowls, one filled with a thick brown ganache and another filled with a glossy orange curd looking substance. I immediately thought of these as being dipping accompaniments to some nutty biscuits, so a few years later here we are!

With the festive season drawing to a close all eyes now look forward to New Years eve, and these are perfect canape type thing for a party or gathering on the night! The biscotti can easily be picked up, dipped and eaten like sweet nachos in guacamole. Whilst it might seem like extra effort to make dipping sauces for biscuits, with these ones I’d seriously recommend you make the effort. Biscotti are crisp Italian biscuits which are twice baked and therefore without the sauces they can be a little too dry to be really enjoyable. However if the thought of new years mahem sends you into a spin you could serve these with some nutella, thinned out with a little double cream and some shop bought preserve or curd instead!

Recipe

Makes 20 biscuits

Time: 90 minutes

Ingredients

For the Biscotti

  • 2 Medium eggs
  • 100g Caster sugar
  • 250g Plain flour
  • ½ tsp Bicarbonate of soda
  • 100g Chopped hazelnuts, plus extra to serve

For the Orange curd

  • 40g Cornflour
  • 3 Large Oranges
  • 1 Lemon
  • 300ml Water
  • 3 Medium egg yolks
  • 85g Caster sugar
  • 50g Butter

For the Ganache

  • 150g Double cream
  • 130g Dark chocolate

Method

  1. Pre-heat the oven to 180˚C and line two baking trays with baking paper.
  2. Put the eggs into a bowl with some sugar and whisk together until pale a fluffy. Add the flour, bicarb, orange zest and hazelnuts and mix these into the egg mixture until a soft dough forms.
  3. Tip the dough out onto a lightly floured surface and shape it into 20cm long sausage (and as wide as you want the length your biscuits to be, I went for about 5 cm). Place the block onto a baking tray and then flatten it slightly. Bake the biscotti block in the oven for 25-30 minutes until starting to brown and go slightly crisp on the outside.
  4. Take the block out of the oven and lower the oven temperature to 160˚C. Leave the biscuit to cool completely.
  5. Place the biscuit block on a chopping board and slice it into 1cm wide biscuits.
  6. Lay these biscuits flat on a baking tray and then bake for a further 10-15 minutes to crisp up. Leave to cool on a wire rack and then move onto the orange curd.
  7. Put the cornflour, orange juice and zest, and the lemon juice and zest into a bowl and whisk to combine.
  8. Next pour the water into a large pan and bring to the boil. Pour the hot water onto the citrus mix, whisking constantly, until combined.
  9. Pour the orange mixture back into the pan and heat gently whilst stirring until the curd has thickened up. Take the pan off the heat and add the egg yolks, sugar and butter. Mix together with a whisk until the butter and sugar have dissolved. Then pour the curd into a jug and set aside for later.
  10. Now make the ganache. Chop the chocolate up finely and put it into a bowl. Then pour the cream into a pan and bring to the boil. Take the cream off the heat and pour over the chocolate, stirring continuously until the chocolate has melted and a thick ganache has started to form. Transfer the ganache to a bowl for later.
  11. When everything is ready serve the biscotti with the curd and ganache in little pots to dip into, and lots of coffee! Any leftover curd or ganache will keep in an airtight container for 2-3 days.

Thanks for reading!

Emma x

Christmas Mug Cake

Christmas Mug Cake

I’m a little late in posting this one – I got to that point in the holidays where I forgot what day it was! That sounds a bit like bliss: getting so lost in time off that you forget where you are, but for control-freak me it’s more of a sign that I’m spiralling downwards. I’ve been really lucky that since going to Uni I’ve been feeling fairly stable and happier than I have in a long time, however since coming back home things have been roller-coasting like crazy. It feels a little weird writing about it here as I know this content gets out to friends and family more than anyone else, and this isn’t something I’d normally discuss with them, but when I changed the angle of this blog I said I’d be more open about my mental health and so I guess that’s what I’m doing.

I know I’ll be ok, and I know this is just a phase, but anyone who’s been in this position themselves knows that it doesn’t make living it any easier. At the moment I have very little motivation to do anything, but I’m lucky that I used my normal crazy energeticness before to make some recipes I could use for times like these. So I made this a while ago, and I also wrote a long post on our Christmas cake tradition in my family, however it feels like a bit too much of a jump between what I wrote then and what I feel is appropriate now to write. But here we go…

Does anyone else have that thing where the Christmas cake is made in October, fed till December, and then eaten slowly until August? Every year we have the panic in our family of hitting December 23rd, realising we don’t have a cake, having a debate over if we do make a cake whether anyone would it eat it anyway, concluding no one probably would, then making one. And alas, it gets picked at over the following months, just to get finished off late August so we can have a few Christmas cake free months before the cycle repeats.

Now I love Christmas cake, I really do, but at Christmas. The spices, fruit and marzipan in a cake just seem out of place when eaten un-surrounded by Christmas trees and mistletoe. So I decided to bring the essence of the Christmas cake into a mug cake so it’s super easy to make, doesn’t require too much forethought and serves a single person! All the spices, all the fruit, all the booze and even a chunk of marzipan in the middle, but none of the paph and palava.

Recipe

Serves 1

Time: 10 minutes

Ingredients

  • 1 tbsp Butter
  • 1 tbsp Brandy
  • 1 tsp Dried cranberries
  • 4 tbsp Raisins
  • 4-5 Dried Apricots
  • 1 Egg
  • 3 tbsp Brown sugar
  • ½ tsp Mixed spice
  • ½ tsp Ground cinnamon
  • 1 tsp Vanilla extract
  • 1 tbsp Self raising flour
  • Pinch of salt
  • 1 tbsp Glace cherries (about 5-6)
  • 2 tbsp Almond, roughly chopped
  • 25g Marzipan

To decorate

  • 1 tbsp Icing sugar, mixed with ½ tsp water
  • 1 tbsp Apricot jam (optional)

Method

  1. Grease a 350ml mug with butter.
  2. Put the butter, brandy and fruit into a mug and microwave for 10-20 seconds until melted.
  3. Add the egg, sugar, spices, and vanilla and beat together with a fork.
  4. Add the flour, salt, cherries, and almonds to the mixture and mix until combined.
  5. Roll the marzipan into a ball and push it into the centre of the cake.
  6. Cook the mug cake for 3 minutes until it comes away from the sides of the mug slightly and is cooked through.
  7. Brush the cake with the apricot jam and then decorate with the icing and water mixture. Enjoy!

Thanks for reading!

Emma x