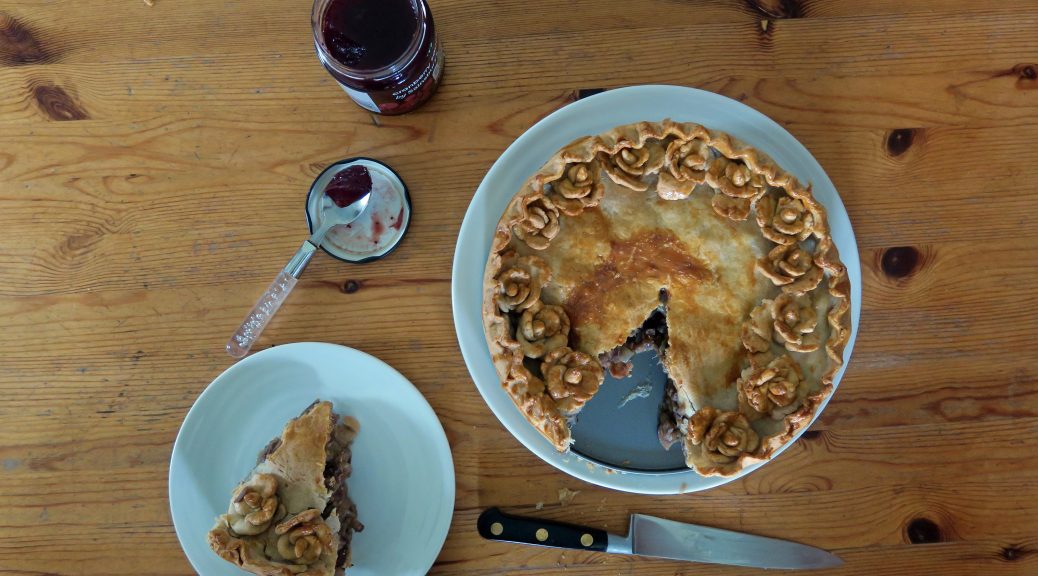
Tag: Pastry

Vegan Woodland Pie

Vegan Woodland Pie

A couple of years ago I was a vegetarian, and although I liked it most of the time, when it came to Christmas, with all the turkey and trimmings on the table, I started to miss meat. Whilst at the time I had a great vegetarian substitute, it didn’t quite match up, and I just wanted something as good as the meat I couldn’t eat.  I’m no longer a veggie, but when I was I developed this pie recipe which is so insanely good you don’t even realise it’s vegan, let alone vegetarian.

Full of beans and veg, this is surprisingly healthy for a pie – especially if you eat it without the crust. It’s stuffed with cranberries and chestnuts, so it’s prefect for a veggie main course at Christmas – you could even make individual pies instead of one large one, so you can cook up the exact number you need. The filling is also so good I’d recommend using it as stuffing, or as an accompaniment to your Christmas meat.  Just make it up as instructed, but rather than putting it into a pie crust, roll it into balls and bake in the oven for 5-10 minutes to firm up and heat through.

You also don’t have to decorate it how I have. In all honesty I wasn’t going to decorate it at all apart from crimping the edge, but I was experimenting with a new pastry for this one and it dried out quicker than expected and cracked when I put the top on. As I wanted it to look nice for the blog I used the leftover pastry to make roses to cover up the cracks, and then I wanted to make enough to make a ring so that it looked uniform. But if you do want to jazz it up a bit you can use the rest of the pastry to make roses or leaves for the top.

Recipe

Serves 6

Time 1 hour (plus cooking time)

Ingredients

For the filling

  • 1 tbsp Sunflower oil
  • 1 White onion, finely chopped
  • 1 Red onion, finely chopped
  • 2 Medium leeks, finely chopped
  • 2 Cloves garlic, crushed
  • 225g Chestnut mushrooms, sliced
  • 25g Dried cranberries
  • 340g Tin of butter beans, roughly chopped
  • 225g Ready-to-eat chestnuts, roughly chopped
  • 50g Hazelnuts, chopped
  • 5 Sprigs fresh thyme, chopped finely
  • Salt and pepper to taste
  • 3 tbsp Cranberry Sauce

For the pastry

  • 280ml Water
  • 115g Vegetable suet
  • 500g Plain flour
  • 1 tsp Salt to season
  • 20ml Soya milk to glaze

Method

  1. Put the oil into a large sauce pan over a medium-high heat. Add the onions, leeks, and garlic and gently fry for 5 minutes until soft and starting to caramelise.
  2. Add the mushrooms, cranberries, beans, chestnuts and hazelnuts and cook on a medium heat until soft and dry – this will take about 10 minutes.
  3. Add the thyme to the mix, season with salt and pepper and then set to one side whilst you make the pastry.
  4. Pre-heat the oven to 180˚C. Take a deep loose-bottomed 23cm pie tin and grease with butter (you can also use individual moulds if you want to make individual pies).
  5. Put the water in a medium saucepan and bring to the boil over a medium-high heat.
  6. Once boiling add the suet and stir to melt and combine.
  7. Put the flour and salt into a bowl and pour over the melted water-suet mix. Using a round bladed knife mix everything into a dough and then turn out onto a work surface and knead for 3 minutes until smooth.
  8. Take ¼ of the pastry and set aside for now. Roll out the other ¾ of the pastry into a large circle, about the thickness of a pound coin. Unlike shortcrust you want this pastry relatively thick to that it doesn’t break.
  9. Gently fold the circle of pastry in half and in half again so you have a quarter of a circle in front of you. Put the point of the quarter into the centre of the lined tin and then unfold the circle and push the dough into the corners and up the sides of the mould. You want a little bit of overhang.
  10. Spoon 1 ½ tbsp of the cranberry sauce into the base of the pie. Spoon ½ of the filling on top, then spoon the rest of the cranberry sauce over the filling. Top with the rest of the filling. Don’t worry if the mixture goes over the top of the tin, as this will make a nice dome when covered in pastry.
  11. Roll out the other ¼ of pastry into a circle of the same thickness as before. Put the circle on top of the pie and trim the excess by slicing with a knife at a 45˚ angle to the tin.
  12. Using your thumbs and index finger crimp around the edge of the pie to seal everything together. Take the milk and brush lightly over the top of the pie to glaze.
  13. Put the pie in the oven for 45-55 minutes until the pastry is golden brown. Take out of the oven and serve immediately with gravy and vegetables.

Thanks for reading!

Emma x

Mince Pie Croissants

Mince Pie Croissants

There’s nothing more quintessentially Christmas than mince pies, and for me there’s nothing better on Christmas morning than a warm croissant which has just come out of the oven. I’ve never seen mincemeat in croissants before, but as chocolate, almonds and nutella make the grade I couldn’t see why it wouldn’t work – and it does – really well. The light, buttery, flakyness of the pastry really works with the rich filling, and unlike normal mince pies there isn’t so much mincemeat that it becomes sickly and overpowering. However, I know mincemeat’s like marmite – ya love it or hate it. If you’re a hater you obviously don’t have to put it in, you could either leave them plain or you could fill them great alternatives like chocolate.

As I’m a baking junkie and I love hands-on baking I’ve made my own pastry for these. This does take a long time and is a bit of a pain to do as you have to leave it a really long time between turns. You also have to make the pastry a day before you’re going to use it as it’s a yeasted dough which needs to rise. So whilst it’s really satisfying and fun to make your own dough, if you don’t have the patience or the time, as most of us don’t at Christmas, you can use ready made croissant dough or puff pastry instead. To be honest, in my opinion the best bit is the shaping, and so even using shop bought pastry can be fun and create better croissants than shop ones. In this case just skip to step 9 in the recipe and go on from there.


Recipe

Makes 12

Time: 1 ½ hours for the dough (+ chilling) and 45 minutes for the shaping and decorating

Ingredients

For the dough

  • 500g Strong white bread flour
  • 10g Salt
  • 80g Caster sugar
  • 10g Instant yeast
  • 2 tsp Mixed spice
  • 300ml Cool water
  • 300g Unsalted block butter

To finish

  • About 200g Mincemeat (or alternative like chocolate)
  • 1 Medium egg
  • 100g Icing sugar

Method

  1. Put the flour, salt, sugar, yeast, and water into a big bowl and use a large spatula to mix into a dough.
  2. Turn the dough out onto a lightly floured surface and knead for 8-10 minutes until smooth and elastic. Tip into a lightly oiled bowl, cover and leave to chill in the fridge for an hour.
  3. Meanwhile, take the chilled block butter and place it between two sheets of cling film. Using a rolling pin beat the butter out into a rectangle about 40 x 19 cm. Cover in clingfilm and put back into the fridge to chill until needed.
  4. Lightly flour you surface and take the dough out of the fridge. Roll it out into a 60 x 20 cm rectangle, about the thickness of a pound coin. The dough will spring back and resist being shaped, but just persist and you will get there.
  5. Put the butter sheet onto the dough so that it covers two thirds, leaving the top third exposed.
  6. Fold the exposed dough onto the first third of the butter, and then fold the bottom third, covered in butter, up onto the dough you’ve just folded down. You should now have layers of dough, butter, dough, butter, dough. Loosely clingfilm the dough and put back into the fridge for an hour.
  7. Take the dough out of the fridge and put onto a floured surface with the short end facing you. Roll out to a rectangle 60 x 20cm. Fold the top third down and then fold the bottom third up on top, as you did before. Turn the square block 90˚ and repeat the rolling and folding. Wrap the dough in clingfilm and chill the pastry in the fridge for 1 hour.
  8. Repeat step 7 two more times, leaving the dough to chill for an hour in between turns. After the last rolling and folding wrap the dough very loosely (wrapping tightly will stop the dough from rising) and leave in the fridge overnight (or for at least 8 hours).
  9. Once the dough has rested and you’re ready to start shaping line 3 baking trays with baking paper.
  10. Lightly flour a surface and roll out the dough into a 50 x 30cm, trimming the edges so you have a neat rectangle.
  11. Cut the rectangle in half so you have two 25 x 30cm rectangles. Then cut triangles along the length of the strip, each with a 12cm base and 25cm from middle of the base to tip. This should give you 12 triangles in total.
  12. Take one of the triangles and pull the two points making up the base to stretch the dough. Then stretch the dough lengthways so it’s as long and wide as possible.
  13. Spoon about 2 tsp of mincemeat into the wide base of the dough. Then roll the croissants up from the base to the tip. To stop the dough from unravelling in the oven press the end into the croissant to stick it together. Then put the croissant onto the lined baking tray, curling the ends in slightly to get the classic shape. Repeat with the rest of the triangles.
  14. Lightly cover the croissants in cling film again and leave for another 2 hours to rise and double in size.
  15. Heat the oven to 180˚C. Beat the egg with a fork and then lightly brush the croissants to glaze. Put in the oven for 15-20 minutes until risen and golden brown. Take out the oven and leave to cool on a cooling rack.
  16. Whilst cooling make the icing. Put the icing sugar into a bowl and add just enough water to make an icing which is just pourable – be careful not to make it too loose. Pour this into a piping bag with a small round nozzle.
  17. Once cool drizzle the croissants with the icing and serve!

Thanks for reading! Another Christmas treat coming on Wednesday…

Emma x

Pear Tart Tatin

Pear Tart Tatin

Here’s another french classic – pear tart tatin. Soft, juicy pears, sticky caramel and crisp, caramelised pastry – it’s a classic for a reason. Unlike most tarts, this one’s unusual as it’s baked upside down. The caramel is made in the pan, then the pears go on top, the pastry on top of that, and then it’s all whopped in the oven. Then when it comes out it’s turned over to show the deliciously caramelised pears. As well as giving the pastry a beautiful flavour, this way of cooking it all also helps to keep the pastry crisp, as the juice from the pears doesn’t have the chance to rest on the pastry when it’s in the oven, and make it soggy.

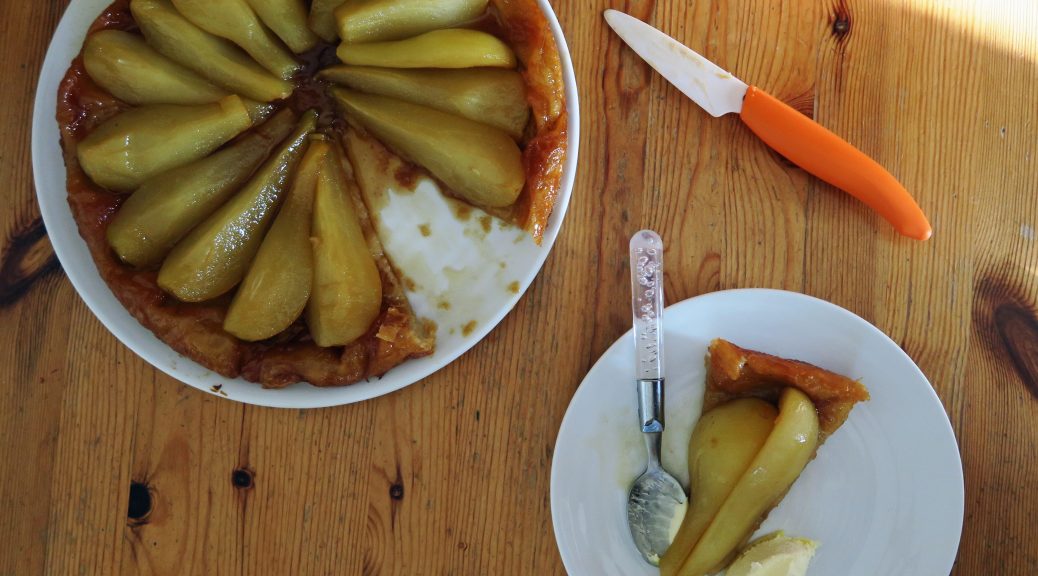
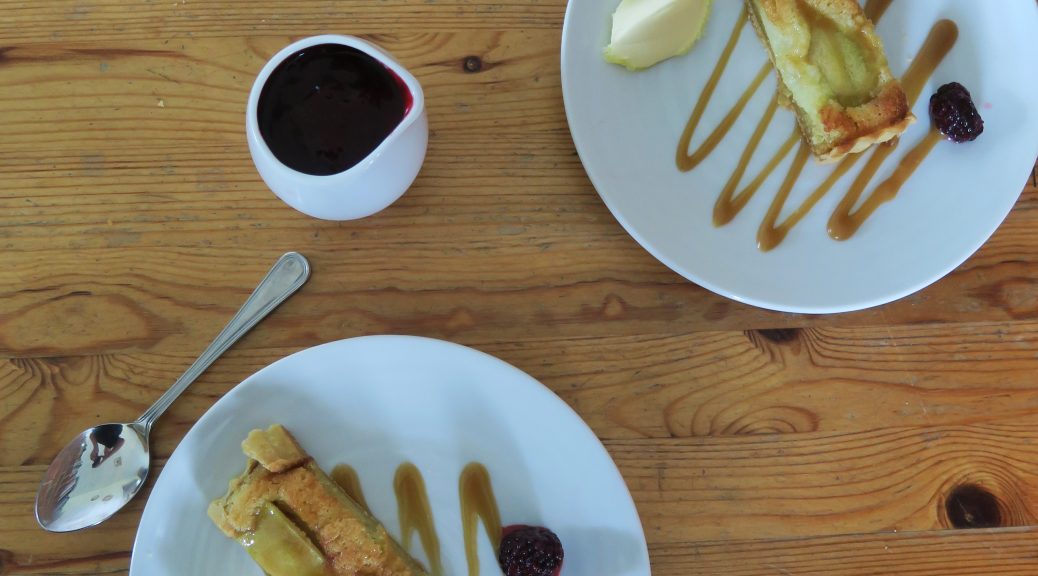
The first time I ever made this I used shop bought puff pastry and roughly chopped apples. These are two great alterations to make if you want to save time or if you’re just starting to learn how to bake. On the other hand, if you haven’t made your own puff pastry before I’d recommend giving it a go. It takes a bit of time, but it’s not so much time that you have to work on it, more just that you have to leave it a lot to chill in between turns. This recipe is for rough-puff which is a slightly easier and quicker variation on full-puff pastry, but it still gives a beautiful light and crispy pastry.

Recipe

Serves 8

Time: 2 hours (plus time for chilling) – much shorter if using shop bought puff pastry

Ingredients

For the rough-puff pastry

  • 225g Plain flour
  • ½ tsp Salt
  • 250g Unsalted butter, cut into small cubes
  • 150ml Cold water

For the Filling

  • 3 tbsp Water
  • 100g Caster sugar
  • 60g Unsalted butter, diced
  • 4 Conference pears, peeled, cored and quartered

Method

  1. Put the flour and salt into a large bowl. Add the cubed butter and stir until each piece is coated in flour, trying not to break the butter up too much.
  2. Pour in the water and then stir with a round-bladed knife to bring the dough together.
  3. Turn the dough out onto a floured surface and shape into a rough rectangle. Wrap in clingfilm and then chill in the fridge for 15-20 minutes.
  4. Roll the pastry out onto a floured surface into a long rectangle until about 1cm thick. Fold the bottom third up onto the middle third of the pastry. Then fold the top third down onto the other two thirds to make a block one third of the original long rectangle.
  5. Turn the pastry 90˚ so that the folded edge faces you, not the smooth edge. Press the ends down with a rolling pin to seal. Chill in the fridge for another 15 minutes.
  6. Repeat steps 4-5 another 4 times.
  7. Chill the pastry in the fridge for at least an hour, ideally overnight.
  8. When the pastry is ready you can begin to assemble. In a large frying pan (which can go in the oven) put the water and caster sugar. Leave for 5 minutes so that the sugar absorbs the water.
  9. Put over a medium heat and gently bring to the boil. Leave until a golden caramel forms – be careful not to stir during this process and the sugar will crystalize. Add the butter and stir to melt and combine. Leave to cool slightly.
  10. Meanwhile roll out the pastry on a floured surface until about the thickness of a pound coin. Cut out a circle 2cm wider than the diameter of the pan.
  11. Add the peeled and cored pears to the caramel in a spiral, all facing the same way. Then add the pastry on top, pressing the excess around the side of the pears so that the pastry snuggles everything in.
  12. Put into the oven and bake for 20-25 minutes until golden brown and crisp.
  13. Once ready take it out of the oven and get ready to turn it out. Take a toasting tin or large bowl and a large plate. Put the plate over the pan so that when turned over the tart will be on the plate. Hold the pan and plate together, and turn 90˚ over the roasting tin to let the juices drain – this will prevent the pastry from going soggy when turned out. Once the juices have stopped dripping, turn over completely, tap a bit to release and then take the pan away.
  14. Serve immediately with double cream or ice cream.

 Thanks for reading!

Emma x


Fruit Tartlets

Fruit Tartlets

As you can probably tell,  there’s nothing I like more than some classic French patisserie, so here’s another one. This is a fairly generic combination, but once you try it you can see why it’s stuck around for so long – a simple sweet shortcrust pastry, with vanilla infused crème patisserie and lots of fresh fruit on top. We’re coming to the end of the season where fresh red berries are around, but I find frozen can also work well, and if that fails you can always go for blackberries and damsons which are at their best now.

These are really light and that’s partly down to this delicate crème patisserie. For anyone who doesn’t know, crème patisserie is basically the stylish cousin of the powdered custard, and it pairs beautifully with this selection of fruit. This recipe is pretty simple, and once you’ve tried it you’ll never want to back to a ready-mix custard ever again.

I’ve kept this recipe simple and classical, but as you may have seen by now, I love giving variations to try. For this one I’d recommend adding 1 tbsp of cocoa powder to the crème pat – hey presto chocolate crème patisserie! You can also top the tartlets with some chopped nuts, caramel or marshmallows to make them even more special. So stretch your creativity and go crazy, or stick to the classic and indulge in French pastry perfection. Either way you won’t regret making this.

Recipe

Serves 8

Time: 2 hours

Ingredients

For the pastry

  • 175g Plain flour
  • 2 tbsp Caster sugar
  • Pinch of salt
  • 115g Butter
  • 1 Egg, separated
  • 2 tbsp Cold water

For the crème patisserie

  • 500ml Whole milk
  • 2 tbsp Vanilla bean paste
  • 100g Caster sugar
  • 6 Egg yolks
  • 20g Plain flour
  • 20g Cornflour

For the topping

  • Any berries you like (I went for raspberries, strawberries, cherries, and blueberries)
  • 50g Dark chocolate

Method

  1. Preheat the oven to 180˚C. To make the pastry put the flour, caster sugar and salt into a bowl and mix with a round bladed knife. Add the butter to the bowl and cut the butter up into small pieces with the knife. Once the butter is in small chunks put the knife to one side and go in with your fingers. Rub the butter into the flour to create a breadcrumb texture mix.
  2. Mix the egg yolk with 2 tbsp of cold water. Slowly add the egg yolk mixture to the flour mixture and bring together with a round bladed knife until a dough forms. Use your hands to make the dough into a ball and then wrap the dough in cling film and chill for at least 1 hour.
  3. Remove the pastry from the fridge and separate it into 8 equally sized balls. Roll them out onto a floured surface to make 8 thin circles. Compare the size of the circles to the size of the tins by putting one of the tins your using onto the circles. You want the pastry a couple of cm wider than the tart tins so that the pastry will go up the edges and have a little overhang.
  4. Line the tins, pressing the pastry into the flutes in the tin. Let the pastry hang over the edge, then use a rolling pin to trim off the excess by rolling over the edge of the tarts. Chill the pastry-lined tins in the fridge for another 45 minutes.
  5. Line the tartlets with greaseproof paper and baking beans (or dry rice if you don’t have any). Put them into the oven to bake for 10 minutes, or until you can see them start to crisp up round the edges.
  6. Remove the baking parchment and the baking beans (careful, they’ll be very hot). Brush the pastry with the beaten egg white to coat lightly and then return them to the oven for 5-10 minutes, until golden brown and crisp. Take out of the oven and leave to cool.
  7. Next make the crème patisserie. Put the milk and vanilla into a saucepan and bring to the boil. Meanwhile, mix the sugar, egg yolks and flours until fully combined.
  8. Once the milk is heated, remove the pan from the heat and mix 1/3 of the milk into the egg mixture. Whisk the mixture quickly and then pour the egg mixture back into the milk.
  9. Put the pan back over a heat and whisk gently on a medium heat until the mixture thickens and boils.
  10. Remove the pan from the heat and let the mixture cool slightly. Put 2-3 tbsp of the crème patisserie into each of the pastry cases and smooth out with the back of a spoon so that it’s evenly spread.
  11. Top the tartlets with fresh fruit so that the patisserie is fully covered.
  12. Put the chocolate into a heatproof bowl and put over a pan of simmering water. Once the chocolate is melted, put it into a pipping bag with a small round nozzle and drizzle over the tartlets.
  13. Leave the chocolate to set. Serve! (- with clotted cream if you want).

Thanks for reading! I’ve got another one coming out on Sunday so look out for it.

Emma x


Butterscotch Pear Tart with Blackberry Sauce

Butterscotch Pear Tart with Blackberry Sauce

In a few weeks’ time hedgerows across the UK will start to drip with plump blackberries, ripe for the picking. As most hedgerows are free-for-all it’s easy to go on a walk with some boxes and to come back with mountains of free berries. If you want to preserve them they make great jams, ice creams and curds, but I find they also work really well as a sauce for this little butterscotch pear tart recipe.

You can use any type of pears in this tart. I went for conference as they’re an attractive shape and a nice flavour against the frangipane. I’d recommend using ripe pears, as under-ripe and they don’t soften enough in the oven, and if they’re over-ripe and they become a mush once cooked. I’d also strongly recommend making the butterscotch sauce yourself. You can buy it in shops, but it doesn’t taste anywhere near as good, and it only takes 5 minutes to put together, so it’s worth giving it a go.

One last thing – I first made this dessert in Cornwall and I found that serving it with a good scoop of clotted cream is a great way to make it truly decadent. The thick cream with the sweet, sharp, juicyness of the other components just works really well, so I’d recommend giving that a go. Right, now on with the recipe…

Ingredients

Serves 8 (Makes one large tart)

Time – 90 minutes, plus time to chill the pastry

For the pastry

  • 175g Plain flour
  • 2 tbsp Caster sugar
  • Pinch of salt
  • 115g Butter
  • 1 Egg yolk, beaten
  • 2 tbsp Cold water
  • 1 Egg white, slightly beaten

For the butterscotch sauce

  • 100g Butter
  • 100g Light muscovado
  • 4 tbsp Golden syrup
  • 8 tbsp Double cream

For the tart filling

  • 100g Ground almonds
  • 100g Caster sugar
  • 100g Butter
  • 2 Eggs
  • A few drops of almond essence
  • 2 Ripe pears, peeled, cored and quartered

For the Blackberry sauce

  • 350g Blackberries (if they’re not in season when you make this, frozen ones also work)
  • 30g Sugar
  • 1 tsp Cinnamon
  • 1 tsp Ginger

Serve with more fresh blackberries and clotted cream

Method

  1. Preheat the oven to 180˚C. To make the pastry put the flour, caster sugar and salt into a bowl and mix with a round bladed knife. Add the butter to the bowl and cut it up into small pieces with the knife, coating in the flour as you do.
  2. Once the butter is in small chunks put the knife to one side and go in with your fingers. Rub the butter into the flour to create a mixture with the texture of breadcrumbs. Shake the bowl from side to side a couple of times to bring the large lumps to the top, make sure these are rubbed into the flour.
  3. Mix the egg yolk with the cold water. Slowly add the egg yolk mixture to the flour/butter mixture and bring it all together with a round bladed knife until a dough forms. Use your hands to make the dough into a ball and then wrap the dough in cling film and chill for at least 1 hour.
  4. To make the butterscotch sauce, put the butter, sugar and syrup into a pan and bring slowly to the boil whilst stirring. Then stop stirring, reduce the heat, and leave to simmer for 3 minutes until the mixture has thickened and begins to hold its shape. Stir in the cream, remove from the heat, and leave to cool.
  5. Remove the pastry from the fridge and roll it out on a floured surface into the shape of your tin. You want it to be as thin as possible (no thicker than a pound coin). Make sure you move the pastry round frequently to stop it sticking to the table. Compare the size pastry sheet to the size of your tin. You want the pastry a couple of cm wider than the tin so that the pastry will go up the sides and have a little overhang.
  6. To easily get the large pastry sheet into the tin, put the rolling pin at the half-way point of the pastry. Then flip the pastry in half, over the rolling pin. You can then pick the rolling pin up and drag the pastry over the tin. Press the pastry into the flutes in the tin, sometimes using a piece of pastry to do this can be easier than using your fingers. Let the pastry hang over the edge, then use a rolling pin to trim off the excess by rolling over the edge of the tart. Chill the base in the fridge for another hour.
  7.  Line the tart with baking paper and baking beans (or dry rice if you don’t have any) and put into the oven to bake for 10 minutes.
  8. Remove the baking parchment and the baking beans (careful, they’ll be very hot). Lightly brush the pastry with the beaten egg white and then return them to the oven for 5-10 minutes, until golden brown and crisp. Take out of the oven and leave to cool completely.
  9. To make the frangipane, mix the ground almonds, sugar, butter, egg and extract together until smooth. Spoon 2 tbsp of the butterscotch sauce into the case and smooth out with the back of a spoon to cover the base. Pour the rest of the sauce into a jug for serving. Spoon some of the frangipane into the case and smooth out over the sauce. Create a slight well in the centre by pushing more of the mixture up the sides of the case.
  10. Take the pear quarters and arrange on top of the frangipane so that the smooth outside of the pear is facing up. Press the pears down slightly, into the frangipane as you do this. Bake in the oven for around 15 minutes, until both the pear and frangipane are cooked.
  11. Whilst the tart bakes make the blackberry sauce. Put the blackberries into a medium size saucepan with 60ml water, the sugar and the spices. Stir to combine and then leave to simmer until the blackberries have become a mush. Use a hand blender to puree the mixture and then sieve to remove the seeds. Pour the sauce into another jug to serve.
  12. Once the tart is out of the oven leave it to cool slightly. Then take it out of the tin and place on a board. Serve with the blackebrry sauce, the leftover butterscotch sauce, fresh blackberries and plenty of clotted cream. Relax and enjoy!

Thanks for reading, I hope you enjoyed this one! New post is coming out on Sunday. Until then, any comments or questions just let me know.

Emma x