Category: Baking

Easy Chocolate Pudding with Chocolate Custard

Easy Chocolate Pudding with Chocolate Custard

From an easy main to an easy dessert, I love making complicated things but there are those times when you just need something you can throw together without thinking about it. Being a student I’m truly experiencing the struggles of little money, little space and little time, so that’s when something like this becomes a godsend. This can be made in the oven or a microwave and so it’s the perfect last-minute, ‘I need chocolate cake now’ kind of dessert.

Of course no good fudgy sponge cake is complete without a good dollop of custard. For this one I’ve used custard powder. Whilst I think fresh custard made with eggs is always a lot nicer, you can’t deny the ease and speed at which you can make custard with a powder mix, so in the interest of preserving your sanity this custard recipe is as quick and as easy as you could want it to be! By extension though, if you don’t want to bother making custard at all, or if you don’t have a hob at your disposal you can use packet custard and then either add cocoa powder to it or just leave it as a vanilla custard.

Recipe

Serves  8

Time: 15 minutes

Ingredients

For the sponge

  • 180g Butter
  • 80g Light brown sugar
  • 50g Cocoa powder
  • 3 Large eggs
  • 2 tbsp Whole milk
  • 175g Self raising flour

For the custard

  • 400ml Milk
  • 5 tbsp Custard powder
  • 5 tbsp Light brown sugar
  • 25g Cocoa powder

To serve

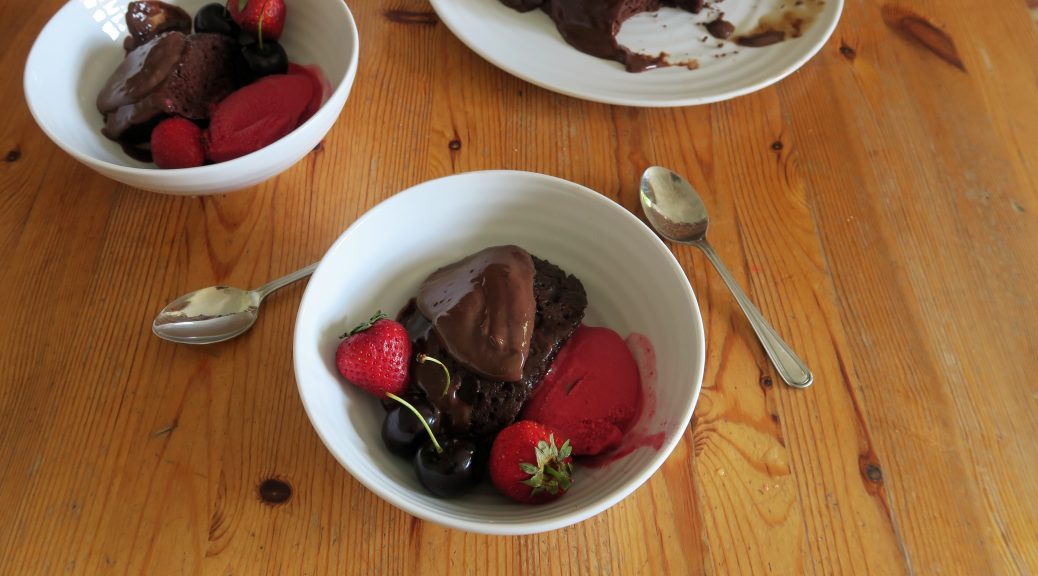
  • Fresh berries (e.g blueberries, strawberries or raspberries)
  • Ice cream or Sorbet (I recommend raspberry sorbet with this!)

Method

  1. Take a 1L pudding bowl and butter the inside (this can be any kind of bowl but just make sure it’s not metal as it’ll be going into the microwave).
  2. Put the butter and sugar into a bowl and beat until smooth. Add the cocoa powder to the mix and then stir until combined.
  3. Add the eggs and milk to the batter and whisk them in, followed by the flour to get a pourable mixture.
  4. Pour the mixture into the greased pudding bowl and cover loosely with clingfilm. Then microwave for 4 ½ minutes on high heat until cooked through. Check the pudding with a skewer to make sure the centre’s not raw, and then leave the pudding to rest for a few minutes.
  5. Meanwhile make the custard. Put the milk into a pan and bring to the boil.
  6. Put the custard powder, sugar and cocoa powder into a bowl and whisk together. Pour a little of the milk onto the mixture and whisk in to make a smooth paste. Then slowly pour the rest of the warm milk into the mixture, whisking constantly, until combined.
  7. Pour the custard mix back into the pan and then cook whilst whisking over a medium heat until the mixture thickens.
  8. Turn the pudding out onto a plate and then pour some of the custard over the top. Serve slices of the pudding with the rest of the custard, fresh berries and sorbet/ice-cream!

Thanks for reading!

Emma x

Coffee and Vanilla Zebra Cake

Coffee and Vanilla Zebra Cake

I’m going Zebra themed this week!!! Wahey! Have I gone mad? No! Y’ see now that I’m officially an art student I was thinking about writing some artistic gumph on how zebras can be symbolic of who knows what and so on, but the truth is I’ve just made a zebra cake because I’ve wanted to make one of these for years and they look so cool. So here we go – zebra cakes 101. These are defined by their vertical stripes made by piping blobs of different coloured cake mix on top of each other to make a series of concentric rings (it’s essentially a fancy marble cake). Here I’ve gone for coffee and vanilla as they’re so good together and just sing out to comfort, but you can pair any two that have different colours (e.g chocolate and vanilla, raspberry and lemon, or chocolate and orange).

Now of course all good coffee cakes should be accompanied with walnuts, however with zebra cakes you want the mixture to be fairly smooth as you’ll be piping it. So to stop chunks of walnuts clogging up m’ nozzle I’ve added them to the filling so this has become a sort of coffee-walnut cake, but you can leave the walnuts out if you’d rather. The trick is also to just be patient. Half way through you’ll want to just go ‘what the heck’ and shove both mixes on top of each other and be done with it, but keep going and it’ll look fab!

Recipe

Serves 8

Time: 90 minutes (including baking and cooling)

Ingredients

For the cake

  • 240g Caster sugar
  • 240g Butter
  • 4 Eggs
  • 250g Self raising flour
  • 2 tsp Baking powder
  • 1 tbsp Coffee powder
  • 1 tbsp Milk
  • ½ tsp Vanilla extract

For the icing/to decorate

  • 225g Icing sugar
  • 100g Butter
  • 1 ½ tbsp Coffee
  • 1 tbsp Milk
  • A handful of Walnuts, roughly chopped

Method

  1. Pre-heat the oven to 180˚C. Grease and line two 18cm round tins with butter and baking paper.
  2. Put the butter and sugar into a bowl and beat with a wooden spoon until pale and creamy.
  3. Add the eggs one by one to the mixture, whisking in between each addition until combined. Add the flour and whisk again to make a smooth batter.
  4. Pour half the cake mixture (about 475g) into another bowl. Add the vanilla to this batch and then pour the mixture into a piping bag.
  5. Put the coffee and milk into a small bowl and stir until the coffee dissolves. Add the coffee to the other bowl of cake mixture and mix until combined. Pour the mixture into another piping bag.
  6. Pipe a blob of the vanilla mixture into the centre of each of your lined tins. Then pipe a blob of an equal size on top of the first blob. Repeat piping blobs on top of each other until all the mixture is used up.
  7. Move the tins around to make sure the mixture coats the whole of the tin (but don’t spread it around with a spatula as this will disrupt your layers!). Then bake the cakes in the oven for 15-20 minutes until risen and golden brown. A skewer inserted into the middle should come out clean.
  8. Transfer the cakes to a wire rack and leave to cool before taking them out of the tins.
  9. Meanwhile move onto the icing. Put the icing sugar and butter into a bowl and beat together until smooth and creamy.
  10. Put the coffee and milk into another small bowl and stir until dissolved. Add the coffee mix to the buttercream and mix all together until smooth. Then spoon the icing into a piping bag with a star shaped nozzle.
  11. Put one of your cakes onto your presentation plate. Then pipe blobs of the icing around the edge of the cake. Pipe icing into the middle so the cake is completely covered (you don’t have to do blobs for the middle bit, you could just pipe and then smooth it over with a knife). Scatter the chopped walnuts over the middle of the icing.
  12. Finally take your other cake and place it on top of the base with the best side facing up. Then pip a ring of icing around the edge on the top and serve!

Thanks for reading. If you try this please take a photo and send it to me, I love seeing people use my recipes! Have a great week!

Emma x


Chocolate Chip Skillet Cookie

Chocolate Chip Skillet Cookie

I made this way way back in the summer when I was in Canada and obsessed with making cookies, but I’ve waited until now to post this one as I think it’s perfect for bonfire night. You know that time when you’re waiting to head out into the cold night, but decide to have one last hot chocolate before bracing the frost? This is what that’s for. (I know today’s Halloween but I’m looking ahead so bare with). Anyway, way back when I was rummaging through the pans of the house we were staying in I found this gorgeous skillet pan right at the back, and I knew right away that I was gonna make one of these giant cookies. Iron skillet pans like this are so useful as they’re perfect for getting the ultimate cook on a fillet steak, making tart tatins, and of course making giant cookies like this! Admittedly I don’t have one myself (yet), but If you haven’t got an iron skillet pan like this I’d really recommend getting one.

The best way to serve these is with a big dollop of ice cream in the middle and then just let everyone dive in. Make it into a big sharing, sociable dessert type thing. Alternatively if you don’t like to share you can make one and eat it all yourself – I won’t judge. Another great thing with cookies like this is that you can customise to your hearts content! Try adding fruit, nuts, spices and other kinds of chocolate to make it super tasty!

Recipe

Serves 8

Time: 10 minutes prep, 20 minutes cooking time

Ingredients

• 150g Unsalted Butter
• 75g Light brown sugar
• 125g Granulated sugar
• 1 Large egg
• 1 tsp Vanilla extract
• 150g Plain flour
• ½ tsp Bicarbonate of soda
• 1/2 tsp Salt
• 75g Milk chocolate, chopped into chunks
• 75g Dark chocolate, chopped into chunks

Method

  1. Pre-heat the oven to 180C.
  2. Mix the butter and sugars together in a bowl with a wooden spoon until pale and fluffy. Add the egg and the vanilla and mix to combine. Then add the flour, bicarb, salt and chopped chocolate and mix together to form a smooth dough.
  3. Take a 10 inch skillet pan and press the dough into it. Don’t worry if the dough doesn’t quite fill the whole skillet as it’ll spread and rise as it bakes.
  4. Bake the whole thing in the oven for 15-20 minutes, until puffed up and golden brown. Leave to cool for 5 minutes so that it solidifies slightly, before serving it with lots of vanilla icecream!

Thanks for reading!

Emma x


Apple Puddle Pudding

Apple Puddle Pudding

We all get those moments where nothing can make you feel better…apart from a particular kind of food. It might be dairy milk chocolate for a break-up, mac and cheese for an essay deadline, or a whole tray of brownies for that night in when you just didn’t want to see another human being for the rest of your life – good comfort food is a really important thing in my books. So, whilst you probably shouldn’t live purely on comfort food (unfortunately) it’s always handy to have a few go-to pick-me-up recipes in your back pocket just in case you need them.

I came across the idea of apple puddle pudding in a food magazine the other day, and I thought it sounded so warming and cuddly that I thought I’d make my own version. Another way cooking de-stresses me when I’m, well, stressed, is if it’s hands on. There’s something about really getting stuck into what your making that can zone you out from all the worry and make you focus on the task in hand. And this is exactly what you do when making these dumplings. Roll your sleeves up, get stuck in, and get messy. This can turn out pretty sweet, so make sure you serve it with lots of clotted cream or vanilla ice-cream to balance it out!

(For more comforting recipes have a look at the ‘comforting’ section under ‘something that’s…’ in the top bar!)

Recipe

Serves 6

Time: 45 minutes

Ingredients

  • 75g Unsalted butter
  • 200g Light brown sugar
  • 60g Golden syrup
  • 2 tbsp Lemon juice
  • 3 Large Bramley apples (or 4 dessert apples)
  • Clotted cream to serve

For the Dumplings

  • 200g Self raising flour
  • 1 tsp Baking powder
  • Pinch of Ground cinnamon
  • 100g Cold Butter
  • 4 1/2 tbsp Milk

Method

  1. Pre-heat the oven to 180˚C.
  2. Put the butter, sugar, syrup, lemon juice, and 125ml water into a pan and bring to a simmer.
  3. Peel, core, and thinly slice the apples and then add them to the pan. Leave to cook for 10-15 minutes, stirring occasionally until they soften. Then pour the apples and the juice into an oven-proof baking dish about 20x30cm.
  4. Next make the dumplings. Put the flour, baking powder, sugar, cinnamon and salt into a large bowl and mix together.
  5. Add the butter to the mixture and rub it into the flour until the mixture resembles bread crumbs. Slowly add the milk, stirring with a round-bladed knife until the mixture starts to clump together.
  6. Use your hands to bring the dough together and then divide the dough into 12 balls. Arrange the dumplings over the apples, leaving little gaps between the balls, and then sprinkle with a little extra brown sugar.
  7. Bake the dumplings in the oven for around 25 minutes, until puffed up and golden brown. Leave to cool a little before serving with lots of cream or ice cream!

Thanks for reading!

Emma x

Blood Orange Chocolate Meringue Pie

Blood Orange Chocolate Meringue Pie

Having just moved to a new place I’m meeting loads of new people and I’m going through that classic process of making friends. The classic what’s your name? Where are you from? What subject do you do? And so on.  Then once your past the go-to questions things get a little more creative, and sooner or later things seem to move onto ‘hobbies and interests’ at which point I inevitably get asked ‘what is your favourite thing to cook?’ It’s taken a while to work out what actually is my favourite thing to cook, and, whilst I don’t have a firm fave, the best answer I have at the moment is fruity meringue pies. This is somewhat ironic as I don’t really like them, but they’re fun to make for two reasons i) they’re my Grandad’s favourite so every time we see him I make a lemon meringue pie, and ii) they involve three really fun elements to make: pastry, curd and meringue.

I normally make traditional lemon meringue pies, but as I’m not a big fan of lemons I thought I’d try making a chocolate orange variation instead. However, the general concept of a meringue pie is that the curd is really sharp and that balances the super sweet meringue, so I’ve added some lemon juice in the curd of this one, not so much for the lemon flavour but more to give the filling a sharp kick. Since I made that almond and blood orange cake a little while ago I’ve been obsessed by blood oranges, and they work so well in this! They’re a little more floral and fruity than normal oranges, so you can think of this as orange-pie-plus!

(If you’ve never made pastry before and the thought of doing so makes you tremble, check out my last post on everything you need to know about making a pastry base!)

Recipe

Serves 12

Time: 2 hours

Ingredients

For the Pastry

  • 285g Plain flour
  • 30g Cocoa powder
  • 90g Icing sugar
  • Pinch of salt
  • 225g Unsalted butter
  • 1 Large egg
  • 1 tbsp Cold water

For the Blood orange curd

  • 3 Blood oranges
  • 3 tbsp Lemon juice
  • 65g Cornflour
  • 300ml Water
  • 110g Caster sugar
  • 85g Unsalted butter
  • 4 Egg yolks

For the meringue

  • 50g Dark chocolate
  • 5 Egg whites
  • 250g Caster sugar
  • 2 tsp Cocoa powder

Method

  1. Pre-heat the oven to 180˚C. Then grease a 9 or 10 inch fluted tart tin.
  2. Put the flour, cocoa, sugar and salt into a large bowl and mix together. Add the butter and cut it up into chunks with a round bladed knife.
  3. Then go in with your fingers and rub the butter into the flour to make a bread-crumb texture.
  4. Add the egg yolk and the vanilla to the mixture and then mix everything together with a round bladed knife until a ball forms. (You might need to go in with your hands again and squish the dough into a ball).
  5. Wrap the dough in cling film and then leave it to chill in the fridge for at least an hour.
  6. Lightly flour a surface and turn the dough out onto it. Roll the pastry into a circle at least 12inch in diameter. Flip the pastry into the tart case and then gently ease it into the flutes of the tin. Then use a rolling pin to trim off the excess by rolling it over the edge. Chill in the fridge for another 30 minutes.
  7. Line the pastry case with baking paper and baking beans. The easiest way to do this is to scrunch up a square of baking paper and then un-crumple it – this will make it super easy to line the tin with!
  8. Put the base in the oven and bake for roughly 15 minutes, until the base is cooked through but not necessarily crisp. Then take the case out of the oven, remove the beans and bake for another 5-10 minutes, until crisp.
  9. Next make the curd. Put the zest and the juice of the blood oranges into a heatproof bowl. Add the lemon juice, cornflour and mix together to form a paste.
  10. Put the water into a pan and bring to the boil. Then pour the hot water over the orange mixture, stirring constantly. When combined pour the mixture back into the pan and place over a medium heat. Stir constantly until the mixture starts to thicken. Then leave to boil for a minute.
  11. Take the mixture off the heat and stir in the sugar, butter and the egg yolks. Set aside until needed.
  12. When the pastry case is ready, pour the curd into the case and smooth over with a spatula . Lower the oven temperature to 140˚C.
  13. Now make the meringue. Put the chocolate into a heatproof bowl over a pan over simmering water (make sure the bottom of the bowl doesn’t touch the water!). Melt gently and then take the bowl off the heat and leave to cool a little.
  14. Next clean a metal or glass bowl and some electric beakers with hot soapy water. (You need them to be really clean so that the meringue will hold its shape).
  15. Put the egg whites into the clean, dry bowl and whisk until soft peaks form.
  16. Slowly add the sugar, one tbsp at a time, whisking constantly until stiff peaks form.
  17. Stir together the cocoa powder and the melted chocolate and fold it into the meringue to get a swirl effect.
  18. Spoon the mixture into a piping bag with a star shaped nozzle and then pipe swirls over the curd (or just dollop the meringue on top if you don’t want to pipe).
  19. Put the whole thing back in the oven for 10-15 minutes until it’s crisp but not brown. Then leave to cool slightly in the oven before serving!

Thanks for reading!

Emma x