Tag: Healthy

Chia Seed Breakfast Pots

Chia Seed Breakfast Pots

Chia seeds are the new super-food that is flooding cookbooks and blogs. They’re full of fibre, omega-3, calcium, protein, phosphorus and much more, and they can be used to help tackle diabetes, heart problems and obesity. So if you’re looking for a nutritious breakfast, simply bung some of these in.

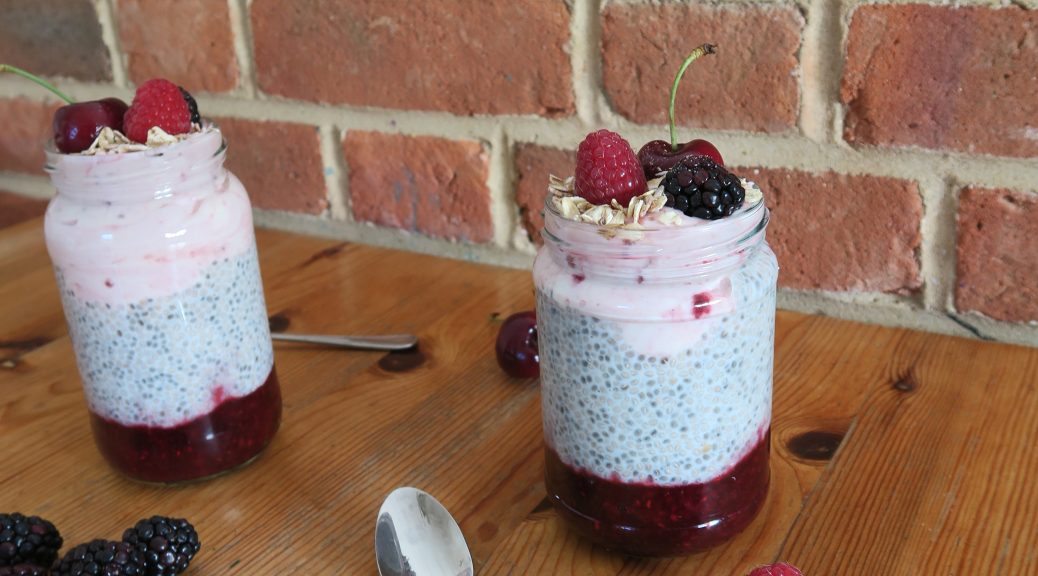
These little pots can be put together the night before so you can gobble it down in the morning without any fuss or bother. I’ve used berries to make the compote and to decorate, but you could use any fruits you like (mango and passion fruit is a really good combo!) You can also present these differently if you want to. I went for jam jars as I think they pretty cool, but you could also just make up the individual elements and serve them up in a bowl if you want.


Recipe

Serves 2

Time 20 minutes, plus chilling time

Ingredients

  • 100g Frozen raspberries
  • 100g Frozen strawberries
  • 100g Frozen blackberries
  • 1 tbsp Honey
  • 80g Chia seeds
  • 450ml Almond milk
  • 1 tsp Vanilla bean paste
  • 300ml Greek yoghurt/fruit yoghurt of your choice
  • A few fresh berries to decorate (I went for cherries, raspberries and blackberries)
  • 2 tbsp Granola

Method

  1. Begin by making the fruit compote. Put the frozen fruits and honey into a small pan and heat gently until they’ve softened and pulpy. Set aside to cool and then put into the bottom of a jar.
  2. Now make the chia seed middle. Put the chia seeds, milk, and vanilla into a jug and stir with a fork. Let sit for 15 mins then stir again to break up the clumps. Put into fridge for at least 2 hours to set (overnight works well to).
  3. When the chia seed filling is ready spoon it over the fruit compote. Then take your yoghurt of choice and spoon it over the chia seed filling. Top with granola and fresh fruit and serve!

Thanks for reading!

Emma x

Tomato Soup

Tomato Soup

Over new year I spent some time in Northern Italy, and for me there’s nowhere where the food is better. One of the things that really sticks in my mind from the trips I’ve made out there is their tomatoes. It’s an odd thing to pick up on, but their tomatoes are 100% better than any you find in the UK. Because of volcanic soil they manage to grow ones which are full of an intense, sweet and sour flavour which makes incredible tomato sauces and soups.

Whilst we don’t have direct access to this incredible produce, the UK does have it’s fair share of delicious vegetables and this soup is a great way of making use of this. Especially now we’re hitting the cold and wet season, and everyone seems to be getting flu, a quick, warm and nourishing bowl of soup is what we need. Packed full of good stuff and deliciously filling this soup is a perfect mid-week winter warmer.

Recipe

Serves 6

Time 25 minutes

Ingredients

  • 1 White onion
  • 2 Garlic cloves
  • 1 Medium Carrot
  • 1 Celery Stick
  • 2 tbsp Vegetable oil
  • 900g Ripe tomatoes
  • 2 tbsp Tomato puree
  • 2 Stock cubes
  • 1 Litre of boiling water
  • Salt and Pepper to season
  • Basil and Pine nuts to garnish

Method

1. Begin by prepping the vegetables. Peel and dice the onion, garlic and carrot. Then take the ends off the celery and chop it into chunks about the same size as the carrot.

2. Put the oil into a large saucepan and heat gently. Add the prepared vegetables once the oil just starts to bubble, and gently fry until the onions begin to caramelise – this’ll take about 5 minutes.

3. Meanwhile chop the tomatoes into chunks. Once the vegetables are ready add the tomatoes and puree to the mixture, stir to combine. Then leave with the lid on for 5 minutes to soften.

4. Next make up the  stock by putting two stock cubes into a jug and pouring over the boiling water. Stir with a fork until the stock cubes have dissolved.

5. Pour the stock over the vegetables and leave on a medium heat to gently simmer with the lid off for about 15 minutes, or until all the vegetables are soft and the liquid has reduced slightly.

6. Take a hand-blender and blend the soup until it’s as smooth as you want it. Season with salt and pepper to taste.

7. Ladle into bowls and garnish with pine nuts and fresh basil. Serve with fresh bread and enjoy!

Thanks for reading!

Emma x

Coconut Entremets (Vegan, Gluten-free, No Refined Sugar)

Coconut Entremets (Vegan, Gluten-free, No Refined Sugar)

I know what you’re thinking. What am I doing making entremets during detox January eh? Well, as predicted I couldn’t resist touching on some French Patisserie this month, but I’ve done my best to make it as healthy as possible, meaning it’s dairy free, vegan, gluten free and has no refined sugars (providing your chocolate has no refined sugars or dairy in it).

Normally when I come across something which has more than one dietary tag on it I become suspicious as it normally involves 20+ ingredients that you can only find in special shops, and/or results in an unsatisfying, oddly textured waste of a dish. But fear not, all the ingredients I used for this you can buy really easily from any supermarket, so you won’t have to waste time searching for xanthan gum down side alleys. I was also surprised by how tasty this ended up. The coconut milk is a great double cream substitute, so the middle is as creamy as a full-fat panna cotta, and the base (made with nuts and dried fruit) is just as tasty as any butter/biscuit combo you’d find in a cheesecake. The most unhealthy bit is probably the chocolate on top, but this really depends on what chocolate you end up using, and as it complements filling really well it’s worth keeping.

Recipe

Serves 4

Time: 1 hour (Plus chilling time)

Ingredients

For the Base

  • 80g Walnuts
  • 30g Desiccated coconut
  • 50g Pecans
  • 15g Chia seeds
  • 80g Dried dates
  • 6 Dried figs

For the Coconut middle

  • 2 Sachets of veggie gel (Personally I’d use 3 gelatine leaves to set the centre of this as I find it easier to work with, but if you’re making this for a vegan or vegetarian powdered gelatine will also work well)
  • 130ml Coconut milk
  • ½ tbsp Vanilla bean paste
  • 160ml Coconut cream
  • 30g Maple syrup

For the Coconut ganache

  • 100g Dark chocolate with high cocoa solids (about 75%+) (you can get really healthy dark chocolate in special food shops if you want)
  • 75ml Coconut cream

To decorate

  • Coconut slices

Method

  1. Put all the ingredients for the base of the etremet into a food processor and whizz up until crumb-like and starting to bind.
  2. Distribute this mix between your four moulds (I went for 7 x 6cm round metal moulds) and press down with the back of a spoon to compact and make an even thickness. Put this into the fridge whilst you make the next layer.
  3. To make the coconut cream layer begin by dissolving the gelatine powder in 15ml of water (or soak the leaves in a bowl of cold water if using).
  4. Then put the coconut milk and vanilla into a small saucepan and heat gently until it starts to bubble. Then take off the heat and stir the gelatine into the hot milk until smoothly combined.
  5. Then wait for the milk to cool completely before adding the coconut cream and syrup. Whisk this all up to combine and then pour into the moulds, over the base.
  6. Chill these in the fridge until completely set, this’ll take about 3 hours.
  7. When your coconut layer is set you can move onto the next step – making the glaze. Put the chocolate into a heatproof bowl over a pan of simmering water. Melt the chocolate gently and then cool slightly before adding the coconut cream. Leave until the mix isn’t too warm and holds its shape, but is still pourable.
  8. Take the coconut entremets out of their moulds by pushing them up and out from underneath (if they’re metal moulds a blowtorch can help).
  9. Put the coconut ganache into a pipping bag with a small round nozzle and pipe little drips of the mixture over the edge of the entremets. You want the drips to be uneven so vary the amount you put over the edge. Then fill in the middle with the ganache so that the whole top is covered and put back into the fridge to set.
  10. When ready to eat plate them up with any left over crumbs from the base mix and some coconut shards to garnish!

Thanks for reading! Next post coming on Wednesday…

Emma x

Honey Glazed Duck Salad

Honey Glazed Duck Salad

There’s nothing like a warm meat salad in winter, and duck is one of the best meats out there for it. When cooked right it’s both crispy and moist, with a deliciously deep meaty flavour. It also goes really well with sticky sweet things, and so naturally it appeals to my sweet tooth.

I first cooked duck this way for a competition a few years ago. Scoring and crisping up the skin before cooking off the meat is the way to make the most out of this cut, as otherwise it can end up really dry and fatty. Then coating it in honey and five spice creates a stunning aroma which makes it hard to not eat immediately. I’ve also combined it with plums and lentils here to make a balanced, substantial salad, but you could easily mix and match these as you choose to suit your preferences.

Recipe

Serves 2

Time: 15 minutes

Ingredients

  • 1 tsp Butter
  • 2 Duck Breasts
  • 2 tbsp Runny honey
  • 1 tsp Five spice
  • 75g Pine nuts
  • 2 Handfuls of salad leaves
  • 200g Green lentils, cooked to packet instructions
  • 3 Plums, de-stoned and cut into 8
  • Olive oil to serve

Method

  1. Put the butter into a frying pan and melt gently over a medium heat.
  2. Trim the excess fat off the duck breasts and score the fat with a knife into a criss-cross shape.
  3. Put the duck fat-side down into the pan and fry until golden and caramelised.
  4. Turn the duck over onto the flesh side, add the honey and five spice, and fry for another 5 minutes on a gentle heat.
  5. Take the duck out of the pan and leave on a board or plate to rest for at least 8 minutes. Meanwhile put the pine nuts into the pan with the juices and lightly brown. Set aside for later.
  6. Put the salad leaves into two bowls. Sprinkle over the cooked lentils and plum pieces. Fan out the duck on the salad and spoon over the pine nuts. Finish the salad with more honey, the pan juices and olive oil and serve!

Thanks for reading!

Emma x

Potato and Leek Soup

Potato and Leek Soup

It’s the second bake of detox January and I’ve gone for the classic diet staple of soup. I know it doesn’t look like much – trust me, it’s very hard to make potato soup look sexy – but it tastes really good, which when you’re dieting is a big plus. As you can see from the recipe it’s very simple and quick to make as you only really need to chop up some veg. You can also alter the quantities depending on how you like the consistency of your soup; essentially the more potatoes you add the thicker it will be. If you’re not in detox land at the moment and you want a deluxe version I’d recommend adding a couple of rashers of grilled bacon and 50ml double cream to the mix before blending!

Recipe

Serves 5

Time: 20 minutes

Ingredients

  • 1 Knob of butter
  • 1 White onion, chopped roughly
  • 3 Medium leeks, sliced into discs
  • 3 Medium potatoes, peeled and chopped into chunks
  • 1 Vegetable stock cube
  • 100ml Single cream to serve (optional)
  • Salt and pepper to season

Method

  1. Put the butter into a large saucepan and melt gently over a medium heat.
  2. Add the onions and fry, stirring occasionally, until they begin to caramelise and brown.
  3. Add the leeks, potatoes and stock cube. Then pour over enough boiling water to cover all the vegetables. Stir to dissolve the stock cube and then leave to boil until the veg are soft.
  4. Puree with a hand blender until smooth. Season to taste and then serve with a drizzle of cream and fresh bread!

Thanks for reading!

Emma x