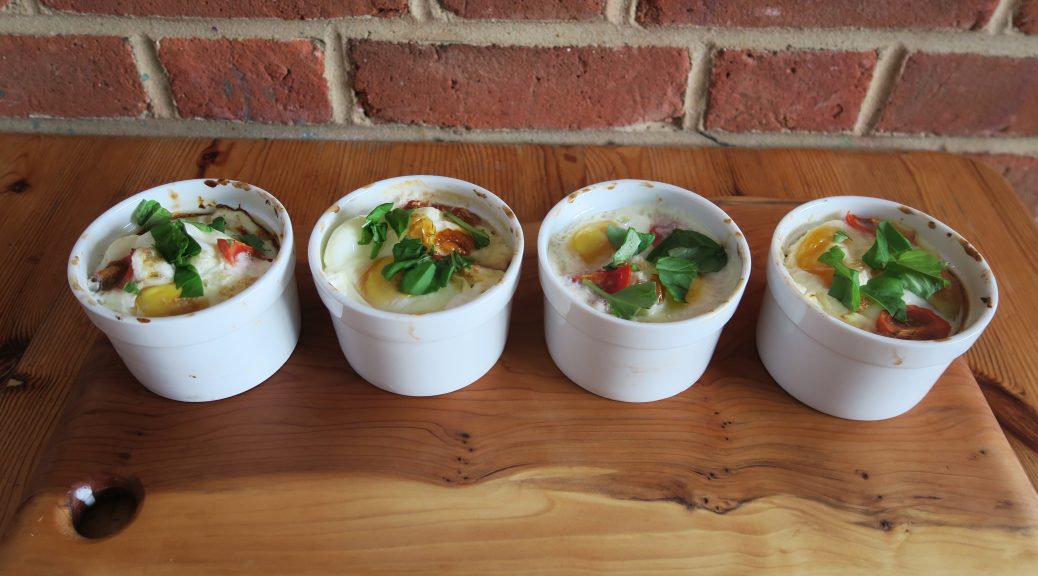
Tag: Healthy

Baked Egg Pots

Baked Egg Pots

Now that it’s 2018 we’re into the new year and new years resolutions are flying all over the place. One that I’ve taken on along with thousands of others over the country is to eat more healthily. Whilst I can’t see this lasting long for the main reason that I write a bi-weekly food blog and I love patisserie, I thought a detox January would be a good way of exploring healthy food. So you can expect a month full of healthy (or healthy attempts) of recipes.

I first heard of baked eggs when I was on French exchange and loads of my friends were being served them by their host families. Since then I’ve wanted to give it a go and so now here we are! I instantly liked making these as I could just delve into my fridge and pull out the first things I could see which I thought would work well together. Whether you have some leftover roast chicken, or some about-to-go-off tomatoes, this is a great way of using it up. I’ve included three variations at the bottom of the post to get your imagination running as to how you could personalise your own baked egg pot.

As well as being really versatile in terms of ingredients, they also have loads of uses. As they’re so quick to make they’re a great little warm snack for a cold day, or you could serve them as simple starters at a dinner party. This is especially useful as they take very little preparation and can be easily altered to suit different dietary requirements! Alternatively you could do what I do and make one for lunch and serve it with a side salad to get a healthy, high-protein meal.

Recipe

Serves 4

Time: 10 minutes prep, 15 minutes to cook

Ingredients

  • 3 Plum tomatoes
  • 1 Small pepper (I went for yellow)
  • 12 tsp Light Cream cheese
  • 8 Large eggs
  • 2 Cherry tomatoes
  • Pinch of salt and pepper
  • Basil to garnish

Method

  1. Pre-heat the oven to 180C.
  2. Chop the plum tomatoes into chunks and put them into the bottoms of 4 ramekins.
  3. Chop the pepper up into chunks and again distribute them between the ramekins.
  4. Take a teaspoon and put three little blobs of cream cheese into each pot.
  5. Crack two eggs into each pot – you don’t need to whisk them up or anything, just pop them straight in.
  6. Chop the cherry tomatoes into quarters and put two quarters into each pot.
  7. Season with salt and pepper (a very important step so do not miss!)
  8. Bake in the oven for 15-20 minutes, the time will vary depending on how you like your eggs cooked.
  9.  Take out of the oven and garnish with fresh basil. Eat with bread and/or a side salad!

Variations-

Smoked salmon – Take out the plum tomatoes and instead add 1 handful of wilted spinach to each pot. Then put some smoked salmon in with the cream cheese before you put on the eggs. Serve with sour cream and chives!

Bacon and Cheese – If you’re not bothered about the whole healthy eating thing you can use full fat cream cheese, or even go two steps further and add bacon and cheddar cheese to make them really indulgent.

Chicken and Sweetcorn – Take some leftover roast chicken, or chopped up cooked chicken breast, and 4 tbsp cooked sweetcorn and divvy it up between the pots with the cream cheese, eggs and seasoning.

Thanks for reading!

Emma x

Roast Pumpkin Soup

Roast Pumpkin Soup

Halloween’s coming up and that means it’s pumpkin time! In the world of carved pumpkins, the inner flesh is useless, but there’s no reason to discard all this delicious vegetable. So here’s something you can do with the leftover pumpkin sitting on your kitchen counter. Warming, smooth and healthy – this is a really quick and tasty lunch. Soup is also really good for freezing – so if you have more pumpkin soup than you can deal with in one go, pop it into a pot and bung it in the freezer until you fancy some more.

Here I’ve suggested roasting the pumpkin first as this will make it soft enough to get out of the skins, but if you’re using flesh from a carved pumpkin – meaning that it’s already out of the skin, you can use it just like that. This also works really well with butternut squash, so if you’re not a pumpkin family you can give that a go instead. My Mum’s really into gardening, and at the moment we have several squash plants taking over the garden, so soup is a great way of turning all this luscious veg into a meal that can be stored away and saved for a later day.

Recipe

Serves 4

Time: 45 minutes

Ingredients

  • 1 tbsp Vegetable oil
  • 1 Small red onion, roughly chopped
  • 1 Small white onion, roughly chopped
  • 2 Small pumpkins (about 1.5kg)
  • 1 Large carrot, peeled
  • 2 Medium baking potatoes, peeled
  • 2 Chicken stock cubes dissolved in 4 cups of boiling water
  • Salt and pepper to season
  • 125ml Single cream
  • 4 Rashers streaky bacon
  • 1/2 tsp dried chilli flakes
  • Fresh basil to serve

Method

  1. Pre-heat the oven to 180˚C. Halve the pumpkins and remove the seeds from the middle with a spoon. Drizzle with oil and then wrap each half in tin foil. Put them into roasting tins and then roast in the oven for 15-20 minutes, until softened. Set aside to cool.
  2. Meanwhile, put the oil into a large saucepan and add the chopped onion. Cook over a medium heat until the onions have begun to caramelise.
  3. Chop carrot and potatoes into chunks. Scoop the flesh out of the cooled, roasted pumpkins and add this, the chopped potatoes, and the chopped carrot to the onion. Pour in the chicken stock and bring to the boil. Leave to simmer for 15-20 minutes until the vegetables are tender.
  4. Meanwhile heat a grill. Put the bacon on a grill pan and heat under the grill for 5-10 minutes, turning over a few times, until crispy all over. Take out from under the grill and set aside for later.
  5. Puree the vegetables once ready with a hand blender, add the chilli flakes and season to taste with the salt and pepper.
  6. Pour in half the cream and stir to mix. Pour the soup into bowls and drizzle with the rest of the cream. Chop the bacon into strips with scissors and sprinkle over the soup. Garnish with fresh basil and serve with buttered bread.

Thanks for reading!

Emma x

Summer Salads

Summer Salads

Here comes the remedy to sweet nachos! Whilst I’m normally a sweet tooth person, it’s unfortunately impossible to live off desserts alone. But I’ve found that a good way of justifying the occasional dessert is a nice leafy salad. They are easy, quick to make and are a great way of getting your 5-a-day. We’ve also hit this great time of year, between summer and autumn, when fresh local produce is in abundance. In the UK we’re so lucky to have the variety and quality of foods that we do, and this is the best time to use them raw, which means it’s time to start the salads. Below are my top three salad combos, which are perfect for these final summer days.

Chicken Pesto Salad

Chicken and pesto is one of the best flavour combinations out there and I think this salad is a great way to combine them. In my family we often have left over chicken from our Sunday roast and this salad is a really good way of using it up. Simply tear the chicken off the carcass and store in the fridge for up to 3 days, then use the shredded chilled chicken instead of the chicken breasts. This prevents waste, is cheaper and also gives the chicken that nice meaty taste that I find you only get from roasting. Alternatively, if you have a griddle pan or BBQ you can also cook the chicken on that instead of in a pan, which would give a nice smoky flavour and beautiful char lines to the meat.

Serves 2

Time: 20 minutes

Ingredients

  • 1 tbsp Vegetable oil
  • 2 Chicken breasts (thighs also work well)
  • 1 Red pepper, deseeded and sliced
  • 40g Pine nuts
  • 80g Baby spinach
  • 150g Cherry tomatoes, cut into halves
  • 25g Feta
  • 2 tbsp Basil pesto

Method

  1. Preheat the oven to 180˚C. Put ½ tbsp of the oil into a pan and put on a medium heat. Chop the chicken breast into pieces and then fry in the oil for 5-10 minutes. To check if the meat is cooked, cut into one of the larger pieces and see if the middle is still pink. If it is then leave to cook for a few more minutes before testing another piece. Remove from the heat and leave to cool.
  2. In another pan put the rest of the oil and place over a medium heat. Add the red pepper and pine nuts and heat until the peppers are softened and the nuts begin to brown. Set to one side.
  3. Take a large platter or 2 plates (whatever you want to serve the salad on) and lay out the spinach leaves. Top with the chicken, tomatoes, peppers and nuts. Crumble the feta over the salad and top with a swirl of the pesto. Serve and enjoy!

Chilli Salmon Salad

This salad is light and refreshing, but it also has a packs a good punch from the chilli, lemon and watercress. As salmon is a rich source of omega 3 it’s also great brain food – perfect for packed lunches, al-fresco dining and sharing with friends. To bulk it out some more I’d recommend serving it with lime leaf and lemon rice. Simply boil rice in water as you usually would, but add 2-3 kaffir limes leaves (found in the fresh herbs section in supermarkets) into the water. When serving remove the leaves and top the rice with some lemon zest. This can help turn this dish from a starter or side into a filling lunch or main meal.

Serves 2 as a main meal or 4 as a starter

Time: 30 minutes

Ingredients

  • 2 Salmon filets
  • 2 tbsp Vegetable oil
  • 1 Lemon
  • 150g Asparagus
  • 90g Green peas
  • ½ Red pepper, sliced
  • 80g Cashew nuts
  • 40g Watercress
  • 40g Rocket
  • 25ml Sweet chilli sauce

Method

  1. Preheat the oven to 180˚C. Place the salmon onto foil and drizzle with 1tbsp of the oil. Cut the lemon in half and squeeze half of it onto the salmon. Wrap the foil around the fish and put into the oven to cook for around 15 minutes, until the flesh is no longer translucent and flakes when prodded with a knife. Remove the skin from the back of the fish and set aside to cool.
  2. Take the asparagus and cut about a thumbs length off the bottom to remove the woody ends. Bring a pan of water to the boil and add a pinch of salt. Add the asparagus and the peas. Boil for 1 minute, until a sharp knife goes into the stem of the asparagus easily. Drain using a sieve and set to one side.
  3. In a small pan heat the rest of the oil and add the sliced red pepper. Add the cashew nuts and fry until the pepper has softened and the nuts begin to brown, it should less than 5 minutes.
  4. Take a large platter to serve the salad on and arrange the watercress and rocket. Lay the asparagus on the leaves and then scatter pieces of the salmon on top. Scatter the peas, nuts and peppers over the salad. Drizzle with the chilli sauce and serve with wedges of the lemon.

Parma Ham and Nectarine Salad

This salad is simple and easy to make, but still tastes incredible. If you want an impressive dinner party starter which takes little time, or just a quick tasty lunch, this is the one for you.

Serves 2

Time: 10 minutes

Ingredients

  • 80g Rocket
  • 1 Nectarine, stone removed and cut into slices
  • 4 slices of Parma ham
  • 50g Walnuts, roughly chopped
  • 50g Feta cheese
  • 50ml Balsamic vinegar

Method

  1. Lay the rocket onto a plate or platter (whatever you want to serve it on).
  2. Arrange the nectarine pieces on top of the rocket.
  3. Cut the slices of Parma ham in two and place between the nectarine pieces.
  4. Scatter the walnuts and then crumble the feta over the salad.
  5. Just before serving drizzle the vinegar over the salad.