Tag: Cake

Plum and Amaretto traybake

Plum and Amaretto traybake

There’s this weird tradition in Oxford (and Cambridge) where once someone’s finished their end of year exams they get ‘trashed’ – aka they get pelted with whatever their friends can find at the local Tescos. Being Oxford based my whole life I’ve seen numbers of students crawling onto the high street covered in shaving foam, silly string and paint, but it wasn’t until the past few weeks that I got to do some trashing of my own. After a slightly surreal shopping trip we arrived at exam schools, belted up with prosseco, honey, ketchup, party poppers and confetti, ready to celebrate the freedom of some of our friends from the clutches of revision! This was the result… (RIP Nik’s sub fusc)…

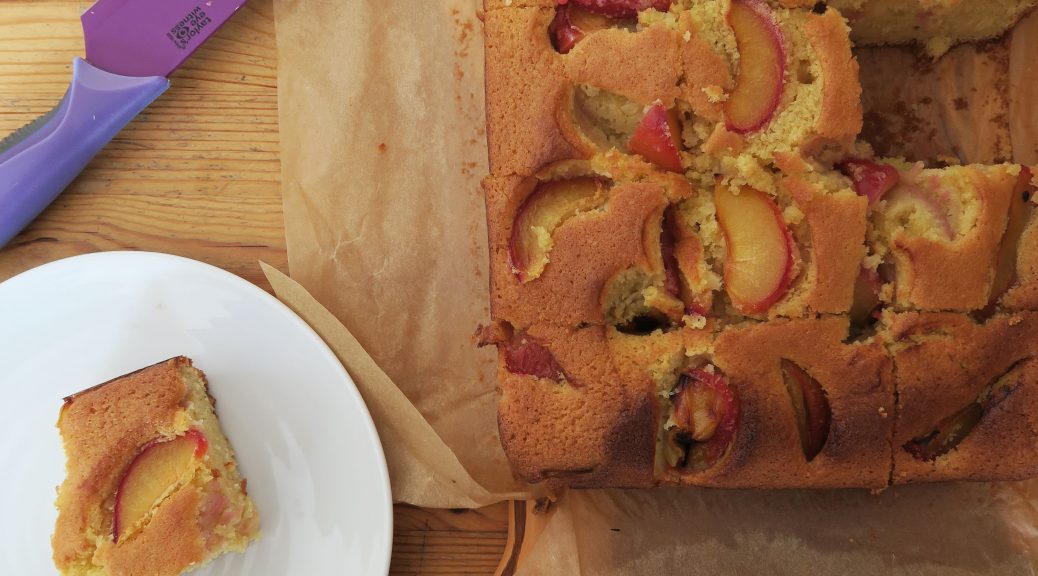
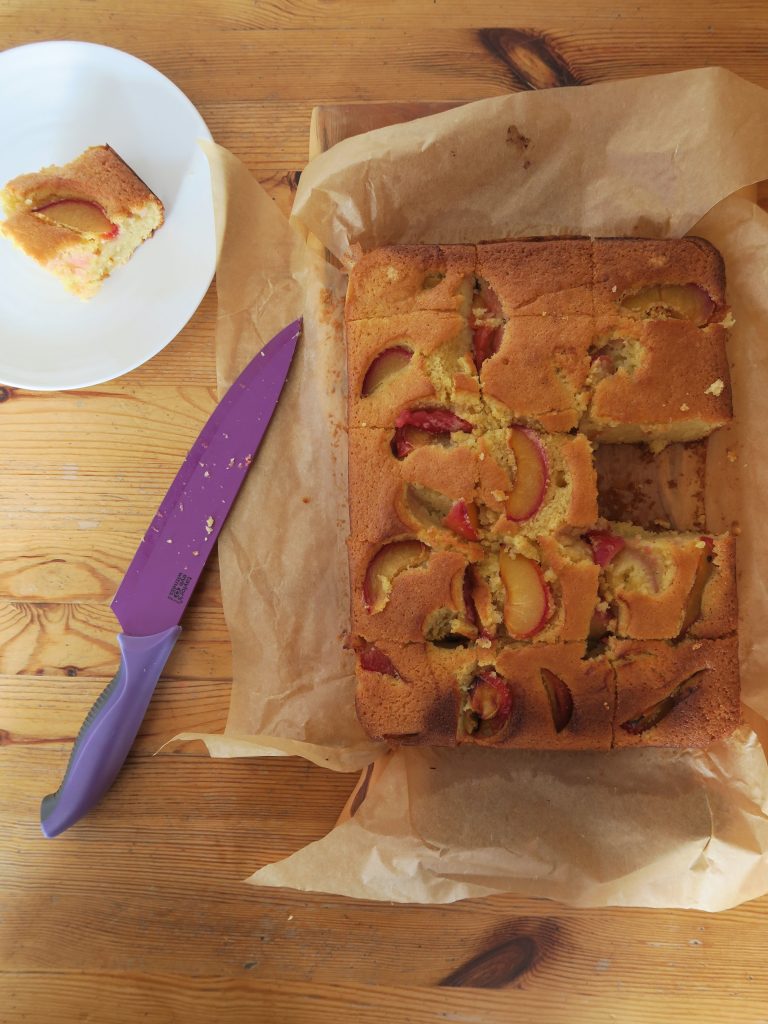
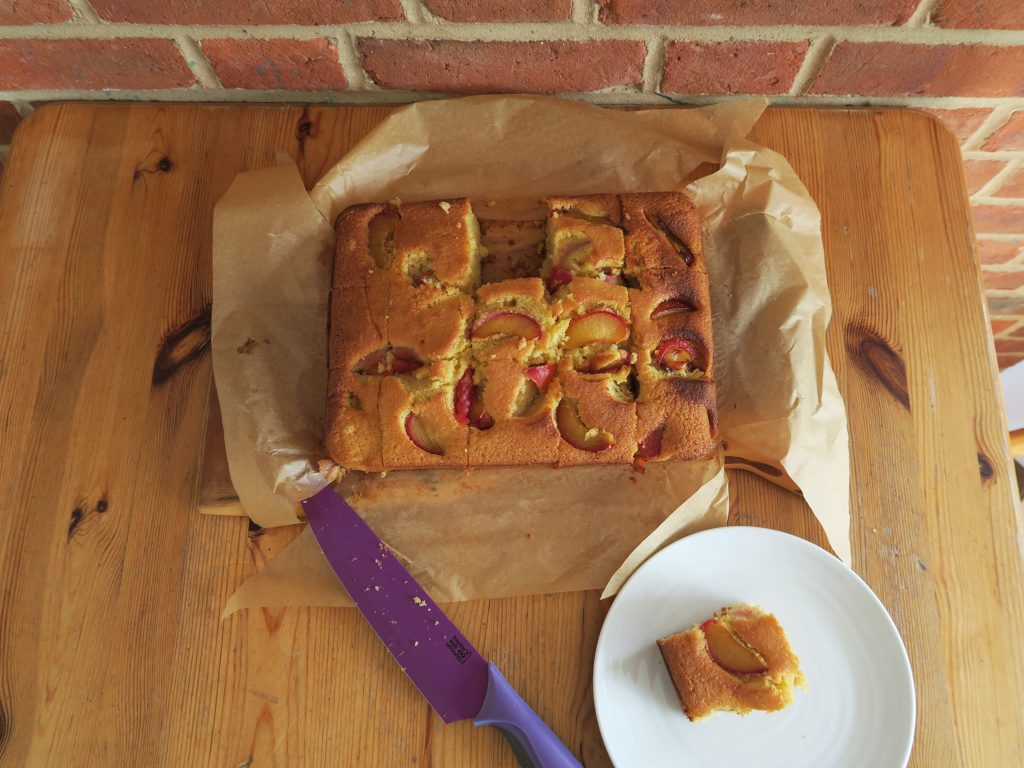
Afterwards came the jumping into the river, the crash back to reality, and then a growing chorus of ‘food?’ being passed around. That’s where this fab amaretto plum cake came in. At uni I didn’t have the chance to bake as much as I would have liked as I was short on time, ingredients and equipment, so since coming home I’ve been going a little crazy in the kitchen and have been making way more than I can feasibly eat. Therefore when I headed back up to uni I thought something like this tray bake would be the perfect thing to share with lots of de-stressed students – and it was!

Recipe

Serves 16

Time: 1 hour

Ingredients

  • 200g Butter
  • 200g Caster sugar
  • 4 Eggs
  • ½ tsp Almond extract
  • 180g Self-raising flour
  • 85g Ground almonds
  • ½ tsp Baking powder
  • 100ml Milk
  • 2 tbsp Amaretto (optional)
  • 3 Plums

Method

  1. Pre-heat the oven to 180˚C. Line a roughly 20 x 15cm cake tin with butter and baking paper.
  2. Put the butter and sugar into a bowl and beat together with a wooden spoon until pale and creamy.
  3. Add the eggs one by one and whisk them in. Then add the almond extract, flour, ground almonds and baking powder. Then add the milk and amaretto, and whisk it all  together to make a smooth batter. Pour the mixture into the lined tin and smooth it over so it evenly fills the tin.
  4. De-stone and then cut the plums into 1/8s. Then scatter them over the top of the cake, pressing them into the mixture a little. Bake in the oven for 20-25 minutes until risen and golden brown.
  5. Leave to cool and then cut into 16 squares.

Thanks for reading!

Emma x

Neapolitan Cake

Neapolitan Cake

After 8 weeks of crazy term-time mania we’ve finally hit the vac once more. As our tutors never cease to remind us we’re on vacation, not holiday, and therefore we;re merely vacating our rooms and are expected to continue working just as much back home, but even so there’s going to be a lot more time for baking now!

Some of my friends are hanging around in college a little longer as they have exams, so yesterday we did some group procrastination and got back into the kitchen. Of course we could have made something simple like pasta or cupcakes, but alas no. After such a long time out of the kitchen I wanted to make a dramatic entrance back into the world of baking, so I drew up a recipe for this Neapolitan cake: 3 layers of chocolate and vanilla marble cake, sandwiched with a strawberry cream-cheese frosting and wafers on top!

It might be a little preemptive to make an ice-cream inspired cake in early March, but hey. Summer is well and truly on the way so what’s the harm in looking forwards a bit? It may be wet, windy and dark outside, but we’ve got enough Neapolitan cake to go around so everything’s OK!

Recipe

Serves 12

Time: Around 2 hours

Ingredients

For the chocolate cake

  • 175g Unsalted butter
  • 175g Caster sugar
  • 3 Large eggs
  • 50g Cocoa powder
  • 100g Self raising flour

For the vanilla cake

  • 100g Butter
  • 100g Caster sugar
  • 2 Eggs
  • 100g Self raising flour
  • 1 tsp Vanilla bean paste

For the strawberry icing

  • 400g Cream cheese
  • 4 tbsp Strawberry jam
  • Zest of 1 Lemon

To decorate

  • A handful of fresh strawberries
  • A few Ice cream wafers
  • Chocolate sprinkles

Method

  1. Pre-heat the oven to 180˚C. Then grease and line 3x 20cm loose bottomed round cake tins with butter and baking paper.
  2. Now start make the chocolate cake mixture. Put the butter and sugar into a large bowl and beat together until pale and creamy. Add the eggs and whisk in until the mixture is smooth. Next add the flour and cocoa powder and whisk again to make a smooth batter.
  3. Using a tablespoon dollop the mixture equally between the 3 tins, leaving gaps to be filled in with vanilla mixture later.
  4. Now make the vanilla cake. Put the butter and sugar into another large bowl and beat with a wooden spoon until pale and creamy. Add the eggs and whisk until smooth. Then add the flour and vanilla and whisk again to make a smooth batter.
  5. Again dollop the mixture between the 3 tins. Then gently smooth the mixture over so it evenly fills the cake tins, but try not to mix the two cake batters too much.
  6. Bake the cakes in the oven for 25-30 minutes until risen and golden brown. A skewer inserted into the middle should come out clean. Turn out onto a wire rack and leave to cool completely.
  7. Meanwhile make the icing. Put the cream cheese into a large bowl and beat with a wooden spoon to soften it a little.
  8. Add strawberry jam and lemon zest to this and then mix again to make a smooth icing. Spoon the icing into a piping bag with a round or star shaped nozzle.
  9. Take your strawberries and take off the green tops. Then cut them into 1/8s and put them to one side until needed.
  10. Once cooled place one of the cakes onto a plate. Arrange some strawberry pieces around the edge of the cake, making sure they’re all facing the same direction. Then spread 1/3 of the icing over the middle of cake. (The strawberry barrier will help keep the icing neat if it’s a little runny!)
  11. Place the 2nd cake on top and repeat with the strawberries, icing, and final layer of cake. Pipe the rest of the icing in rings of blobs over the top of the cake.
  12. Pile the remaining strawberries in the centre of the cake. Halve and then place wafers evenly around the edge and then finish with a sprinkle of chocolate sprinkles!

Thanks for reading!

Emma x

Passion fruit and Ginger Madeleines

Passion fruit and Ginger Madeleines

I’ve always been a bit of a sucker for new bits of kitchen kit. There’s so much you can do with the basics, but a cool whisk or tin can make things super fun! When I was in Bruges over Christmas I found myself wandering around loads of kitchen shops, most of which would have huge displays of little kitchen bits and bobs all over the walls. This is where I came across this really cute madeleine tin – a little bit smaller than the traditional ones but perfectly sized to fit in my oven at uni! Until then I’d made madeleines before in cupcake tins, which works really well, but if you want the classic shell-shaped treats I’d really recommend finding yourself a tin. You can get all kinds of ones from the classic for about £20 to small and sweet ones like this which I picked up for around £4!

I think the best way of working with madeleines is to pack them full of flavour. They of course taste great on their own, but I think they’re a great canvas to decorate with lots of flavour! These are gently spiced with a womph of ginger, but have a cooling passion fruit curd centre and a drizzle of chocolate to give that extra lil bit of pazazz. If you’re not a fan of that though you could try lemon curd and white chocolate instead, or dipping the madeleines in melted chocolate and then hazelnuts once cooled?

Recipe

Makes 12

Time: 30 minutes

Ingredients

  • 50g Butter, melted, plus extra for greasing
  • 50g Plain flour, plus extra for dusting
  • 1 Egg
  • 50g Caster sugar
  • ¼ tsp Baking powder
  • ½ tsp Ground ginger
  • 50g Dark chocolate, to decorate

For the Passion fruit Curd

  • 13g Cornflour
  • Juice of 2 Passion fruit
  • 1 tbsp Lemon juice
  • 100ml Water
  • 1 Medium egg yolk
  • 30g Caster sugar
  • 15g Butter

Method

  1. Begin by making the passion fruit curd. Put the cornflour, passion fruit juice and lemon juice into a bowl and whisk together to make a smooth paste.
  2. Put the water into a small pan and bring to the boil. Pour the water onto the passion fruit mixture, whisking constantly until combined. Pour the mixture back into the pan, place over a medium heat and cook whilst whisking until the mixture thickens.
  3. Take the pan off the heat and whisk in the egg yolk, sugar and butter until smooth. Set to one side until needed.
  4. Pre-heat the oven to 180°C. Brush a little of the melted butter into the Madeleine tray. Then dust the tray with a little flour and shake out the excess.
  5. To make the madeleine batter, begin by putting the eggs and sugar into a bowl. Using an electric whisk the mixture until pale and fluffy.
  6. Sift the flour into the mixture and then add the baking powder, ground ginger and melted butter. Whisk everything together and then leave the mixture for 5 minutes to rest.
  7. Pour the mixture into a piping bag and then leave in the fridge for another 10 minutes to rest.
  8. Pipe the batter into the prepared mould (you want the mixture to be filling about 2/3 of each hole) and then bake for 8-10 minutes in the oven until lightly risen and golden brown (they cook very quickly so keep a close eye on them!).
  9. When baked take a knife and make a small incision in the top of each cake. Then pipe a little of the passion fruit curd into the hole in each one until you see it pouring out a little. It’s best to do this when the cakes are still warm as it’ll let the curd seep into them.
  10. Whilst the cakes are cooling melt the chocolate in a heatproof bowl over a pan of simmering water.
  11. Drizzle the cakes with the melted chocolate and then serve!

Thanks for reading!

Emma x


Vegan Chocolate Cake

Vegan Chocolate Cake

It’s 2019. Everything’s squeaky fresh and everything’s vegan! (For this month at least). I have 9 delish vegan recipes coming your way and then depending on how I like the whole vegan thing I might carry on with it or go back to being a chill veggie. That said, it’s only been 1.5 days and I’ve been hungry and staring at every non vegan thing in my kitchen for most of that time. But it’s gonna be great. I’ve got hummus, I’ve got aubergines, and I’ve got some sweet wonders like this chocolate cake to keep me going!

I actually first came across this way of making a cake a couple of years ago before I even considered going vegan, and it was so good that I didn’t realise it had no milk, eggs etc in it. It also doesn’t require lots of random hard-to-find ingredients like lots of vegan foods do, all you need is just a couple of avocados and you’re good to go! I also cannot stress enough that this is a hella good cake in it’s own right – this has actually become my go-to chocolate cake because it tastes so insanely good. So if the first thing you think of when someone says vegan is a bowl full of bland vegetables try whipping up one of these!

Recipe

Serves 10-12

Time: 2 hours

Ingredients

For the cake

  • Dairy free spread for greasing
  • 2 Small avocados (about 150g)
  • 300g Caster sugar
  • 350g Plain flour
  • 60g Cocoa powder
  • 1 tsp Bicarbonate of soda
  • 2 tsp Baking powder
  • 400ml Soya milk
  • 150ml Vegetable oil
  • 2 tsp Vanilla extract

For the icing

  • 70g Ripe avocado
  • 100g Dairy free spread
  • 200g Dark chocolate (dairy free)
  • 125ml Soya milk
  • 25g Cocoa powder
  • 200g Icing sugar
  • 1 tsp Vanilla extract

Method

  1. Pre-heat the oven to 170˚C. Line two 20cm sandwich tins with dairy free spread and baking paper.
  2. Put the avocado flesh into a bowl and puree it with a hand blender. Then put the avocado through a sieve into another big bowl.
  3. Add the sugar, flour, cocoa powder, bicarb, baking powder, milk, oil, vanilla and a pinch of salt to the avocado and whisk together until smooth and velvety.
  4. Pour the mixture into the two tins and bake for 20-25 minutes until risen and springy. (A skewer inserted into the middle should come out clean). Leave to cool for a few minutes and then turn the cakes out onto a wire rack.
  5. Now make the icing. Put the avocado and sunflower spread into a large bowl and beat until smooth. Pass the mixture through a sieve and then set aside for now.
  6. Melt the chocolate in a bowl over a pan of simmering water and then leave to cool for a couple of minutes.
  7. Put the dairy-free milk into a pan and bring to a simmer. Put the cocoa powder into a bowl and pour over the milk, whisking until a smooth mixture forms.
  8. Add the avocado, icing sugar, melted chocolate and vanilla and beat again until the mixture is thick, smooth and shiny.
  9. Put one of the cooled cakes onto a plate. Spread over half the icing, then top with the other sponge and the rest of the icing. Serve!

Thanks for reading!

Emma x

Tiramisu Cake

Tiramisu Cake

So my first term at Oxford has come to an end and oh boy has it been a term. I’ve switched degrees, become a vegetarian and have made some incredible friends (miss you already btw!). Just before we left we had a big birthday celebration dinner thing for my friend Kat and so I made this tiramisu cake for dessert!

I love baking things for people’s birthdays as it always puts the best look on their face and you can personalise what you make to fit the person! I’ve topped this one with chocolate decorations of an elephant in a little woodland as Kat loves elephants, but you can pipe your decorations to look like anything. To make these ones I got a picture of an elephant up on my phone and then placed a sheet of baking paper over my phone so that I could see the outline underneath. Then I just piped over the top following the lines. A top tip with this is make sure that the piping is thick enough so that you can peel the shapes off the paper without it breaking (RIP too many thin elephants!).

Recipe

Serves 16

Time: 2 hours

Ingredients

For the cake

  • 240g Caster sugar
  • 240g Butter
  • 4 Eggs
  • 250g Self raising flour
  • 2 tbsp Coffee powder
  • 2 tbsp Milk
  • 1 tbsp Cocoa powder

For the filling

  • 750g Mascarpone cheese
  • 300ml Double cream
  • 3 tbsp Icing sugar

To Decorate

  • 100g Dark chocolate
  • 1 tbsp Instant coffee powder
  • 1 tbsp Milk
  • Cocoa powder to dust

Method

  1. Pre-heat the oven to 180˚C. Grease and line a square tin with butter and baking paper.
  2. Put the butter and sugar into a bowl and beat with a wooden spoon until pale and creamy.
  3. Add the eggs one by one to the mixture, whisking in between each addition until combined. Add the flour and whisk again to make a smooth batter.
  4. Put the coffee and milk into a small bowl and stir until the coffee dissolves. Add the coffee to the cake mixture and mix until combined.
  5. Pour the mixture into your lined tin and then bake the cake in the oven for 15-20 minutes until risen and golden brown – a skewer inserted into the middle should come out clean.
  6. Transfer the cake to a wire rack and leave to cool before taking it out of the tin.
  7. Now make the chocolate decorations. Put the chocolate in a bowl over a pan of gently simmering water. Leave to melt and then pour into a piping bag with a very small, round nozzle.
  8. Take a sheet of baking paper and either draw your design onto the paper with a pencil and then turn it over so you can see the design on the back, or use your phone as a light box to shine a design through the paper from underneath.
  9. Carefully pipe the chocolate over your designs and then leave to set completely (not in the fridge as it’ll go white and horrible!).
  10. To make the cream filling put the mascarpone, cream and icing sugar into a large bowl and whisk together until smooth and creamy. Spoon the mixture into a piping bag fitted with a star shaped nozzle.
  11. When the cake has cooled take a sharp knife and cut the cake in half horizontally. Dissolve 1 tbsp coffee in the milk and then brush the coffee evenly over the two sponges.
  12. Place the bottom half on the board or plate you’ll present it on. Pipe blobs of the cream over the cake. Then top  with the other cake half and pipe the rest of the cream over the top.
  13. Carefully peel your chocolate decorations off your baking paper and arrange them over the top of the cake. Finish with a dusting of cocoa powder and serve!

Thanks for reading!

Emma x