Category: Quick

For the times when you need food and you need it fast.

Hangover Breakfast

Hangover Breakfast

Pretty much everyone who knows me knows that I’m really not a heavy drinker. I’m that person who’ll maybe have a cider at the start of a party but that’s about it, and completely forget about clubbing when it comes to me. So it might seem a bit weird that I’ve got a go-to hangover breakfast, but alas there is a reason. I’ve just started Uni (as of yesterday!) so it’s fresher’s week for me and as most of my friends are now uni-based I thought a hangover breakfast might be useful for all you guys who are planning on turning into the walking dead this week. I hope this helps with any upcoming hangovers, but it can’t solve everything so please drink responsibly!

Recipe

Serves 1

Time: 10 minutes

Ingredients

  • 2 Rashers of bacon
  • 2 Slices white bread
  • 1 Large egg
  • 35g Cheddar cheese, grated
  • 1/2 Beef tomato
  • A handful of salad leaves (I went for baby spinach)

Method

  1. Put a frying pan over a medium heat and fry the bacon until crispy all over. Take the bacon out of the pan and set to one side for later.
  2. Next take one of the slices of bread and fry it in the pan with the bacon grease for a couple of minutes until it’s toasted.
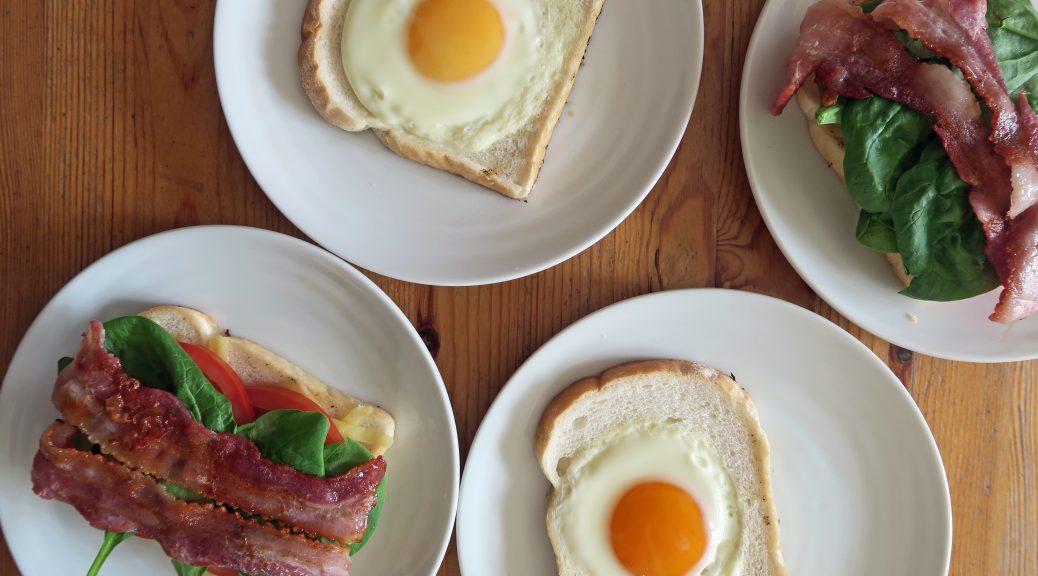
  3. Take a 7cm round cookie cutter (or just cut a hole with a knife) and punch out a circle in the other slice of bread. (You can eat or discard the circle you’ve just cut out).
  4. Put this slice of bread into the pan and crack the egg into the hole you cut out. Fry for 3-4 minutes, until the egg white has cooked all the way through and is opaque.
  5. Sprinkle the cheese around the edge of the bread and fry for another 1-2 minutes until the cheese starts to melt.
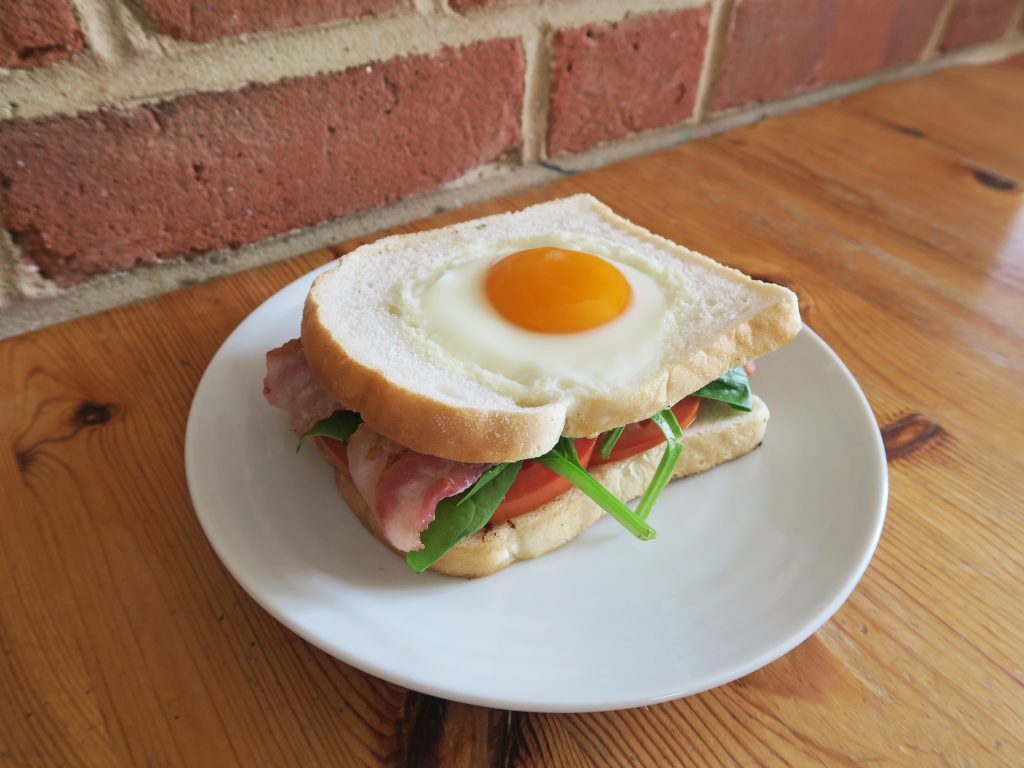
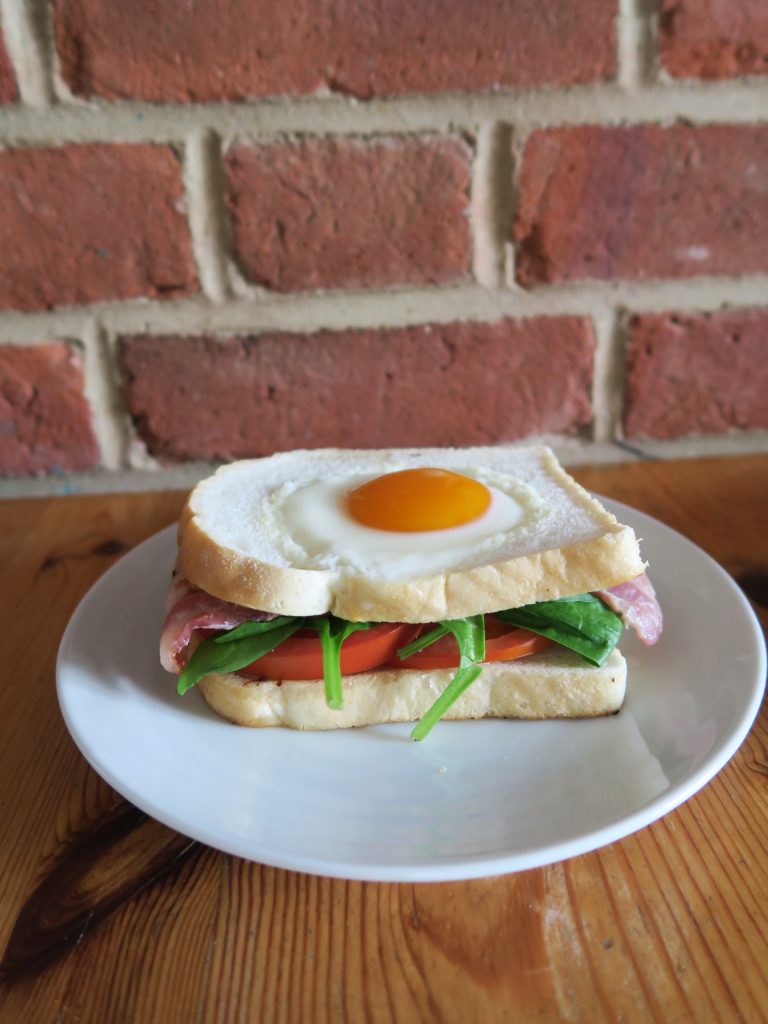
  6. Meanwhile slice the beef tomato and arrange it over the bottom slice of bread (the one without the egg on it). Then scatter the salad leaves over the tomato and top with the slices of crispy bacon. Finish by putting the slice of bread with the egg in it on top and enjoy!

Thanks for reading!

Emma x

Black Forest Amaretto Trifles  

Black Forest Amaretto Trifles  

I’m heading off to uni in a couple of days where I’ll be in the land of little space and little money, so recently I’ve been doing a load of cooking to make the most of the time I’ve got left. The result of doing a load of cooking at once is that you end up having the weirdest niche ingredients lying around the kitchen which then work their way into new recipes. A little while ago I made some stuffed amaretti peaches (recipe coming soon!) and so I had half a bag of amaretti biscuits leftover. I found myself snacking on these biscuits for a couple of days before I realised that rather than snacking on them I should probably use them to make something else. They’re not something I have lying around very often but they can add great flavour to a dish!

So that’s how these came into being. Some crushed amaretti biscuits in the bottom of a glass, topped with some spiced, previously frozen cherries (keeping frozen fruit in the freezer is the most useful thing for speedy, quick desserts!) and then a chocolate custard type thing on the top. The custard layer in this takes a while to thicken as it doesn’t use eggs, so if you want to make this super quick you could just make a light ganache by heating up some double cream and pouring it over the same amount of chopped chocolate. Then add 2 tsp milk and mix until combined. This may make the dessert a little richer, but it’ll make it super quick to put together.

Recipe

Serves 4

Time: 20 minutes (may be a little longer depending on how long it takes for your custard to set!)

Ingredients

For the Cherry layer

  • 150g Frozen cherries
  • 50g Caster sugar
  • ½ tsp Ground cinnamon
  • ½ tsp Ground ginger
  • ½ tsp Vanilla bean paste

For the Chocolate layer

  • 500ml Milk
  • 1 tbsp Plain flour
  • 2 tbsp Caster sugar
  • 1 tsp Vanilla bean paste
  • 60ml Amaretto
  • 100g Dark chocolate
  • 50g Unsalted butter

For the Topping/Base

  • 250ml Double cream
  • 125g Amaretti Biscuits, plus a few extra to decorate

Method

  1. Begin with the cherry layer. Put the cherries, sugar, cinnamon, ginger, vanilla and 2 tbsp water into a pan and bring to a gentle simmer. Leave until the cherries are squishy and the juices are running out of them but the cherries are still in shape. Set aside for later.
  2. Now make the chocolate layer. Put the milk into a pan and heat gently.
  3. In another bowl put the flour, sugar and vanilla into a bowl and whisk together until smooth. Slowly pour the warm milk over the mixture, whisking constantly to combine, and then pour the custard mix back into the pan.
  4. Place the pan back onto a medium heat, stirring constantly until the mixture thickens and is smooth.
  5. Add the amaretto and mix it in. Then take the pan off the heat and stir in the chocolate and the butter until they’ve melted. Set aside for now.
  6. To prep the topping pour the double cream into a bowl and whisk gently until soft peaks form. Leave somewhere cool (like in a fridge) until needed. Then crush the amaretti biscuits and put them into a bowl.
  7. Now you’re ready to start layering the trifles. Take 4 shallow glasses or one large serving dish and sprinkle ½ the amaretti biscuits into the bottom. Then spoon over ½ the chocolate mixture, followed by the cherries, keeping a few aside to decorate. Portion out the rest of the chocolate mixture between the glasses and smooth over with a spoon to make an even layer. Dollop the cream onto the top of the trifle(s) and finish with a sprinkle of the rest of the rest amaretti biscuits and a cherry. Enjoy!

Thanks for reading!
Emma x

Canadian Salad

Canadian Salad

Have you heard I went to Canada this summer? Yup, in case you didn’t already know, a few weeks ago I crossed the pond once more on a spontaneous summer get away. As my sister used to live out there she and I spent our three weeks staying with her friends, going to tones of insanely good BBQs, and generally soaking up the stunning landscape. There’s something so relaxing and creatively inspiring about the mountains and the rivers out there. I found myself sketching for the first time in years (ironic as I’ve been doing an art course the past year), voluntarily exercising, and actually stopping and thinking rather than just hurtling through life like I usually do when I’m at home.

I also found myself eating more creatively – partly because I was on a tight budget and also because I was doing a lot of cooking with my sister who’s a fitness fanatic and eats way more vegetables than I’m used to! Whilst I’ve called this Canadian salad I didn’t actually make it when I was over there because food was generally expensive and this has lots of components to it. The reason for the name is that I first came across a variation of this at restaurant up the side of a mountain in Lake Louise. I’ve never seen something like this before and it tasted amazing so I thought I’d make my own, e voila!

The reason I love this salad so much is that it’s relatively healthy but it’s also sweet enough to satisfy a sugar craving. The combo of the fruit, the spiced pecans and the cheese is one of those things that shouldn’t work but just does. If you’re not a sweet-toothed person I’d recommend coating the pecans in just the butter and cinnamon, and leaving out the sugar so that the only sweetness is coming from the natural sugars in the fruit. This also originally had daikon in it (I hadn’t heard of it either, apparently it’s a vegetable like a radish), but as I couldn’t find one in Aldi this one is daikon-less, but you could use radish if you want some peppery-ness in here.

Recipe

Serves 2

Time: 10 minutes

Ingredients

  • 50g Pecans
  • 1 tbsp Unsalted butter (or soya margarine)
  • 1 tsp Brown sugar
  • 1/4 tsp Ground cinnamon
  • 2 Handfuls of Baby spinach
  • Roughly 4 Strawberries
  • 1 Orange
  • 20g Dried cranberries
  • 20g Feta cheese
  • 1 tbsp Maple syrup
  • 20ml Balsamic vinegar

Method

  1. Begin with the candied pecans. Put the pecans, butter, sugar and cinnamon in a small pan and leave the butter to melt. Stir the contents a little so that the pecans are covered in the butter/sugar mixture and then leave to bubble up for 3-5 minutes. Take off the heat and set aside for later.
  2. Scatter the spinach across two plates, or one large serving dish if you’re making a salad to share.
  3. Hull and halve the strawberries and scatter them over the salad. Then halve the orange and cut one of the halves into 6 wedges. Cut the skin and any pith off the segments and then arrange them over the salad.
  4. Next scatter the dried cranberries, feta cheese and candied pecans over the plate.
  5. To make the dressing put the maple syrup, 1 tbsp orange juice (you can get this from the other half of the orange) and vinegar into a small bowl or jug. Mix together and then drizzle over the salad. Serve!

Thanks for reading!

Emma x


Chicken Noodle Soup

Chicken Noodle Soup

Here’s a nice quick one for soup Sunday! Every Sunday in my house we don’t have the traditional British roast, instead we have soup. It’s kind of a ritual where every leftover vegetable left in the fridge from the week is boiled up and blitzed into a bowl of vegetable soup surprise. This one is a bit more conventional than the ones we have on a normal Sunday lunch, but it’s just as warming and comforting. 

Although I said earlier that we don’t have roasts every Sunday, when we do we have roast it’s normally chicken, and it always results in a box of shredded chicken meat sitting in the fridge. This soup is great for leftover roast chicken, and pretty much any left over meat. Just finely slice or shred it and then add it to the soup. By adding some noodles to this relatively light, protein studded soup the whole thing is made into a full, hearty meal, and brings a nice oriental element to the whole thing.

Recipe

Serves 4

Time: 30 minutes

Ingredients

  • 2 Chicken breasts (or chopped chicken thigh)
  • 1 White onion
  • 2 Medium sized carrots
  • 2 Spring onions
  • 1 tbsp Root ginger
  • 1/2 Small red chilli, deseeded
  • 1 Small leek
  • 50g Unsalted butter
  • 1 tbsp Olive oil
  • 1L Chicken stock (or 1L boiling water with 2 chicken stock cubes)
  • 2 balls of Uncooked egg noodles
  • Salt and pepper to season

Method

  1. Pre-heat the oven to 180˚C. Wrap the chicken in foil and then leave to cook in the oven for 10-15 minutes until just cooked through. Leave to one side for later.
  2. Next prep the veg. Peel and then finely slice the onion and carrots. Then top and tail the spring onions and the leek and finely chop. Take the chilli and chop it finely. Then peel the ginger and then finely grate it.
  3. Put the butter and oil into a pan and leave to melt. Then add the prepped vegetables and fry gently until they begin to brown and soften. Then add the stock and leave to simmer for 5 minutes.
  4. Slice the chicken into strips and then add it to the soup. Leave it all to boil for another 5 minutes and then add the noodles. Leave to boil for a further 8-10 minutes until the noodles are just cooked before seasoning to taste and serving!

Thanks for reading!

Emma x


Rugelach

Rugelach

What is this? Another unusual bake that no one’s ever heard of before? Well you’d be right there. As you can probably tell I’m pretty obsessed with foreign baking, and over the course of the year I’ve been really pushing that side of my cooking. In my town there’s this really old bookshop that has a massive cookbook section, full of every style, theme, and cuisine of cookbook you could imagine. I love flicking through the books there, making mental notes of any unusual flavours, techniques, and ideas to give a go.

I first came across these in a Nordic recipe book and I immediately knew they’d be something I’d want to work on myself. Despite finding them in a Nordic cookbook though, these are actually a Jewish pastry, mainly found in the middle east. The dough is made with cream cheese which creates a really interesting, soft texture. These are then stuffed with apricot jam, nuts, raisins and cinnamon which makes them super moreish.

I quite like these as small, one-mouthful bites, but if you want to make them chunkier you can easily do this by cutting your circle into 6 or 8 triangles, rather than 12 like I have. I also haven’t tried this, but I wouldn’t be surprised if this filling works really well with shortcrust, puff, or even filo pastry, so you can really play around with these to suit your personal taste.

Recipe

Makes 24

Time: 45 minutes plus chilling and baking

Ingredients

  • 230g Cream cheese
  • 250g Unsalted butter
  • 155g Caster sugar, plus 3 tbsp for dusting
  • ½ tsp Salt
  • 1 tsp Vanilla extract
  • 300g Plain flour
  • 40g Light brown sugar
  • 1 ½ tsp Ground cinnamon
  • 140g Raisins
  • 140g Walnuts, finely chopped
  • ½ cup Apricot jam
  • 1 Large egg, beaten

Method

  1. Put the cream cheese and butter into a bowl and whisk until light and pale. Add 55g of the caster sugar, salt and vanilla and mix again to combine. Slowly add the flour and mix slowly until a dough forms.
  2. Roll the dough into a ball. Then cut the ball into quarters, roll each quarter into a ball and wrap in cling film. Leave in the fridge for an hour.
  3. Meanwhile make the filling. Put the 100g of the caster sugar, the brown sugar, ½ tsp cinnamon, raisins and chopped walnuts into a bowl and mix together.
  4. Lightly flour a surface and roll each dough ball out into a 9 inch circle. Spread the apricot jam over the circles and sprinkle with some of the filling mix, pressing it into the dough slightly.
  5. Cut the dough circle into 12 wedges. Then, starting at the wide end of the wedge roll the dough up like a croissant.
  6. Line a baking tray with baking paper and put the rolled up cookies on the tray, making sure the point where the folded bit of pastry ends is underneath. Chill for 30 minutes.
  7. Pre-heat the oven to 180˚C. Lightly brush each biscuit with the beaten egg. Then combine the rest of the caster sugar and cinnamon in a bowl and sprinkle over the biscuits.
  8. Bake the rugelach in the oven for 15-20 minutes until golden brown and crisp.
  9. Leave to cool on a wire rack and then serve!

Thanks for reading!

Emma x