Category: Fun

For the times when you just want to get in the kitchen and get hands on.

Falafels

Falafels

It’s time for these lil’ chickpea balls of happiness to enter the meze-sphere. These are made with chickpeas, cumin and lots of other lovely stuff, which all come together to make some very tasty kinda non-meat meatballs. These can be a little dry on their own, so they’re best served with something juicy like the roasted aubergine dish I posted yesterday, or some delicious homemade hummus!

Recipe

Makes 8

Time: 10 minutes

Ingredients

  • 1 tbsp Vegetable oil
  • 1 Shallot
  • 1 Garlic clove
  • 250g Chickpeas
  • ½ tsp Ground cumin
  • 1 tsp Mixed herbs
  • Zest of 1 Lemon
  • 1 Small chilli
  • Salt and Pepper to season
  • 1 Medium egg
  • 1 tbsp Olive oil

Method

  1. Pre-heat the oven to 200˚C.
  2. Put the vegetable oil into a small pan and put over a medium heat. Finely chop the shallot and then add this to the pan and fry for 2-3 minutes until starting to caramelise. Add the garlic and fry for another couple of minutes before taking off the heat.
  3. Drain the chickpeas into a sieve and then rinse and dry them. Tip the chickpeas into a bowl and add the onion and garlic. Mash the mixture so the chickpeas are all broken down and then add the cumin, herbs, lemon zest, and chilli. Mix together and then season with salt and pepper.
  4. Add the egg to the mix and then stir to make a sort of dough. Divide the mixture into 10 small balls. Place these onto a lined baking tray and then leave in the fridge to chill for half an hour.
  5. When ready take the falafels out of the fridge, drizzle with the olive oil and then put into the oven to bake for 20 minutes, until golden brown and crisp.
  6. Transfer to a serving dish and serve warm with lots of hummus and salad!

Thanks for reading!

Emma x

Peanut Butter Chocolate Chip Cookies  

Peanut Butter Chocolate Chip Cookies  

Something that I really love about making biscuits, and in particular cookies, is how quick and simple it is to make them. The three basic ingredients in any biscuit is flour, butter and sugar, and anyone who bakes regularly will probably have these in their home at all times, so these are something that can be rustled up at a moments notice without the need for a shop first. I also love how easy it is to make them. Whop everything in a bowl, mix it together, portion it out and bake them. Then, no decoration, filling, or embellishment required, they can be devoured in minutes, warm pools of chocolate oozing out of them!

Peanut and chocolate is one of the ultimate flavour marriages out there, and in these it works sublimely. The little saltiness from the nuts compliments and brings out the richness of the chocolate, and the nutty flavour makes the basic cookie dough a little more interesting than your classic plain stuff. Recently there’s been a food craze of different nut butters  (like peanut butter but made out of cashews or almonds etc) so you could also try experimenting with other nut-choco combos. Especially if you’re not a fan of peanuts, there might be another nutty substitute that you’d prefer. These will also freeze really well, so if you want you can make the dough, pop it into a freezer-proof container and leave it in the freezer for months until you need it (and that way a fresh, warm cookie is always only minutes away!)

Recipe

Makes 10

Time: 15 minutes, plus cooking time

Ingredients

  • 110g Unsalted butter
  • 75g Caster sugar
  • 100g Light brown sugar
  • 1 Large egg
  • 1 tsp Vanilla extract
  • 130g Peanut butter
  • 200g Plain flour
  • 1/2 tsp Bicarbonate of soda
  • 1/2 tsp Baking powder
  • 75g Milk chocolate

Method

  1. Begin by putting the butter and sugars into a bowl and beating them with a wooden spoon until pale and fluffy.
  2. Add the eggs to the mixture and stir until combined. Then add the vanilla and the peanut butter and beat again until incorporated.
  3. Add the flour, bicarb and baking powder to the mixture and mix until a smooth dough forms.
  4. Chop the chocolate into rough chunks and then stir it into the dough.
  5. Split the dough into 16 pieces and then roll each portion into a ball. Place the balls on two trays lined with baking paper. Take a fork and press down on each of the balls in a criss-cross pattern to slightly flatten and decorate them. Chill the biscuits in the freezer for 15 minutes.
  6. Preheat to 180˚C. When ready bake the biscuits for 10-15 minutes until golden and starting to crisp around the edges. Leave to cool slightly and then enjoy!

Thanks for reading!

Emma x

Cheesy Garlic Focaccia

Cheesy Garlic Focaccia

I’ve always had this unhealthy obsession with garlic bread. When I was at Primary School, every year they’d have this hot-rods competition where you’d be given a block of wood and four wheels and you’d have to make them into something that could be raced down a ramp. One year I basically baked and varnished a loaf of garlic bread and stuck it on top of the wood. It was very weird, but hey, I did win the originality prize that year!

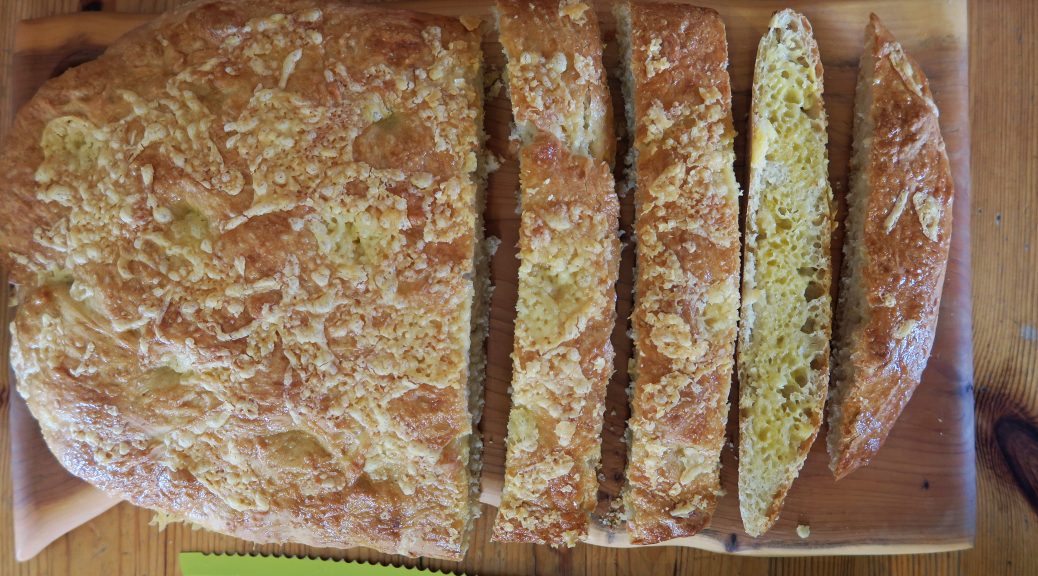
With my bread racing days behind me, now I just eat my garlic bread, and this is one of the best! Focaccia is a very soft Italian bread which is a perfect base for garlic bread as it’s soft and easy to share. The dough requires a lot of water to get this soft, open structure to it, so it can be petty hard to work with. Rather than kneading the dough on a work top I’ve found that kneading it in a bowl makes everything a lot easier, and also means that you don’t waste as much dough from it being suck on the table!

In most garlic breads the garlic isn’t actually in the bread, but is rather a garlic butter that’s sandwiched in between slices of the bread, or is spread on the top. In this one I’ve put a little garlic into the dough itself, but to give it more of a garlic hit I’ve also spread it with garlic butter when it’s warm out of the oven! You also don’t have to use cheese if you don’t want it, it’s completely personal preference, but I find that it gives the whole thing a delicious tang on the top!

Recipe

Makes 1 loaf

Time: 1 hour, plus proving time

Ingredients

  • 500g Strong white bread flour
  • 10g Salt
  • 14g Yeast
  • 2tbsp Olive oil
  • 1 tbsp Garlic paste
  • 400ml Warm (but not hot!) water
  • 1 Large egg, beaten
  • 50g Strong cheddar cheese, grated
  • 3 cloves of garlic
  • 50g Unsalted butter

Method

  1. Put the flour into a bowl. Then add the salt and yeast on opposite sides of the bowl, followed by the oil, garlic paste and the water. Mix everything together with your fingers until a dough starts to form. Then knead/stretch the dough in the bowl for 10 minutes until smooth and stretchy.
  2. Tip the dough into another, lightly oiled bowl and cover with cling film. Leave to rise for about an hour until doubled in size.
  3. Line a baking tray with baking paper. Punch the risen dough down in the bowl to knock it back. Then pour/tip the dough onto the lined tin and shape it into a rough rectangle. Oil a piece of cling film and then cover the loaf, oil side down, and leave to rise for another hour.
  4. Pre-heat the oven to 180˚C. Use your fingers to punch holes into the loaf and then brush the bread with the beaten egg. Bake the loaf in the oven for 15-20 minutes, until a soft crust has formed.
  5. Take the bread out of the oven and then sprinkle with the grated cheese. Then pop the loaf back into the oven to bake for 5-10 minutes, until golden brown and baked through.
  6. To make the garlic butter crush or finely chop the garlic. Then add it to the butter and mix until the butter is soft and the garlic is mixed through.
  7. Whilst the bread is still warm, slice the loaf into strips and brush each strip on both sides with the butter. Enjoy!


Why not try…

If you love cheese, and really love cheesy garlic bread, you can take this to the next level by adding mozzarella. About 5 minutes before the bread’s done, when you put on the cheddar in step 5, slice the bread into strips almost all the way through, but leave a little space at the end so it’s still all joined together. Then slice the bread the other way so you get criss-cross squares of bread. Take a ball of mozzarella and tear it up, and then push the cheese into the gaps between the bread slices. Top with the cheddar and put back in the oven until melted!

Thanks for reading!

Emma x

French Toast with Maple Syrup and Summer Berry Compote

French Toast with Maple Syrup and Summer Berry Compote

With term over now I’m getting into full holiday mode, and a big part of that requires making breakfast at midday in m’ PJs, dancing crazily round the kitchen to Panic at the Disco. Pancakes would probably be my go-to brunch dish, but I’ve made a lot of them recently so I thought I’d branch out. There’s a tonne of different names for this, but whether you call it egg bread, gypsy toast or French toast, it all tastes insane. For those of you who’re as unfamiliar with French toast as I was about a week ago I’ll explain what it is. Basically you take some bread, or brioche in my case because the concept of dieting has flown from my mind, then you soak it in a gently spiced egg/milk mixture, before frying it in a pan with some butter to get a beautifully crispy, spongy piece of bread. You can then serve it with a good drizzle of maple syrup and some stewed red fruits to make an irresistible, comforting brunch dish.

The egg/milk mixture you soak the bread in isn’t sweetened, so you could easily make this into a savoury breakfast if that’s more your thing. To do this use some thick white bread instead of the brioche and don’t add the spices to the milk mix. Then top it all off with bacon and maple syrup, cheese and tomatoes, or scrambled egg!

Recipe

Serves 4

Time: 20 minutes

Ingredients

  • 2 Large eggs
  • 120ml Milk
  • 1 tsp Vanilla extract
  • ½ tsp Ground cinnamon
  • ½ tsp Ground ginger
  • 4 Thick slices of brioche
  • 1 tbsp Vegetable oil
  • 1 tbsp Butter
  • 2 tbsp Maple syrup
  • Fresh berries to serve

For the compote

  • 100g Mixed frozen berries (e.g strawberries, blackberries and raspberries)
  • 1 tbsp Lemon juice
  • 2 tbsp Caster sugar

Method

  1. Whisk together the eggs, milk, vanilla, cinnamon and ginger.
  2. Cut the brioche slices in half to make triangles, then lay them out in a single layer in a shallow dish. Then pour the milk mixture over them and leave to soak for 5 minutes, turning the slices over half way through.
  3. Heat 1 tbsp of the oil and butter in a non-stick frying pan until melted and bubbling.
  4. Carefully pick up two of the bread slices and fry in the pan for 3 minutes on each side till golden and crisp. Repeat with the rest of the bread.
  5. Serve with the berry compote, a drizzle of maple syrup and some fresh berries!

Thanks for reading!

Emma x

Cornish Pasties

Cornish Pasties

So back into the south for some inspiration this week. It’s kind of a necessity to eat a pasty at some point when you’re in the West-country, and though there’s dozens of kinds out there for the picking, a good old Cornish pasty will always be my favourite. When I think of pasties I think of wandering barefoot along the beach with a warm, slightly over-flowing pasty in hand. Flakes of buttery pastry flying into your face in the wind, and shooing off seagulls left, right and centre. This might not paint the most relaxing experience of dining there is, but it’s rough, rustic and nostalgic which is what I love most about it.

I know that quite often people hate pasties because they’re thought of being greasy and stodgy. These homemade ones are a lot cleaner than you’d think, and the rough-puff pastry is way lighter than the stuff you find on traditional pasties.  The key is to make sure you season the filling A LOT as it’ll totally transform the flavour of the pasty and make it really moreish. Traditionally beef skirt is used to fill a pasty as it releases gorgeous juices that taste amazing. That said, beef skirt is almost impossible to find in a local supermarket, so if you can’t find it I’d recommend using frying steak, escalopes or any cut of beef that’s relatively thin.

Recipe

Makes 6

Time: 90 minutes, plus chilling

Ingredients

For the pastry

  • 450g Strong bread flour
  • Large pinch of salt
  • 100g Cold, unsalted block butter
  • 100g Cold lard
  • 200ml Cold water

For the filling

  • 200g Potatoes
  • 1 Small onion
  • 100g Swede (1 small)
  • 200g Lean beef skirt (or frying steak if you can’t find beef skirt)
  • Salt and pepper to season
  • 1 Beaten egg

Method

  1. Begin by making the pastry. Put the flour and salt into a large bowl. Then take the chilled blocks of lard and butter and grate them into the butter. I’d recommend giving everything a little mix regularly as you do the grating so that the fats can be coated in flour, this will stop them all re-forming into a lump when you mix it all together.
  2. Then take a round-bladed knife and mix the fat into the flour so it’s all coated. Pour the cold water into the bowl and continue to mix to form a soft dough.
  3. Tip the dough out onto a surface and knead a little to bring the dough together into a ball. Wrap the pastry in cling film and chill in the fridge for at least 30 minutes.
  4. Now prep the filling. Peel the potatoes, onions and swede. Then chop the potato into chunks, about the thickness of a £1 coin. Then finely chop the onion, and chop the swede into chunks the same size as the potato.
  5. Now prep the meat. Using a sharp knife remove any gristle from the meat, but leave the fat as it’ll add great flavour to the pasty. Then chop the meat into chunks about the same size as the potato.
  6. Pre-heat the oven to 180˚C.
  7. Split the pastry into 6 and then roll each one out to a 14cm diameter circle. Using a plate as a stencil can be helpful here to get a neat circle.
  8. Distribute the onions between the pastry discs, spreading them in a semi-circle over one half of the dough, leaving a 1 cm boarder around the edge for sealing. Sprinkle over a little salt and pepper. Then top with a layer of swede, then meat and finally potato, seasoning a little between each layer.
  9. Take a cup of water and dip your finger into it. Then moisten the rim of the pastry circle with your finger. Fold the unfilled half of the pastry over the filling and use the edge of your hand to gently seal the pastry.
  10. Now it’s time for the crimping that’ll keep the pastry together. Working from right to left fold the pastry over itself and then press down. Repeat along the seam of the pasty to make a rope pattern until you reach the end.
  11. Put the pasties onto a baking tray and brush with the beaten egg. Bake for 15-20 minutes until golden brown, then reduce the oven temperature to 160˚C and continue to bake for 15 minutes. Then turn off the heat and leave the pasties to cool/keep cooking in the oven for another 30 minutes. Serve!

Thanks for reading!

Emma x