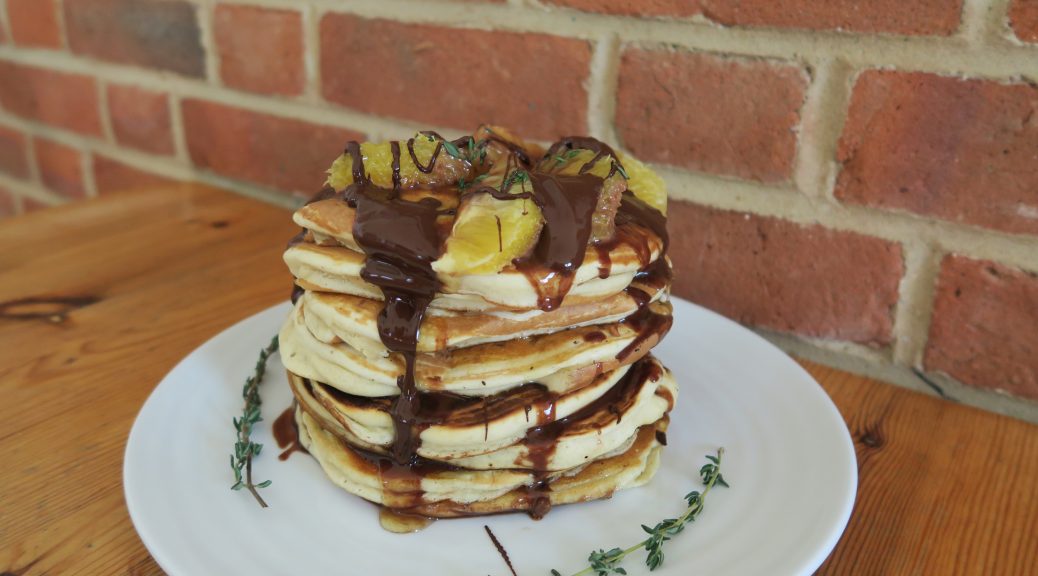
Chocolate, Orange and Thyme Pancakes
As the title of this blog is Cocoa and Thyme I thought it was about time I make a recipe to show these two ingredients at their best. Whilst it’s not yet an every-day flavour pairing, chocolate and thyme is a contemporary flavour combo that’s becoming very popular in fine dinning restaurants. Since pancake day is on Tuesday I’ve decided to incorporate it into a delicious pancake dish!
It’s a bit of an acquired flavour combo so I understand that it probably won’t be for everyone, but if you like being a bit adventurous it’s a worthwhile experiment. However, these pancakes are also insanely fluffy and delicious, so even if you’re not up for wacky flavours I’d recommend making them and topping them with whatever topping you tend to go for. In my case that’s lemon juice and sugar, but nutella, banana, golden syrup, bacon, strawberries, or anything else that takes your fancy will also go really well with these.

Recipe
Serves 4
Time: 45 minutes
Ingredients
For the Orange syrup
- 190g Sugar
- 110ml Water
- 190ml Orange juice
- 1 tbsp Cornflour
- 2 tbsp Butter
For the Chocolate sauce
- 50g Dark chocolate
- 25g Butter
- 125ml Double cream
- 1 tbsp Caster sugar
- Thyme leaves, chopped
For the Pancakes
- 300g Self-raising flour
- 1 ½ tbsp Baking powder
- 60g Caster sugar
- 2 Large eggs
- 200ml Milk
- Vegetable oil for greasing
Method
- Begin by making the orange syrup. Whisk together the sugar and water in a pan over a medium heat until the sugar is dissolved. Bring the mixture to the boil.
- Then, in another bowl whisk the orange juice and cornflour. Pour this mixture into the sugar and water pan and simmer whilst whisking constantly, until the mixture thickens. Stir in the butter until melted and then leave covered, to keep warm, until needed.
- Then make the chocolate thyme sauce. Put the chocolate into a heatproof bowl over a pan of simmering water and leave to melt. In another pan put the butter, sugar and cream and heat gently until melted together.
- Pour the chocolate into the cream mix and add the chopped thyme leaves. Stir until smooth. Pour into a jug and set aside until later.
- Now make the pancakes. Put the flour, baking powder and caster sugar into a bowl. Mix to combine and then make a well in the centre. Add the egg and milk in the well and then whisk until combined and smooth.
- Put a large frying pan with 1 tbsp of vegetable over a medium heat. Using a ladle pour a neat circle of batter into the middle of the pan. Leave to cook for 1-2 minutes, until bubbles start to form on top, and then turn over and cook on the other side.
- Once cooked on both sides, (when brown spots start to form on the surface you know they’re done) transfer them onto a large plate.
- Repeat with the rest of the batter, creating a stack of pancakes. In between each pancake pour a little of the orange syrup to keep the pancakes moist. Once all the batter is used pour the chocolate sauce over the stack. Serve with fresh orange segments, thyme leaves and the rest of the orange syrup and chocolate sauce.

Thanks for reading, and happy pancake day!
Emma x