Author: Emma Hawkins

Coffee and Vanilla Zebra Cake

Coffee and Vanilla Zebra Cake

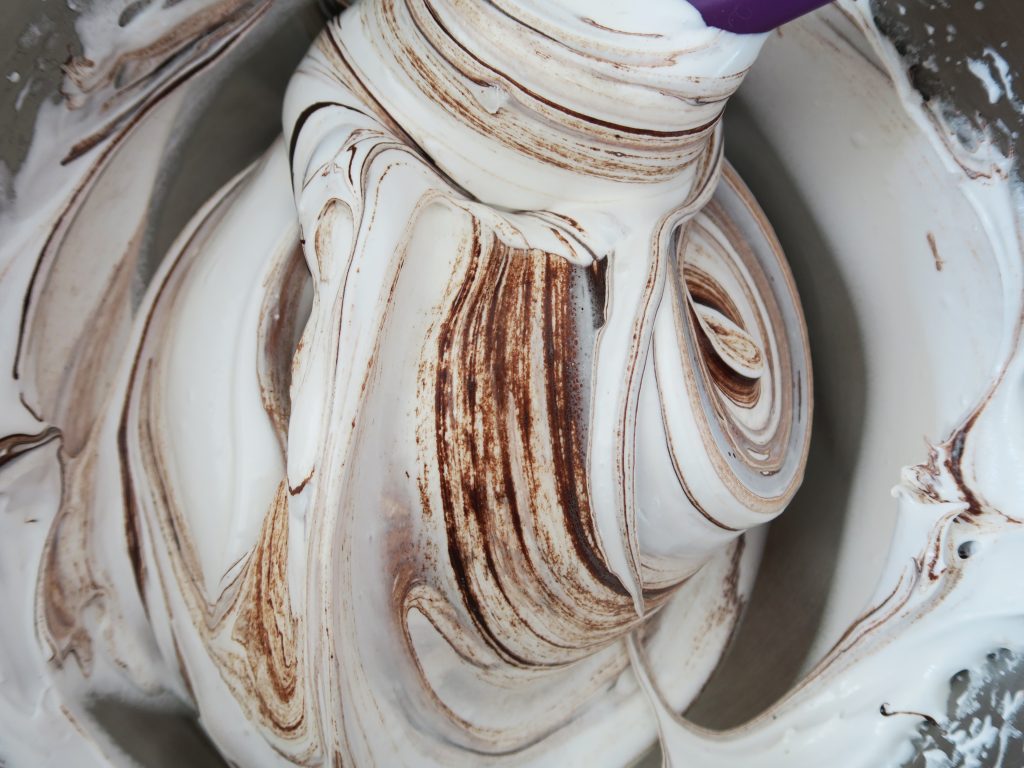
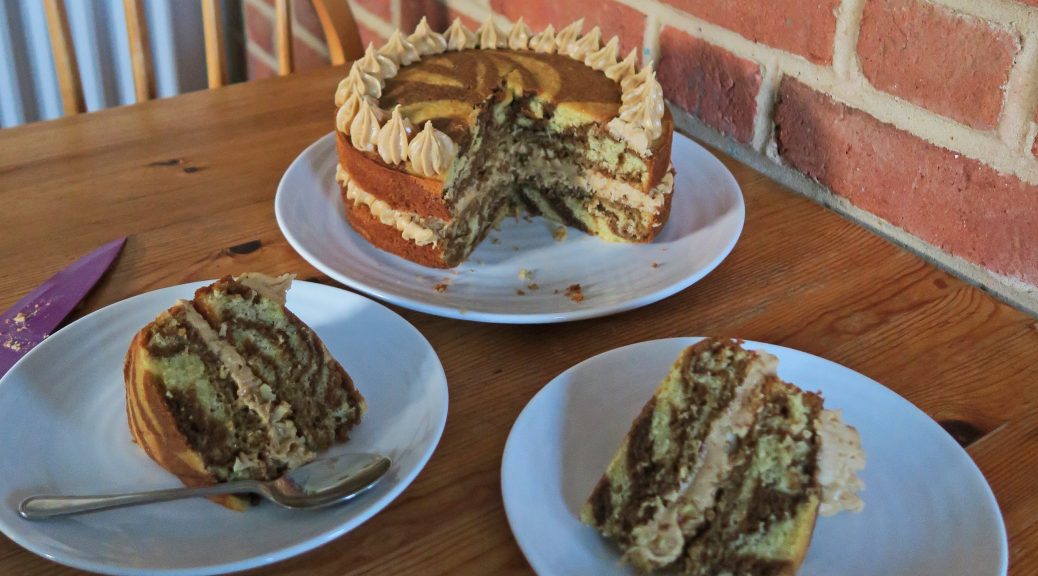
I’m going Zebra themed this week!!! Wahey! Have I gone mad? No! Y’ see now that I’m officially an art student I was thinking about writing some artistic gumph on how zebras can be symbolic of who knows what and so on, but the truth is I’ve just made a zebra cake because I’ve wanted to make one of these for years and they look so cool. So here we go – zebra cakes 101. These are defined by their vertical stripes made by piping blobs of different coloured cake mix on top of each other to make a series of concentric rings (it’s essentially a fancy marble cake). Here I’ve gone for coffee and vanilla as they’re so good together and just sing out to comfort, but you can pair any two that have different colours (e.g chocolate and vanilla, raspberry and lemon, or chocolate and orange).

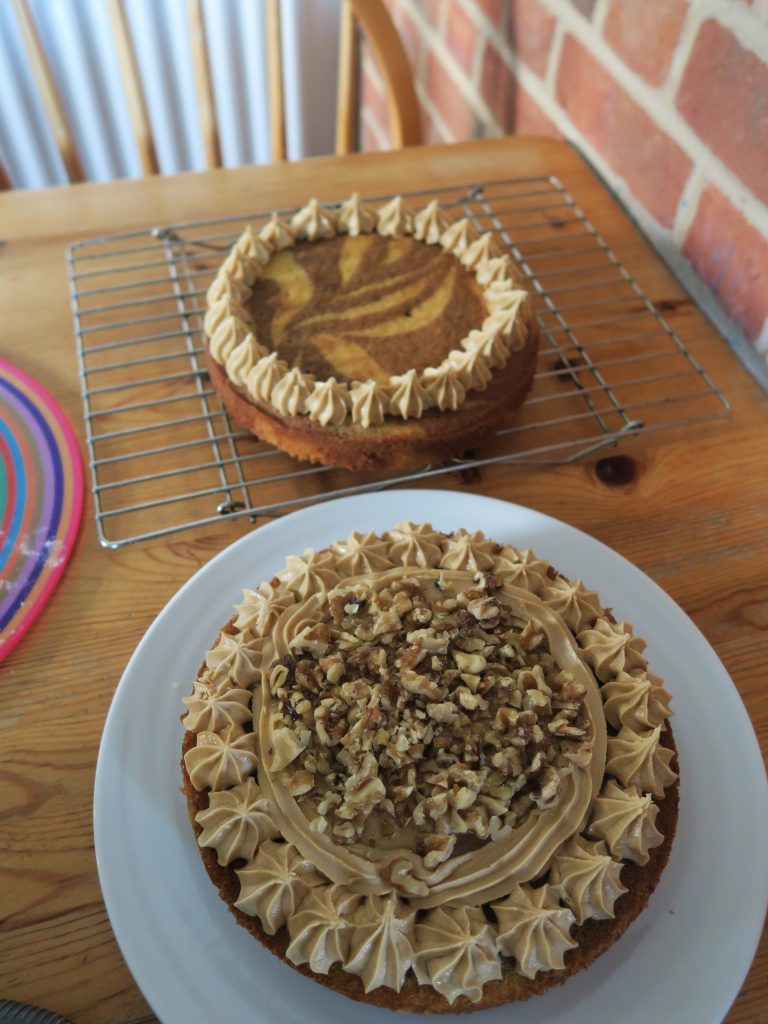
Now of course all good coffee cakes should be accompanied with walnuts, however with zebra cakes you want the mixture to be fairly smooth as you’ll be piping it. So to stop chunks of walnuts clogging up m’ nozzle I’ve added them to the filling so this has become a sort of coffee-walnut cake, but you can leave the walnuts out if you’d rather. The trick is also to just be patient. Half way through you’ll want to just go ‘what the heck’ and shove both mixes on top of each other and be done with it, but keep going and it’ll look fab!

Recipe

Serves 8

Time: 90 minutes (including baking and cooling)

Ingredients

For the cake

  • 240g Caster sugar
  • 240g Butter
  • 4 Eggs
  • 250g Self raising flour
  • 2 tsp Baking powder
  • 1 tbsp Coffee powder
  • 1 tbsp Milk
  • ½ tsp Vanilla extract

For the icing/to decorate

  • 225g Icing sugar
  • 100g Butter
  • 1 ½ tbsp Coffee
  • 1 tbsp Milk
  • A handful of Walnuts, roughly chopped

Method

  1. Pre-heat the oven to 180˚C. Grease and line two 18cm round tins with butter and baking paper.
  2. Put the butter and sugar into a bowl and beat with a wooden spoon until pale and creamy.
  3. Add the eggs one by one to the mixture, whisking in between each addition until combined. Add the flour and whisk again to make a smooth batter.
  4. Pour half the cake mixture (about 475g) into another bowl. Add the vanilla to this batch and then pour the mixture into a piping bag.
  5. Put the coffee and milk into a small bowl and stir until the coffee dissolves. Add the coffee to the other bowl of cake mixture and mix until combined. Pour the mixture into another piping bag.
  6. Pipe a blob of the vanilla mixture into the centre of each of your lined tins. Then pipe a blob of an equal size on top of the first blob. Repeat piping blobs on top of each other until all the mixture is used up.
  7. Move the tins around to make sure the mixture coats the whole of the tin (but don’t spread it around with a spatula as this will disrupt your layers!). Then bake the cakes in the oven for 15-20 minutes until risen and golden brown. A skewer inserted into the middle should come out clean.
  8. Transfer the cakes to a wire rack and leave to cool before taking them out of the tins.
  9. Meanwhile move onto the icing. Put the icing sugar and butter into a bowl and beat together until smooth and creamy.
  10. Put the coffee and milk into another small bowl and stir until dissolved. Add the coffee mix to the buttercream and mix all together until smooth. Then spoon the icing into a piping bag with a star shaped nozzle.
  11. Put one of your cakes onto your presentation plate. Then pipe blobs of the icing around the edge of the cake. Pipe icing into the middle so the cake is completely covered (you don’t have to do blobs for the middle bit, you could just pipe and then smooth it over with a knife). Scatter the chopped walnuts over the middle of the icing.
  12. Finally take your other cake and place it on top of the base with the best side facing up. Then pip a ring of icing around the edge on the top and serve!

Thanks for reading. If you try this please take a photo and send it to me, I love seeing people use my recipes! Have a great week!

Emma x


Chicken Ramen

Chicken Ramen

Ladies and gentlemen, I have flu. Like really bad flu. Like the rip your nostrils out, shove a fog horn down your throat kinda flu. So whilst I was going to do something more halloween-y for today’s post, I’ve resorted to what I’d actually want to be eating right now – this soothing bowl of chicken ramen soup. Think of this as pot noodle+. It’s pretty quick to make, and I can safely say that no matter how hung over, ill or dead you are, you will be able to make this. So if you’re like me right now and you feel like the walking dead, rustle yourself up (or find a nice person to do that bit for you) and glug down a decent bowl of this and I promise you you’ll feel a little bit better.

Recipe

Serves 2

Time: 25 minutes

Ingredients

  • 2 Chicken Breasts
  • 1L Chicken stock
  • 2 ‘Layers’ of Noodles
  • 4 Spring onions
  • 2 Handfuls of Baby spinach

Method

  1. Pre-heat the oven to 180˚C. Put the chicken breasts on a sheet of tin foil and then wrap it up around the chicken so the join of the foil is on top. Then put this in a small roasting tin and roast in the oven for 15-20 minutes until cooked all the way through (so it’s not pink inside).
  2. Put the chicken stock into a pan and heat up. (You can make this by putting 1L of water into a pan with a chicken stock cube and bringing it up to the boil.)
  3. Add the noodles and boil until they’re soft but not too floppy.
  4. Meanwhile take the spring onions and chop the tops and tails off them. Then finely slice them into little discs. Add half the spring onions to the stock, keeping the other half for later.
  5. Once the chicken is ready slice it into 1cm slices.
  6. Ladle the stock into 2 bowls. Then portion the noodles between the bowls.
  7. Top with the slices chicken breast, the rest of the spring onions, and a handful of baby spinach on each bowl. Serve!

(Note: If you don’t have an oven you can chop the chicken into chunks and then poach it in the stock until it’s cooked all the way through!)

Thanks for reading!

Emma x

Pumpkin Lasagne

Pumpkin Lasagne

Did you know that 18,000 tonnes of pumpkin is wasted in the UK every year from pumpkin carving?! That’s a lot of delicious soups, lasagnes, and roast pumpkin salads in the bin. One of my first food memories is having pumpkin soup round one of my friend’s houses when I was at pre-school, and so I have a bit of a nostalgic fondness for pumpkin and it’s definitely not a veg to throw away. It’s a bit of a bitch to cut up and prepare as they’re so flipping massive when they’re whole, but roasting them before scooping out the filling can make it bearable! On the other hand, if you’re carving out the filling for lanterns anyway problem solved. These are a great vegetarian variation of the classic lasagne and is so much easier to make than the classic as the cheese sauce is just a ricotta mixture. So don’t throw your pumpkin away this year, use it!

Recipe

Serves 4

Time: 1 hour, plus roasting time for the pumpkin

Ingredients

  • 1kg Pumpkin pieces (about 1 medium sized pumpkin)
  • 1 tbsp Olive oil
  • ¼ tsp Ground nutmeg
  • 1 tsp Dried sage leaves
  • 350g Ricotta
  • 1 Egg
  • 100g Cheddar cheese, grated, plus extra for topping
  • 8 Lasagne sheets
  • 80g Butter
  • 2 tbsp Chopped walnuts
  • 12 Fresh sage leaves

Method

  1. Pre-heat the oven to 180˚C.
  2. Cut the pumpkin into quarters and then place it on a baking tray. Drizzle with the oil and the salt and pepper. Cover with foil and then roast for 20-25 minutes until tender.
  3. Put the pumpkin into a food processor and puree. Add the sage, nutmeg, and a lot of seasoning, and pulse until the mixture is smooth. Spoon the  mixture into a bowl and set aside for later.
  4. Now make the cheesy layer. Wash out your food processor and put the ricotta, egg and cheddar cheese into a food processor with some seasoning. Whizz together until smooth.
  5. Cover the base of a 24cm oven-proof dish with a layer of lasagne sheets. Spread over half the pumpkin mix. Then top with another layer of lasagne sheets. Spread over half the ricotta mix and then repeat the same layers again. Sprinkle the top layer with some more cheddar and then bake for 20-30 minutes until golden and the edges are starting to crisp.
  6. Heat the butter, walnuts and sage leaves in a pan and heat until the butter starts to bubble.
  7. Remove the pan from the heat, spoon the walnuts and sage over the lasagne and then serve with a side salad!

Thanks for reading!

Emma x

Apple Puddle Pudding

Apple Puddle Pudding

We all get those moments where nothing can make you feel better…apart from a particular kind of food. It might be dairy milk chocolate for a break-up, mac and cheese for an essay deadline, or a whole tray of brownies for that night in when you just didn’t want to see another human being for the rest of your life – good comfort food is a really important thing in my books. So, whilst you probably shouldn’t live purely on comfort food (unfortunately) it’s always handy to have a few go-to pick-me-up recipes in your back pocket just in case you need them.

I came across the idea of apple puddle pudding in a food magazine the other day, and I thought it sounded so warming and cuddly that I thought I’d make my own version. Another way cooking de-stresses me when I’m, well, stressed, is if it’s hands on. There’s something about really getting stuck into what your making that can zone you out from all the worry and make you focus on the task in hand. And this is exactly what you do when making these dumplings. Roll your sleeves up, get stuck in, and get messy. This can turn out pretty sweet, so make sure you serve it with lots of clotted cream or vanilla ice-cream to balance it out!

(For more comforting recipes have a look at the ‘comforting’ section under ‘something that’s…’ in the top bar!)

Recipe

Serves 6

Time: 45 minutes

Ingredients

  • 75g Unsalted butter
  • 200g Light brown sugar
  • 60g Golden syrup
  • 2 tbsp Lemon juice
  • 3 Large Bramley apples (or 4 dessert apples)
  • Clotted cream to serve

For the Dumplings

  • 200g Self raising flour
  • 1 tsp Baking powder
  • Pinch of Ground cinnamon
  • 100g Cold Butter
  • 4 1/2 tbsp Milk

Method

  1. Pre-heat the oven to 180˚C.
  2. Put the butter, sugar, syrup, lemon juice, and 125ml water into a pan and bring to a simmer.
  3. Peel, core, and thinly slice the apples and then add them to the pan. Leave to cook for 10-15 minutes, stirring occasionally until they soften. Then pour the apples and the juice into an oven-proof baking dish about 20x30cm.
  4. Next make the dumplings. Put the flour, baking powder, sugar, cinnamon and salt into a large bowl and mix together.
  5. Add the butter to the mixture and rub it into the flour until the mixture resembles bread crumbs. Slowly add the milk, stirring with a round-bladed knife until the mixture starts to clump together.
  6. Use your hands to bring the dough together and then divide the dough into 12 balls. Arrange the dumplings over the apples, leaving little gaps between the balls, and then sprinkle with a little extra brown sugar.
  7. Bake the dumplings in the oven for around 25 minutes, until puffed up and golden brown. Leave to cool a little before serving with lots of cream or ice cream!

Thanks for reading!

Emma x

Blood Orange Chocolate Meringue Pie

Blood Orange Chocolate Meringue Pie

Having just moved to a new place I’m meeting loads of new people and I’m going through that classic process of making friends. The classic what’s your name? Where are you from? What subject do you do? And so on.  Then once your past the go-to questions things get a little more creative, and sooner or later things seem to move onto ‘hobbies and interests’ at which point I inevitably get asked ‘what is your favourite thing to cook?’ It’s taken a while to work out what actually is my favourite thing to cook, and, whilst I don’t have a firm fave, the best answer I have at the moment is fruity meringue pies. This is somewhat ironic as I don’t really like them, but they’re fun to make for two reasons i) they’re my Grandad’s favourite so every time we see him I make a lemon meringue pie, and ii) they involve three really fun elements to make: pastry, curd and meringue.

I normally make traditional lemon meringue pies, but as I’m not a big fan of lemons I thought I’d try making a chocolate orange variation instead. However, the general concept of a meringue pie is that the curd is really sharp and that balances the super sweet meringue, so I’ve added some lemon juice in the curd of this one, not so much for the lemon flavour but more to give the filling a sharp kick. Since I made that almond and blood orange cake a little while ago I’ve been obsessed by blood oranges, and they work so well in this! They’re a little more floral and fruity than normal oranges, so you can think of this as orange-pie-plus!

(If you’ve never made pastry before and the thought of doing so makes you tremble, check out my last post on everything you need to know about making a pastry base!)

Recipe

Serves 12

Time: 2 hours

Ingredients

For the Pastry

  • 285g Plain flour
  • 30g Cocoa powder
  • 90g Icing sugar
  • Pinch of salt
  • 225g Unsalted butter
  • 1 Large egg
  • 1 tbsp Cold water

For the Blood orange curd

  • 3 Blood oranges
  • 3 tbsp Lemon juice
  • 65g Cornflour
  • 300ml Water
  • 110g Caster sugar
  • 85g Unsalted butter
  • 4 Egg yolks

For the meringue

  • 50g Dark chocolate
  • 5 Egg whites
  • 250g Caster sugar
  • 2 tsp Cocoa powder

Method

  1. Pre-heat the oven to 180˚C. Then grease a 9 or 10 inch fluted tart tin.
  2. Put the flour, cocoa, sugar and salt into a large bowl and mix together. Add the butter and cut it up into chunks with a round bladed knife.
  3. Then go in with your fingers and rub the butter into the flour to make a bread-crumb texture.
  4. Add the egg yolk and the vanilla to the mixture and then mix everything together with a round bladed knife until a ball forms. (You might need to go in with your hands again and squish the dough into a ball).
  5. Wrap the dough in cling film and then leave it to chill in the fridge for at least an hour.
  6. Lightly flour a surface and turn the dough out onto it. Roll the pastry into a circle at least 12inch in diameter. Flip the pastry into the tart case and then gently ease it into the flutes of the tin. Then use a rolling pin to trim off the excess by rolling it over the edge. Chill in the fridge for another 30 minutes.
  7. Line the pastry case with baking paper and baking beans. The easiest way to do this is to scrunch up a square of baking paper and then un-crumple it – this will make it super easy to line the tin with!
  8. Put the base in the oven and bake for roughly 15 minutes, until the base is cooked through but not necessarily crisp. Then take the case out of the oven, remove the beans and bake for another 5-10 minutes, until crisp.
  9. Next make the curd. Put the zest and the juice of the blood oranges into a heatproof bowl. Add the lemon juice, cornflour and mix together to form a paste.
  10. Put the water into a pan and bring to the boil. Then pour the hot water over the orange mixture, stirring constantly. When combined pour the mixture back into the pan and place over a medium heat. Stir constantly until the mixture starts to thicken. Then leave to boil for a minute.
  11. Take the mixture off the heat and stir in the sugar, butter and the egg yolks. Set aside until needed.
  12. When the pastry case is ready, pour the curd into the case and smooth over with a spatula . Lower the oven temperature to 140˚C.
  13. Now make the meringue. Put the chocolate into a heatproof bowl over a pan over simmering water (make sure the bottom of the bowl doesn’t touch the water!). Melt gently and then take the bowl off the heat and leave to cool a little.
  14. Next clean a metal or glass bowl and some electric beakers with hot soapy water. (You need them to be really clean so that the meringue will hold its shape).
  15. Put the egg whites into the clean, dry bowl and whisk until soft peaks form.
  16. Slowly add the sugar, one tbsp at a time, whisking constantly until stiff peaks form.
  17. Stir together the cocoa powder and the melted chocolate and fold it into the meringue to get a swirl effect.
  18. Spoon the mixture into a piping bag with a star shaped nozzle and then pipe swirls over the curd (or just dollop the meringue on top if you don’t want to pipe).
  19. Put the whole thing back in the oven for 10-15 minutes until it’s crisp but not brown. Then leave to cool slightly in the oven before serving!

Thanks for reading!

Emma x