Author: Emma Hawkins

Cookie Dough Cake

Cookie Dough Cake

So I’m officially in my 20s and the wide road of young adulthood lies before me yada yada yada. I’m starting to realise that no matter how old you get you still have no idea what’s going on – you just learn to ride the sinking boat a little better than before. But at least we’re all on that boat together and there are life savers like cookie dough and cake to keep us going. I’m talking cookie dough, in a cake, in cookie dough with cookies on it!!

So here I am, a slightly confused 20 year old with a big pile of cookie dough cake in m’ kitchen and another year of comfort cookery to come. In the meantime I still have 3/4 of this whopping cake so if anyone local wants some hmu!

 Recipe

Serves 12-16

Time: 3 hours

Ingredients

For the cookie dough

  • 75g Butter
  • 20g Brown sugar
  • 25g Caster sugar
  • 1.5 tbsp Milk
  • 65g Plain flour
  • ¼ tsp Salt
  • 1 tsp Vanilla bean paste
  • 20g Milk chocolate chips
  • 20g Dark chocolate chips

For the cake

  • 200g Butter
  • 430g Caster sugar
  • 3 Large eggs
  • 120g Greek yogurt
  • 220ml Whole milk
  • 1 tsp Vanilla bean paste
  • 420g Plain flour
  • 2 tsp Baking powder
  • 1 tsp Salt
  • 175g Milk chocolate chips

For the buttercream

  • 300g Butter
  • 105g Brown sugar
  • 975g Icing sugar
  • 200g Plain flour
  • 8 tbsp Milk
  • 2 tsp Vanilla bean paste

To decorate

  • 100g Dark chocolate
  • 100g Double cream
  • Small cookies to decorate

Method

  1. Begin by making the cookie dough. Put the butter and sugars into a bowl and cream together until pale and creamy. Add the milk and vanilla and mix until combined. Then add the flour, salt and chocolate chips. Stir to make a smooth dough.
  2. Take the dough and split it into 12 balls. Then chill the balls in the fridge for 2 hours (or in the freezer for 1 hour).
  3. Now start the cake. Pre-heat the oven to 180˚C and grease and line 3x 7.5inch cake tins with butter and baking paper.
  4. In a large bowl mix together the butter and sugar with a wooden spoon until pale and creamy. Whisk in one egg at a time, then whisk in the yogurt. Next whisk in the milk and vanilla, followed by the flour, baking powder and salt. Finally fold in the chocolate chips to make a smooth batter.
  5. Evenly divide the mixture between the lined tins and spread them out to make an even layer. Take the cookie dough balls out of the fridge and squash them to make ‘patties’. Then put 4 bits of cookie dough in each tin, pressing them down slightly so they’re covered in cake mix.
  6. Bake the cakes in the oven for 25-30 minutes until a skewer inserted into the middle comes out clean. Let the cakes cool down for 30 minutes and then turn them out onto a wire rack to cool completely.
  7. Meanwhile make the buttercream. Put the butter and brown sugar into a bowl and beat together with a wooden spoon until smooth. Add the icing sugar and flour and mix again until smooth.
  8. Slowly add the milk and vanilla to the mixture, beating constantly with a spoon to make a smooth icing.
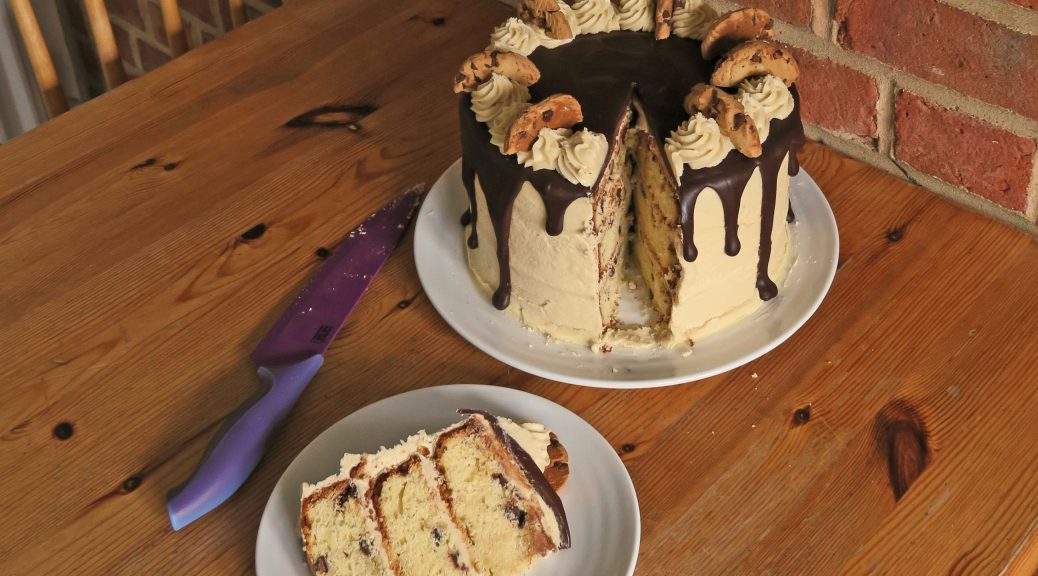
  9. When the cakes are completely cool you’re ready to start assembling. Put one of the cakes onto a board or plate and then spread 1-2 tbsp on top. Layer another cake on top and repeat with icing and cake layers.
  10. Once stacked blob half the remaining icing on top of the cake and use a palette knife to work it around the sides of the cake. This is your crumb coat so you want it to be smooth but don’t worry if you can still see the cake as you’ll put another layer on it later. Leave in the fridge for at least 1 hour to set.
  11. Take the cake out of the fridge and blob the rest of the icing on the top. Again, gently smooth the icing round the side of the cake to make a smooth finish. Leave in the fridge until needed.
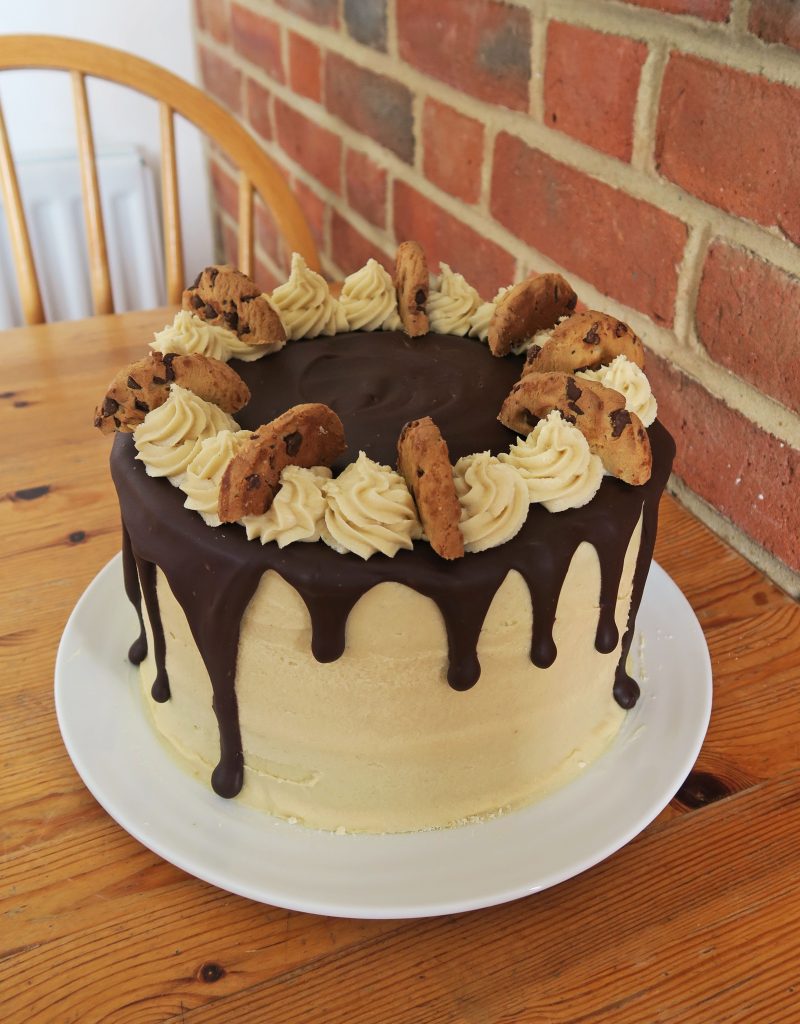
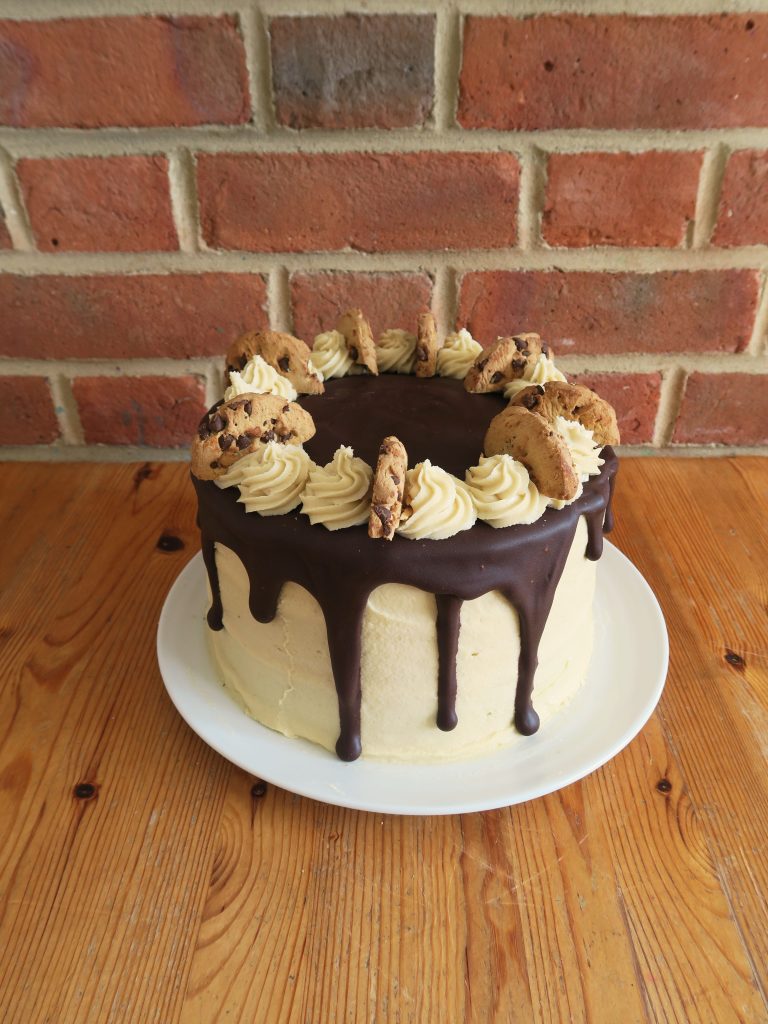
  12. Now make the chocolate drips for the decoration. Finely chop the chocolate and put it into a heat-proof bowl. Then heat the cream in a small saucepan until just about to boil.
  13. Pour the hot cream onto chopped chocolate and stir to make a smooth ganache. Leave to cool until pourable but not hot.
  14. Pour the ganache over the top of the cake and use a spatula to gently push it over the side of the cake to make drips. Pipe extra icing in rosettes on the top of the cake. Then cut the cookies in half and place them around the edge of the cake and serve!

Thanks for reading!

Emma x


Blueberry and Pistachio Scones

Blueberry and Pistachio Scones

Happy Mother’s Day! Today’s the day to look to our mothers and take a moment to realise how lucky we are to have them in our lives. It can be a very hard day for some – those who have lost their mums, have a difficult relationship with their mums, or may even be struggling to have children themselves.  But if that’s the case maybe take the time today to remember those who are there for you. Think of the motherly figure in your life and take a second to thank them for all they’ve done for you!

As the photo shows above, before I took to the whisk my Mum was the one cooking in the wooden-tabled-kitchen you see in all my photos. One of the many things my Mum’s done for me is introduce me to the world of cooking and set me off on the path I’m on now. As long as I can remember I’ve been sat in the kitchen at my Mother’s side, cracking eggs, sifting flour and cutting out biscuits, and I’m so grateful for it! Something that I’m still working towards is to make scones as light and scrumptious as the ones she makes. They’re always beautifully risen, golden brown and seem to come out the oven just when you need them.

For me nothing beats a good scone with lots of jam and cream and nothing makes me feel more at home than the smell of freshly baked scones just out of the oven, but I think adding some delish blueberries and pistachios into the mix makes them a little bit special for a day like today. You could also try adding strawberries, blackberries or even try playing around with different nuts if you want to work with what’s in season!

Recipe

Makes 14

Time: 1 hour

Ingredients

  • 370g Self Raising flour
  • 1 tsp Baking powder
  • 40g Caster sugar
  • Zest of 1 Lemon
  • 80g Butter
  • 150g Blueberries
  • 60g Pistachios, shelled
  • 100ml Full fat milk
  • 2 Large eggs, plus 1 for glazing

Method

  1. Pre-heat the oven to 180˚C and line a couple of baking trays with baking paper.
  2. Put the flour, baking powder, sugar and lemon zest into a bowl and mix together to combine.
  3. Add the butter to the dry ingredients and rub the butter into the flour until fully combined (the mixture should look a little like breadcrumbs).
  4. Coarsely chop the pistachios on a board and then add it to the scone mixture. Then add the blueberries and stir them into the mixture.
  5. In another bowl mix the milk and eggs and then pour this mixture into the main bowl. Mix everything together with a round-bladed knife to make a soft dough.
  6. Lightly flour your work top and turn the dough out onto it. Gently roll the dough out to about 2.5cm thick and then cut out scones using a 4cm wide cookie cutter.
  7. Break the egg into a small bowl and beat it with a fork. Then brush the beaten egg over the top of the scones to glaze.
  8. Bake the scones in the oven for 15-20 minutes until golden and with a firm top. Serve with jam and clotted cream!

Thanks for reading!

Emma x

Hazelnut Mocha Bread

Hazelnut Mocha Bread

I’m just going to pause for a moment and soak up the beauty that is this eight-strand plaited hazelnut mocha bread (yes it’s a mouthful of a name but it’s worth it!)….. OK…. onto where we are this week. In the words of The Beatles ‘when I find myself in times of trouble’ bread is there to comfort me. Everything’s a little crazy at the moment, I’m not entirely sure which way is up and I’m just diving head first into I don’t quite know what. But hey. Get some bread dough in between your fingers, smell it baking in the oven, taste the freshness on your tongue and it’s just about bearable.

One thing great about bread is that it’s a very forgiving medium. Unlike pastry it’s hard to over work bread dough and so as long as the bake is right it’s (relatively) easy to get a warm fresh loaf on the table with ease. The first few times I made bread it was generally more effective as a garden rock than as an edible delicacy, but once I got the hang of kneading and proving everything fell into place. Not to mention how satisfying it is when the loaf comes out of the oven warm, a gorgeous shade of brown and 100% homemade. Call me dramatic but there’s a level of love and comfort poured into a homemade loaf of bread that you just don’t get from shop bought ones.

So if you’re ever bored, angry, frustrated or restless bread is the thing you need to be making. Pummel all your feelings onto the dough, stuff it with luscious flavours and it’ll rise into a beautiful cradle of comfort!

Recipe

Makes 1 loaf

Time: 2 hours, plus proving and baking time

Ingredients

For the dough

  • 650g Strong white bread flour
  • 12g Salt
  • 14g Dried yeast
  • 35g Unsalted butter
  • 400ml Water
  • 3 tbsp Coffee granules
  • 1 Small egg

For the filling

  • 4 tbsp Nutella
  • A Few handfuls of chopped hazelnuts

Method

  1. Put the flour, salt, yeast and butter into a large bowl. Make sure to put the yeast and salt on different sides of the bowl as the salt could de-activate the yeast.
  2. Bring 1/4 of the water to the boil in a pan or kettle and then add and leave the coffee to dissolve in it. Top the coffee solution with the rest of the cold water, then add 2/3 of it to the dry ingredients and stir to make a loose dough. Add the rest of the coffee mix and then bring together with your hands into a ball.
  3. Turn the dough out onto a table and knead for 5-10 minutes until smooth and stretchy. Put the dough back into a clean bowl, cover with cling film and leave to rise for 1-2 hours until doubled in size.
  4. Once risen take the dough out of the bowl and knead for a couple of seconds to knock the air out. Then split the dough into 4. Roll each piece of dough out into a rectangle 40cm x 30cm.
  5. Spread the ¼ of the Nutella over each bread sheet. Then sprinkle over the chopped hazelnuts. Roll up each bit of dough long edge to long edge to make tight rolls. Then halve each roll to make 8 strands.
  6. Now comes the plaiting. Lay the strands out on a large surface and group the ends together at the side furthest away from you on the table. Now number the strands in your head 1-8, working left to right. Every time you plait the numbers will re-jig so that it’s still 1-8 left to right.
  7. Now start plaiting through the sequence. First take 8 under 7 and then over 1. Then repeat the following steps until the plait is finished:
    • Take 8 over 5.
    • Take 2 under 3 and over 8
    • Take 1 over 4
    • Take 7 under 6 and over 1.
  1. It’s going to be a little complicated, but keep going and it’ll be fine! Once finished tuck the end of the plait under itself to fuse it. Then transfer it to a line baking tray. Cover loosely with cling film and prove for another hour or so to double in size.
  2. Pre-heat the oven to 180˚C. Beat the egg in a small bowl with a fork and then brush over the loaf to glaze. Bake in the oven for  50 minutes – 1 hour until golden brown and cooked through. If it starts to burn on top cover with tin foil and keep it in the oven. Leave to cool a little before serving!

Thanks for reading!

Emma x

Halloumi and Parma Ham Salad with a Peach Coulis Dressing

Halloumi and Parma Ham Salad with a Peach Coulis Dressing

I admit to writing this a little jet lagged and sleep-deprived as I’ve just got back from a trip to the Austrian Alps with my Mum. After a week of stunning snow and sun it’s a surprise to see that the weather here is just as gorgeous as it is over there! The sun is shining, the sky is the lushest blue and all I want to eat right now is lots of salads (weird right?). I’ve always been more of a comfort food kind of girl than a healthy one, but I’m now trying to fuse the two by making tasty salads. I’ve found that the best way to do this is to accessorise a base of leaves with any meats, cheeses and fruits that appeal, and hey presto – delicious healthy salads!

Recipe

Serves 2

Time: 10 minutes

Ingredients

  • 225g Halloumi
  • 3 Ripe peaches
  • 1 tbsp Olive oil
  • 1 tbsp Lemon juice
  • Salt and Pepper
  • A couple of handfuls of Bagged salad
  • 4 slices of Parma ham

Method

  1. Put a frying pan over a medium heat. Slice the halloumi into slices roughly 1cm wide. Place in the pan and fry for 30-60 seconds on each side until starting to go golden brown. Set to one side until needed.
  2. Cut the peaches in half and de-stone them. De-skin one of the peaches and put it into a small bowl. Use a hand blender to make it into a puree. Add the oil and lemon juice and pulse again to make a smooth dressing.
  3. To plate up scatter the salad leaves over two plates. Then slice the each peach into 8 and scatter the slices around the plate. Then arrange the halloumi and the parma ham around he plate. Finish with a drizzle of the peach dressing and serve!

Thanks for reading!

Emma x

Plum and Amaretto traybake

Plum and Amaretto traybake

There’s this weird tradition in Oxford (and Cambridge) where once someone’s finished their end of year exams they get ‘trashed’ – aka they get pelted with whatever their friends can find at the local Tescos. Being Oxford based my whole life I’ve seen numbers of students crawling onto the high street covered in shaving foam, silly string and paint, but it wasn’t until the past few weeks that I got to do some trashing of my own. After a slightly surreal shopping trip we arrived at exam schools, belted up with prosseco, honey, ketchup, party poppers and confetti, ready to celebrate the freedom of some of our friends from the clutches of revision! This was the result… (RIP Nik’s sub fusc)…

Afterwards came the jumping into the river, the crash back to reality, and then a growing chorus of ‘food?’ being passed around. That’s where this fab amaretto plum cake came in. At uni I didn’t have the chance to bake as much as I would have liked as I was short on time, ingredients and equipment, so since coming home I’ve been going a little crazy in the kitchen and have been making way more than I can feasibly eat. Therefore when I headed back up to uni I thought something like this tray bake would be the perfect thing to share with lots of de-stressed students – and it was!

Recipe

Serves 16

Time: 1 hour

Ingredients

  • 200g Butter
  • 200g Caster sugar
  • 4 Eggs
  • ½ tsp Almond extract
  • 180g Self-raising flour
  • 85g Ground almonds
  • ½ tsp Baking powder
  • 100ml Milk
  • 2 tbsp Amaretto (optional)
  • 3 Plums

Method

  1. Pre-heat the oven to 180˚C. Line a roughly 20 x 15cm cake tin with butter and baking paper.
  2. Put the butter and sugar into a bowl and beat together with a wooden spoon until pale and creamy.
  3. Add the eggs one by one and whisk them in. Then add the almond extract, flour, ground almonds and baking powder. Then add the milk and amaretto, and whisk it all  together to make a smooth batter. Pour the mixture into the lined tin and smooth it over so it evenly fills the tin.
  4. De-stone and then cut the plums into 1/8s. Then scatter them over the top of the cake, pressing them into the mixture a little. Bake in the oven for 20-25 minutes until risen and golden brown.
  5. Leave to cool and then cut into 16 squares.

Thanks for reading!

Emma x