Author: Emma Hawkins

Mixed Berry Clafoutis

Mixed Berry Clafoutis

When I was in Canada over the summer we were lucky enough to spend a day with a couple of my Mum’s friends at their lake-side house in depths of British Columbia. It was a stunning place – really hot, gorgeously sunny and beautifully peaceful.

Image may contain: sky, outdoor and nature

For dinner that evening we had a really good blueberry clafoutis for dessert. The end result was a really interesting texture, kinda unlike anything I’ve eaten before. It’s a cross between a set custard and a light sponge cake, so it’s creamy, sweet and fluffy all at the same time – but it somehow really works! I’d heard of clafoutis as a thing but I’d never eaten one, which is really odd as they’re so easy and quick to make! As the ingredients are very basic and are also really easy to substitute for, even in the depths of Canada, a boat ride away from the nearest town, something as tasty as this could be rustled up.

Here I’ve used fresh summer fruit as it’s that time of year when it tastes really good and is readily available, but you can use pretty much any fruit for this. It’s an especially good thing to whip up if you have any soft fruit that needs eating up (e.g plums, peaches, berries and so on). Just bung them in the dish, pour over the all-in-one batter mix and voila!

Recipe

Serves 6

Time: 10 minutes prep, 25-30 minutes cooking

Ingredients

  • 80g Plain flour
  • ½ tsp Baking powder
  • 100g Golden caster sugar, plus extra for sprinkling
  • 2 Large eggs
  • 2 Large egg yolks
  • 260ml Double cream
  • 1 tbsp Vanilla bean paste
  • Butter for greasing
  • A handful each of strawberries, blueberries and raspberries (or any other soft fruit you like)

Method

  1. Pre-heat the oven to 180˚C.
  2. Put the flour, baking powder, sugar, eggs, egg yolks, cream and vanilla into a bowl and whisk until fully combined.
  3. Take a medium sized oven-proof dish and grease it with a little butter. Then sprinkle over some sugar to line the dish.
  4. Hull and quarter the strawberries. Then scatter these strawberries, along with the blueberries and raspberries into the greased dish.
  5. Pour over the batter mix and then bake in the oven for 25-30 minutes, until golden brown and slightly puffed up.
  6. Serve slightly warm with icecream!

Thanks for reading!

Emma x

Sticky Toffee Puddings

Sticky Toffee Puddings

Generally speaking I love complicated, fancy food. I love how weird and wacky it can sound on paper, or look on the plate, and yet how incredibly tasty it can be. But I have to admit that nothing beats the classics – I mean they’re classics for a reason. In this case I don’t think I’ve ever had a sticky toffee pudding I haven’t liked. Whatever the texture, whatever the ingredients, as long as it’s true to the name and is sweet and sticky you’re on to a winner!

These ones are particularly light a fluffy as they’re made with a classic sponge mix and are then steamed, but the date puree in the mix also makes them really squidgy and sweet. The toffee sauce put on the top then adds even more sticky moistness, with a bit of a bitter flavour to really complement the sponge! They’re also really good with ball of fresh vanilla ice cream and  this will cut through the sweetness and also provides a great temperature balance to the warm sponge!

Recipe

Serves 8

Time: 1 hour

Ingredients

  • 130g Chopped dried dates
  • 130ml Water
  • 130g Unsalted butter, plus extra for greasing
  • 125g Caster sugar
  • 3 Large eggs
  • 180g Self raising flour
  • 1 tsp Baking powder

For the toffee sauce

  • 300ml Double cream
  • 125g Light brown sugar
  • 50g Unsalted butter

Method

  1. Pre-heat the oven to 180˚C. Then grease 8 small pudding basins with butter.
  2. Put the dates and water into a small saucepan and leave to gently simmer over a medium heat until soft (about 5 minutes). Blend the mix to a puree and set to one side.
  3. Put the butter and sugar into a bowl and beat until smooth. Add the eggs and whisk together. Then add the flour, baking powder, and date puree until smooth.
  4. Distribute the mixture between the basins and put them into a deep roasting tin. Fill the tin with boiling water so it comes half way up the side of the basins. Cover the tin with foil and then put in the oven to bake/steam for 40 minutes.
  5. Meanwhile make the toffee sauce. Put half the cream, the sugar and the butter into a small saucepan and bring to the boil whilst stirring. Once the sugar is dissolved and the butter has melted, leave the mixture to boil gently until it becomes a deep amber colour.
  6. Then take the caramel off the heat and add the rest of the cream. Stir together and then keep warm until needed.
  7. When the puddings are ready (a skewer will come out clean when inserted into the middle), turn them out of their moulds onto plates. Serve with the toffee sauce and ice cream!

Thanks for reading!

Emma x

Mini Hazelnut, Cherry, and Chocolate Pavlovas

Mini Hazelnut, Cherry, and Chocolate Pavlovas

My main issue with cooking, besides the endless washing up, is that I constantly have leftovers in pots around the kitchen. Consequentially, what I cook next is often influenced by what’s leftover, which doesn’t make for very interesting blog posts. In particular I always seem to end up with spare egg whites floating around which I feel compelled to do something with on the same day they’re separated, before they go off or become too runny. When I was making the ice cream for my hazelnut cake post (I made these a long time ago, I haven’t kept the egg whites in m’ fridge for all this time!) I had some egg whites leftover so I decided to whip them up into some hazelnut meringue nests to work with.

Luckily meringues last for a good while in a solid air-tight tin, so once I’d made them I could tuck them away until I’d worked out what to do with them. So when I realised we had some whipped cream and poached cherries in the fridge I had my answer – mini hazelnut, cherry and chocolate pavalovas. These are perfect little desserts which can be prepped well in advance, and then put together at the last minute. You can also switch in any kind of soft fruit you like to fit the seasonal fruits available.

(Meringues are kinda my default go-to for leftover egg whites, but I’ve got a list of other ways to use them up at the end of my chocolate fondants post if you’re interested!)

Recipe

Serves 6

Time: 1 hour, plus baking

Ingredients

For the Daquoise

  • 100g Chopped hazelnuts
  • 100g Caster sugar
  • 9g Cornflour
  • 2 Large egg whites
  • Pinch salt

For the Cherries

  • 200g Frozen cherries
  • 4 tbsp Kirsch
  • 1 tbsp Caster sugar
  • 2 tsp Ground cinnamon

For the Filling

  • 300ml Whipping cream
  • 1 tbsp Vanilla bean paste

To Decorate

  • 100g Dark chocolate
  • A few sprigs of mint

Method

  1. Pre-heat the oven to 180˚C.
  2. Begin by making the daquoise. Put the hazelnuts into a small roasting tin and roast in the oven for 5-10 minutes, until just starting to colour. (This is an important step as it’ll massively increase the flavour of the nuts).
  3. Leave to cool and then mix with 75g of the sugar and the cornflour. Set to one side for later.
  4. Lower the oven temperature to 150˚C for the meringues. Line 2 baking trays with baking paper. Take a round object with a diameter of roughly 5cm and draw round it onto the sheets of baking paper to act as a guide for piping later. You should get about 3 onto each sheet. Turn these sheets over so that the pencil line is on the other side of the paper to that which you’ll pipe on.
  5. Take a super clean metal or glass bowl and put the egg whites into it.
  6. Add the salt and then whisk with an electric hand whisk (or a stand-free mixer) until it forms soft peaks (can just hold it’s shape).
  7. Continue whisking and add the other 125g caster sugar, one 1 tbsp at a time until it’s all incorporated.
  8. Keep whisking until the mixture becomes glossy and forms a stiff peak.
  9. Then take a large, stiff spatula and gently fold the hazelnuts into the meringue. From here you’ll need to work quickly as the oils in the nuts will start to deflate the meringue.
  10. Take a piping bag with a round nozzle and fill it with the meringue. Then pipe onto the lined baking trays. Start at the middle of one of your circles and when you get to the edge pipe upwards in a circle round the edge to build the meringues into little nests. Do the same for each circle.
  11. Bake in the oven for about 40 minutes, until crisp to the touch but not starting to brown. Then turn the oven off and leave the meringues to cool in the ovens.
  12. Now prep the filling. Put the cherries into a pan and heat gently until they simmer in their juice and are soft. Then add the kirsch, sugar and cinnamon. Stir to combine and then leave to simmer for 10 minutes.  Remove the cherries from the heat and leave to cool in the juices.
  13. Then take 3/4 of the chocolate and melt it in a heatproof bowl over a pan of simmering water. Take a pastry/paintbrush and paint the inside of the meringues with it. This will add some flavour and will also stop the cream from making the meringue soggy. Leave to set.
  14. Meanwhile make the cream filling. Put the whipping cream and vanilla into a bowl and whisk until it just holds its shape.
  15. When the chocolate is set spoon the cream into the meringues. Take the cherries and scoop them out of the juice – save this juice for later! Dry the cherries slightly on some kitchen roll and then distribute them between the meringues, about 3 on each.
  16. Take a vegetable peeler and run it along the edge of the rest of the chocolate over the meringues to get little sprinkles on them. Garnish with fresh mint and serve with the rest of the cherry juice!

Thanks for reading!

Emma x

Spiced Lamb on a Flatbread with Lime Leaf Rice and a Sweet Potato Samosa

Spiced Lamb on a Flatbread with Lime Leaf Rice and a Sweet Potato Samosa

The other day I went up to London for the day to see a couple of shows at the theatre as a very belated 18th birthday present from my parents. Whilst waiting for the evening show at the Young Vic, ‘The Inheritance’  – which for the record is incredible, it’s sold out now but if it’s put on again go and see it! – we went to the restaurant/bar ‘The Cut’ next to it and had some incredible Greek mezes. We had a baked aubergine thing, some broccoli and cauliflower falafels and, my favourite, a flatbread toped with spiced mince lamb and a tangy, spiced yoghurt. As always, this inspired me to interpret it into a dish thing.

I’ve also had this incredible samosa recipe up my sleeve from back when I used to do cookery competitions, made with sweet potato and filo pastry. I made them again the other day and they taste sooooo insanely good, but I wasn’t really happy with the duck dish I originally put them in.  So instead I decided to weave a bit of Greek-Indian fusion into this one and pair them with the lamb which works really well.

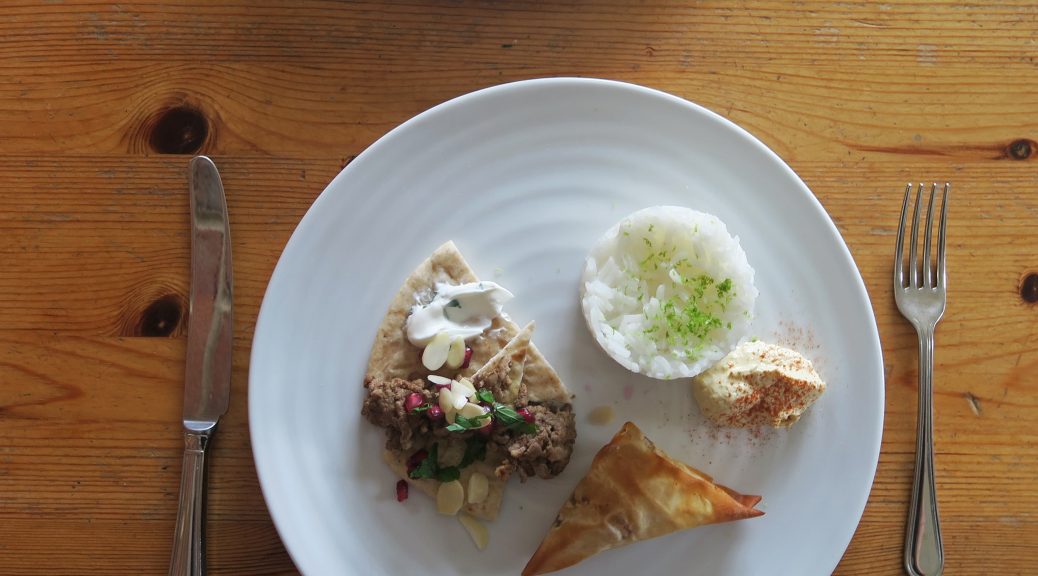
So on the plate there’s a slightly spicy sweet potato samosa with a tangy fragrant lime leaf rice, which act as the Indian aspects of the dish. By cooking the rice with fresh lime leaves in the water it takes on a refreshing, citrus flavour which works really well with the rest of the aromatic spices on the plate. The lamb is cooked in a delicious spice blend called ras el hanout, which pairs really well with the zingy mint yoghurt and sweet bursts of pomegranate. Finally, the humus acts as the sauce, giving everything a little moistness and a sharp tang to accompany the aromats, and sprinkling it with a little paprika on the plate gives a touch of heat to the whole thing. I’ve served it all up here to make it a plated meal, but you could easily serve everything in little tapas-style bowls or dishes so people can help themselves!

Recipe

Serves 4

Time: 1 1/2 hours

Ingredients

For the Samosas

  • 2 Small shallots
  • 1 Garlic clove
  • 1 tbsp Olive oil
  • 2cm Root ginger
  • 1 Spring onion
  • 1/2 Small chilli (as hot or a mild a variety as you like)
  • 2 Small sweet potatoes, chopped into small chunks
  • 50g Frozen peas
  • 1 Sheet of filo pastry
  • 60g Unsalted butter

To Serve

  • 200g Jasmin rice
  • 2 Fresh lime leaves
  • 1 tbsp Olive oil
  • 400g Minced Lamb
  • 2 tbsp Ras el hanout (a spice)
  • 2 Chapatis (or other type of flat bread)
  • 100g Greek yoghurt
  • A handful of Fresh mint
  • A sprinkle of Flaked almonds
  • A handful of Pomegranate seeds
  • Zest of 1 Lime
  • 4 tbsp Hummus
  • 1 tsp Paprika

Method

  1. Pre-heat the oven to 180˚C. Then line a baking tray with greaseproof paper and set to one side.
  2. Then begin by making the samosas. Peel and finely chop the shallots and garlic. Put the oil into a pan and put over a medium heat. Add the shallots and garlic and fry gently until they begin to caramelise.
  3. Peel and grate the ginger and then finely chop the spring onion and chilli. Add these to the onion mix and continue to fry for another 2-3 minutes.
  4. Peel and roughly chop the sweet potato into small chunks, and then add this to the mix. Cover the pan with a lid and lower the heat. Leave to gently simmer for about 15 minutes, until the potato begins to soften.
  5. Add the peas and ½ of the butter to the mix, stir to combine and then leave uncovered to cool a little whilst you prep the pastry.
  6. Put the remaining butter into a small pan and leave to melt over a low heat.
  7. Lay out one of the sheets of filo on your worktop and cut it into a long rectangle of width about 8cm. Cover the rest of the filo you’re not using at any one time as it will dry out very quickly.
  8. Brush the filo strip with the melted butter. Spoon a little of the sweet potato filling into the corner of one short end of the filo. Fold the corner of the filo over to make a triangle shape. Then fold the pastry up into another triangle. Continue this process up the filo sheet until you get to the top, (there’s a photo at the top of the if you want to see the folding process being done).
  9. Repeat with the rest of the filo pastry and filling. Put the samosas onto the lined baking tray and brush with more of the melted butter. Put into the oven and bake for 10-15 minutes until golden brown. Then keep warm until everything else is ready.
  10. Meanwhile put a pan filled with water over a high heat for the rice. Once boiling add the rice, lime leaves and a good pinch of salt. Stir to break up the rice and then leave to boil until just soft.
  11. Meanwhile move onto the lamb. Put the oil into a pan and put over a medium heat. Add the lamb and then fry gently until it’s brown all over.  Use a wooden spoon to turn the meat over and break it up into small bits. Add the rasel hanout and continue to fry for another 3-4 minutes to cook the spice. Turn off the heat and cover to keep warm.
  12. Then put the chapatis onto a lined baking tray and put into the oven with the samosas to warm up.
  13. Now prep the yoghurt. Scrunch the mint into a ball and then finely chop it. Add it to the yoghurt and stir to combine. Set to one side for now.
  14. When the rice is ready drain it and leave in a pan with a lid on to keep warm.
  15. When everything’s ready start to plate up. Chop the flatbreads into triangles and put two on each plate. Spoon a little of the yoghurt onto each flatbread and then top with the minced lamb.
  16. Spoon the rice into a little mound next to the flatbreads and grate a little of the lime zest over it. Take a samosa and put it next to the other elements. Then spoon a little of the hummus around the plate, sprinkle with the paprika, flaked almonds and pomegranate, and serve!

Thanks for reading!

Emma x

Sweet Potato Gnocchi with Homemade Passata

Sweet Potato Gnocchi with Homemade Passata

The first time I had gnocchi was in Sorrento in Italy and it was one of the most delicious things I’ve ever eaten. We were in a very Italian restaurant in the middle of the town, with red chequered table cloths and plastic tables, and as the Italians eat a lot later than we do we were the only ones in there at the time. I remember being served this very simple-looking bowl of potato dumplings with a basic tomato sauce and a little sprinkle of parmesan, so it didn’t look like much, but the taste of it was just perfection in a bowl.

Every time I go back to Italy now I always order gnocchi, and it never fails to impress. Not to mention the incredible passata (aka tomato sauce) they can make over there to go with it. If you’ve been following my other posts you’ll know by now I’m obsessed with Italian tomatoes. Apparently the volcanic soil makes them super good, and it’s really true! Whilst we don’t have tomatoes like that here, I find that a way of making the most of what we do have is to make your own homemade tomato passata, which will always taste so much better than the ones you buy in shops.

It’s a bit weird that it’s taken me this long to get round to making my own gnocchi, especially as it’s a lot easier than you’d think to make and it’s really tasty. These are slightly different to the traditional as they’re made with sweet potato, which makes them slightly heavier than the normal potato gnocchi, but it also gives them a really rich, sweet flavour, which works really well with the sauce! This recipe makes quite a lot of gnocchi, so if you can’t get through it all in one sitting you can blanch it (as in step 6) and then put it in an airtight pot in the fridge for up to 48 hours before carrying on and frying it.

Recipe

Serves 6

Time: 1 hour

Ingredients

  • 2 Medium sized Sweet potatoes (about 500g)
  • A sprinkle of Salt
  • 300g Pasta flour (plus extra for dusting)
  • 50g Unsalted butter

For the Passata:

  • 1 Small white onion
  • 2 Garlic cloves
  • 1 tbsp Olive oil
  • 8 Beef tomatoes
  • 3 tbsp Sundried tomato paste
  • 2 tsp Mixed herbs

To serve:

  • 2 Balls of Mozerella
  • 4 Handfuls of Baby spinach
  • A few leaves of Basil

Method

  1. Pre-heat the oven to 180˚C.
  2. Put the potatoes onto a baking tray and sprinkle over the salt. Leave to roast in the oven for about an hour until soft. Cut in half and then leave to cool.
  3. Once cool enough to handle, scoop the flesh out of the potatoes with a spoon. (The skins aren’t used in this recipe, but keep them as they’re great for making crispy, stuffed potato skins!)
  4. Mash the potato flesh with a fork so it becomes smooth. Season with a little salt and pepper and then slowly add the flour, squeezing he dough with your hands to make a pliable dough.
  5. Divide the dough in half and roll each half into a thin sausage, about 60cm long. Cut the lengths into little pillow shapes about 2cm wide.
  6. Bring a pan of water to the boil. Drop the gnocci into the water and boil for a couple of minutes to blanch them. Normal potato gnocchi will rise to the surface when ready, but these are a little heavier so they might not. Scoop the gnocchi out of the water and place on a plate to cool.
  7. Now make the passata. Peel and finely chop the onion and garlic. Put the oil into a pan and heat gently. Add the chopped onion and garlic and fry, stirring occasionally, for a few minutes until the mixture starts to caramelise.
  8. Then chop the beef tomatoes into chunks and add them to the onions. Stir in the sundried tomato paste, mixed herbs and a little salt and pepper to season. Then leave to simmer on a medium heat for about 15 minutes, until the tomatoes have gone mushy and the mixture has begun to reduce down.
  9. You can leave your passata like this, but if you’d prefer it to be smooth take a hand-blender and puree the passata to make a smooth sauce. Taste again and season the sauce if needed. Then keep warm until the gnocchi is ready.
  10. Put the butter into a large frying pan and leave to melt. Then add the gnocchi and fry for 2-3 minutes. When one side is golden brown flip them over and cook on the other side. Once all the gnocchi have become crispy and golden-brown all over, transfer them to a plate and then serve with the passata, mozerella, baby spinach and a handful of fresh basil.

Thanks for reading!

Emma x