Tag: Comfort

Chocolate Fondants

Chocolate Fondants

Be ready for a long post – these are amazing and I have a lot to say about them! I first made these fondants for a cookery competition 6 years ago, and I’ve been regularly making them ever since. There’s something highly addictive about the taste-texture combination of these little puddings which will have you making them again and again.

They take a little bit of time to master due to the precision needed in the cooking time, and as ovens vary so much you really have to find the perfect time for your particular oven. Cook them for too long and there will be no fondant, too short and there’s no sponge. Instead of using a skewer, like you would for a cake, you have to go on instinct of what the surface texture should look like, in order to know when to take them out the oven.  But apart from the baking bit, they’re really easy to make so I’d recommend giving them a go. Even if they’re under or over baked (and believe me, mine have been both many times) they taste good, so you can’t really lose.

This dessert also looks and sounds impressive, so I’ve found that it works really well as a dinner party dessert. You can make the mixture, and put it into the moulds, up to 48 hours before the party. Chill them in the fridge, then bring them out at least an hour before they go in the oven, to bring them back up to room temperature. This doesn’t affect the quality of the finished dessert and it will give you more time on the day to make everything else. It’s also really easy to make these dairy-free. Simply use soya margarine instead of butter, and make sure the dark chocolate you use has no milk in it. They taste identical to the normal versions, so if you have anyone dairy-free to cook for, instead of making a different or altered dessert for them, you can make these for everyone and no one will notice the difference.

Fondants I made for a dinner party (above)

That said, whilst these are good for parties and for sharing, my favourite time to make them is for a good night in. There’s something truly comforting about a quick-to-make cake which has a soft exterior and then a puddle of velvety sauce in the middle. So, if you’ve been looking for a quick dessert which exudes chocolately gooeyness, and is perfect for a quiet evening, you’ve just found it.

Recipe

Serves 4

Time – 45 minutes

Ingredients

  • 100g Unsalted butter
  • 150g Dark chocolate, chopped roughly
  • 2 Eggs
  • 2 Egg yolks (see below for what to do with the egg whites)
  • 120g Sugar
  • 100g Plain flour
  • A pinch of salt (this really brings out the chocolate flavour)

Method

  1. Pre-heat the oven to 180˚C. Grease four small pudding basins with butter and put onto a baking tray.
  2. In a heat-proof bowl put the butter and the chocolate. Place over a pan of gently simmering water and leave to melt, stirring occasionally.
  3. In a separate bowl whisk the eggs, egg yolks and sugar together until pale a fluffy. An electric whisk is quicker and easier, but a hand whisk also works.
  4. Slowly pour the chocolate mixture into the egg mixture, whisking continuously until smooth.
  5. Add the flour and salt to the mixture and whisk again until fully combined.
  6. Pour the mixture into the four pudding moulds. At this point you can cover the moulds in cling film and chill in the fridge for up to two days, just make sure they return to room temperature before cooking.
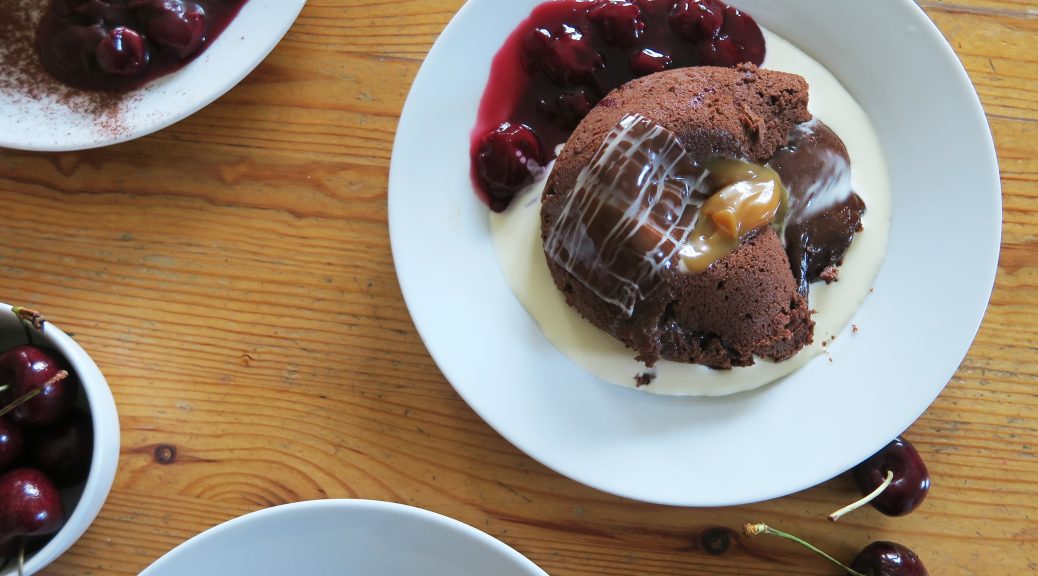
  7. Put the fondants into the oven and bake for 8-10 minutes. This time works for me, but as all ovens can vary I’d recommend going on the texture rather than a specific time. You want the surface of the fondants to be just skinning over, so that the edges are cooked but the middle is very soft. If anything bring them out a little too early than too late. If they are too liquid when tipped out, you can quickly microwave them for 20 seconds to cook more of the batter.
  8. Take the fondants out of the oven and use a knife to loosen them from the edge of the moulds. Carefully turn them out onto plates and serve immediately. Enjoy!


These are really good with…

  • Fruit sorbet (raspberry and mango are particularly good ones to try)
  • Any flavour ice cream
  • Salted caramel sauce
  • Fresh fruit (e.g raspberries or strawberries)
  • Clotted, double or squirty cream
  • Fruit sauce (e.g coulis)
  • Chocolate chips or chocolate decorations


How to use up leftover egg whites…

This recipe, like so many others I come across, results in leftover egg whites. You separate the eggs, put the yolks into the batter and are left with two perfectly good, unused whites. They keep in the fridge for up to two days, and can be used for so many things, so rather than throwing them away, here’s some ways of using them up….

  1. Meringues – about 80% of the time I have left over egg whites I turn them into meringues. A simple combo of caster sugar and egg white, meringues are surprisingly simple to make and can be used in so many ways (such as daquoise, pavalova, or meringue kisses – made by pipping the meringue into peaks on a baking tray). If you are going to make meringues though, or any of the following which involve a meringue base (they have a * next to them) it’s better to use the egg whites on the same day as you separate the eggs, as you’ll get a stiffer peak from the mixture, resulting in a better meringue.
  2. Lining pastry – When making pastry brush the whites onto the pastry after taking the beans out for a blind bake. Put the pastry back in the oven for a further 5 minutes after brushing to firm up the base even more. This will act as a barrier between the pastry and the filling, keeping the base crisp.
  3. Marshmallows* – these start off as swiss meringue, and then use gelatin to give that incredible pillowy texture. Like meringues, these can be customised with fruit, nuts and chocolate to make them even more special, and they last for up to two weeks.
  4. They’re still eggs– the eggs may have lost their yolks, but they can still be cooked in the ways you would normally cook an egg. You can fry, scramble or poach the whites as you would  normally.
  5. Mousse* – whilst many mousse recipes require the whole egg, some are egg whites only, and thus can be a good thing to make when left over whites are hanging around. Whilst these don’t technically have a meringue base, it’s still important to use the egg whites fresh, as it will allow more air to be trapped, and so will result in a better mixture.
  6. Icing – egg whites can be used to make royal icing for anything in need of some icing, including Christmas cakes, so if you happen to have one lying around that you need to ice…
  7. Macaroons* – another meringue based delight. Add almonds and a bit of flourish and you’ve got these great little biscuits.
  8. Bread glazes – if you’re into bread making you can use the whites to glaze bagels, buns and loaves. Brush them over with the whites after their second prove, or just before putting them into the oven. If you want a golden crust you’ll be better off using egg yolks, but the whites can still give a beautiful shine.
  9. Cakes – Some cakes, such as angel food cake, use only egg whites, so why not make a lighter-than air cake with some of the leftover egg whites?
  10. Soufflés – These are really fun to make! You can make them in almost any flavours and they taste amazing. They maybe aren’t so great to make on the same day as cooking the fondants, as they’re best with fresh egg whites, and need to be baked and eaten immediately after being made. However, if you’re chilling your fondant mixture for another day, these are great for a decadent dinner dessert.

I hope you enjoyed this post! More coming soon so keep a look out. Any requests, comments or questions don’t hesitate to ask.

Emma x

Sweet Nachos

Sweet Nachos

Now, it’s never possible to have too much of a good thing, so why stop at savoury nachos? The following is my version of sweet nachos. They’re particularly good for BBQs, a great share plate for a movie night, and perfect for bonfire night. Just like the savoury version, these can also be adapted to your personal taste. I’ve also included 3 alternative sweet-nacho combos below, which make equally good dessert pyramids. 

Recipe

Serves 6

Time: 1 hour

Ingredients

  • 6 Small flour tortillas (no more than 14cm diameter)
  • 2 tbsp Butter, melted
  • 1 ½ tsp Cinnamon
  • 100g Caster sugar
  • 50g Mini marshmallows
  • 50g Chilli chocolate
  • 50g White chocolate
  • 35g Chopped hazelnuts
  • 200g Double cream, with 1 tsp vanilla bean paste, whisked to soft peaks
  • 50g Salted caramel sauce
  • 200g Strawberries, hulled and chopped into chunks
  • 100g Raspberries
  • 20g Coco nibs
  • 20g Popping candy

For the coulis

  • 200g Strawberries
  • 30g Caster sugar

Serve with raspberry compote and mango sorbet

Method

  1. Preheat the oven to 180˚C. Brush a baking tray lightly with the melted butter.
  2. Place one tortilla onto a chopping board and brush lightly with the melted butter, ensuring it’s covered all over. Place another tortilla on top of the buttered one and brush it with butter. Continue with the others until you have a stack of buttered tortillas.
  3. Take a large knife and cut the pile in half. Then cut each half in half again, and repeat twice more so you have 8 tortilla stacks.
  4. In a bowl mix the cinnamon and sugar. Separate the tortilla stacks so that each chip is a single layer and arrange the chips on the buttered tray. Sprinkle the chips with the cinnamon sugar so each one is evenly coated
  5. Put the chips in the oven for 6-10 minutes, until they’re crisp and slightly brown.
  6. To check if the chips are done test the edges to see if they are crisp and dry. The middle may be slightly softer, but they’ll crisp up as they dry. If the middles don’t crisp up once out of the oven, place back into the oven for 2-3 minutes. Once the crisps are done place them to one side and leave them to cool.
  7. Meanwhile, break up the two chocolates into chunks and put into two separate heatproof bowls. Place each over a pan of water on a medium, heat and leave to melt gently.
  8. Whilst waiting for the chocolates to melt, make the strawberry coulis. Place the strawberries and the sugar in a pan over a medium heat with 25ml water. Heat gently until the strawberries have collapsed and have released their juice. Blend the mixture with a hand blender to create a smooth mixture (you can also sieve the mixture if you want to remove the pips, but it’s not essential). Pour the coulis into a small jug and place to one side.
  9. Begin to assemble the nachos by scattering half the chips on a plate or baking tray lined with baking paper (whatever you want to serve it on). Drizzle with a little of the chocolate, and scatter with nuts, strawberries, caramel sauce and marshmallows. Pile the rest of the chips on top in a pyramid shaped pile. Top with the rest of the marshmallows and strawberries. (If you have a blow torch you can now quickly blast the marshmallows to caramelise them). Dollop the cream in blobs around the stack, drizzle with the rest of the caramel and chocolate and top with the rest of the hazelnuts, the cocoa nibs and popping candy. Serve immediately with the coulis and any ice cream or sorbet you wish.

Alternatives

  1. Tropical – Make the nacho chips the same way as above, but without the cinnamon. Then top with chopped mango, pineapple, coconut chips, whisked vanilla cream, dark chocolate and passion fruit.
  2. Banoffee – Top the cinnamon chips with maple syrup, whipped cream, chopped banana, chocolate chips and pecan praline (made by mixing pecans with caramel and adding a pinch of salt. Leave to cool on baking paper and then break up into small pieces).
  3. Caramel apple – Top the cinnamon chips with chopped up apples ( a mix of granny smith and royal gala is particularly good), salted caramel sauce, chopped up snicker bars, peanuts, and vanilla ice cream.

Thanks for reading, I hope you enjoy the recipe. Any questions or comments dont hesitate to contact me. Look out for my next post!

Emma x

The Ultimate Nacho Pyramid

The Ultimate Nacho Pyramid

This summer I spent some time in  Canada and I found that alongside snow, bears and lakes, Canada should also be famous for its incredible nachos. Tortilla chips piled high with mountains of cheese, peppers, jalapenos, and beef, served with tubs of guacamole and sour cream creates a pyramid of pure comfort. Whatever the weather, they can’t fail to put a smile on your face.

The following recipe is my ultimate nacho pyramid. I’ve added some personal touches to suit my taste preferences, however the great thing about nachos is that you can pretty much put anything with them and they’re still amazing. So if there’s any ingredient you love or hate you can easily swap it in or out to create your own perfect combination.

Recipe

Serves 6

Time: 1 hour

Ingredients

  • 4 tbsp Sunflower or vegetable oil
  • 8 small tortillas (no more than 14cm in diameter)
  • 2 rashers of smoked bacon
  • 1 Small red onion, finely chopped
  • ½ a small red, green and orange pepper, diced
  • 100g Mozerella, torn into pieces
  • 100g Cheddar cheese, grated
  • 1 jalapeno, chopped into discs
  • 1 beef tomato, diced
  • 80g Sweetcorn
  • 80g kidney beans, drained and rinsed
  • Sour cream and guacamole to serve

Method

  1. Preheat the oven to 180˚C. Put 2 tbsp of the oil into a small bowl.
  2. Place one tortilla onto a chopping board and brush lightly with oil, ensuring it’s covered all over. Place another tortilla on top of the oiled one and brush it with oil. Continue with the others until you have a stack of oiled tortillas.
  3. Take a large knife and cut the pile in half. Then cut each half in half again, and repeat twice more so you have 8 tortilla stacks.
  4. Line 3 trays with baking paper and brush each with oil. Separate the tortilla stacks so that each chip is a single layer. Place the chips on the oiled tray so that their non-oiled surface is in contact with the oiled tray. It’s best if the chips don’t overlap, but if they do just move them around on the tray half way through cooking so that they crisp up all over.
  5. Sprinkle the chips with a generous pinch of sea salt so that all the chips are seasoned. Then put the trays in the oven for 8-12 minutes.
  6. To check if the chips are done test the edges to see if they are crisp and dry. The middle may be slightly softer, but they’ll crisp up as they cool down. If the middles don’t crisp up once cool, place them back into the oven for 2-3 minutes. Leave the chips to cool.
  7. Meanwhile pre-heat the grill to a high heat. Place the bacon rashers on a grill pan and heat under the grill. Grill for around 5 minutes and then turn the rashers over and grill for a further 5 minutes on the other side so that they become crisp all over.
  8. Take the bacon off the grill pan and cut into strips with scissors. Place the strips to one side.
  9. Now prepare the veg. Put the remaining 2tbsp of oil into a pan and put on a medium-high heat. Put the chopped onion in the pan and stir to coat in the oil. Stirring occasionally, fry the onions until they start to caramelise (go brown and sticky).
  10. Then add the chopped up peppers and stir to mix and coat them in the oil. Place to one side.
  11. Line a baking tray with baking paper. To assemble the nachos, begin by loosely scattering a few of the tortilla chips on the lined tray. Top with some of the peppers, onions, bacon strips, mozzarella and cheddar. Layer up with more tortilla chips to make a pyramid shape. Top with the rest of the bacon, peppers and onions, as well as the jalapenos, tomatoes, sweetcorn, and kidney beans. Top with the rest of the mozzarella and cheddar and then place in the oven.
  12. Bake the nachos until the cheese is just melted, it should take around 10 minutes, but it may take longer for the mozzarella to melt. If the chips start to colour too much, loosely cover the pile in tin foil.
  13. Take the nachos out of the oven and leave to cool for a few minutes before eating. Serve with sour cream and guacamole. Enjoy!

Top tip – Lining the trays with baking paper can be hard as the paper inevitably roles back on itself. To prevent this just scrunch up the paper, as though you’re about to throw it away, and then unfold it. It’ll make it easier to work with.

Thanks for reading, more coming soon…

Emma x