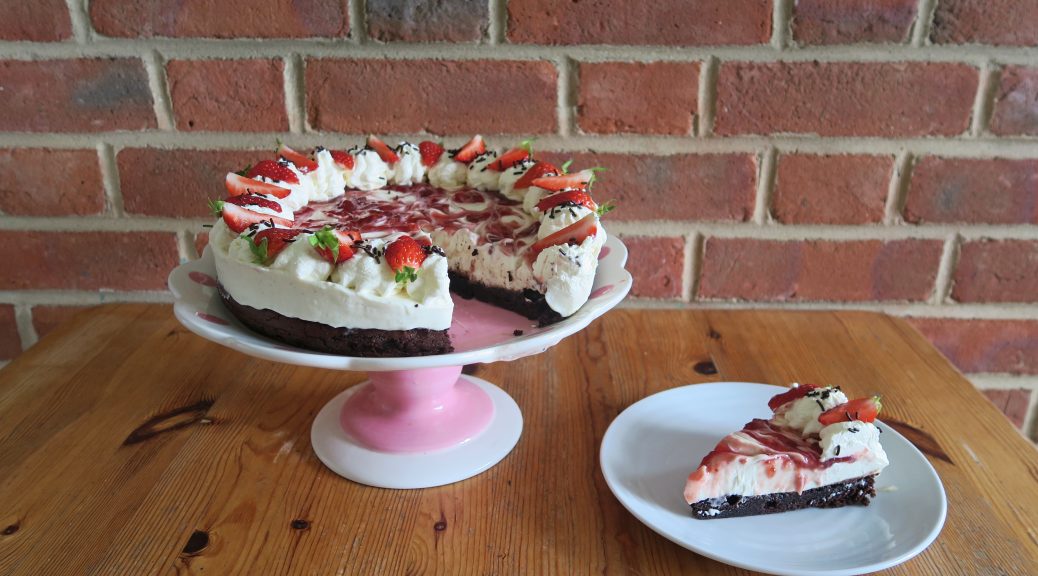
Neapolitan Brownie Cheesecake
My parent’s are aiming to walk the South West Coastal Path over the next few years and so last week we were all on holiday to kick-start the journey. As we were walking loads, we were in Devon, and it was insanely hot, it goes without saying that we ate a tonne of ice cream. So in homage to all of that I decided to do an ice-cream themed bake for Father’s day.

In truth, I’m more of a mint choc chip girl than Neapolitan, but I thought that the classic vanilla, chocolate, strawberry layer thing was too good to not use for this. I also finished my Art Foundation course the other day (silent whoop!) and so after that I treated myself to a brownie cheesecake thing from Tescos. I’ve seen brownies being used in cheesecakes for years but that was the first time I tried it myself, and boy was it good. So rather than having a biscuit base for this one I made a fudgy brownie, and dare I say it I think it’s better than a biscuit base. It’s chewy, rich, and is way easier to transport/slice into as you don’t have crumbs flying everywhere!

This one has a few elements to it, but it’s all very easy to put together when broken down. For the swirls on the top I used strawberry jam which worked way better than I thought it would! If you’d prefer something sharper for the topping you could use marmalade, raspberry jam or boil up equal parts fruit and sugar to make a thick puree.

Recipe
Serves 12
Time: 1 hour, plus chilling
Ingredients
For the Brownie
- 230g Caster sugar
- 100ml Vegetable oil
- 2 Medium Eggs
- ½ tsp Vanilla extract
- 55g Cocoa powder
- 90g Plain flour
For the Cheesecake
- 1 tbsp Vanilla bean paste
- 550g Cream cheese
- 50g Icing sugar
- 250ml Double cream
For the Topping
- 2 tbsp Strawberry jam
- 200ml Double cream
- 4 Small fresh strawberries, plus extra for serving
- 2 tbsp Chocolate sprinkles
Method
- Begin by making the brownie. Pre-heat the oven to 160˚C. Grease and line a 9-inch cake tin with baking paper.
- Put the sugar and oil into a large bowl and whisk to combine. Add the eggs and vanilla and whisk these in to make a smooth mix. Add the cocoa and whisk it in carefully, it will explode out of the bowl a lot! Finally, add the flour and whisk it in to make a smooth batter.
- Pour the mixture into the lined cake tin and bake in the oven for 15-20 minutes so that a crust has formed and the middle is goey but baked through. Leave to cool in the tin.
- Now make the cheesecake layer. Put the vanilla and cream cheese into a bowl and whisk together until smooth. Add the icing sugar and double cream and then whisk again until the mixture is lump-free and beginning to thicken.
- Once the brownie is completely cooled pour the cheesecake mix on top and smooth it over with a spatula.
- Spoon the strawberry jam into a small bowl and beat it with a small spoon to break it up and make it slightly runny. Spoon blobs of the jam onto the cheesecake and then mix it around with a knife a little to get a swirl effect.
- Put the whole cheesecake into the freezer for 1 hour, and then leave in the fridge for another 3 hours, or better still over night to set.
- When ready start prepping the topping. Pour the double cream into a bowl and whisk until soft peaks form. Spoon the mixture into a piping bag fitted with a star-shaped nozzle. Pipe rosettes of the cream around the edge of the cheesecake.
- Quarter the strawberries and then push them into the gaps between the cream rosettes. Finish with some of the sprinkles and serve chilled!

Thanks for reading!
Emma x