Tag: Baking

Scones

Scones

The next layer in out afternoon tea extravaganza is the classic scone! However you pronounce it, or whichever order you put the cream and jam on, these are to afternoon tea what meat is to chilli con carne. We have these all the time at home on lazy afternoons and as they are so easy and simple to put together they can be made at a moments notice. Scones are so versatile, and whilst these ones are very simple and plain you can customise them so much. I’ve written a few alternations you can try out at the bottom of the post if you want to jazz your afternoon tea up a bit more.

Recipe

Makes 14 Scones

Time: 20 minutes, plus cooking time

Ingredients

  • 100g Unsalted butter
  • 465g Self raising flour, plus extra for dusting
  • 3 tbsp Caster sugar, plus extra for the topping
  • A pinch of salt
  • 220ml Milk
  • 1 Egg for glazing

Method

  1. Pre-heat the oven to 180˚C and line two baking trays with baking paper.
  2. Put the butter and flour into a bowl and use a round-bladed knife to chop the butter into small chunks. When you can’t cut the butter up any more go in with your fingers and rub the butter into the flour to get a mixture with the texture of breadcrumbs.
  3. Add the sugar and salt to the mixture and stir it in with a round-bladed knife.
  4. Now slowly add the milk in a steady stream, mixing continuously with a round-bladed knife until the mixture comes together into a dough.
  5. Lightly flour a surface and turn the dough out onto it. Roll the dough out to about 3cm in thickness. Then take a round pastry cutter and stamp out as many scones as you can, placing them onto the lined baking trays as you do. For the best results push the cutter straight down into the dough, don’t twist as this will make the scones rise unevenly. Knead together any leftover dough and repeat.
  6. Crack the egg into a bowl and whisk it up with a fork. Then brush the egg onto the top of the scones to glaze.
  7. Bake the scones in the oven for 10-15 minutes until risen and golden brown. Then transfer them to wire racks to cool and then serve with jam and clotted cream!

Why not try…

  • Sprinkling a little caster sugar onto the top of the scones before baking them – this will give them a delicious crunchy sugar topping!
  • Adding 40g of raisins to the mix to get fruity scones.
  • Add the zest of 1 lemon to the mixture when you add the milk to get citrus scones. Then serve them with lemon curd and clotted cream.
  • Mixing 50g of grated cheddar cheese into the flour, before adding the milk, to get cheesy scones.

Thanks for reading!

Emma x

Mad Hatter’s Tea Party

Mad Hatter’s Tea Party

“Why, sometimes I’ve believed as many as six impossible things before breakfast” – Lewis Carrol, Alice in Wonderland.

We’re at the end of book themed month (where did that go?!) and so I’ve decided to end like we started and do a week of recipes themed around one book – this time that good old favourite Alice in Wonderland! I’m from Oxford and there’s loads of Lewis Carrol references around the city that I’ve been trotted around since I was very young, so I’ve always had a fondness for this crazy story. Although it’s technically a children’s book I think the actual themes and plot are pretty incomprehensible and I remember being really confused with it as a kid, but re-reading the book now in my early adult years I’m finding it much more insightful and interesting.

So, back to why we’re here, the food! When doing an Alice in Wonderland themed week on a food blog it’s kinda compulsory to do a Mad Hatter’s tea party so that’s what we have. This is an all bells and whistles afternoon tea, but you could scale it back if you don’t want to spend two days baking. If you really don’t want to bake that much you could just take inspiration from what I’ve put together and buy the elements from a shop. I have to admit to being sooo tempted to just buy a bakewell tart on my way out of the shop when I was buying the ingredients for this! In my opinion a ‘complete’ afternoon tea needs…

• Finger sandwiches

• Scones

• Some kind of cake

• Some kind of biscuit

• Something made out of choux pastry (e.g a profiterole)

• Something made out of Shortcrust pastry (e.g a tart)

• And of course lots of tea!

I’ll be posting a recipe a day which you’ll be able to find on the main page of my blog, or on this post where I’ll be collating all the links…

First up is the base of all afternoon teas – finger sandwiches!

Afternoon Tea Sandwiches

Scones

Banana, Cinnamon and Rum Friands

Bakewell Tartlets

Passion Fruit and Chocolate Profiteroles

Chocolate Ginger Biscuit Shards

Thanks for reading!

Emma x

The Hobbit – Honey Cake with Catalan Cream and Lemon Curd

The Hobbit – Honey Cake with Catalan Cream and Lemon Curd

“THERE WAS A BUZZING AND A WHIRRING AND A DRONING IN THE AIR. BEES WERE EVERYWHERE. AND SUCH BEES! BILBO HAD NEVER SEEN ANYTHING LIKE THEM.”

I have to confess to being a huge Tolkien fan, and so either LOTR, The Saumarillion, or The Hobbit had to pop up on here sooner or later this month. Whilst I’ve taken The Hobbit as specific inspiration for this one, you could say that it’s generally a Middle Earth inspired dessert.

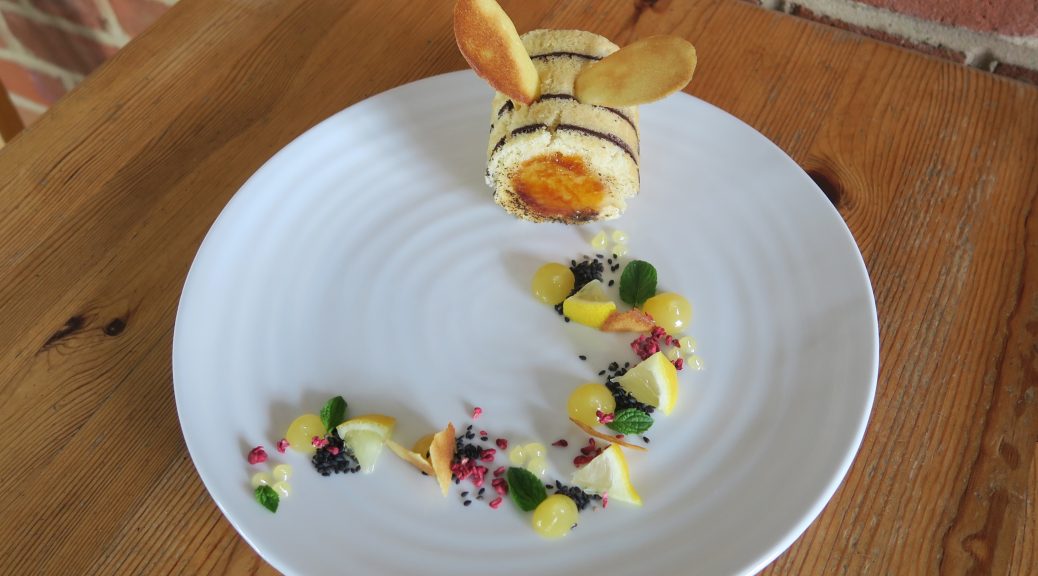
When thinking about making a Hobbit-inspired dish you’d probably expect some kind of ring cake, or generally a ring-shaped thing. So you may be wondering why I’ve made a honey bee out of cake instead? Well there is a reason. When Gandalf, Bilbo and the dwarfs end up staying at Beorn’s home before departing for Mirkwood (sorry to anyone who hasn’t read/seen The Hobbit), there’s lengthy descriptions about the gigantic honey bees in the garden which really hit my imagination, and therefore I’ve gone bee-themed for this one. As a parting gift Beorn also gives the company jars of honey from his bees to nourish them on the trip and anyone who’s seen the film might remember the big fuzzy bees swarming around the barn as they run in.

Whilst Middle Earth inspired the components of the dish, it was my trip to the Edinburgh Fringe a couple of years ago that inspired the flavours. Whilst up there I went to this amazing ice-cream shop which always had a selection of really interesting flavours. One day I had the lemon, honey and black sesame ice-cream and it was sublime! So, as a result, lemon, honey and sesame all feature in here. There was also this really cute campervan at the festival that sold little creme brulees and Catalan creams (basically creme brulees flavoured with lemon and cinnamon). This inspired me to fill my honey bee with some Catalan cream, set with gelatin, and then caramelise sugar on either end. You could also fill the cake with pannacotta, mousse or jelly if you’d prefer!

Recipe

Makes 2 Bees (but leaves some leftover cake and biscuits to nibble on!)

Time: 2 1/2 hours, plus setting time

Ingredients

For the Décor paste

  • 114g Unsalted butter
  • 114g Icing sugar
  • 2 Large egg whites
  • 90g Plain flour
  • 40g Cocoa powder
  • A few drops of black food colouring (optional)

For the Honey cake

  • 50g Butter
  • 20g Runny honey
  • 110g Self raising flour, sifted
  • ½ tsp Baking powder
  • 2 Large eggs
  • 120g Caster sugar

For the Catalan cream

  • 335ml Whole milk
  • 50g Black sesame seeds, plus extra to garnish
  • 1 Cinnamon stick
  • 2 leaves of Gelatin
  • Zest of 1 Lemon
  • 1 tsp Vanilla bean paste
  • 200g Caster sugar, plus extra for caramelising
  • 1 ½ tbsp Cornflour
  • 2 Medium egg yolks

For the Honey tuile

  • 20g Runny honey
  • 30g Unsalted butter
  • 1 Egg white
  • A few drops of Vanilla extract
  • A pinch of Salt
  • 3tbsp Plain flour

To Decorate

  • Lemon curd
  • 1/2 Lemon, cut into little pieces
  • Fresh Mint leaves
  • Freeze dried raspberries (optional)

Method

  1. Line a 38x26cm tin with butter and baking paper. Pre-heat the oven to 160˚C.
  2. Begin by making the décor paste that’ll make the stripes on your bees. Put the butter and icing sugar into a bowl and cream them together until smooth. Add the egg whites and whisk until combined. Then add the flour, cocoa powder and food colouring (if you’re using it) and mix together until a uniform colour and smooth.
  3. Pour the batter into a piping bag with a small, round nozzle. Then pipe lines horizontally across the lined tin, about 2cm apart, to make your stripes. Leave the tin the freezer for at least 20 minutes, or until needed.
  4. Now make the honey cake. Put the butter, honey, flour, baking powder, eggs and sugar into a bowl and whisk until combined – an electric whisk here can make things easier!
  5. Pour the cake mixture over the stripes in your tin and smooth the mixture out so it’s an even layer. Then bake the cake in the oven for 15-20 minutes, until puffed up, golden brown and so that the cake springs back when it’s poked gently.
  6. Meanwhile take 2, 6 ½ cm diameter metal rings. Grease them with butter and then line them with clingfilm.
  7. When baked, turn the cake sheet out onto a wire rack and remove the baking paper. Quickly cut the cake into strips, following the lines of the stripes (so not cutting across the stripes). The width of the strips should be the same as the height of your metal rings.
  8.  Take one of the still warm cake strips and fit it into the ring. To make a tight fit you might need to cut the strip to make it shorter, but do this carefully as you need the cake to fully wrap around the inside of the ring. Repeat with the other ring and then leave to one side for later.
  9. Next make the Catalan cream. Take a large saucepan and put in the milk, cinnamon, lemon rind, sesame seeds, and vanilla. Bring to the boil and then leave to simmer for a couple of minutes. Sieve the milk to remove the sesame seeds and then pop to one side.
  10. Put the gelatin into a bowl with some cold water and leave for at least 5 minutes until soft and flexible.
  11. In another bowl whisk the egg yolks, cornflour and 150g of the sugar until thick and creamy. Slowly pour the milk into the mix, whisking constantly until smooth.
  12. Pour the mixture back into the pan and place over a medium heat. Stir the mixture constantly until it beings to thicken. Add the gelatin to the mix and whisk in until dissolved. Then take the pan off the heat and leave to cool until luke warm.
  13. Carefully pour the cooled cream mixture into the rings lined with the cake and leave to set in the fridge for at least 3 hours, or better still overnight.
  14. Now make the tuiles. Put the butter and honey into a bowl and mix together until smooth. Add the egg white, vanilla and a pinch of salt. Then add the flour and mix again until all combined.
  15. Take a sheet of acetate (or you can improvise straight onto a baking sheet) and cut out a wing shape with a scalpel. Line 2 baking trays with baking paper.
  16. Place your stencil onto your baking tray. Then dollop 1 tsp of the tuile mixture onto the space in the stencil (you don’t need very much). Take a palette knife and smooth the mixture over the gap and then sweep the knife across the stencil at a 45˚ angle to remove the excess mixture and to make the shape clear. Repeat over the rest of the baking sheets to get a lot of little wings. (You’ll need two per bee, but some will break so always make more than you need).
  17. Pre-heat the oven to 140˚C. Bake your tuiles for 5-8 minutes until just starting to brown at the edges. Leave to cool completely and then transfer to a wire rack until needed.
  18. Once the Catalan cream has set, sprinkle a little caster sugar over the exposed cream so it’s covered. Then, using a blowtorch, lightly brush the sugar with the flame until golden and caramelised. Leave to set for a few minutes before turning the ring over and repeating on the other side so both ends of the bee are set with caramel. Repeat for all your bees.
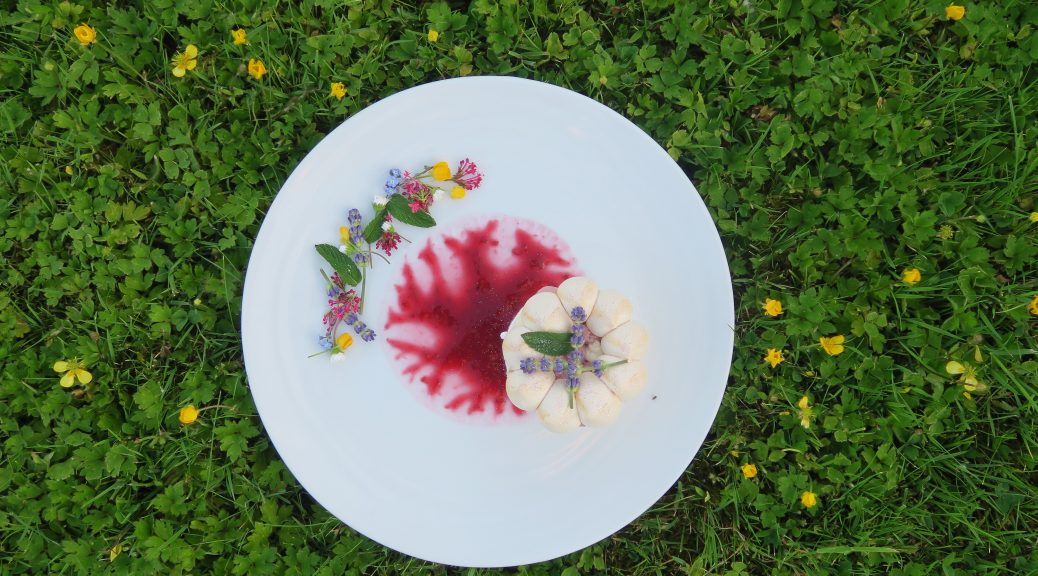
  19. Now start plating – you can do this on any shape of plate but I find rectangle or round works well. Remove your bee from it’s ring, peel off any clingfilm and place it on your plate. Take a sharp knife and make two small incisions into the cake near the top – these will be the holes for your wings. Take two relatively similarly sized wing tuiles and insert them into the holes you just made.
  20. Next make the trail behind the bee. Spoon the lemon curd into a piping bag or bottle and squeeze little dots in a swirl across the plate- this swirl will be the template for the rest of your garnishes. Take your little lemon pieces and place them along the swirl. Then take a teaspoon and sprinkle little piles of sesame seeds and freeze-dried raspberries along the same shape. Finish off with some fresh mint leaves and some broken bits of tuile to garnish. Serve!

Thanks for reading!
Emma x


Midsummer Night’s Dream Dessert

Midsummer Night’s Dream Dessert

The next post in my book themed month is based on A Midsummer Night’s Dream by William Shakespeare! This book/play has long been one of my favourites and so I couldn’t wait to make a dessert to reflect it. I first read the play at school and I instantly loved all the imagery, wit and chaos that goes on, as well as the magical themes running through the whole story. I’ve tried to capture this magic and fun in this dish, as well as use floral and summery flavours to complement the themes and title of the play.

This dessert is made up of elderflower and raspberry Mousses on a peach marshmallow, with a meringue ring and a raspberry coulis to serve. I’ve also decorated the plate with lots of lovely flowers from m’ garden for aesthetic. I should point out that these aren’t all edible, so if you have similar ones in your garden please don’t assume you can eat them! This will take a bit of time to make so if you’re in a hurry you could buy marshmallows and meringues from a shop, and then serve them with the two mousses and coulis to make a fancy eton-mess-type-thing.

Recipe

Serves 4

Time: 3 hours, plus setting time

Ingredients

For the Meringue

  • 3 Egg whites
  • ½ tsp Cream of tartar
  • A few drops of Lemon juice
  • 230g Caster sugar
  • Orange food colouring

For the Marshmallow

  • Oil for greasing
  • 100g Icing sugar
  • 50g Cornflour
  • 10 Gelatin leaves
  • 280ml Peach juice
  • 425g Caster sugar
  • 15g Liquid glucose
  • 2 Large egg whites

For the Elderflower mousse

  • 2 Gelatin leaves
  • 90ml Milk
  • 2 Small Egg yolks
  • 10g Caster sugar
  • 8g Cornflour
  • 2 tbsp Elderflower cordial
  • 200ml Double cream

For the Raspberry mousse

  • 2 Gelatin leaves
  • 2 Eggs, separated
  • 80ml Double cream
  • 40g Caster sugar
  • 150ml Raspberry puree

For Plating

  • Raspberry coulis
  • A few Edible flowers
  • A sprinkle of Edible glitter
  • A Few mint sprigs
  • Popping candy

Method

  1. Begin by making the meringue rings. Pre-heat the oven to 180˚C and line two baking trays with baking paper.
  2. Take a 5cm ring/cookie cutter and draw round it onto the baking paper to get 12 rings. Then turn the paper over so these pencil marks are on the underside.
  3. Put the egg whites into a super clean metal or glass bowl. Add the lemon juice and cream of tartar and whisk up with an electric whisk until they form soft peaks.
  4. Add the sugar one tbsp at a time, whisking constantly, until it’s all incorporated and the mixture is stiff.
  5. Put a pipping bag with a small, round nozzle into a glass or beaker to hold it upright. Take the food colouring and brush it down either side of the inside of the bag. Fill the bag with the meringue mixture and twist the top of the bag to create some tension.
  6. Pipe blobs of the meringue onto the baking paper in a ring, using the circles you dew earlier as a guide.
  7. Bake the meringues in the oven for 10 minutes, then lower the temperature to 140˚C and bake for another 20 minutes until the meringue is dried out and hasn’t started to brown. Turn the oven off and leave the meringue to cool in the oven to prevent them from cracking.
  8. Now move onto the marshmallow. Grease a 20x30cm tin with oil. Then line it with clingfilm and grease the clingfilm lightly.
  9. Mix the icing sugar and cornflour in a bowl and dust the tin with the mix.
  10. Take the gelatin and put it into a bowl with some cold water. Then leave it to soak for 5 minutes until soft.
  11. Next squeeze out the gelatin and put it into a pan with 100ml of the juice.  Stir the mixture constantly over a medium heat until the gelatin has dissolved. Keep warm but don’t let simmer.
  12. Now put the sugar, glucose and the rest of the juice into a large pan and put over a high heat. Stir the mix until the sugar has dissolved (you shouldn’t be able to feel the crystals scrapping the bottom of the pan).
  13. Leave the mixture to boil, using an electric thermometer to check the temperature, you want to bring the mixture up to 110˚C.
  14. Meanwhile put the egg whites into a very clean metal or glass bowl. When the sugar/juice mix hits 110˚C start whisking the whites until they hit soft peaks.
  15. When the sugar/juice mix reaches 121˚C start to pour it into the egg whites, whisking continuously. Try to avoid pouring it onto the beaters or you’ll end up with spun sugar!
  16. Once it’s all incorporated pour the gelatin mix into the marshmallow and continue to whisk for 5-10 minutes until the mix has cooled completely and is stiff.
  17. Pour the mixture into the lined tin, dust it with more of the cornflour mix and leave it to set completely, it’ll take about 2 hours.
  18. Now make the elderflower mousse. Put the gelatin in a bowl with some cold water and leave to soak until soft (about 5 minutes).
  19. Put the milk into a saucepan and bring to the boil.
  20. Meanwhile put the egg yolks, sugar, cornflour and elderflower into a bowl and whisk until smooth and pale.
  21. Pour in the milk whilst whisking until fully combined. Then pour the custard mixture back into the pan and whisk over a medium heat until the mixture thickens. Pour the custard into a bowl and leave to cool completely.
  22. Pour the cream into a bowl and whisk until it forms soft peaks. Fold the cream into the cooled elderflower custard and pour this into a pipping bag with a small round nozzle. Leave the mousse in the fridge until needed.
  23. Now make the raspberry mousse. Leave the gelatin to soak in a bowl of cold water. When it’s soft squeeze the gelatin and put it into a small pan. Add 1 tbsp cold water and put over a medium heat. Stir until the gelatin has dissolved, then set to one side and keep warm.
  24. Put the egg whites into a clean metal or glass bowl and whisk until stiff peaks form.
  25. Then pour the cream into a bowl and whisk until soft peaks form.
  26. Next put the sugar and egg yolks into a bowl and whisk with an electric whisk for a couple of minutes until pale and fluffy. Stir in the raspberry puree and the warm gelatin mix.
  27. Fold the cream into the main mixture until it’s all incorporated. Then fold in the stiff egg whites, ½ at a time, until it’s all folded together and there’s no flecks of white.
  28. Pour the mousse into another pipping bag with a small round nozzle and leave in the fridge for at least 3 hours until it can be piped, or until needed.
  29. When you’re ready to plate start by spooning (or piping) a dot of the coulis into the centre of the plate. Then take a large, round, flat lid or plate and press straight down on into the coulis. Lift the utensil up and a pattern should appear. Alternatively you could just flick or dot the coulis around the plate if you’d prefer.
  30. Then cut a 5cm circle of marshmallow and put it onto the plate, I like it when it slightly offsets the coulis shape but it’s up to you. Pipe alternate blobs of the two mousses over the marshmallow and top it all off with one of the meringue rings.
  31. Decorate the plate with the edible flowers and mint and then dust it all off with the edible glitter and the popping candy.

Thanks for reading!

Emma x

Pita Bread

Pita Bread

Pita bread is one of those incredible foods that is so versatile and will just work with everything. Whilst now I prefer my pita dipped in hummus, back in primary school I used to stuff them with Mini Cheddars to make an improvised crisp/cheese sandwich. My culinary experiments have moved on a lot since then, but I still have a fondness for these bread pockets and they pair super well with the other meze dishes in this banquet!

Recipe

Makes 4 Pitas

Time: 20 minutes, plus proving and baking time

Ingredients

  • 250g Strong white bread flour
  • 7g Instant yeast
  • 1 tsp Salt
  • 160ml Water
  • 2 tsp Olive oil

Method

  1. Put the flour, yeast and salt into a bowl and stir to combine. Be careful not to put the salt directly on top of the yeast as this will kill it and prevent your dough from rising. Add the oil and then slowly add the water, mixing as you do, to get a smooth dough.
  2. Turn the dough out onto a worktop and knead for about 10 minutes, until smooth and stretchy. Place this dough into a clean bowl, cover with clingfilm and leave to rise until doubled in size (about an hour).
  3. Pre-heat the oven to 200˚C and pop a baking tray in the oven to warm up.
  4. When the dough is ready turn it out onto your surface and knead for 20 seconds to knock out the air bubbles.
  5. Split the dough into 6 and roll each portion into a ball. Then lightly flour a surface and roll each ball out into a 5cm long oval.
  6. Take the tray out of the oven and lightly dust with flour. Put each pitta onto it and then bake for 5-10 minutes until they start to brown slightly.
  7. Serve with lots of hummus!

Thanks for reading!

Emma x