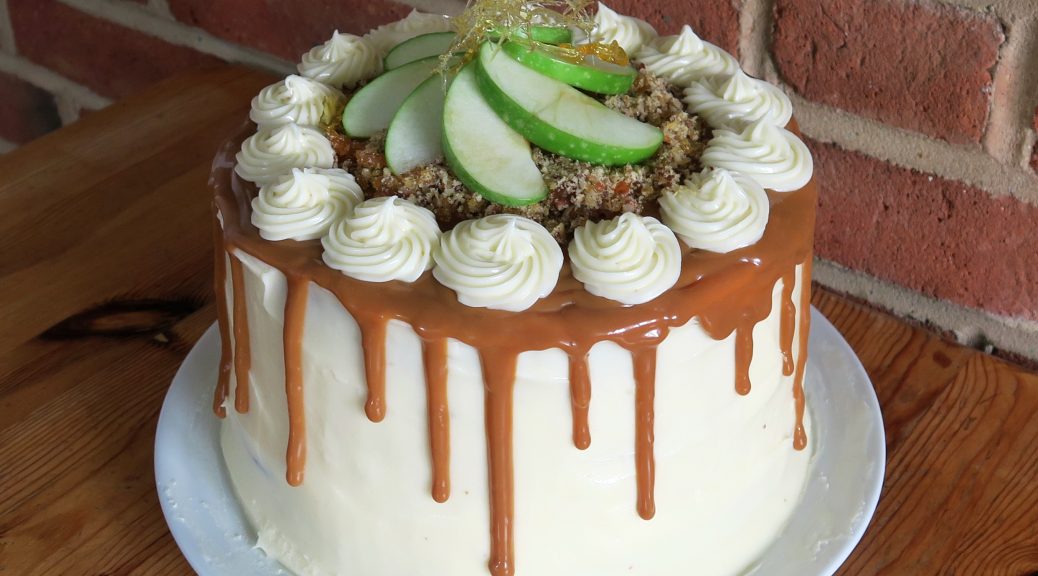
The Almighty Sticky-Apple-Ginger-Praline Cake
This is the third cake in our trio of big cakes – and I think I’ve saved the best till last! This kinda snowballed until it became what we see here, which is why I’ve named it ‘the almighty…’ – as it’s jam packed with flavours and textures. As always it began as just a simple ginger cake. Then I thought why not add apples and dates to make it extra sticky and moist. Sticky cakes work really well with crunchy pecan praline, so that got added in, and then some sparklers were clearly needed to put the cherry on the top.

That said, I did have bonfire night in mind, and I wanted to make a cake which encompassed all flavours of the occasion. From warming ginger to caramel apples, this cake is everything you could want for a cold autumnal evening. If you don’t have a crowd to feed, and trust me this cake will feed a crowd, you can use 2/3 of the cake mix and do a two layer version which will work just as well. Similarly, if you want a cake that’s easy to transport and share you can use 2/3 of the mix and do a large tray-bake, or even make cupcakes, so that you can distribute it easily.

Recipe
Serves 14
Time: 2 1/2 hours
Ingredients
For the sticky apple and ginger cake
- 500g Chopped dates
- 500ml Water
- 6 Large eggs
- 300g Light brown sugar
- 75 Dark brown sugar
- 50g Golden syrup
- 3 tsp Vanilla extract
- 300g Butter, melted
- 4 Medium cooking apples, peeled and cored (about 600g)
- 525g Self raising flour
- 5 1/2 tsp Ground ginger
- 3 tsp Bicarbonate of Soda
- Pinch of salt
For the icing
- 140g butter
- 400g cream cheese
- 1kg icing sugar
For the pecan praline
- 100g Sugar
- 75g Pecans
To decorate
- 1 Granny Smith apple
- 100g Caster sugar
- 1 Can of Carnations Caramel (about 375g)
- Sparklers (optional)
Method
- Pre-heat the oven to 180˚C. Then line three 7.5inch tins with butter and baking paper.
- Put the chopped dates and water into a saucepan and bring to the boil. Leave to simmer for 5 minutes and then take off the heat and set aside.
- With an electric whisk, whisk the eggs, sugars, syrup and vanilla together until pale and fluffy. Then, whilst whisking, slowly pour in the melted butter.
- Using a large spatula, fold the date mixture into the egg mixture. Then grate the peeled and cored apple into the main bowl and fold this in.
- Sift the flour, ginger, bicarb and salt into the wet ingredients and fold with a large spatula until fully combined.
- Pour the mixture into the three lined tins and bake for 35-45 minutes, until a skewer comes out clean when inserted into the centre of the cakes.
- Turn the cakes out onto cooling racks and leave to cool completely.
- Now make the cream-cheese frosting. Put the butter into a large bowl and beat until smooth and soft. Add the cream cheese and half the icing sugar an beat again until smooth. Add the rest of the icing sugar and beat again until smooth. Leave in the fridge until needed.
- To make the pecan praline put the sugar into a saucepan with 60ml of water. Put the pan over a medium heat and bring to the boil, without stirring, and leave until a golden brown colour has developed.
- Put the pecans onto a baking sheet, pour the caramel over them and then leave to cool completely.
- Once cooled, break the praline up, either with a rolling pin or by hand. Then put it into a food processor and blitz into a coarse crumb.
- Now start to build the cake. Put a dollop of the icing onto the board you’ll present the cake on, and put the base sponge onto this blob – this will stop the cake moving around. Spoon some of the icing onto the cake and spread over, making the side slightly more raised than the centre. Sprinkle ½ of the praline into the centre of the cake, and then put the second sponge on top. Repeat the icing and then praline on this second cake, and then top with the final cake.
- Using a palette knife, spread the frosting over the cake, trying to make as smooth a surface as possible – this is called the ‘crumb-coat’. I find putting a big blob on the top of the cake and then working it over and round the sides a good way of getting the icing on. Keep enough of the icing to do another coat and to pipe rosettes on top (about 1/3 – 1/2 of the original amount). Put the cake in the fridge until the icing has set slightly.
- Meanwhile make the apple decorations. Quarter the apple and core it. Then slice each quarter into 3 to make 12 apple segments. In a pan put the sugar and 50ml of water, like you did above for the praline. Bring to the boil and heat until a golden caramel forms. Add the apple segments and shake in the pan to coat fully (don’t stir as this may crystallise your caramel). Turn the apples out onto a greaseproof sheet, and leave to cool completely – if you can separate them before they cool this will make it easier later!
- Take the cake out of the fridge and make a second coat of icing, making sure it’s really smooth as this will be on show. Heating a palette knife slighting under hot water or with a blow torch can be a good way to get a smooth finish. Leave in the fridge to set.
- Pour the caramel into a bowl and heat in a microwave or pan until just starting to loosen. Stir to make an even consistency, and then pour into a jug or pipping bottle – anything that’s easy to operate and will give you control when pouring.
- Pipe the caramel around the edge of the cake so that it just drips over the edge. You want the drips to be slightly uneven, so you can vary how much is squeezed over the edge in various places. Fill the middle of the cake with the rest of the caramel and then leave in the fridge for 15 minutes to set.
- Take the pipping bag with the frosting and pipe rosettes around the edge of the cake. Sprinkle the rest of the praline into the centre and then top with the caramelised apples. Finish with some sparklers to bring some extra bonfire magic!

Thanks for reading and happy bonfire night!
Emma x