Category: Dessert

Sticky Toffee Puddings

Sticky Toffee Puddings

Generally speaking I love complicated, fancy food. I love how weird and wacky it can sound on paper, or look on the plate, and yet how incredibly tasty it can be. But I have to admit that nothing beats the classics – I mean they’re classics for a reason. In this case I don’t think I’ve ever had a sticky toffee pudding I haven’t liked. Whatever the texture, whatever the ingredients, as long as it’s true to the name and is sweet and sticky you’re on to a winner!

These ones are particularly light a fluffy as they’re made with a classic sponge mix and are then steamed, but the date puree in the mix also makes them really squidgy and sweet. The toffee sauce put on the top then adds even more sticky moistness, with a bit of a bitter flavour to really complement the sponge! They’re also really good with ball of fresh vanilla ice cream and  this will cut through the sweetness and also provides a great temperature balance to the warm sponge!

Recipe

Serves 8

Time: 1 hour

Ingredients

  • 130g Chopped dried dates
  • 130ml Water
  • 130g Unsalted butter, plus extra for greasing
  • 125g Caster sugar
  • 3 Large eggs
  • 180g Self raising flour
  • 1 tsp Baking powder

For the toffee sauce

  • 300ml Double cream
  • 125g Light brown sugar
  • 50g Unsalted butter

Method

  1. Pre-heat the oven to 180˚C. Then grease 8 small pudding basins with butter.
  2. Put the dates and water into a small saucepan and leave to gently simmer over a medium heat until soft (about 5 minutes). Blend the mix to a puree and set to one side.
  3. Put the butter and sugar into a bowl and beat until smooth. Add the eggs and whisk together. Then add the flour, baking powder, and date puree until smooth.
  4. Distribute the mixture between the basins and put them into a deep roasting tin. Fill the tin with boiling water so it comes half way up the side of the basins. Cover the tin with foil and then put in the oven to bake/steam for 40 minutes.
  5. Meanwhile make the toffee sauce. Put half the cream, the sugar and the butter into a small saucepan and bring to the boil whilst stirring. Once the sugar is dissolved and the butter has melted, leave the mixture to boil gently until it becomes a deep amber colour.
  6. Then take the caramel off the heat and add the rest of the cream. Stir together and then keep warm until needed.
  7. When the puddings are ready (a skewer will come out clean when inserted into the middle), turn them out of their moulds onto plates. Serve with the toffee sauce and ice cream!

Thanks for reading!

Emma x

Mini Hazelnut, Cherry, and Chocolate Pavlovas

Mini Hazelnut, Cherry, and Chocolate Pavlovas

My main issue with cooking, besides the endless washing up, is that I constantly have leftovers in pots around the kitchen. Consequentially, what I cook next is often influenced by what’s leftover, which doesn’t make for very interesting blog posts. In particular I always seem to end up with spare egg whites floating around which I feel compelled to do something with on the same day they’re separated, before they go off or become too runny. When I was making the ice cream for my hazelnut cake post (I made these a long time ago, I haven’t kept the egg whites in m’ fridge for all this time!) I had some egg whites leftover so I decided to whip them up into some hazelnut meringue nests to work with.

Luckily meringues last for a good while in a solid air-tight tin, so once I’d made them I could tuck them away until I’d worked out what to do with them. So when I realised we had some whipped cream and poached cherries in the fridge I had my answer – mini hazelnut, cherry and chocolate pavalovas. These are perfect little desserts which can be prepped well in advance, and then put together at the last minute. You can also switch in any kind of soft fruit you like to fit the seasonal fruits available.

(Meringues are kinda my default go-to for leftover egg whites, but I’ve got a list of other ways to use them up at the end of my chocolate fondants post if you’re interested!)

Recipe

Serves 6

Time: 1 hour, plus baking

Ingredients

For the Daquoise

  • 100g Chopped hazelnuts
  • 100g Caster sugar
  • 9g Cornflour
  • 2 Large egg whites
  • Pinch salt

For the Cherries

  • 200g Frozen cherries
  • 4 tbsp Kirsch
  • 1 tbsp Caster sugar
  • 2 tsp Ground cinnamon

For the Filling

  • 300ml Whipping cream
  • 1 tbsp Vanilla bean paste

To Decorate

  • 100g Dark chocolate
  • A few sprigs of mint

Method

  1. Pre-heat the oven to 180˚C.
  2. Begin by making the daquoise. Put the hazelnuts into a small roasting tin and roast in the oven for 5-10 minutes, until just starting to colour. (This is an important step as it’ll massively increase the flavour of the nuts).
  3. Leave to cool and then mix with 75g of the sugar and the cornflour. Set to one side for later.
  4. Lower the oven temperature to 150˚C for the meringues. Line 2 baking trays with baking paper. Take a round object with a diameter of roughly 5cm and draw round it onto the sheets of baking paper to act as a guide for piping later. You should get about 3 onto each sheet. Turn these sheets over so that the pencil line is on the other side of the paper to that which you’ll pipe on.
  5. Take a super clean metal or glass bowl and put the egg whites into it.
  6. Add the salt and then whisk with an electric hand whisk (or a stand-free mixer) until it forms soft peaks (can just hold it’s shape).
  7. Continue whisking and add the other 125g caster sugar, one 1 tbsp at a time until it’s all incorporated.
  8. Keep whisking until the mixture becomes glossy and forms a stiff peak.
  9. Then take a large, stiff spatula and gently fold the hazelnuts into the meringue. From here you’ll need to work quickly as the oils in the nuts will start to deflate the meringue.
  10. Take a piping bag with a round nozzle and fill it with the meringue. Then pipe onto the lined baking trays. Start at the middle of one of your circles and when you get to the edge pipe upwards in a circle round the edge to build the meringues into little nests. Do the same for each circle.
  11. Bake in the oven for about 40 minutes, until crisp to the touch but not starting to brown. Then turn the oven off and leave the meringues to cool in the ovens.
  12. Now prep the filling. Put the cherries into a pan and heat gently until they simmer in their juice and are soft. Then add the kirsch, sugar and cinnamon. Stir to combine and then leave to simmer for 10 minutes.  Remove the cherries from the heat and leave to cool in the juices.
  13. Then take 3/4 of the chocolate and melt it in a heatproof bowl over a pan of simmering water. Take a pastry/paintbrush and paint the inside of the meringues with it. This will add some flavour and will also stop the cream from making the meringue soggy. Leave to set.
  14. Meanwhile make the cream filling. Put the whipping cream and vanilla into a bowl and whisk until it just holds its shape.
  15. When the chocolate is set spoon the cream into the meringues. Take the cherries and scoop them out of the juice – save this juice for later! Dry the cherries slightly on some kitchen roll and then distribute them between the meringues, about 3 on each.
  16. Take a vegetable peeler and run it along the edge of the rest of the chocolate over the meringues to get little sprinkles on them. Garnish with fresh mint and serve with the rest of the cherry juice!

Thanks for reading!

Emma x

Deconstructed Mississippi Dessert

Deconstructed Mississippi Dessert

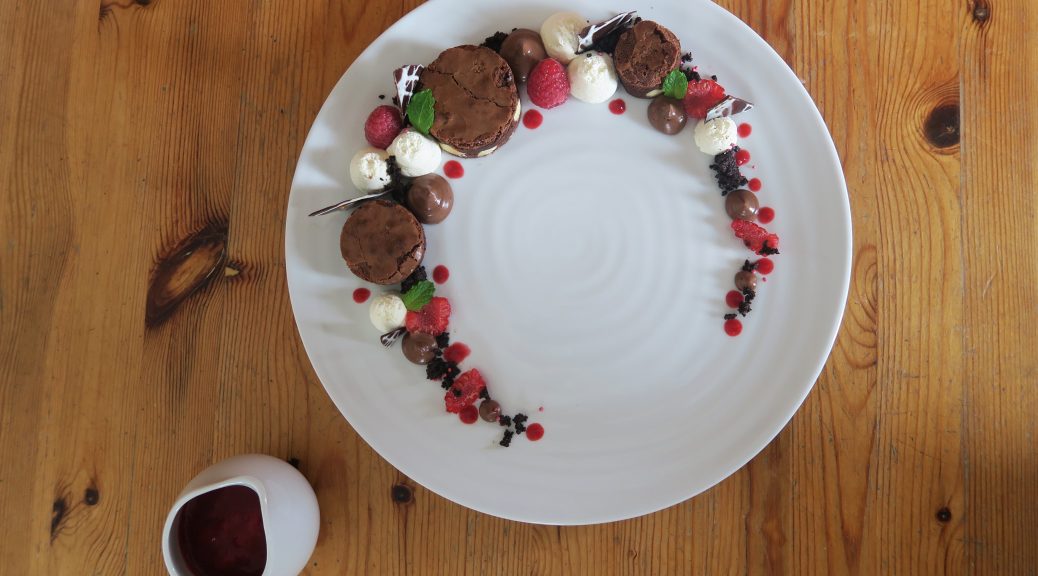
Back in November I made a Mississippi mud pie for thanksgiving, which if I say so myself was pretty darn good. So for a while now, being the massive chocoholic I am, I’ve been thinking how I could re-interpret it, and with a little refinement make it into an awesome dessert. With Masterchef just finished I’ve been going through a bit of withdrawal, but I’ve been super inspired by all the incredible cooking on the show, and so I decided now would be the time to make a more delicate dish, like this delish deconstructed mud pie.

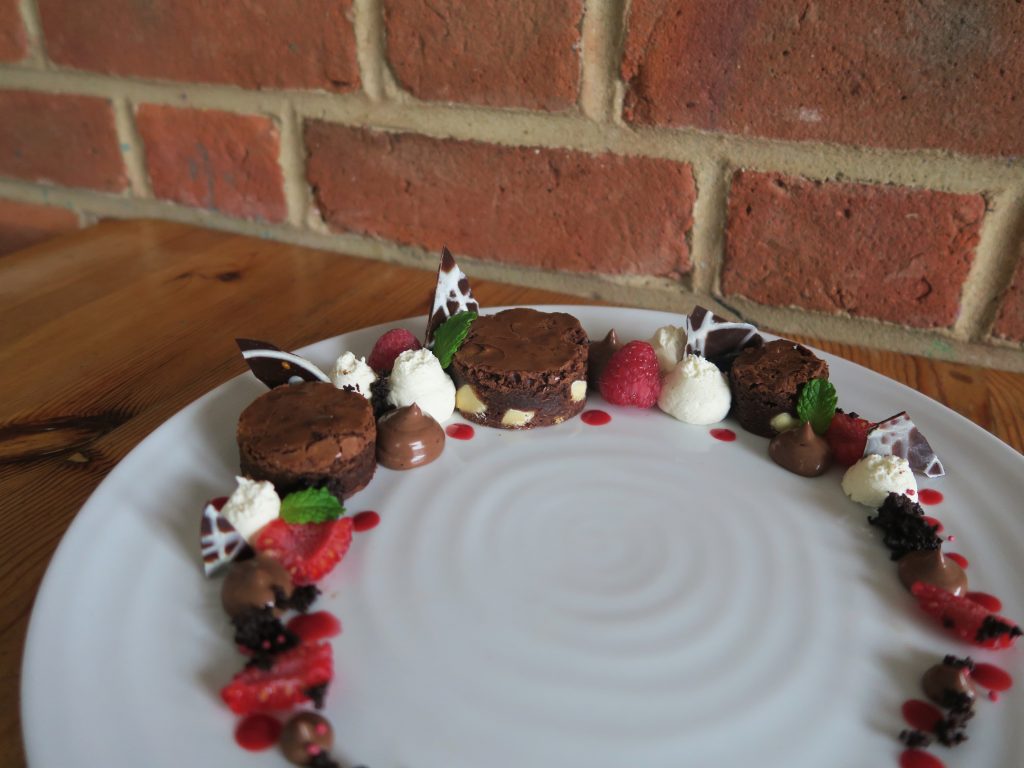
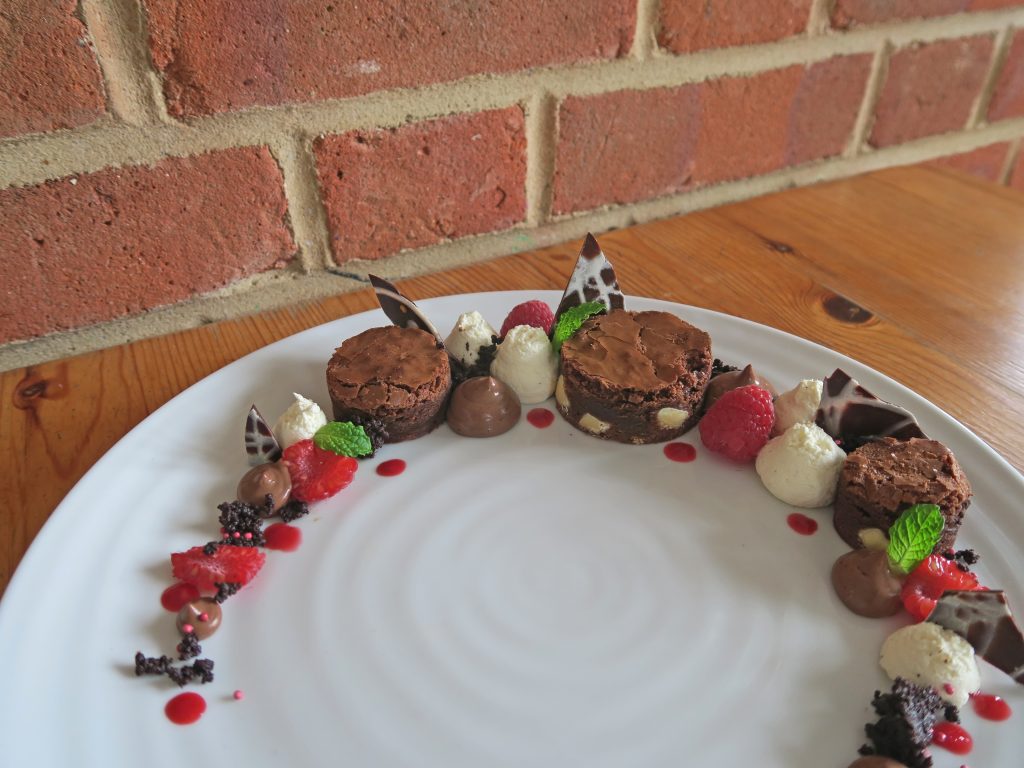
Whilst being predominantly chocolate based, each element here contributes a unique texture and flavour to the dish so it doesn’t come across too rich. Almost like an ombre there’s a crumbly, very rich chocolate crumb, a lighter but fudgy brownie, a creamy sweet chocolate custard, and then a light whipped cream, all served with chocolate shards and a sharp raspberry coulis to cleanse the palette. (As you can probably tell from how pretentious that sounds, I’m pretty proud of how this one has turned out). Unlike my other fancier dishes this one is also fairly easy. There are a lot of elements but each one doesn’t require too much knowhow to make, so it’s worth giving a go!

Recipe

Serves 5

Time 2 hours, plus cooling time

Ingredients

For the Chocolate brownie

  • 110g Butter
  • 140g Dark chocolate
  • 2 Medium eggs
  • 140g Caster sugar
  • 30g Plain flour
  • 100g White chocolate, roughly chopped

For the Chocolate custard

  • 100g Dark chocolate
  • 290ml Whole milk
  • 3 Egg yolks
  • 60g Caster sugar
  • 15g Plain flour
  • 1 tbsp Cocoa powder
  • 20g Cornflour
  • 160ml Double cream

For the Chocolate crumble

  • 100g Plain flour, plus extra for dusting
  • 150g Unsalted butter
  • 55g Cocoa powder
  • 40g Caster sugar
  • 5g Sea salt

For the Cream

  • 300ml Double cream
  • 1 tsp Vanilla bean paste

For the Coulis

  • 150g Raspberries
  • 100g Caster sugar

To Decorate

  • 50g White chocolate
  • 100g Dark chocolate
  • 5 Fresh raspberries
  • A few sprigs of fresh mint

Method

  1. Pre-heat the oven to 180˚C. Grease and line a 15×15 cm loose tin with butter and baking paper.
  2. To make the brownies put the butter and chocolate into a bowl over a pan of simmering water and leave to melt.
  3. Take another bowl and whisk the eggs until pale and fluffy with an electric whisk. Add the sugar and continue to whisk until it leaves a trail when the whisk is taken out.
  4. Fold the chocolate into the eggs, sieve in the flour and add the white chocolate. Fold everything again until combined.
  5. Pour the mixture into the lined tin and bake for around 20 minutes until a crust has formed on top and it feel slightly firm. Set aside to cool.
  6. Now make the chocolate filling. Put the chocolate into a heat-proof bowl and melt over a pan of simmering water. Then put the milk into a pan and heat until just boiling.
  7. In another bowl whisk the egg yolks, sugar, plain flour, cocoa powder and cornflour until smooth. Pour in the milk whilst whisking until smooth. Pour the mixture back into the pan and cook gently, whilst whisking, until just starting to thicken. Take off the heat, stir in the melted chocolate and then leave in the fridge to cool completely.
  8. Take the filling out of the fridge and whisk to break up. In another bowl whisk the double cream to soft peaks. Fold the cream into the chocolate mix and then pour this into a pipping bag. Put this into the fridge to chill for 2 hours.
  9. Now make the chocolate crumble. Put all the ingredients into a bowl and mix until a smooth dough forms. Roll this out on a lightly floured surface to make a thin sheet. Put this onto a baking tray lined with greaseproof paper and bake in the oven for 10 minutes. Take out of the oven and crumble with your fingers to make a crumble/crumb-like texture. Then put it back into the oven to bake for another 10 minutes until crisp. Set to one side to cool.
  10. Next whip up the double cream and vanilla into soft peaks (when it just holds its shape). Spoon this into a pipping bag with a round nozzle and leave in the fridge to chill until needed.
  11. Then make the chocolate shards. Put the white and dark chocolates into separate heatproof bowls over pans of gently simmering water. When melted transfer the white chocolate to a piping bag with a small, round nozzle. Take a sheet of baking paper or acetate and drizzle the white chocolate in a squiggle pattern over it. Leave to set completely at room temperature.
  12. When set, take the dark chocolate and spread over the white chocolate in a thin layer, making it smooth with a palette knife. Leave to set.
  13. Finally make the raspberry coulis. Put the raspberries and sugar into a pan and heat gently until the raspberries mush and gently simmer.
  14. Pour the mixture into a sieve and press through with the back of a spoon to get the juice and pulp but to remove the seeds. Pour this into a pipping bottle with a small, round nozzle and leave in the fridge until needed.
  15. When ready to plate up begin by cutting 3 small circles out of the brownie. Place these in a semi-circle around the edge of the plate. Take the chocolate custard and pipe blobs of it around the brownies. Then take the fresh raspberries and arrange them in a crescent around the other elements. Then take the cream and fill in the gaps. Then sprinkle the crumble in the gaps to make a crescent shape and then break the chocolate sheet into shards and place them around the plate. Take the coulis and pipe spots of it around the plate, and then put the rest into a jug to serve with the dessert. Garnish with the fresh mint and serve!

 Thanks for reading!

Emma x

Hazelnut Cake with an Orange, Balsamic, Salted Caramel Ice cream, Honeycomb and Chocolate Shards

Hazelnut Cake with an Orange, Balsamic, Salted Caramel Ice cream, Honeycomb and Chocolate Shards

You probably recognise the elements of this dessert from my post last week on orange, balsamic and salted caramel chocolates. After I made them I had some of the caramel left over and so I was inspired to work it into a dessert somehow. I  decided to use the caramel to flavour an ice cream and to decorate the plate, and then I put it with chunks of honeycomb, a hazelnut cake and chocolate shards.

This combo of flavours, textures and temperatures makes for a really decadent dessert. It’s a bit complicated and will take some time to make, but it’s all well worth the effort. However, if you want a slightly unique pudding with as little effort as possible the ice cream is also very good on its own!

Recipe

Serves 4

Time: 2 1/2 hours

Ingredients

For the Caramel

  • 125ml Orange juice
  • 45ml Whipping cream
  • 1/2 tbsp Vanilla bean paste
  • 150g Caster sugar
  • 20g Liquid glucose
  • 100g Salted butter
  • 7 ml Balsamic vinegar

For the Ice cream

  • 2 tbsp Vanilla bean paste
  • 600ml Double cream
  • 80g Sugar
  • 3 Egg yolks

For the Cake

  • 100g Butter
  • 75ml Semi-skimmed milk
  • 300g Light brown sugar
  • 6 Large eggs
  • 2 tbsp Cornflour
  • 180g Plain flour
  • 200g Chopped hazelnuts

For the Honeycomb

  • 100g Caster sugar
  • 40g Golden syrup
  • 1 tsp Bicarbonate of soda

For the Shards

  • 100g White chocolate
  • 200g Dark chocolate

To decorate

  • Chopped Hazelnuts
  • 50g Dark chocolate

Method

  1. Begin by making the caramel for the ice cream. Put the orange juice into a pan with the vanilla and gently simmer over a medium heat until it’s reduced by half.
  2. Meanwhile put the cream in a pan over a low heat and start to warm through.
  3. Then put the sugar and glucose into a pan and heat gently whilst stirring until the sugar crystals dissolve. Then leave the mixture to boil until it becomes a deep amber caramel.
  4. Take the caramel off the heat and add the warmed cream, stand well back when you do this as the mixture will spit a LOT. Mix the cream in and then do the same with the reduced orange juice.
  5. Cut the butter into cubes and then stir them into the caramel, a few chunks at a time. Then leave the mixture to cool before stirring in the vinegar. Transfer the caramel to a pot and leave in the fridge for 2 hours to set a little.
  6. Then start making the ice cream base. Put the vanilla and cream into a pan and bring slowly to the boil.
  7. In a bowl put the sugar and egg yolks and whisk until pale. Then slowly pour in the hot cream mixture whilst continuously whisking. Keep whisking until the mixture starts to cool.
  8. Then put the mixture through a sieve before whisking in most of the caramel, keeping a little aside for plating later. Pour the mixture into an ice cream maker and leave to churn. Once starting to set pour the mixture into a freezer-proof container and leave in the freezer to set completely.
  9. Next make the hazelnut cake. Pre-heat the oven to 180˚C. Then grease a 20x20cm square tin with butter and baking paper.
  10. Put the butter and milk into a pan and heat gently until the butter has melted. Set to one side.
  11. Put the sugar and eggs into a large bowl and whisk with an electric whisk until thick, pale and fluffy.
  12. Sift the flour and cornflour and then fold them into the mix with a large metal spoon or spatula. Add the chopped hazelnuts and fold them into the mix. Finally pour the milk and butter mixture into the main bowl and fold this in until fully combined.
  13. Pour the mixture into the lined tin and then bake in the pre-heated oven until risen and springy to the touch, about 30 minutes. Check if it’s done by inserting a skewer, it should come out clean. Then turn the cake out onto a wire rack and leave to cool completely.
  14. Meanwhile move onto the honeycomb. Put the sugar and golden syrup into a pan. Put over a medium heat and cook, whilst stirring until the sugar has dissolved. Then stop stirring and leave to boil until it reaches a deep amber colour.
  15. Take the mixture off the heat and quickly tip in the bicarb. Stir quickly with a wooden spoon and then turn it out onto a baking sheet and leave to set completely.
  16. Then make the chocolate shards. Put the white and dark chocolates into separate heat-proof bowls over pans of simmering water. Leave to melt gently.
  17. Spoon the white chocolate into a pipping bag with a small nozzle and drizzle over a sheet of acetate, or if you don’t have acetate you can use baking paper, to make a doodle-pattern. Leave to set completely.
  18. Then take the slightly cooled, melted dark chocolate and pour it over the white chocolate. Smooth the layer over with a palette knife to make a smooth sheet of chocolate and then leave to set.
  19. Now plate up! Slice the hazelnut cake into rectangles. Place one of these onto your plate on an angle. Drizzle with a little melted chocolate and top with a hazelnut at one end.
  20. Take a scoop of your icecream and place it on the plate next to the cake. Then decorate the plate with your honeycomb and chopped hazelnuts. Then cut your chocolate sheet into triangles and gently peel them off and place them around the plate. Finish with a few blobs of the caramel!

Thanks for reading!

Emma x

Orange, Balsamic, and Salted Caramel Chocolates with Honeycomb and Hazelnuts

Orange, Balsamic, and Salted Caramel Chocolates with Honeycomb and Hazelnuts

This is one of those rare occasions when my cooking coincides with my art practise. I’ve recently been inspired by multi-sensory art and the general stimulating of the other senses to enhance our perception of visual art. For this I made some photograms in response to a trip to Bristol I went on the other day. I then analysed these photograms and developed a chocolate to reflect them. WARNING: things are about to get seriously pretentious!

I decided to go for a dark chocolate shell to represent the deep dark tones in the image. I then filled it with a orange balsamic salted caramel – bitter, sharp, sweet and salty tastes to reflect the structural and mechanical elements of the photos, whilst being smooth and soft in texture to reflect the softer marks captured on the paper. Finally, honeycomb and hazelnuts to give some texture, as the images are also highly textured, and to provide a roasted, caramelised flavour. It sounds weird, but it kinda made sense when I was working through it. I then got my friends to eat the chocolates in front of the photograms (as demonstrated by the lovely Lisa above) and voila – multi-sensory art!

As with all good chocolate work, this does require some techy stuff to make it, so here’s a quick heads up of what you’ll need:

  • A plastic mould to construct the chocolates in – I’d recommend plastic over silicon. It’s harder to get them out but you’ll get a more defined shape and your chocolates will have a greater chance of keeping their shine if they’re made in a plastic mould.
  • A good digital thermometer. This is essential for properly tempered chocolate which will result in chocolates that are shiny and crisp to bite into. It will also prevent the chocolates from getting a ‘bloom’ which is when the chocolate sets with a white chalky finish, so if you want a professional finish tempering’s the way to go.
  • You should also use a chocolate with high cocoa solids (higher than about 75% is good). You can find this out by looking at the back of the packaging. A higher cocoa content means that the chocolate is higher quality and will therefore temper better.

Recipe

Makes 21

Time: 2 hours

Ingredients

  • 400g Dark chocolate
  • 100g Roasted, chopped hazelnuts

For the Honeycomb

  • 100g Caster sugar
  • 40g Golden syrup
  • 1 tsp Bicarb

For the Caramel

  • 125ml Orange juice
  • 45ml Whipping cream
  • 1/2 tbsp Vanilla bean paste
  • 150g Caster sugar
  • 20g Liquid glucose
  • 100g Salted butter
  • 7 ml Balsamic vinegar

Method

  1. Begin by tempering the chocolate. Finely chop the chocolate with a serrated knife. Then put 300g of this chocolate into a heatproof bowl and place over a pan of gently simmering water (aka a bain marie), making sure that the bottom of the bowl doesn’t touch the water.
  2. Melt the chocolate until it reaches 55-58°C on an electric thermometer and then take the chocolate off the heat. Put 100g of the melted chocolate into another heatproof bowl and put back over the bain marie to keep it warm.
  3. Meanwhile add the other 100g of chopped chocolate you set aside earlier to the remaining 200g of melted chocolate and stir constantly until the temperature decreases to 28-29°C.
  4. Pour the melted chocolate you’ve been keeping warm back into the main bowl of chocolate and combine to raise the temperature to 31°C. Your chocolate’s now ready to use!
  5. Pour the chocolate over your mould so every hole is fully filled to the top. Tap the mould on your worktop to get rid of any bubbles and then turn the mould 180° over a container and let the excess chocolate drip out.
  6. Once the chocolate has mostly stopped dripping you should have the mould coated with a thin layering of chocolate. Take a chocolate scraper or palette knife and move the blade over the top of the mould at a 45° angle to take all the excess chocolate off the surface. Keep the excess chocolate for later and leave the mould to set completely.
  7. Now move onto the fillings. To make the honeycomb begin by putting the sugar and golden syrup into a pan. Put over a medium heat and cook, whilst stirring until the sugar has dissolved. Then stop stirring and leave the mixture to boil until it reaches a deep amber colour.
  8. Take the mixture off the heat and quickly tip in the bicarb. Stir quickly with a wooden spoon and then turn it out onto a baking sheet and leave to set completely.
  9. Next make the caramel. Put the orange juice into a pan with the vanilla and gently simmer over a medium heat until it’s reduced by half.
  10. Meanwhile put the cream in another pan over a low heat and start to warm through.
  11. Then put the sugar and glucose into another pan and heat gently whilst stirring until the sugar crystals dissolve. Then leave the mixture to boil until it becomes a deep amber caramel.
  12. Take the caramel off the heat and add the warmed cream, stand well back when you do this as the mixture will spit a LOT. Mix the cream in and then do the same with the reduced orange juice.
  13. Cut the butter into cubes and then stir them into the caramel, a few chunks at a time. Then leave the mixture to cool before stirring in the vinegar. Transfer the caramel to a plastic piping bag and leave in the fridge for 2 hours to set a little.
  14. Once everything is ready you can start to fill your chocolates. Put the leftover chocolate from earlier back over a bain marie to re-melt gently.
  15. Cut a small bit off the end of the piping bag filled with caramel and pipe a little bit of caramel into each chocolate shell – you want about half the shell to be filled with the caramel.
  16. Break your honeycomb up into very small pieces and put one or two chunks into the chocolates, pushing them down into the caramel. Sprinkle over the roasted hazelnuts and then leave them to sit for a couple of minutes so the nuts sink into the caramel.
  17. Take your re-melted chocolate and like you did before pour it over the mould. Shake the mould to make sure the chocolate has no bubbles. Then take your palette knife or scraper and drag the blade along the top of the mould at a 45° angle to remove any excess chocolate from the top of the mould. You should now have 21 chocolates filled with your fillings and topped off with a layer of chocolate.
  18. Leave the chocolates to set at room temperature. It’s important not to put them into the fridge when they’re setting as this could cause the chocolate to ‘bloom’ and get a white sheen. Then, once they’re completely set, put them into the freezer for 10 minutes (this will make it a lot easier to de-mould them).
  19. Turn the mould over and bash it on a work top to get the chocolates out (if you have a silicon mould you can just pop them out).
  20. Share and enjoy!

Thanks for reading,

Emma x