Category: Dessert

Apple and Blackberry Crumble

Apple and Blackberry Crumble

Being a country girl, pretty much every hedgerow and tree around where I live is covered in blackberries or apples at the moment, and it’s times like these – when fruit is literally falling onto your doorstep – that you need to make the most of it. The other day a big bag of cooking apples magically appeared on the kitchen table, which happens a lot now that my Mum has discovered foraging. But lucky for me I knew exactly what I wanted to do with them –  when life gives you apples, make apple crumbles.

Ever since I was small a big bowl of this with some custard would put a smile on my face, and it still does to this day. You can put almost any fruit into a crumble – rhubarb, berries or pears just to name a few other classics. Blackberries and apples are definitely my go-to couple though, as they carry a lot of flavour, and they’re the perfect combo of sweet and sharp.

I’d recommend serving this with a really good custard. You can either make this powdered, in which case follow the back of the packet’s instructions, or you could make an even better custard from scratch. For this I have a really good recipe which is on two of my other posts – Bakewell roly poly and French fruit tarts – the links to which are at the bottom of this post under ‘you may also like’ (if they’re not there, refresh the page and they’ll pop up or go to my recipe index).

Recipe

Serves 8

Time: 1 hour

Ingredients

  • 4 Bramley apples
  • 85g Brown sugar
  • 150g Blackberries
  • 150g Butter
  • 150g Caster sugar
  • 150g Plain flour
  • 150g Rolled oats
  • 1 tsp Ground cinnamon

Method

  1. Preheat the oven to 180˚C.
  2. Peel, core and chop the apples into chunks.
  3. Put the apples into a pan with the brown sugar and heat gently until they begin to break down and soften. At this point remove them from the heat, add the blackberries, and set aside for now.
  4. Now make the crumble topping. Put the butter and caster sugar into a bowl and beat with a wooden spoon until smooth and light. Add the flour and rub it into the butter mixture with your fingers. Work this until you get a bread-crumb texture, shaking the bowl from side to side every so often to bring the lumps to the top.
  5. Add the oats and cinnamon, and then mix with a round bladed knife to combine with the breadcrumb mixture. Don’t worry if clumps form, this will happen as the butter will have softened, it’ll taste good.
  6. Take a large oven-proof pot or dish and put the stewed apples and blackberries into it. Spoon the crumble over the top loosely, not pressing down as you want it to remain crumbly.
  7. Put the crumble into the oven for 25-35 minutes until the topping is golden brown and slightly crisp.
  8. Serve immediately with lots of custard, cream or ice cream.

Thanks so much for reading and happy national baking week! We’re getting halloweeeny on the next few posts so make sure you look out for them.

Emma x

Bakewell Roly-Poly Pudding

Bakewell Roly-Poly Pudding

I think this might just be the most British pudding that has ever existed. Not only is it a roly-poly pudding – the Lord of quintessentially British desserts – but it’s a bakewell roly-poly pudding.  For years this steamed suet roll has been gracing our tables in the UK, whether it be in the school canteen or at a humble family meal, and so it’s naturally become synonymous with warmth and comfort. Thus, if you need a little comfort food, all you need to do is rustle up one of these –  it’s bound to bring back memories of cosy autumn evenings and home baking, even if you never had this as a kid.

The flavours of a bakewell pudding can be summarised as almonds + raspberry. In this case I’m going to use plums instead as they’re in season and also work really well with the almonds. I’m also not going to use traditional animal suet as it isn’t vegetarian and vegetable suet is just as readily accessible. You could use it if you want the true ‘authentic’ version, but it’s completely your choice. I must warn you that suet is weird. If you’ve never worked with it before, imagine those pellets that you feed rabbits, then imagine them made out of wax. That’s the kind of stuff we’re dealing with here. But, that said, it does make really good puddings, so we’re going to use it.

I should probably write more for this post, but a simple pudding only needs a simple write-up. So, in summary, this tastes good and it’s comforting, perfect for now!

Recipe

Serves 8

Time:  1 hour plus extra time for cooking

Ingredients

  • 50g Slightly salted butter
  • 200g Self raising flour
  • 50g Ground almonds
  • ½ tsp Almond essence
  • ½ tbsp Vanilla bean paste
  • 50g Vegetable suet, shredded
  • 150ml Milk
  • 150g Plum jam

For the custard

  • 250ml Whole milk
  • 1 tbsp Vanilla bean paste
  • 50g Caster sugar
  • 3 Egg yolks
  • 10g Plain flour
  • 10g Cornflour

To serve

  • 2 Plums
  • 75g Plum jam
  • 25g Flaked almonds


Method

  1. Preheat the oven to 180˚C. Take a deep roasting tin and fill it with water about 2/3 full. Put this onto the bottom shelf, or base of the oven and leave in the oven.
  2. Take a sheet of foil and another of greaseproof paper and lay the paper on top of the foil. Grease the paper lightly with butter, and set aside for later.
  3. Now it’s time make the roly-poly. Put the butter, flour, ground almonds, almond essence and vanilla into a bowl. Cut into the butter with a round bladed knife to chop it into small lumps. Once you can’t chop the butter any further, go in with your fingers and rub the butter into the flour until you have a bread-crumb texture. Shake the bowl from side to side every now and then to get the lumps to the top so you can rub them in.
  4. Stir the suet into the mixture. Then pour in the milk and bring together with a round-bladed knife until a dough forms. If the dough is dry add some more milk, you want the dough to be a little sticky.
  5. Flour a surface (a lot) and tip out the dough. Shape into a rough square and then roll out to around 25x25cm. Don’t roll it as thin as you would pastry, and this dough is very soft and will tear easily.
  6. Spread the jam over the sheet of dough, leaving a 1cm strip at one end. Roll the dough up from the other end into a tight spiral. Pinch the non-jammy dough into the roll to seal it.
  7. Lift the roll onto the greased baking paper, making sure that the join is on the paper and not facing up. I know this part is much harder than you would expect, I found that it’s true to it’s name, and so literally rolling it onto the greaseproof was the best way to get the roll off the work surface.
  8. Bring the foil and paper up around the roly-poly and fold over the top and scrunch the ends to seal the parcel. Don’t wrap the dough too tightly as it’ll need to stretch when cooking.
  9. Make sure a rack is above the tin of water in the oven and place the parcel onto the rack. Steam in the oven for at least 1 hour.
  10. Meanwhile make the custard. Put the milk and vanilla into a saucepan and bring to the boil.
  11. Mix the sugar, egg yolks and two flours until fully combined. Once the milk is heated, remove the pan from the heat and mix 1/3 of the milk into the egg mixture.
  12. Whisk the mixture quickly and then pour the egg mixture into the milk. Put the pan back over a heat and whisk on a medium heat until the mixture boils and thickens. Pour into a jug and cover with cling-film to prevent a skin from forming. Set aside for later.
  13. Once the pudding is ready take it out of the oven and let it sit for a few minutes before unwrapping. When this is going on you can prep the decorations.
  14. Put the almonds into a small roasting tin and roast in the oven for 3-5 minutes, or until starting to brown. Set aside for now. Then halve, stone and thinly slice the plums. Take the extra plum jam and put into a pan. Heat gently for around 2 minutes, until it’s thinned out slightly. Put into a pipping bag with a small round nozzle.
  15. Unwrap the roly-poly and put it onto a serving plate. Arrange the plum slices on top of the pudding. Pipe the thinned jam on top of the plum slices in a zig-zag and top with the flaked almonds. Serve with the custard and enjoy!

Thanks so much for reading. I hope this one brings you a little warmth and comfort for the cold days ahead. Next post coming out on Sunday!

Emma x

Raspberry and Hazelnut S’more Dessert

Raspberry and Hazelnut S’more Dessert

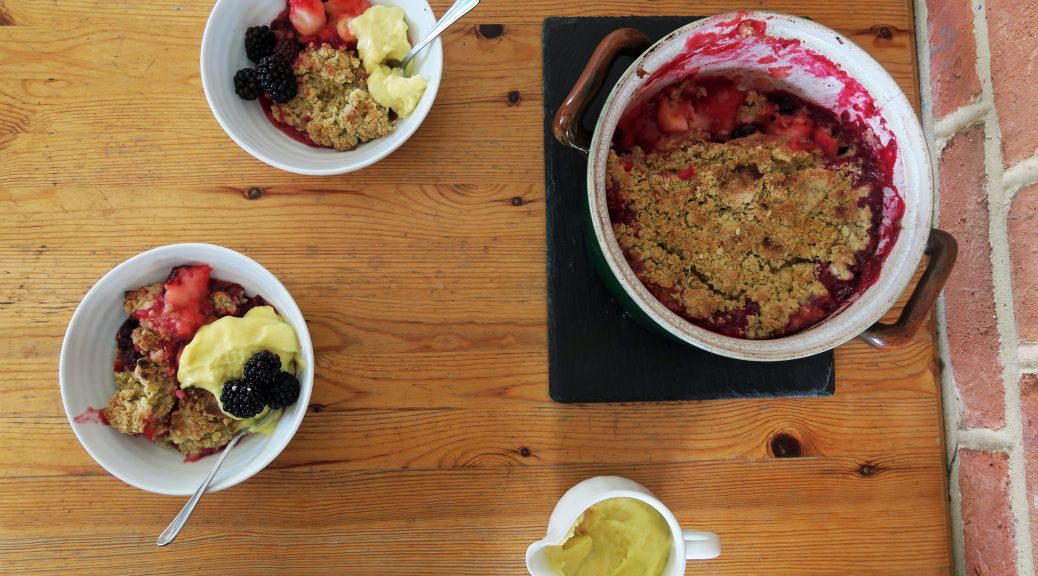
A s’more is one of the best campfire snacks there is. Two graham crackers sandwiching a thick marshmallow and a block of chocolate, all put over an open flame to melt it into a messy squidgy tasty thing. However, the main problem with s’mores is that they rarely make an appearance outside the mid-summer eve campfire.

On my travels this summer, as you’ll probably all know by now, I spent some time in North America. This is the hometown of the s’more, and pretty much every supermarket I went into had giant marshmallows and graham crackers everywhere, just asking to be made into these treats. This sparked my imagination to try to transform this snack into a fully-fledged dessert.

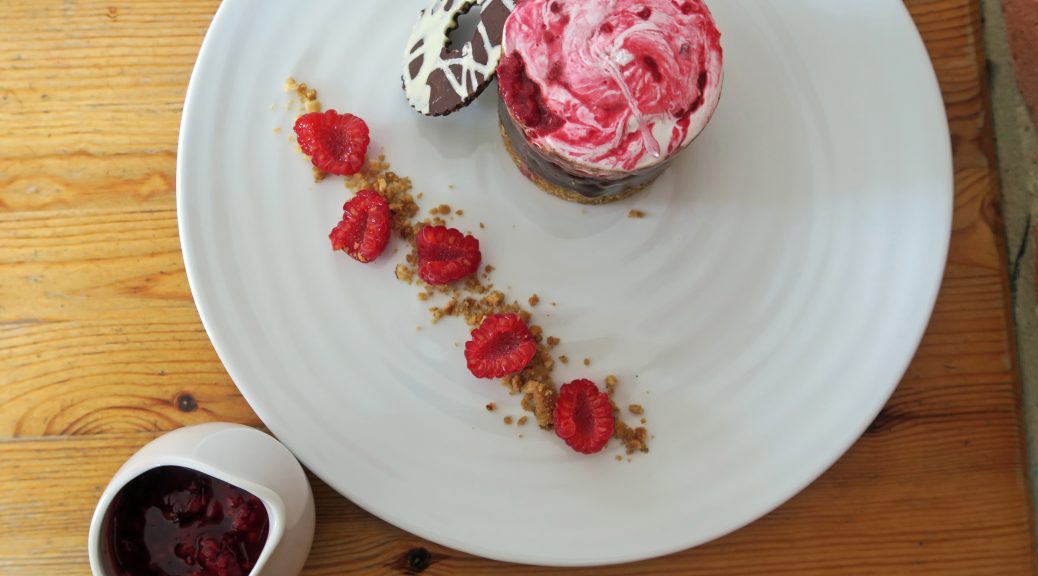
So that’s what I’ve done. I’ve taken the main components of biscuit, marshmallow and chocolate and have played around with them to make this. I’ve added in the two new flavours of raspberry and hazelnut as I think they bring something new that works with this. They also helpfully cut through the pure sweetness which you inevitably get once you’ve up-sized this snack. So in the end we have a nutty biscuit base – a bit like a cheese cake, a chocolate and brown butter ganache, and a raspberry marshmallow to top it all off.

Whilst I usually write my own recipes I should point out that the chocolate and brown butter ganache I haven’t changed at all from the original source. I found this recipe on the Great British Chefs website, and after I’d made it I found that it tasted so good I didn’t want to mess around with it. Originally the ganache was part of a much larger recipe (the link to which is at the bottom of this post), but I’ve taken it out of that recipe and have slotted  it into this one, where I think it fits really well. The ganache also tastes really good on it’s own, so if you have any mixture left over after making this, put it into small pots and you can have it as an after-dinner snack!

This does take a long time to make, and it is fairly complicated, but the finished result is well worth the effort. Just make sure you have a crazy amount of time to carry  it out so you don’t get stressed, and be patient.

It’s also worth mentioning before you start that you’ll also need some specialist equipment to make and present this. You’ll need 4 metal food presentation rings, a blowtorch, an electric or stand-alone whisk, and an electric food thermometer. You could probably work around this if you don’t have any of the above (the rings and blow torch in particular), but unless you have a really strong arm and an intuitive sense of what temperature sugar is boiling at, you’re going to need a thermometer and electric whisk. Anyway, aside from that there’s no reason why you can’t make this, so on to the recipe…

Recipe

Serves 4

Time: 2 1/2 hours, plus lots of time to set the layers

Ingredients

For the hazelnut biscuit base

  • 50g Chopped hazelnuts
  • 150g Biscuits
  • 70g Butter

For the chocolate and brown butter ganache

  • 200g Salted butter
  • 200g Dark chocolate, melted
  • 200g Milk chocolate, melted
  • 375g Double cream
  • 50g Glucose
  • 3 Egg yolks
  • 4g Cocoa powder

To decorate

  • 100g Dark chocolate
  • 50g White chocolate

For the raspberry marshmallow

  • 225g Granulated sugar
  • ½ tbsp Liquid glucose
  • 2 Gelatine sheets
  • 1 Egg white
  • ½ tsp Vanilla bean paste
  • 63g Raspberries, crushed

For the raspberry coulis

  • 125g Raspberries
  • 20g caster sugar
  • 1 tbsp lemon juice

Method:

  1. Begin by making the biscuit base. Pre-heat the oven to 180˚C. Put the hazelnuts into a tin and roast in the oven for 5 minutes, until starting to brown. Crush the biscuits in a large bowl with the back of a rolling pin until they become crumbs. Melt the butter in a pan and then add to the biscuits. Add the nuts and then mix until fully combined.
  2. Take 4, 6x7cm presentation rings and place on a lined baking tray. Spoon the biscuit mixture into the bottom of the rings and smooth out with the back of a spoon so it’s an even thickness. Leave in the fridge for half an hour to set.
  3. Next make the chocolate and brown butter ganache. Melt the butter in a pan for around 8 minutes. You want it to turn a rich nutty brown but not to burn. Allow to cool slightly then pass through a sieve. Don’t use a plastic sieve as it’ll melt (I’ve found this out from past experience). Leave to cool completely.
  4. Put 125g of the cream into a saucepan and bring to the boil. Add the glucose and allow to dissolve before removing from the heat.
  5. Melt the chocolates in a heatproof bowl. Then pour the cream onto them and mix until smooth. Set aside for later.
  6. In another bowl whisk the egg yolks until pale and creamy. Add the cocoa powder and whisk again until combined. Slowly drizzle the brown butter into the egg yolks, whisking continuously as you do so, as though you were making a mayonnaise.
  7. Fold the nutty egg mixture into the chocolate mix. Whip the remaining double cream until soft peaks start to form. Fold this into the main chocolate mix.
  8. Take the biscuit bases out of the fridge and pour the brown butter ganache on top. Leave enough space in the top of the moulds to top with marshmallow (so only fill around 2/3 full).
  9. Chill the cylinders in the fridge for at least two hours to set.
  10. Meanwhile make the chocolate decorations. Gently melt the white and dark chocolates in separate heatproof bowls over pans of simmering water. Line two baking trays with acetate. Drizzle the white chocolate over the acetate to create a scribble pattern. Leave to set at room temperature, meanwhile keep the dark chocolate melted but not hot.
  11. Once the white chocolate has set pour the dark chocolate over the top and smooth out with a palette knife. Leave to cool for 5 minutes. Then take a large cookie cutter and cut out rounds out of the chocolate sheet. Take a smaller cutter and cut out smaller circles within the larger ones to create discs. Leave to cool completely until set and then use the cutters again to fully cut out the shapes. Leave somewhere cool until plating.
  12. Once the ganache is completely set you can start to make the marshmallow. Begin by soaking the gelatine sheets in a bowl of water.
  13. Put the sugar, glucose and 100ml water into a saucepan and boil. Heat the sugar until it reaches 127˚C. Remove the gelatine from the water and squeeze to remove excess water. Add to the sugar syrup to dissolve the sheets. Pour the mixture into a jug and set aside for later.
  14. Put the egg white into a very clean bowl and whisk with an electric whisk until firm peaks form (if you have a mixer this is a good time to use it as the next step can take a while). Continue to whisk the egg whites and pour the sugar syrup onto them to make an Italian meringue. Add the vanilla and whisk until the mixture is thick, shiny and has cooled down, this should take around 10 minutes.
  15. Take the raspberries and crush them slightly. Fold them into the marshmallow mixture and then spoon the mixture on top of the ganache in the moulds. Chill in the fridge for at least 1 hour, or until completely set.
  16. To make the raspberry coulis mix the sugar and lemon juice with the raspberries in a pan. Heat gently until the raspberries are mushy and the sugar is dissolved. Press the mixture through a sieve and discard the seeds. Put the coulis into a small jug to serve.
  17. Now it’s time to plate! Use a palette knife to loosen the s’mores from the baking tray. Lift the moulds onto the plate using the palette knife. Use a blowtorch to lightly heat the sides of the moulds to loosen them from the mixtures inside. Remove the moulds to reveal the stacks of s’mores. Blowtorch the top of the marshmallow to lightly caramelise it. Carefully remove a chocolate disc from the acetate with a palette knife and lean against the side of the s’more stack. Serve with fresh raspberries and the raspberry coulis.

Thanks so much for reading, I hope you enjoyed this one! Lot’s more coming very soon…

Emma x

(Here’s the link to the original recipe for the brown butter ganache

http://www.greatbritishchefs.com/recipes/chocolate-brown-butter-ganache-recipe )


Butterscotch Pear Tart with Blackberry Sauce

Butterscotch Pear Tart with Blackberry Sauce

In a few weeks’ time hedgerows across the UK will start to drip with plump blackberries, ripe for the picking. As most hedgerows are free-for-all it’s easy to go on a walk with some boxes and to come back with mountains of free berries. If you want to preserve them they make great jams, ice creams and curds, but I find they also work really well as a sauce for this little butterscotch pear tart recipe.

You can use any type of pears in this tart. I went for conference as they’re an attractive shape and a nice flavour against the frangipane. I’d recommend using ripe pears, as under-ripe and they don’t soften enough in the oven, and if they’re over-ripe and they become a mush once cooked. I’d also strongly recommend making the butterscotch sauce yourself. You can buy it in shops, but it doesn’t taste anywhere near as good, and it only takes 5 minutes to put together, so it’s worth giving it a go.

One last thing – I first made this dessert in Cornwall and I found that serving it with a good scoop of clotted cream is a great way to make it truly decadent. The thick cream with the sweet, sharp, juicyness of the other components just works really well, so I’d recommend giving that a go. Right, now on with the recipe…

Ingredients

Serves 8 (Makes one large tart)

Time – 90 minutes, plus time to chill the pastry

For the pastry

  • 175g Plain flour
  • 2 tbsp Caster sugar
  • Pinch of salt
  • 115g Butter
  • 1 Egg yolk, beaten
  • 2 tbsp Cold water
  • 1 Egg white, slightly beaten

For the butterscotch sauce

  • 100g Butter
  • 100g Light muscovado
  • 4 tbsp Golden syrup
  • 8 tbsp Double cream

For the tart filling

  • 100g Ground almonds
  • 100g Caster sugar
  • 100g Butter
  • 2 Eggs
  • A few drops of almond essence
  • 2 Ripe pears, peeled, cored and quartered

For the Blackberry sauce

  • 350g Blackberries (if they’re not in season when you make this, frozen ones also work)
  • 30g Sugar
  • 1 tsp Cinnamon
  • 1 tsp Ginger

Serve with more fresh blackberries and clotted cream

Method

  1. Preheat the oven to 180˚C. To make the pastry put the flour, caster sugar and salt into a bowl and mix with a round bladed knife. Add the butter to the bowl and cut it up into small pieces with the knife, coating in the flour as you do.
  2. Once the butter is in small chunks put the knife to one side and go in with your fingers. Rub the butter into the flour to create a mixture with the texture of breadcrumbs. Shake the bowl from side to side a couple of times to bring the large lumps to the top, make sure these are rubbed into the flour.
  3. Mix the egg yolk with the cold water. Slowly add the egg yolk mixture to the flour/butter mixture and bring it all together with a round bladed knife until a dough forms. Use your hands to make the dough into a ball and then wrap the dough in cling film and chill for at least 1 hour.
  4. To make the butterscotch sauce, put the butter, sugar and syrup into a pan and bring slowly to the boil whilst stirring. Then stop stirring, reduce the heat, and leave to simmer for 3 minutes until the mixture has thickened and begins to hold its shape. Stir in the cream, remove from the heat, and leave to cool.
  5. Remove the pastry from the fridge and roll it out on a floured surface into the shape of your tin. You want it to be as thin as possible (no thicker than a pound coin). Make sure you move the pastry round frequently to stop it sticking to the table. Compare the size pastry sheet to the size of your tin. You want the pastry a couple of cm wider than the tin so that the pastry will go up the sides and have a little overhang.
  6. To easily get the large pastry sheet into the tin, put the rolling pin at the half-way point of the pastry. Then flip the pastry in half, over the rolling pin. You can then pick the rolling pin up and drag the pastry over the tin. Press the pastry into the flutes in the tin, sometimes using a piece of pastry to do this can be easier than using your fingers. Let the pastry hang over the edge, then use a rolling pin to trim off the excess by rolling over the edge of the tart. Chill the base in the fridge for another hour.
  7.  Line the tart with baking paper and baking beans (or dry rice if you don’t have any) and put into the oven to bake for 10 minutes.
  8. Remove the baking parchment and the baking beans (careful, they’ll be very hot). Lightly brush the pastry with the beaten egg white and then return them to the oven for 5-10 minutes, until golden brown and crisp. Take out of the oven and leave to cool completely.
  9. To make the frangipane, mix the ground almonds, sugar, butter, egg and extract together until smooth. Spoon 2 tbsp of the butterscotch sauce into the case and smooth out with the back of a spoon to cover the base. Pour the rest of the sauce into a jug for serving. Spoon some of the frangipane into the case and smooth out over the sauce. Create a slight well in the centre by pushing more of the mixture up the sides of the case.
  10. Take the pear quarters and arrange on top of the frangipane so that the smooth outside of the pear is facing up. Press the pears down slightly, into the frangipane as you do this. Bake in the oven for around 15 minutes, until both the pear and frangipane are cooked.
  11. Whilst the tart bakes make the blackberry sauce. Put the blackberries into a medium size saucepan with 60ml water, the sugar and the spices. Stir to combine and then leave to simmer until the blackberries have become a mush. Use a hand blender to puree the mixture and then sieve to remove the seeds. Pour the sauce into another jug to serve.
  12. Once the tart is out of the oven leave it to cool slightly. Then take it out of the tin and place on a board. Serve with the blackebrry sauce, the leftover butterscotch sauce, fresh blackberries and plenty of clotted cream. Relax and enjoy!

Thanks for reading, I hope you enjoyed this one! New post is coming out on Sunday. Until then, any comments or questions just let me know.

Emma x

Chocolate Fondants

Chocolate Fondants

Be ready for a long post – these are amazing and I have a lot to say about them! I first made these fondants for a cookery competition 6 years ago, and I’ve been regularly making them ever since. There’s something highly addictive about the taste-texture combination of these little puddings which will have you making them again and again.

They take a little bit of time to master due to the precision needed in the cooking time, and as ovens vary so much you really have to find the perfect time for your particular oven. Cook them for too long and there will be no fondant, too short and there’s no sponge. Instead of using a skewer, like you would for a cake, you have to go on instinct of what the surface texture should look like, in order to know when to take them out the oven.  But apart from the baking bit, they’re really easy to make so I’d recommend giving them a go. Even if they’re under or over baked (and believe me, mine have been both many times) they taste good, so you can’t really lose.

This dessert also looks and sounds impressive, so I’ve found that it works really well as a dinner party dessert. You can make the mixture, and put it into the moulds, up to 48 hours before the party. Chill them in the fridge, then bring them out at least an hour before they go in the oven, to bring them back up to room temperature. This doesn’t affect the quality of the finished dessert and it will give you more time on the day to make everything else. It’s also really easy to make these dairy-free. Simply use soya margarine instead of butter, and make sure the dark chocolate you use has no milk in it. They taste identical to the normal versions, so if you have anyone dairy-free to cook for, instead of making a different or altered dessert for them, you can make these for everyone and no one will notice the difference.

Fondants I made for a dinner party (above)

That said, whilst these are good for parties and for sharing, my favourite time to make them is for a good night in. There’s something truly comforting about a quick-to-make cake which has a soft exterior and then a puddle of velvety sauce in the middle. So, if you’ve been looking for a quick dessert which exudes chocolately gooeyness, and is perfect for a quiet evening, you’ve just found it.

Recipe

Serves 4

Time – 45 minutes

Ingredients

  • 100g Unsalted butter
  • 150g Dark chocolate, chopped roughly
  • 2 Eggs
  • 2 Egg yolks (see below for what to do with the egg whites)
  • 120g Sugar
  • 100g Plain flour
  • A pinch of salt (this really brings out the chocolate flavour)

Method

  1. Pre-heat the oven to 180˚C. Grease four small pudding basins with butter and put onto a baking tray.
  2. In a heat-proof bowl put the butter and the chocolate. Place over a pan of gently simmering water and leave to melt, stirring occasionally.
  3. In a separate bowl whisk the eggs, egg yolks and sugar together until pale a fluffy. An electric whisk is quicker and easier, but a hand whisk also works.
  4. Slowly pour the chocolate mixture into the egg mixture, whisking continuously until smooth.
  5. Add the flour and salt to the mixture and whisk again until fully combined.
  6. Pour the mixture into the four pudding moulds. At this point you can cover the moulds in cling film and chill in the fridge for up to two days, just make sure they return to room temperature before cooking.
  7. Put the fondants into the oven and bake for 8-10 minutes. This time works for me, but as all ovens can vary I’d recommend going on the texture rather than a specific time. You want the surface of the fondants to be just skinning over, so that the edges are cooked but the middle is very soft. If anything bring them out a little too early than too late. If they are too liquid when tipped out, you can quickly microwave them for 20 seconds to cook more of the batter.
  8. Take the fondants out of the oven and use a knife to loosen them from the edge of the moulds. Carefully turn them out onto plates and serve immediately. Enjoy!


These are really good with…

  • Fruit sorbet (raspberry and mango are particularly good ones to try)
  • Any flavour ice cream
  • Salted caramel sauce
  • Fresh fruit (e.g raspberries or strawberries)
  • Clotted, double or squirty cream
  • Fruit sauce (e.g coulis)
  • Chocolate chips or chocolate decorations


How to use up leftover egg whites…

This recipe, like so many others I come across, results in leftover egg whites. You separate the eggs, put the yolks into the batter and are left with two perfectly good, unused whites. They keep in the fridge for up to two days, and can be used for so many things, so rather than throwing them away, here’s some ways of using them up….

  1. Meringues – about 80% of the time I have left over egg whites I turn them into meringues. A simple combo of caster sugar and egg white, meringues are surprisingly simple to make and can be used in so many ways (such as daquoise, pavalova, or meringue kisses – made by pipping the meringue into peaks on a baking tray). If you are going to make meringues though, or any of the following which involve a meringue base (they have a * next to them) it’s better to use the egg whites on the same day as you separate the eggs, as you’ll get a stiffer peak from the mixture, resulting in a better meringue.
  2. Lining pastry – When making pastry brush the whites onto the pastry after taking the beans out for a blind bake. Put the pastry back in the oven for a further 5 minutes after brushing to firm up the base even more. This will act as a barrier between the pastry and the filling, keeping the base crisp.
  3. Marshmallows* – these start off as swiss meringue, and then use gelatin to give that incredible pillowy texture. Like meringues, these can be customised with fruit, nuts and chocolate to make them even more special, and they last for up to two weeks.
  4. They’re still eggs– the eggs may have lost their yolks, but they can still be cooked in the ways you would normally cook an egg. You can fry, scramble or poach the whites as you would  normally.
  5. Mousse* – whilst many mousse recipes require the whole egg, some are egg whites only, and thus can be a good thing to make when left over whites are hanging around. Whilst these don’t technically have a meringue base, it’s still important to use the egg whites fresh, as it will allow more air to be trapped, and so will result in a better mixture.
  6. Icing – egg whites can be used to make royal icing for anything in need of some icing, including Christmas cakes, so if you happen to have one lying around that you need to ice…
  7. Macaroons* – another meringue based delight. Add almonds and a bit of flourish and you’ve got these great little biscuits.
  8. Bread glazes – if you’re into bread making you can use the whites to glaze bagels, buns and loaves. Brush them over with the whites after their second prove, or just before putting them into the oven. If you want a golden crust you’ll be better off using egg yolks, but the whites can still give a beautiful shine.
  9. Cakes – Some cakes, such as angel food cake, use only egg whites, so why not make a lighter-than air cake with some of the leftover egg whites?
  10. Soufflés – These are really fun to make! You can make them in almost any flavours and they taste amazing. They maybe aren’t so great to make on the same day as cooking the fondants, as they’re best with fresh egg whites, and need to be baked and eaten immediately after being made. However, if you’re chilling your fondant mixture for another day, these are great for a decadent dinner dessert.

I hope you enjoyed this post! More coming soon so keep a look out. Any requests, comments or questions don’t hesitate to ask.

Emma x