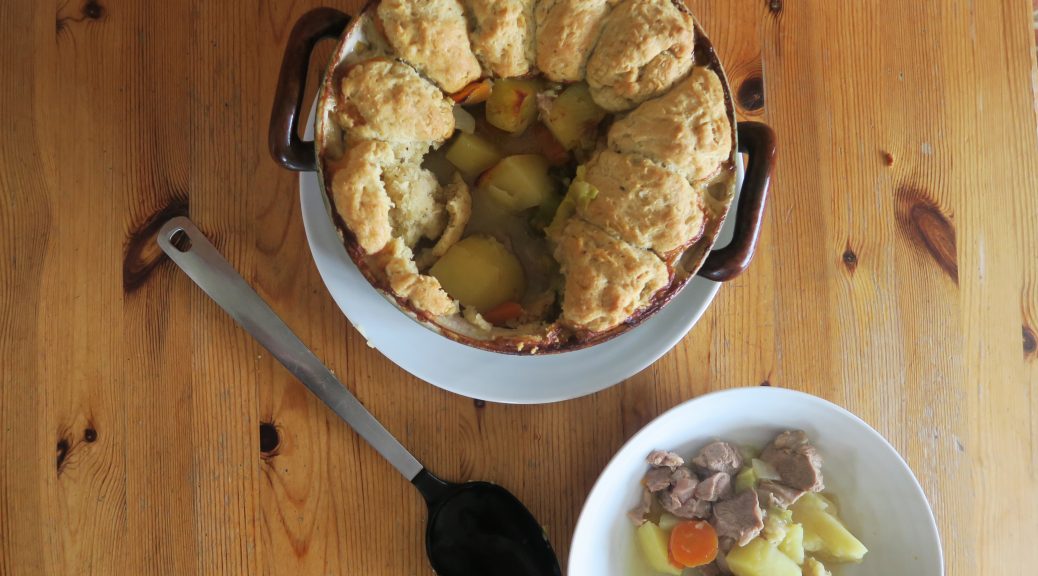
Irish Stew with Dumplings
One day I’ll stop doing a themed dish for every post, but today’s not that day. Apparently it’s St Patrick’s day on Saturday so it’s time to start digging out the shamrocks and leprechauns to celebrate. Alongside that a good lamb and potato stew should definitely be on the menu. This one is full of nourishing veg and tender lamb shoulder, which goes really well with the light herby dumplings and warming broth to make a hearty meal all in one pot!
 Stews also always taste better a few days after they’re made, so you can make this up to two days in advance without the dumplings, leave it in the fridge and then carry on the recipe from step 7 when you need it.

Recipe
Serves 6
Time: 30 minutes prep, 2 hours cooking
Ingredients
For the Stew
- 2 tbsp Vegetable oil
- 1 White onion, roughly chopped
- 450g Lamb shoulder pieces
- 2 Large baking potatoes, peeled and cut into quarters
- 1 Leek, Finely sliced
- 2 Large carrots, peeled an roughly chopped
- 2 tbsp Plain flour
- 750ml Beef stock
- Salt and pepper to season
For the Dumplings
- 150g Butter
- 250g Self-raising flour
- 2 tbsp Chopped mixed herbs
Method
- Pre-heat the oven to 180˚C.
- Put the oil into a large frying pan and put over a medium heat. Add the chopped onion and fry gently until it starts to caramelise. Tip this into an oven-proof casserole dish.
- Add the lamb pieces to the pan you cooked the onions in and fry until the pieces have browned all over. Season the meat and then add the lamb to the dish with the onions.
- Cover the lamb and onions with the chopped potatoes, leeks and carrots, and then mix it all together.
- Add the flour to the pan you cooked the lamb in and cook it on a gentle heat for about 3 minutes so it soaks up all the juices. Then slowly add the beef stock whilst stirring until you have a smooth, lump-free sauce.
- Pour this sauce over the meat and vegetables. Cover the casserole with a lid and then put it into the oven to cook for 90 minutes. Check on this several times to make sure the sauce hasn’t reduced too much, if the meat or vegetables are exposed cover with more water.
- Now make the dumplings. Put the butter and flour into a large bowl. Using a knife cut the butter into little pieces in the flour, and then go in with you fingers and rub the butter into the flours to make a mixture like breadcrumbs.
- Stir in the herbs, salt and pepper to season. Pour in 150ml water and stir with a round bladed knife to form a dough. Flour your hands and roll the dough into small balls.
- Put the dumplings around the edge of the stew and put back into the oven uncovered to bake for another 25-30 minutes.
- Serve!

Thanks for reading!
Emma x


 (Note: If you don’t have a blowtorch you can caramelise the sugar under the grill. Be careful with this though as it can burn very easily (as I’ve done a bit in these ones))

