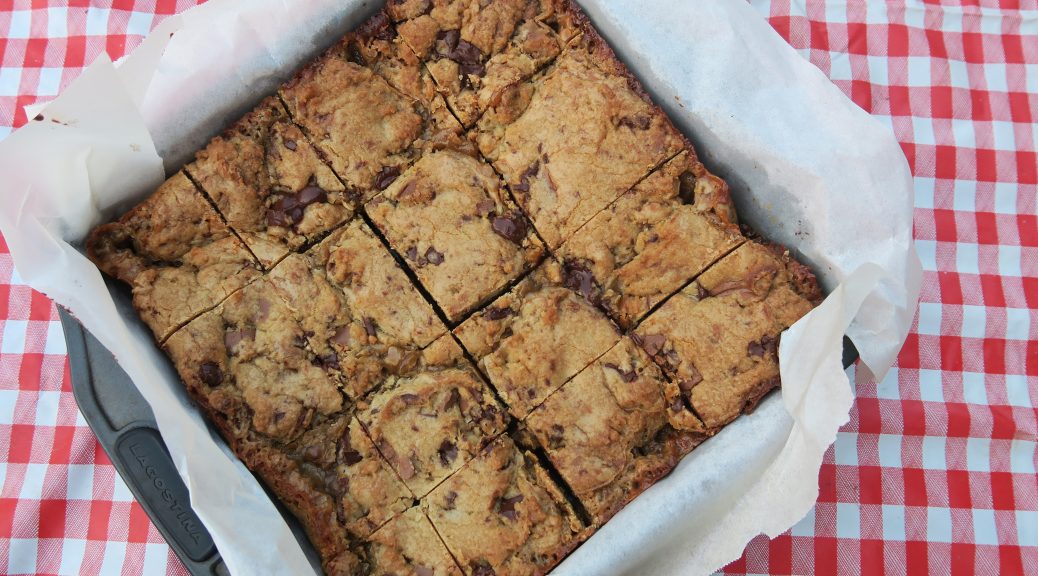
Salted Caramel Cookie Bars
During my time in Canada this summer I was surprised to find myself being more sociable than I’d ever been in my 19 years living in the UK. As my sister used to live out there she had loads of people to catch up with, and as all of them were so lovely and hospitable we were invited to more BBQs and picnics than I can count! It was so amazing to be in a culture where everyone is so welcoming. Maybe it’s because I’m English, or maybe it’s because I’m more specifically a Southerner, but until then I’d never experienced so many strangers being so hospitable and kind to me. A few plates of ribs, wings and chicken breasts and it felt like you were slipping into a community you were already apart of, sitting around with friends you’d known for years.

On the evening’s we were lucky enough to have a BBQ to go to we’d always take some food to add to the table, and being a keen baker it was often a dessert that I contributed. I made these particular bad boys to take to a BBQ at my sister’s old work friends Bonnie and Wanda’s house. They were super quick to make, really easy to transport and perfect for sharing as we could cut them up into as many pieces as we needed. For these I made my own caramel because I happened to have to ingredients for it lying around, but you could use a pre-made caramel to make these super easy!

Recipe
Makes 16 squares
Time: 20 minutes, plus cooking time
Ingredients
For the caramel
- 125g Light brown sugar
- 350ml Double cream
- 50g Unsalted butter
For the cookie dough
- 300g Plain flour
- A pinch of salt
- ½ tsp Bicarbonate of soda
- 180g Unsalted butter, melted
- 130g Light brown sugar
- 100g Granulated sugar
- 1 Large egg
- 1 Large egg yolk
- 2 tsp Vanilla extract
- 100g Milk chocolate, chopped roughly
- 100g Dark chocolate, chopped roughly
Method
- Begin by making the caramel. Put the butter, sugar and half the cream into a pan and bring to the boil whilst stirring. Leave to boil for 5 minutes, until starting to thicken and turning golden, and then take off the heat. Stir in the rest of the cream and set aside to cool until needed later.
- Preheat oven to 170˚C and then line an 19x19cm square tin with baking paper.
- In a bowl whisk together flour, salt and bicarb.
- In another bowl mix together the melted butter and the sugars. Then add the egg, egg yolk, and vanilla and beat until smooth.
- Slowly add dry ingredients, mixing as you do, and then the chopped chocolate. Mix together until combined.
- Divide the dough into two and put half the cookie dough in the lined tin. Smooth over with a spatula to make an even layer.
- Pour the cooled caramel over the cookie layer. Then spread the rest of the cookie dough over the top. (Spooning it on first can help here as the caramel will make it hard to spread out. If you can’t cover all the caramel don’t worry as they dough will spread itself out during baking).
- Bake for 25-30 minutes until the top is golden brown and the edges have started to crisp. Leave to cool and then cut into 16 bars.

Thanks for reading!
Emma x