Category: Cakes

Lemon Swiss Roll

Lemon Swiss Roll

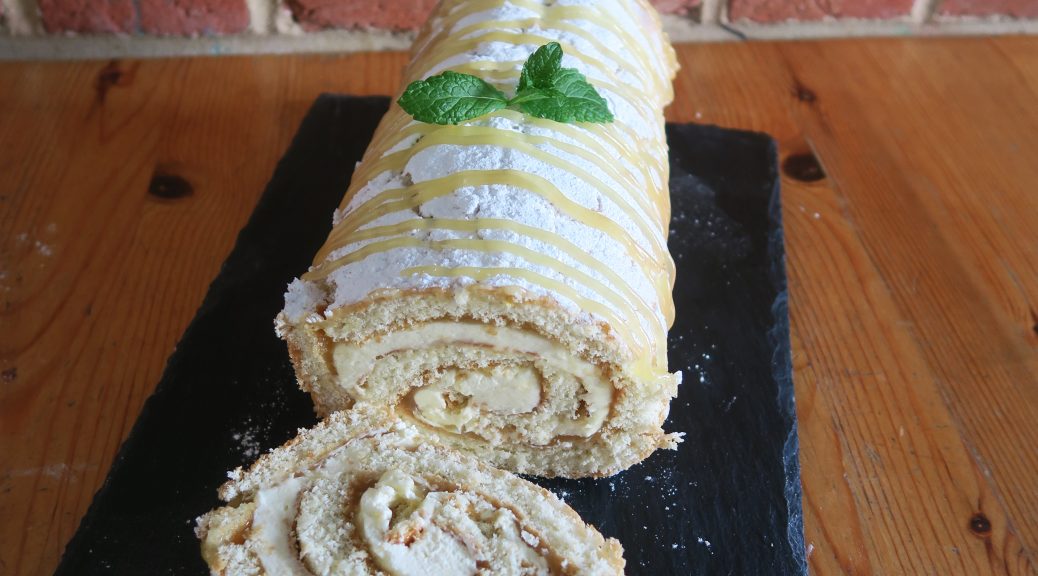
So today’s Mother’s day and I don’t know about you but my Mum does so much for me she deserves a good treat on a day like today! Whilst cards and flowers are the more traditional prezzie I tend to give people bakes for special occasions – I actually first made this for my friend Lisa’s birthday back in October, but I’ve been saving it to post until now as I think it’s perfect for Mother’s day.

The cake is insanely light as it’s essentially a meringue with a bit of flour folded into it, which makes it really refreshing and delicate when eaten with the chantilly cream and lemon curd filling. It’s shape also makes it perfect for sharing, and as it’s easily transportable it’s the perfect Mother’s day bake/gift!

Recipe

Serves 8

Time: 1 hour

Ingredients

For the cake

  • 3 Large eggs
  • 115g Caster sugar, plus extra for dusting
  • Zest of 1 Lemon
  • 115g Plain flour

For the filling

  • 350ml Double cream
  • 1 tbsp Vanilla bean paste
  • 40g Icing sugar
  • 3 tbsp Lemon curd, plus extra to garnish
  • Icing sugar for dusting
  • Mint to garnish (optional)

Method

  1. Pre-heat the oven to 180˚C.
  2. Line a 30×25 cm Swiss roll tin with butter and baking paper.
  3. Put the eggs, sugar, and zest into a heatproof bowl over a pan of simmering water.
  4. Whisk the mixture with an electric whisk until the mixture is pale and thick enough to leave a trail when the prongs are lifted out of the mixture.
  5. Take the bowl off the heat and keep whisking for another 5 minutes until the mixture is really thick.
  6. Sift in the flour and fold it in with a large spatula or metal spoon until it’s fully combined.
  7. Pour the mixture into the lined tin and bake in the oven for about 12 minutes, until risen and springy.
  8. Put a sheet of baking paper onto the worktop and dust it with caster sugar.
  9. Tip the cake out of the tin and onto the paper. Take a knife and score a line about 1cm from the short edge. Roll the Swiss roll up, with the paper inside the roll, until it’s as tight as possible. Leave the cake to cool like this.
  10. Meanwhile prepare the filling. Put the cream, vanilla and icing sugar into a bowl and whisk it up to soft peaks – until it just holds its shape.
  11. Once the cake is completely cool unroll it and smooth it flat. Spread the lemon curd over the sponge and then spread the cream over the top in a smooth layer (make sure it reaches all corners of the sponge).
  12. Re-roll the sponge up, this time without the baking paper inside, to make a tight roll.
  13. To make it look neater you could slice the ends off either side of the roll before serving, or you could just leave it as it is. Put a little more curd into a piping bag and drizzle it over the cake. Then sprinkle with icing sugar and garnish with fresh mint!

Thanks for reading!

Emma x

Almond, Blood Orange and Raspberry Cake

Almond, Blood Orange and Raspberry Cake

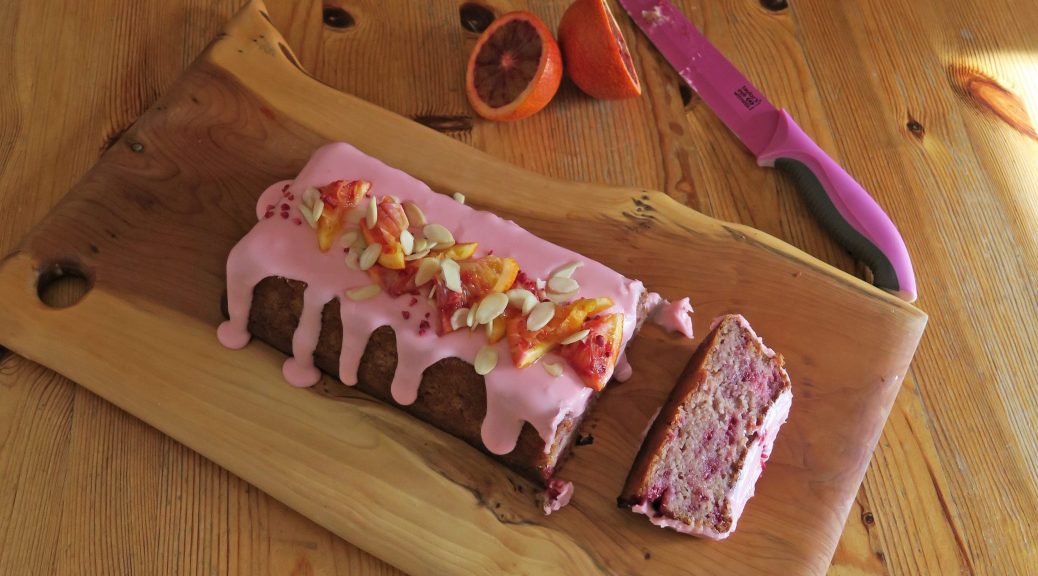
Blood oranges are the delicious ingredient that I think is about to flood the food world and hit the mainstream. They have a very unusual flavour – sort of the classic orange taste with a fruity kick similar to strawberries in the background. This makes it a perfect partner for almonds and raspberries, which when all mixed into a cake tastes delicious! They also have an incredible natural pink colour – this icing is just blood orange juice and icing sugar, no food colouring!

Depending on the size of orange you use the mixture has the potential to end up very wet. If this happens there’s a chance the cake could take too long to cook and end up burnt on the outside and raw in the middle. Therefore, if this happens, I’d recommend adding a couple more tbsp of flour to the mixture to thicken it up – it’s not really the done thing in the world of baking but it works for me. If you’re unsure if your mixture is too wet or not you can check it using the v test. Take a blob of mixture on the wooden spoon you’ve been mixing with and sharply shake the spoon once to drop the mixture off it. If the mixture hanging off the spoon is a v shape it’s ready!

Recipe

Makes 1 cake

Time: 1 hour

Ingredients

  • 250g Butter
  • 200g Caster sugar
  • 60g Clear honey
  • 4 Large eggs
  • 140g Greek Yoghurt
  • 1 tsp Almond extract
  • 250g Self-raising flour
  • 100g Ground Almonds
  • 1tsp Baking powder
  • 200g Frozen raspberries
  •  Zest of 3 Bood oranges
  • Juice of 2 Blood oranges

To decorate:

  • 1 Blood orange
  • 200g Icing sugar
  • A sprinkle of Freeze dried raspberries
  • 25g Flaked almonds

Method

  1. Pre-heat the oven to 180˚C. Take a rectangular pound cake tin and line with butter and baking paper.
  2. Put the butter and sugar into a large bowl and beat with a wooden spoon until smooth and creamy. Add the honey, eggs, yoghurt, and almond extract and whisk together to combine.
  3. Sift in the flour, ground almonds, and baking powder and whisk into the mixture until smooth.
  4. Add the orange juice, zest and the raspberries into the mixture and fold with a spatula to combine.
  5. Pour the batter into the lined tin and bake in the pre-heated oven for around 55 minutes, until it’s risen, starting to brown, and a skewer inserted into the centre comes out clean. Take the cake out of the tin and leave to cool completely.
  6. Meanwhile make the icing. Cut the blood orange in half and juice one of the halves, setting the other to one side for later.
  7. Put the icing sugar into a bowl and pour in the juice. Stir to make a smooth icing.
  8. When the cake is completely cooled drizzle the icing over the cake. Slice the remaining 1/2 orange into chunks and arrange then on top of the cake. Finish with a sprinkle with the freeze dried raspberries and flaked almonds. Serve!

Thanks for reading!

Emma x

Blackforest Daquoise Gateau

Blackforest Daquoise Gateau

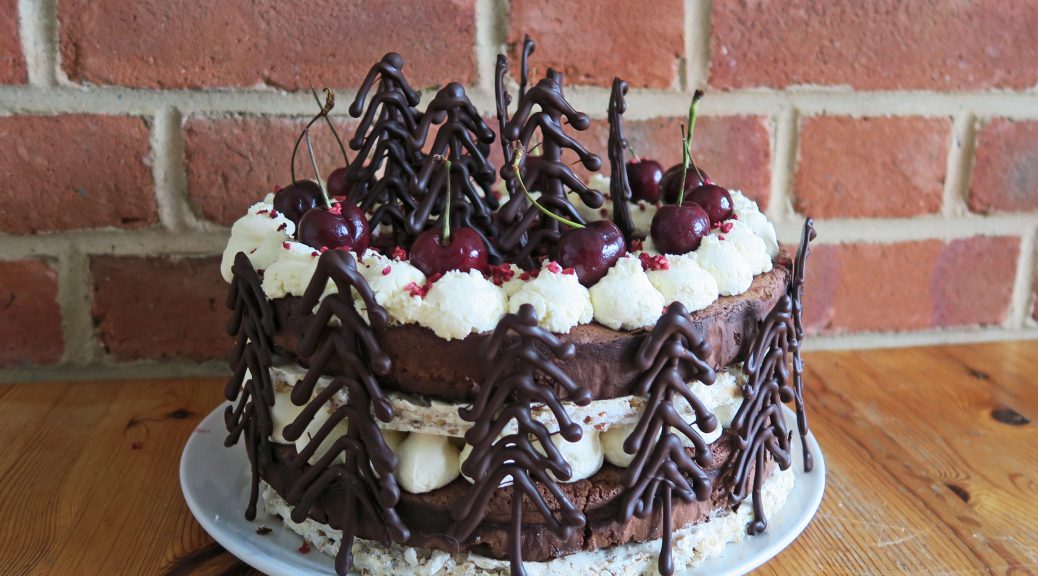
One of the most stunning retro desserts out there is the black forest gateau – and it has three of my favourite things: chocolate, cherries and a woodland association. Over the years I’ve become a bit addicted to taking these delicious flavours and have put them into almost anything and everything – but nothing beats a classic cake based gateau.

That said I have adapted this slightly by adding a daquoise, aka a nutty meringue, which adds a bit of texture and brings some sweetness to contrast the rich chocolate cake and creamy filling. Whilst I think this is as good as it gets, if you’re short on time or want to go for a more traditional gateau you could leave out the meringue layers and you’d still end up with something delicious. On the other hand, you could leave out the cake and then you’d end up with a derlish layered, hazelnut and cherry pavalova!

(Note: before starting make sure you have 2 cakes tins 21cm in diameter, and an electric or stand-free mixer!)

Recipe

Serves 12

Time: 2 1/2 hours

Ingredients

For the Daquoise

  • 170g Chopped hazelnuts
  • 200g Caster sugar
  • 18g Cornflour
  • 4 Large egg whites
  • Pinch salt

For the Chocolate cake

  • Butter for greasing
  • 200g Golden caster sugar
  • 7 Large eggs, separated
  • 3tbsp Cocoa powder
  • 2 tbsp Morello cherries (with juice)
  • 200g Dark chocolate

For the Filling

  • 600ml Double cream
  • 1 tbsp Vanilla bean paste
  • 4 tbsp Kirsch
  • 200g Morello cherries

To Decorate

  • 200g Dark chocolate
  • 2 tsp Dried raspberries
  • A handful of fresh Cherries

Method

  1. Pre-heat the oven to 180˚C.
  2. Begin by making the daquoise. Put the hazelnuts into a small roasting tin and roast in the oven for 5-10 minutes, until just starting to colour. (This is an important step as it’ll massively increase the flavour of the nuts).
  3. Leave to cool and then mix with 75g of the sugar and the cornflour. Set to one side for later.
  4. Lower the oven temperature to 150˚C for the meringues. Line 2 baking trays with baking paper. Take a 21cm diameter tin and draw round it onto the sheets of baking paper to act as a guide for pipping later. Turn these sheets over so that the pencil line is on the other side of the paper to that which you’ll pipe on.
  5. Take a super clean metal or glass bowl and put the egg whites into it.
  6. Add the salt and then whisk with an electric hand whisk (or a stand-free mixer) until it forms soft peaks (can just hold it’s shape).
  7. Continue whisking and add the other 125g caster sugar, one 1 tbsp at a time until it’s all incorporated.
  8. Keep whisking until the mixture becomes glossy and forms a stiff peak.
  9. Then take a large, stiff spatula and gently fold the hazelnuts into the meringue. From here you’ll need to work quickly as the oils in the nuts will start to deflate the meringue.
  10. Take a pipping bag with a round nozzle and fill it with the meringue. Then pipe onto the lined baking trays in a spiral, starting from the edge of the circles you drew to the centre.
  11. Bake in the oven for about 40 minutes, until crisp to the touch. Then turn the oven off and leave the meringues to cool in the ovens.
  12. When completely cool take out of the oven and set to one side for later.
  13. Now move onto the chocolate sponge. Increase the oven temperature to 180˚C. Line two cake tins, the same ones you used to draw round rings for meringue, with butter and baking paper.
  14. Put the sugar and egg yolks into a bowl and whisk until pale, fluffy and thick. You can test if it’s ready by taking the whisk out of the mixture, and if the trail it leaves is visible for 3 seconds or more it’s thick enough. Add the cocoa powder and cherries and then whisk to combine.
  15. Put the chocolate into a heatproof bowl over a pan of simmering water. Leave to melt and then fold into the sugar mixture.
  16. In metal or glass bowl whisk the egg whites to soft peaks.
  17. Add 1/3 of the egg whites to the chocolate mixture and mix in. Then fold in the rest of the egg whites with a large spatual until the batter is uniform in colour, with no flecks.
  18. Pour the batter into the two tins, making sure each has the same amount of mix. Spread the mixture around the tins so it’s an even thickness and then bake for 12-14 minutes, until risen, and just firm to the touch.
  19. Take out of the tins and leave on wire racks to cool completely.
  20. Whilst waiting for the cakes to cool move onto the fillings and decorations. Pour the cream into a bowl and add the vanilla. Then whisk it up until soft peaks start to form – be careful not to over whisk or it won’t pipe smoothly. Transfer this cream to a piping bag with a round nozzle and leave in the fridge until needed.
  21. Then take the chocolate and melt it in a heatproof bowl over a pan of simmering water. Take a piping bag with a small round nozzle and pour the melted chocolate into it.
  22. Line a baking tray with greaseproof paper. Take a pencil and draw some trees about 10cm maximum in height. Turn the paper over and then pipe over your designs with the chocolate. It’s worth piping more than you think you’ll need in case some break. Leave these to set at room temperature. When completely set, transfer them to the freezer to make them easier to work with when it comes to decorating the gateau.
  23. When all the elements are ready you can start assembling the gateau. Put one of the meringue layers on the plate or board you want to display it on. Top with one of the chocolate sponges, and brush the sponge with ½ of the kirsch. Scatter the cherries over the sponge and then pipe blobs of the cream over the cherries. Then put the second meringue layer onto the cream and repeat the layering of the cake, cherries and cream, although this time only pipe two rings of cream on the top of the cake.
  24. Take a sharp knife and make small incisions in the top of the gateau where you want to position your chocolate trees. Gently peel the trees off the baking paper (a palette knife is useful for this) and stick them into the top of the gateau in the gaps you just made. Decorate with the fresh cherries and freeze-dried raspberries, and then finish with a dusting of cocoa powder!

Thanks for reading! Any comments, requests or queries don’t hesitate to ask…

Emma x


Salted Caramel, Raspberry + Chocolate Brownie Pudding

Salted Caramel, Raspberry + Chocolate Brownie Pudding

When I was younger my favourite dessert was chocolate sponge with custard, and this is a bit of a deluxe adaption on that warming comfort food classic. As usual I’ve gone a bit over the top on the indulgence, but it’s totally worth it. Fudgy chocolate brownie, with a salted caramel sauce underneath, and topped with fruity bursts of raspberries is the ultimate comforting pudding.

For the keen beans out there you’ll also notice that the brownie mix is pretty similar, ney identical to that in my Mississippi mud pie recipe. The is because I’m a) short on time this week and b) it works so well in this that it made sense to rework it into this recipe. So if by chance you made and enjoyed my Mississippi mud pie you’ll probably like this to!

(Note: It’s pretty rich, so a smallish tray will feed more people than you think!)

Recipe

Serves 10

Time: 45 minutes

Ingredients

  • 160g Butter
  • 220g Dark chocolate
  • 3 Medium eggs
  • 210g Caster sugar
  • 40g Plain flour
  • 100g White chocolate, roughly chopped
  • 6 tsp Salted caramel (Homemade or shop bought)
  • 100g Raspberries
  • Cream to serve

Method

  1. Preheat the oven to 180°C. Grease a glass, 30x20cm oven-proof dish with butter and set aside for later.
  2. Now make the brownie mix. Put the butter and chocolate into a bowl over a pan of simmering water and leave to melt.
  3. Take another bowl and whisk the eggs until pale and fluffy with an electric whisk. Add the sugar and continue to whisk until it leaves a trail when the whisk is taken out.
  4. Fold the chocolate into the eggs, sieve in the flour and add the chopped white chocolate. Fold everything again until combined.
  5. Take the caramel sauce and pour it over the base of your greased dish. Pour the brownie mix over the top and spread over evenly. Finally sprinkle over the raspberries and push them into the batter slightly.
  6. Bake in the oven for 20-25 minutes, until the brownie is just cooked. Don’t leave it in the oven for too long, you want it to be gooey and soft in the middle.
  7. Serve with fresh rapberries and cream!

Thanks for reading!

Emma x

Fruit Muffins

Fruit Muffins

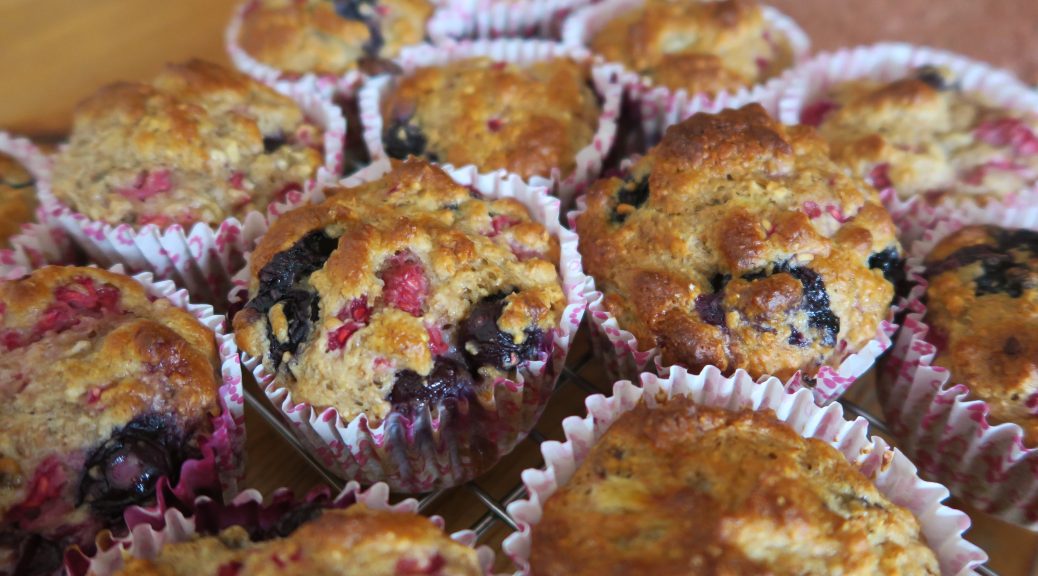
In every person’s healthy eating phase there comes a time where the ‘healthy muffin’ makes an appearance. They’re a sort of comforting link to the world of cakes, and yet are considered to be way more healthy (not sure why, but they are).

Whilst not great for the carb-free seekers, these are low in refined sugar, full of fibre and packed with fruit. The Greek yoghurt in the recipe might seem odd but it’s a clever way of  getting really light muffins. The acidity in yoghurt reacts with the baking powder to send it into overdrive and causes it to make lots of lovely CO2, which will make your muffins really light and airy.

Recipe

Makes 16

Time: 25 minutes

Ingredients

  • 160g Wholemeal flour
  • 50g Plain flour
  • 40g Rolled oats
  • 1 ½ tbsp Baking powder
  • ½ tsp Bicarbonate of soda
  • 200g Greek yoghurt
  • 2 Medium Bananas, mashed with a fork
  • 2 Large eggs
  • 100g Honey
  • 2 tsp Vanilla
  • Handful of blueberries
  • Handful of raspberries

Method

  1. Preheat the oven to 180˚C. Line a 12 hole muffin tray with muffin cases.
  2. Put the flours, oats, baking powder, and bicarb into a bowl and mix together.
  3. In another bowl put the yoghurt, mashed bananas, eggs, honey, and vanilla and whisk together.
  4. Make a well in the centre of the dry ingredients and pour in the wet ingredients. Whisk to combine, then add the berries and whisk them a little more to mix them in. The mixture should be pretty thick, but if it’s too thick to work with you can thin it out with 2 tbsp of milk.
  5. Distribute the mixture between the muffin cases and then bake in the oven for 15-20 minutes, until a skewer inserted into the centre of the muffins comes out clean.
  6. Leave to cool on a wire wrack and then they’re ready!

Thanks for reading!

Emma x