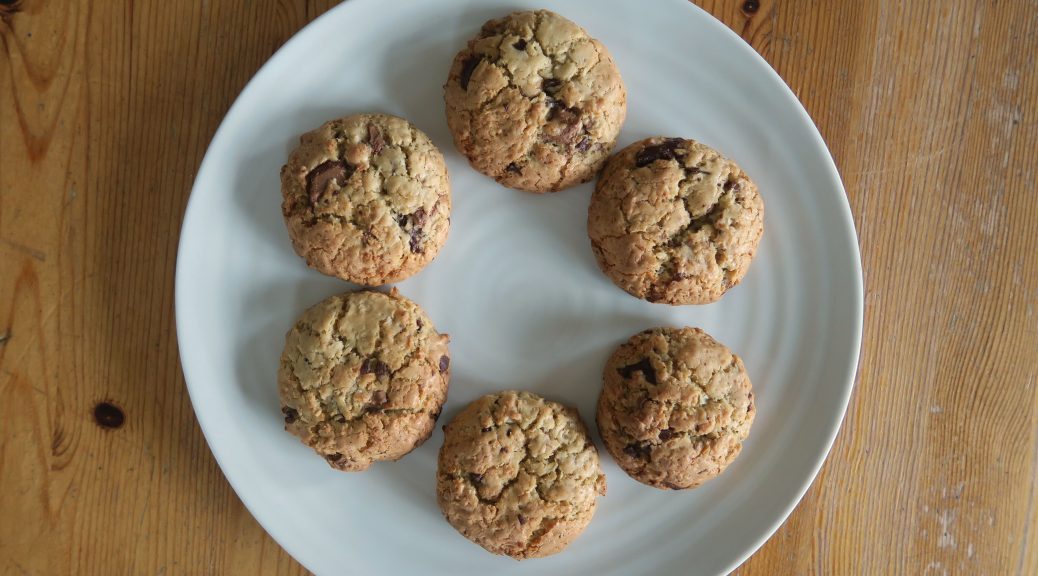
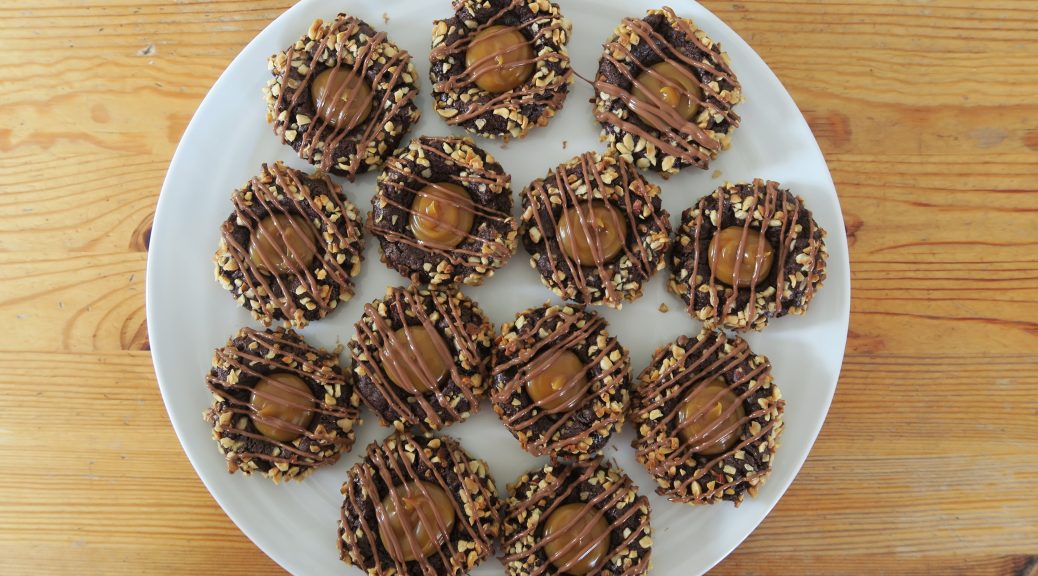
Author: Emma Hawkins

Turtle Cookies

Turtle Cookies

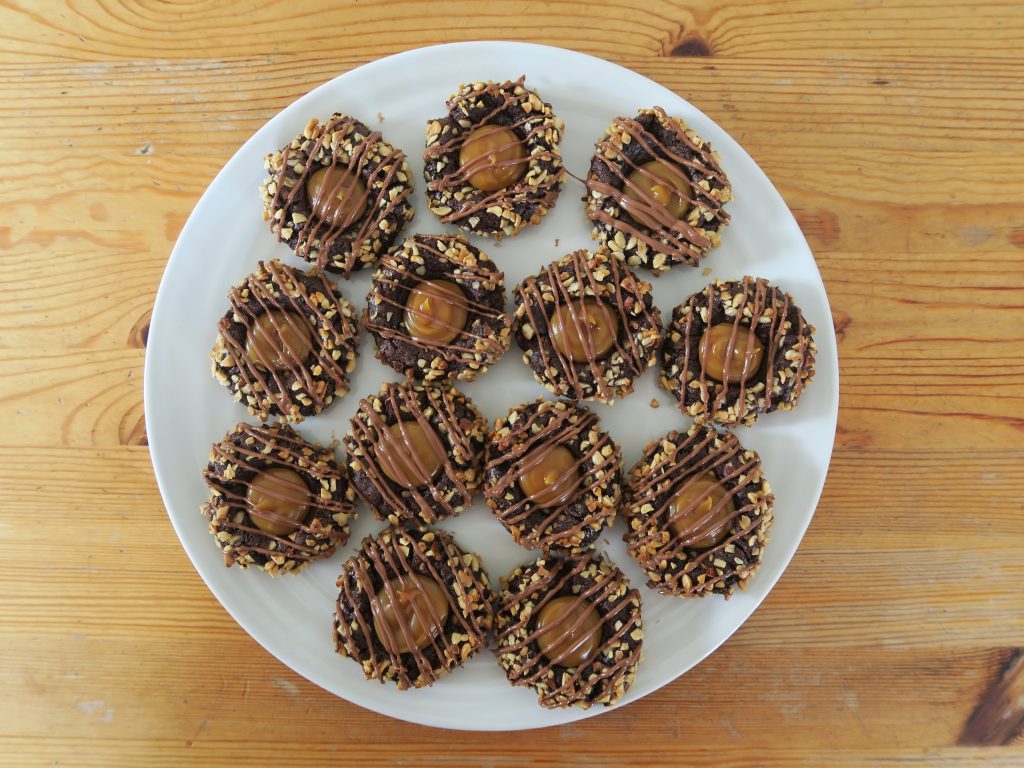
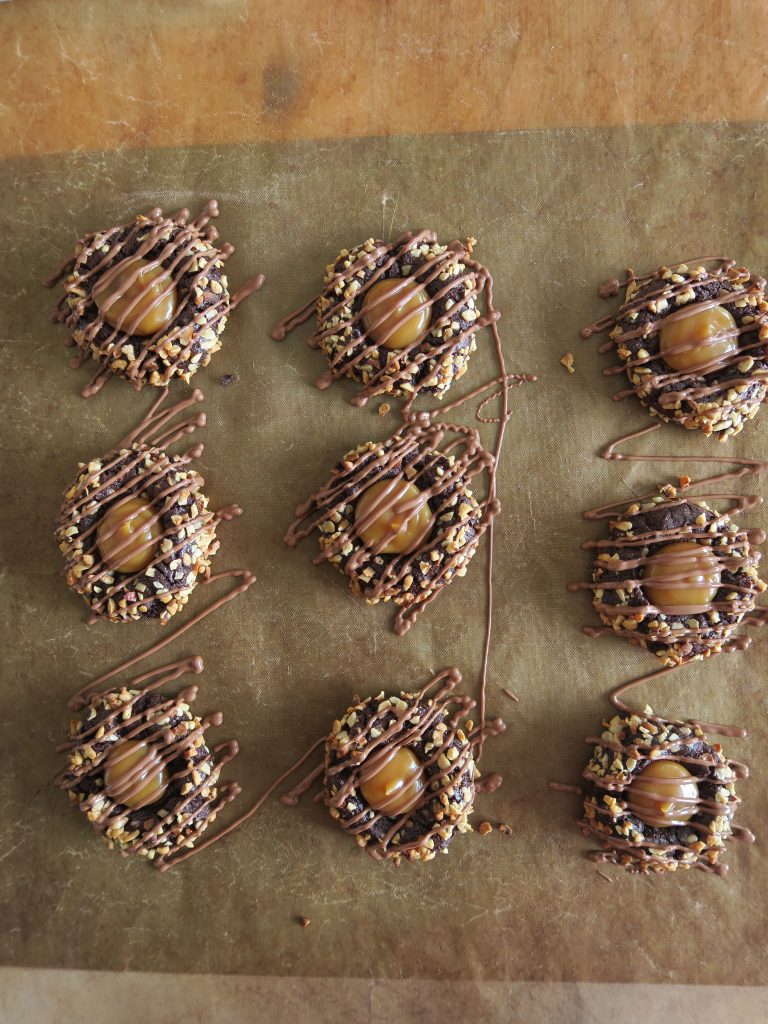
So funny story about how I found these. I was originally searching on google images for pictures of turtle shaped cookies as I found pictures of the idea on pinterest and I wanted to make some of my own. However, the first things that came up when I searched ‘turtle cookies’ were tonnes of these treats, and they looked so mouthwatering I knew I had to try making some myself! They’re essentially rich chocolate biscuits, rolled in pecans (although I’ve used hazelnuts as I think they’re a superior nut) and then filled with salted caramel and drizzled with melted chocolate. I mean what’s not to love eh?

As you may or may not know it’s currently mental health awareness week – this year focusing on the very key issue of body image so I thought I’d briefly touch on this. We all have bodies and we all have varying opinions of them. Personally I’m not as positive about my body as perhaps I should be. I’m a little too round, too squidgy, too ‘curvy’, whatever is the most pc. I’ve also had an annoying conflict of interests between my passion for baking and my want to be healthy and slim for a really long time. I now find myself constantly swinging between being miserable because I’m not baking in an attempt to eat healthily, and disliking my body because of all the baked goods I eat. Of course there is something called self control, but I’ve never been very good at applying that to myself when it comes to baked goods.  But although I’ve not quite got to the point of accepting my roundness I have started to get to the point where I can accept how I look and not let it affect my mental health which is something for now. So if you’re in a similar position I just want you to know that if you’re insecure about your body firstly know that you are gorgeous, even if you can’t see it,  and secondly that there is so much more to life than how you look. So don’t let size get you down – there’s so much more to focus on and enjoy in life, and having a little extra padding won’t stop you from doing any of it!

Recipe

Makes 20

Time: Around 90 minutes

Ingredients

  • 80g Unsalted butter
  • 140g Caster sugar
  • 1 Large egg, separated
  • 2 tbsp Milk
  • 1 tsp Vanilla extract
  • 140g Plain flour
  • 40g Cocoa powder
  • 200g Chopped hazelnuts
  • 200g Caramel
  • 1/2 tsp Table salt
  • 25g Milk chocolate to decorate

Method

  1. Begin by making the cookies. Pre-heat the oven to 180C and line two baking trays with baking paper.
  2. In a large bowl cream together the butter and sugar with a wooden spoon until pale and creamy. Add the egg yolk, milk and vanilla and mix again until combined.
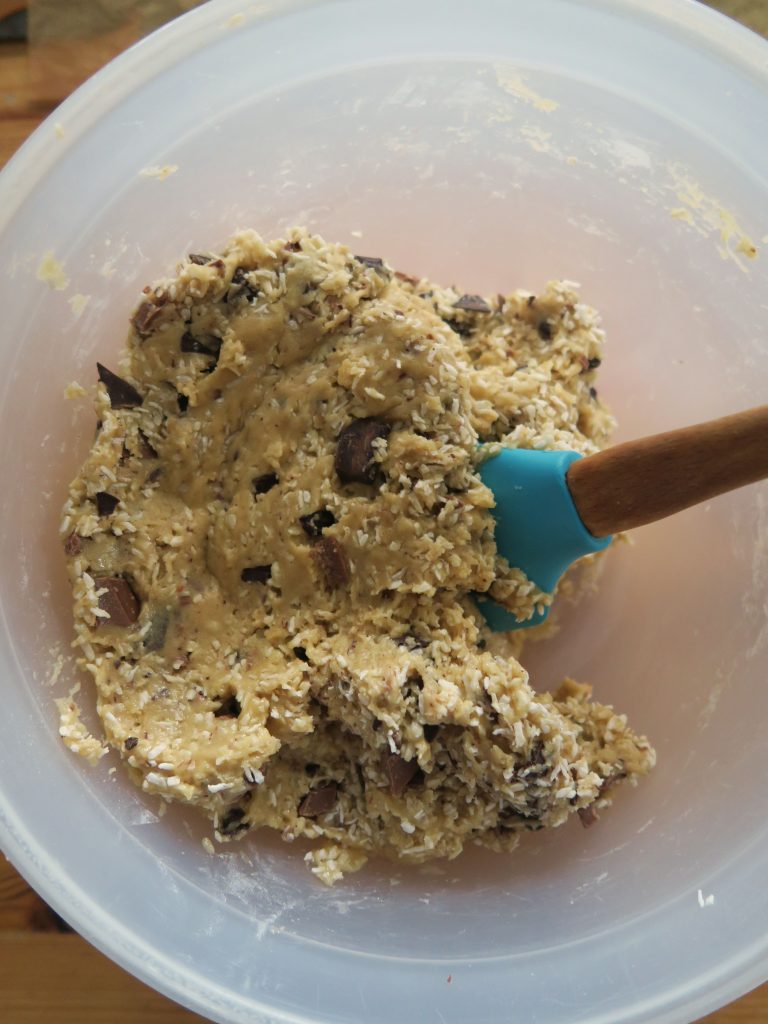
  3. Stir the flour and cocoa powder into the mixture to make a soft dough. Then wrap the dough in cling film and chill in the fridge for at least 1 hour.
  4. Take the egg white and whisk it until it’s frothy. Then put the chopped hazelnuts into another bowl.
  5. Take the dough out of the fridge and roll it into 20 equally sized balls. Then dip each one in the egg whites followed by the chopped hazelnuts. Place the balls on a lined baking tray.
  6. Using a round measuring spoon (like a 1/2 teaspoon) press into the centre of each ball to make a dip.
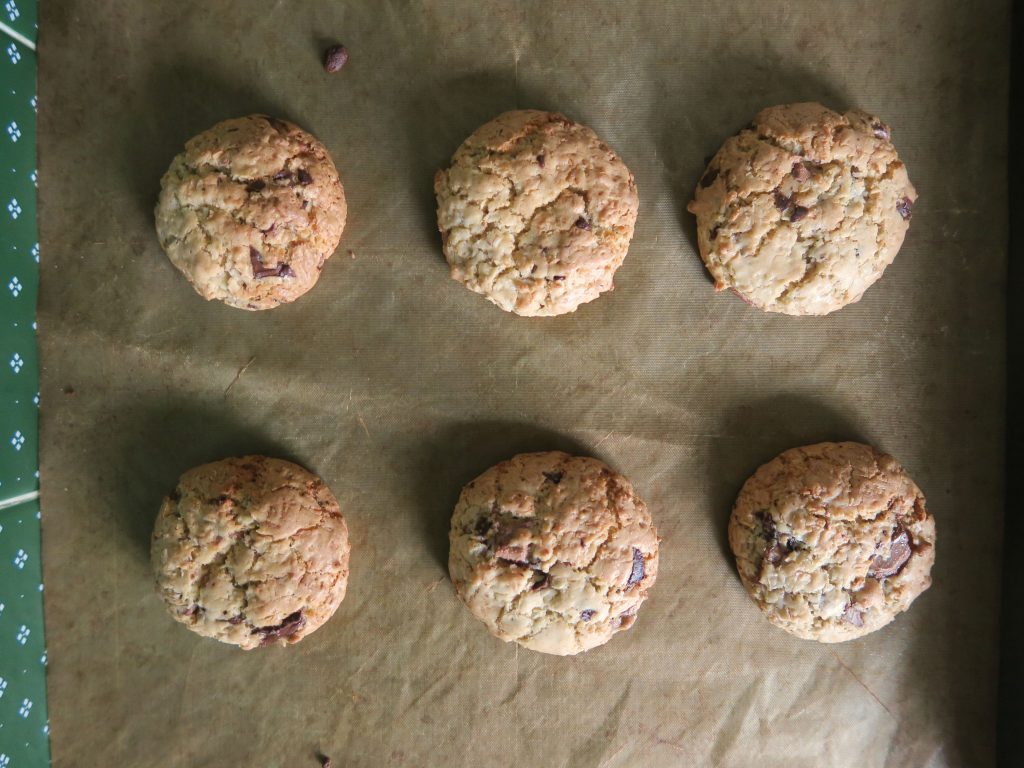
  7. Bake the cookies in the oven for around 10 minutes until just set. They will harden more when cooled so don’t wait for them to crisp.
  8. Leave the cookies to cool completely on wire racks. Meanwhile put the caramel into a bowl and stir in the salt. Transfer the caramel to a pipping bag and leave in the fridge until needed.
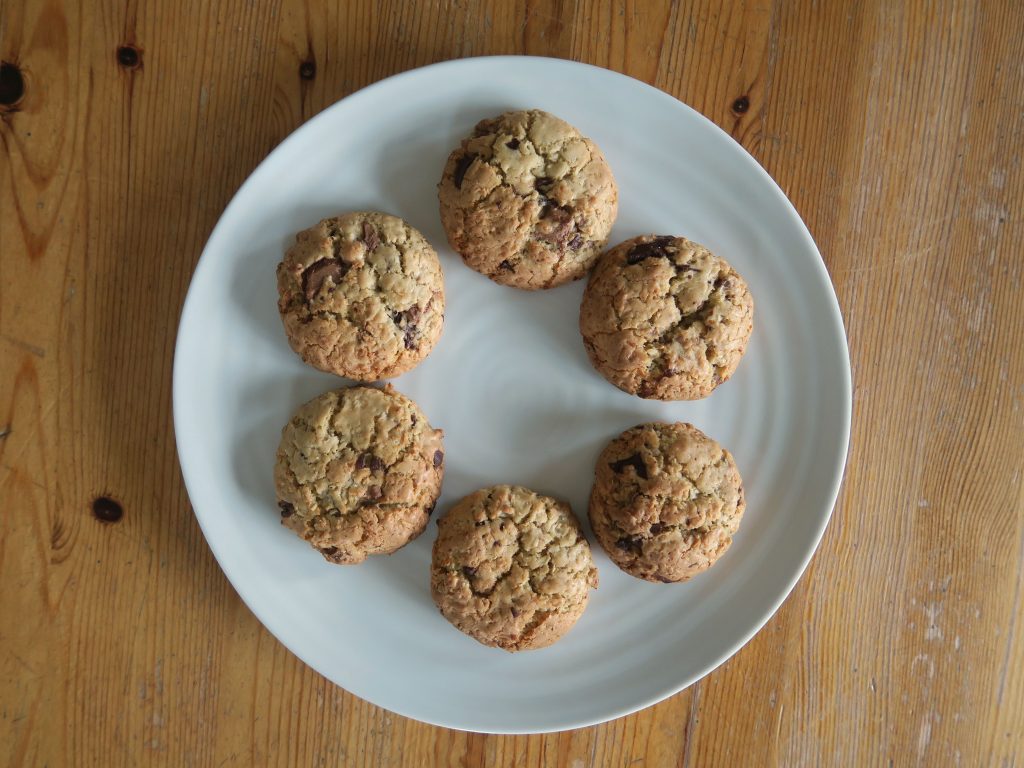
  9. Pipe the caramel into the centre of each cooled cookie and then leave for 5 minutes to set.
  10. Meanwhile melt some chocolate in a heatproof bowl over a pan of simmering water. Spoon the chocolate into a disposable piping bag and cut a small round hole in the bottom. Then pipe a drizzle of chocolate over the top of each cookie. Leave again to set and then serve!

Alternatives to try:

  • Fill the middle with a berry coulis instead of caramel, and then drizzle with dark chocolate.
  • Roll the biscuits in chopped peanuts (or any other nut you’d prefer).
  • Flavour the dough with the zest of 1 lemon/orange and fill with lemon curd/chocolate ganache.

Thanks for reading! For more info on Mental Health Awareness week click on the link here

Emma x

Dark Chocolate and Coconut Cookies

Dark Chocolate and Coconut Cookies

I’ve been thinking a lot about mental health support recently. It’s always there in my mind but over the past week or so it’s been playing on my mind a bit more. Primarily how do we make support for those with mental illness better? We are lucky enough to have great support in the UK through charity groups and in my case university counselling systems, but it’s still no where near enough for the growing numbers of people needing these services. I’m trying to write an article at the moment for an Oxford newspaper about mental health support in the university and during my research I found that around 12% of the university’s undergraduates tend to use the counselling service every year – and that’s just the people who have the courage to seek help. If that’s the number of people in the system how many are suffering across the entire community?

Unfortunately there’s little large-scale difference a single person can make on ground level. We can do our best to help by starting conversations, breaking down taboos, and raising money for the great organisations that are trying to help. But we can’t reduce NHS waiting times or the way in which help is given by these systems. I grant you that this isn’t much of a positive conclusion. I’d prefer to leave you on a grand call to arms ‘this is how we will go forward’ moment, but alas I think the most I can say for now is look after each other. Talk to each other, have real conversations about real things, not just flippant ones about food or reality tv (although they’re great to!). Bake with friends, eat with friends, take some time for yourself. Find what you enjoy and do that. You don’t have time to be doing anything else.

(On a side note, today I felt like writing about something more poignant than cookies, but nonetheless these are super super moreish and really easy to make so I’d really recommend them for group baking and sharing!)

Recipe

Makes 18

Time: 30 minutes

Ingredients

  • 250g Plain flour
  • 1 tsp Baking powder
  • ½ tsp Baking soda
  • 2 tsp Cornflour
  • ¼ tsp Salt
  • 115g Melted butter
  • 150g Brown sugar
  • 50g Caster sugar
  • 1 Large egg
  • 2 tsp Vanilla extract
  • 120g Desiccated coconut
  • 130g Chocolate chips

Method

  1. Pre-heat the oven to 180˚C. Line a couple of baking trays with baking paper.
  2. Put the flour, baking powder, baking soda, cornflour and salt into a large bowl and whisk together to combine.
  3. In another bowl whisk together the melted butter and the two sugars until fully combined. Then whisk in the egg and vanilla.
  4. Add the dry ingredients to the wet and then mix with a wooden spoon until a smooth dough forms. Add the desiccated coconut and the chocolate chips and mix again to incorporate them.
  5. Separate and then roll the dough into small balls (about 1 tbsp of mixture each) and then place them on the lined baking trays with some space between them.
  6. Bake the biscuits for 10-12 minutes until spread and starting to turn golden. Leave to cool and then eat!

Thanks for reading!

Emma x

Berry Souffle with Yogurt and Blood Orange

Berry Souffle with Yogurt and Blood Orange

Ok, so for a second I’d like you to cast from your mind any previous things you’ve ever known or thought about souffles. Forget the stereotype that they’re hard, posh and chefy – listen to this. I’m a strong believer that if you have the right recipe you can make just about anything. In the past I’ve struggled with souffles but I think that’s down to the individual recipes rather than the technique. The other day I decided to whip up a quick souffle in the same way I normally would, but this time following a different ratio of ingredients, and it somehow resulted in some of the best souffles I’ve ever made.

Souffles have to be served straight from the oven otherwise they sink, but I’ve always heard that a good souffle should still have some marshmallowy bounce to it even after it’s sunk from it’s original glory – and hey presto that’s what happened here! Photographs taken, uploaded and tweaked and even after all that these beauties were like little pillows of fruity air. It’s traditional to serve these at fancy dinner parties, but personally I think why not eat them whenever? They take relatively little time to make as far as desserts go and are super light, making them perfect for summer days!

Recipe

Serves 2

Time: 30 minutes

Ingredients

  • Butter for greasing
  • 100g Caster sugar, plus extra for sprinkling
  • 100g Frozen cherries
  • 50g Frozen raspberries
  • 50g Frozen blackberries
  • ¼ tsp Ground cinnamon
  • ¼ tsp Ground ginger
  • 10g Cornflour
  • 2 Egg whites

To serve

  • 1 Blood orange
  • 2 tsp of Greek yogurt

Method

  1. Pre-heat the oven to 180˚C. Take 2 ramekins and grease them with butter in vertical lines. Chill the ramekins in the freezer for 15 minutes and then sprinkle a little caster sugar to line the mould. Tap out the excess and then leave in the fridge until needed.
  2. Now make the fruit puree. Put the frozen fruit and spices into a small pan and leave covered for 15-20 minutes on a low heat to simmer and soften. Then press the mixture through a sieve to make a puree (make sure to scrape mixture off the bottom of the sieve as lots of puree will collect there).
  3. Put the puree and 50g of the sugar into a pan and bring back up to the boil.
  4. Mix the cornflour and 2 tsp of water in a small bowl and add it to the puree. Stir over a medium heat until the mixture thickens to a jam-like consistency. Pour 50g of the puree into a large, clean mixing bowl and leave to cool completely.
  5. Crack the two egg whites into a super-clean metal or glass bowl and whisk with an electric whisk until soft peaks form. Add the sugar and whisk again until the mixture is stiff and fluffy.
  6. Fold 1/3 of the egg whites into the fruit mixture until uniform in colour. Then fold in the other 2/3 to make a thick, even mixture.
  7. Divide the mixture between the two chilled ramekins and tap them gently on the worktop to make sure the mixture fills the ramekins. Then take a palette knife (or the back of a table knife) and sweep it across the top of the ramekins to make the top a smooth layer.
  8. Take your thumb at an angle and run it around the rim of the ramekin to shape the top. Then bake the souffles in the oven for 5-10 minutes until risen and just golden on top.
  9. Whilst baking chop the top and bottom off the blood orange and then peel the skin off with a knife. Then slice the orange into discs around 1/2 cm wide.
  10. Serve the souffles as soon as they come out of the oven with the orange slices and 1 tsp of yogurt on each plate!

Thanks for reading!

Emma x


Whortleberry and Coconut Roly Poly with Coconut Custard

Whortleberry and Coconut Roly Poly with Coconut Custard

What a magnificent word is whortleberry eh? I’d never heard of it before my trip down to Devon last month when I came across a jar of whortleberry jam in a little corner shop. It sounded really weird but I’m always one for trying new flavours so I knew I had to give it a go. Flavour wise it’s a kinda cross between a blueberry and a blackberry, but it also just makes the perfect combo with coconut. I really wanted to use this stuff in a recipe but I wasn’t sure how to incorporate jam into something as fun as it’s name. Then I remembered just how much I love a good roly poly, and the name whortleberry jam roly poly was something too good to pass on.

It might seem a bit weird to have a traditional sticky British pud in summer, but I personally see no reason to put an expiration date on these beauties. I mean I kid you not when I say that I saw snow, rain and glorious sunshine within hours of each other yesterday so anything goes. Besides, this is comfort food 101 and that stuff is needed all year round so I’m bringing the roly poly into May – coconut, whortleberry, custard and all!

Recipe

Serves 8

Time:  1 hour plus extra time for cooking

Ingredients

  • 50g Coconut Oil, plus extra for greasing
  • 200g Self raising flour
  • 50g Desiccated coconut
  • ½ tbsp Vanilla bean paste
  • 50g Vegetable suet, shredded
  • 150ml Coconut milk
  • 150g Whortleberry (or blueberry) jam

For the custard

  • 250ml Coconut milk
  • 1 tbsp Vanilla bean paste
  • 50g Caster sugar
  • 3 Egg yolks
  • 10g Plain flour
  • 10g Cornflour

To serve

  • A handful of Blueberries
  • 75g Whortleberry (or blueberry) jam
  • 25g Flaked coconut

Method

  1. Preheat the oven to 180˚C. Take a deep roasting tin and fill it with water about 2/3 full. Put this onto the bottom shelf, or base of the oven and leave in the oven.
  2. Take a sheet of foil and another of greaseproof paper and lay the paper on top of the foil. Grease the paper lightly with a little coconut oil, and set aside for later.
  3. Now it’s time make the roly-poly. Put the coconut oil, flour, desiccated coconut, and vanilla into a bowl. Cut into the oil with a round bladed knife to chop it into small lumps. Once you can’t cut it up any further, go in with your fingers and rub the oil into the flour until you have a rough bread-crumb texture. Shake the bowl from side to side every now and then to get the lumps to the top so you can rub them in.
  4. Stir the suet into the mixture. Then pour in the coconut milk and bring together with a round-bladed knife until a dough forms. If the dough is dry add some more milk – you want the dough to be a little sticky.
  5. Flour a surface (a lot) and tip out the dough. Shape into a rough square and then roll out to around 25x25cm. Don’t roll it as thin as you would pastry, and this dough is very soft and will tear easily.
  6. Spread the jam over the sheet of dough, leaving a 1cm strip at one end. Roll the dough up from the other end into a tight spiral. Pinch the non-jammy dough into the roll to seal it.
  7. Lift the roll onto the greased baking paper, making sure that the join is on the paper and not facing up. I know this part is much harder than you would expect, but I found that it’s true to it’s name and literally rolling it onto the grease-proof was the best way to get the roll off the work surface.
  8. Bring the foil and paper up around the roly-poly and fold over the top and scrunch the ends to seal the parcel. Don’t wrap the dough too tightly as it’ll need to stretch when cooking.
  9. Make sure a rack is above the tin of water in the oven and place the parcel onto the rack. Steam in the oven for at least 1 hour.
  10. Meanwhile make the custard. Put the coconut milk and vanilla into a saucepan and bring to the boil.
  11. Mix the sugar, egg yolks and two flours until fully combined. Once the milk is heated, remove the pan from the heat and mix 1/3 of the milk into the egg mixture.
  12. Whisk the mixture quickly and then pour the egg mixture into the milk. Put the pan back over a medium heat and whisk until the mixture boils and thickens. Pour into a jug and cover with cling-film to prevent a skin from forming. Set aside for later.
  13. Once the pudding is ready take it out of the oven and let it sit for a few minutes before unwrapping. When this is going on you can prep the decorations.
  14. Put the flaked coconut into a small roasting tin and roast in the oven for 3-5 minutes, or until starting to brown. Set aside for now. Take the extra jam and put into a pan. Heat gently for around 2 minutes, until it’s thinned out slightly. Put into a pipping bag with a small round nozzle.
  15. Unwrap the roly-poly and put it onto a serving plate. Arrange the extra bluberries on top of the pudding. Then pipe the thinned jam on top of the blueberries in a zig-zag and top with the flaked coconut. Serve with the custard and enjoy!

Thanks for reading!

Emma x

Apple Pancakes

Apple Pancakes

Stress. Yup, stress is officially the key work of the week. Everything’s blowing up a bit atm but we’re getting through it with the help of some amazing friends and (as always) lots of food. This recipe takes me back to the chilled few days when I was down in Devon walking the south west coastal path last month. We didn’t have access to big shops with lots of ingredients so instead I made simple dishes like these sweet apple pancakes with Greek yogurt.

My opinion of healthy pancakes fluctuates regularly. Some days I think they’re the key to all healthy eating and God’s gift to sweet toothed brunchers, and on other days I really can’t see the point as they essentially just take the best bits out of the pancake and replace them with ingredients more closely resembling gravel. That said these do have the element of feeling a little healthy due to the apple floating through the batter and make a great semi-low-sugar brunch to get your day started.

Recipes

Serves 2

Time: 15 minutes

Ingredients

  • 40g Self raising flour
  • 1 Egg
  • 20ml Milk
  • 1 tsp Brown sugar
  • ½ tsp Ground cinnamon
  • 1 Green apple
  • 1 Red apple
  • 1 Cal oil spray (or 1/2 tsp Sunflower oil)
  • 2 tbsp Greek yogurt to serve
  • 2 tbsp Maple syrup to serve (optional)

Method

  1.  Put the self raising flour into a bowl and make a well in the middle. Break in the egg and mix together. Then pour in the milk a litttle at a time to get a runny batter.
  2. Add the sugar and cinnamon to the mixture and stir these in. Then grate the apples into the batter and stir to combine (you can leave the skin on the apples to grate them if you want).
  3. Put a little oil into a large pan and use it to grease it. Then place it over a medium heat and leave for about a minute to warm up.
  4. Spoon blobs of the batter onto the pan (I got about 3 at once in mine) and fry until you can see the underside starting to cook through. Flip the pancakes over with a fish slice and fry again until golden brown.
  5. Put the cooked pancakes on a plate to one side and repeat with the rest of the batter. Serve warm with Greek yogurt and a little maple syrup.

Thanks for reading!

Emma x