Author: Emma Hawkins

Cornish Pasties

Cornish Pasties

So back into the south for some inspiration this week. It’s kind of a necessity to eat a pasty at some point when you’re in the West-country, and though there’s dozens of kinds out there for the picking, a good old Cornish pasty will always be my favourite. When I think of pasties I think of wandering barefoot along the beach with a warm, slightly over-flowing pasty in hand. Flakes of buttery pastry flying into your face in the wind, and shooing off seagulls left, right and centre. This might not paint the most relaxing experience of dining there is, but it’s rough, rustic and nostalgic which is what I love most about it.

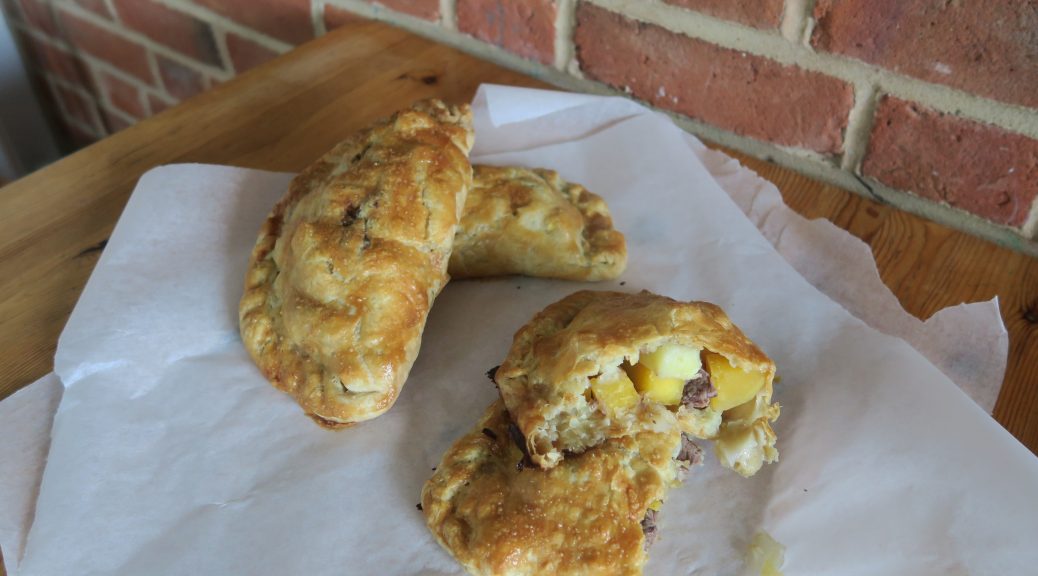
I know that quite often people hate pasties because they’re thought of being greasy and stodgy. These homemade ones are a lot cleaner than you’d think, and the rough-puff pastry is way lighter than the stuff you find on traditional pasties.  The key is to make sure you season the filling A LOT as it’ll totally transform the flavour of the pasty and make it really moreish. Traditionally beef skirt is used to fill a pasty as it releases gorgeous juices that taste amazing. That said, beef skirt is almost impossible to find in a local supermarket, so if you can’t find it I’d recommend using frying steak, escalopes or any cut of beef that’s relatively thin.

Recipe

Makes 6

Time: 90 minutes, plus chilling

Ingredients

For the pastry

  • 450g Strong bread flour
  • Large pinch of salt
  • 100g Cold, unsalted block butter
  • 100g Cold lard
  • 200ml Cold water

For the filling

  • 200g Potatoes
  • 1 Small onion
  • 100g Swede (1 small)
  • 200g Lean beef skirt (or frying steak if you can’t find beef skirt)
  • Salt and pepper to season
  • 1 Beaten egg

Method

  1. Begin by making the pastry. Put the flour and salt into a large bowl. Then take the chilled blocks of lard and butter and grate them into the butter. I’d recommend giving everything a little mix regularly as you do the grating so that the fats can be coated in flour, this will stop them all re-forming into a lump when you mix it all together.
  2. Then take a round-bladed knife and mix the fat into the flour so it’s all coated. Pour the cold water into the bowl and continue to mix to form a soft dough.
  3. Tip the dough out onto a surface and knead a little to bring the dough together into a ball. Wrap the pastry in cling film and chill in the fridge for at least 30 minutes.
  4. Now prep the filling. Peel the potatoes, onions and swede. Then chop the potato into chunks, about the thickness of a £1 coin. Then finely chop the onion, and chop the swede into chunks the same size as the potato.
  5. Now prep the meat. Using a sharp knife remove any gristle from the meat, but leave the fat as it’ll add great flavour to the pasty. Then chop the meat into chunks about the same size as the potato.
  6. Pre-heat the oven to 180˚C.
  7. Split the pastry into 6 and then roll each one out to a 14cm diameter circle. Using a plate as a stencil can be helpful here to get a neat circle.
  8. Distribute the onions between the pastry discs, spreading them in a semi-circle over one half of the dough, leaving a 1 cm boarder around the edge for sealing. Sprinkle over a little salt and pepper. Then top with a layer of swede, then meat and finally potato, seasoning a little between each layer.
  9. Take a cup of water and dip your finger into it. Then moisten the rim of the pastry circle with your finger. Fold the unfilled half of the pastry over the filling and use the edge of your hand to gently seal the pastry.
  10. Now it’s time for the crimping that’ll keep the pastry together. Working from right to left fold the pastry over itself and then press down. Repeat along the seam of the pasty to make a rope pattern until you reach the end.
  11. Put the pasties onto a baking tray and brush with the beaten egg. Bake for 15-20 minutes until golden brown, then reduce the oven temperature to 160˚C and continue to bake for 15 minutes. Then turn off the heat and leave the pasties to cool/keep cooking in the oven for another 30 minutes. Serve!

Thanks for reading!

Emma x

Neapolitan Brownie Cheesecake

Neapolitan Brownie Cheesecake

My parent’s are aiming to walk the South West Coastal Path over the next few years and so last week we were all on holiday to kick-start the journey. As we were walking loads, we were in Devon, and it was insanely hot, it goes without saying that we ate a tonne of ice cream. So in homage to all of that I decided to do an ice-cream themed bake for Father’s day.

In truth, I’m more of a mint choc chip girl than Neapolitan, but I thought that the classic vanilla, chocolate, strawberry layer thing was too good to not use for this. I also finished my Art Foundation course the other day (silent whoop!) and so after that I treated myself to a brownie cheesecake thing from Tescos. I’ve seen brownies being used in cheesecakes for years but that was the first time I tried it myself, and boy was it good. So rather than having a biscuit base for this one I made a fudgy brownie, and dare I say it I think it’s better than a biscuit base. It’s chewy, rich, and is way easier to transport/slice into as you don’t have crumbs flying everywhere!

This one has a few elements to it, but it’s all very easy to put together when broken down. For the swirls on the top I used strawberry jam which worked way better than I thought it would! If you’d prefer something sharper for the topping you could use marmalade, raspberry jam or boil up equal parts fruit and sugar to make a thick puree.

Recipe

Serves 12

Time: 1 hour, plus chilling

Ingredients

For the Brownie

  • 230g Caster sugar
  • 100ml Vegetable oil
  • 2 Medium Eggs
  • ½ tsp Vanilla extract
  • 55g Cocoa powder
  • 90g Plain flour

For the Cheesecake

  • 1 tbsp Vanilla bean paste
  • 550g Cream cheese
  • 50g Icing sugar
  • 250ml Double cream

For the Topping

  • 2 tbsp Strawberry jam
  • 200ml Double cream
  • 4 Small fresh strawberries, plus extra for serving
  • 2 tbsp Chocolate sprinkles

Method

  1. Begin by making the brownie. Pre-heat the oven to 160˚C. Grease and line a 9-inch cake tin with baking paper.
  2. Put the sugar and oil into a large bowl and whisk to combine. Add the eggs and vanilla and whisk these in to make a smooth mix. Add the cocoa and whisk it in carefully, it will explode out of the bowl a lot! Finally, add the flour and whisk it in to make a smooth batter.
  3. Pour the mixture into the lined cake tin and bake in the oven for 15-20 minutes so that a crust has formed and the middle is goey but baked through. Leave to cool in the tin.
  4. Now make the cheesecake layer. Put the vanilla and cream cheese into a bowl and whisk together until smooth. Add the icing sugar and double cream and then whisk again until the mixture is lump-free and beginning to thicken.
  5. Once the brownie is completely cooled pour the cheesecake mix on top and smooth it over with a spatula.
  6. Spoon the strawberry jam into a small bowl and beat it with a small spoon to break it up and make it slightly runny. Spoon blobs of the jam onto the cheesecake and then mix it around with a knife a little to get a swirl effect.
  7. Put the whole cheesecake into the freezer for 1 hour, and then leave in the fridge for another 3 hours, or better still over night to set.
  8. When ready start prepping the topping. Pour the double cream into a bowl and whisk until soft peaks form. Spoon the mixture into a piping bag fitted with a star-shaped nozzle. Pipe rosettes of the cream around the edge of the cheesecake.
  9. Quarter the strawberries and then push them into the gaps between the cream rosettes. Finish with some of the sprinkles and serve chilled!

Thanks for reading!

Emma x

Cauliflower Cheese Fish Pie

Cauliflower Cheese Fish Pie

Recently my family have been really enjoying these supermarket cod fishcakes with a oozy cheddar centre. I’d never of thought of putting cheese and fish together, but like this it works insanely well. So, inspired by this as always, I decided to do something fishy on the blog. Then the other day we had cauliflower cheese for dinner as it’s my Dad’s favourite, and we ended up with a big tub of it leftover in the fridge. It then occurred to me that most fish pies have a white sauce base with vegetables and fish mixed in, kinda like the fishcakes we like. So rather than go to all the effort of re-making a cheese sauce for a new fish dish I just mixed a bit of cod into the cauliflower cheese, then added bit more veg, whopped some mash on the top and bunged it in the oven. Hey presto, quick, tasty cauliflower cheese fish pie!

So this is great if you have leftover cauliflower cheese, but I’m also aware that it’s not a staple food in everyone’s home, and in order to make it in the first place you’re gonna need a recipe. Therefore the recipe below starts from scratch with making the cheese sauce and prepping the cauliflower, so you could make this as a thing without the need to make it from leftovers. You could also add prawns or a more oily fish like salmon if you want a bit more fish variety in there, but I’ve gone for just cod as it’s pretty easy to cook in a pie and pairs really well with the cheesy sauce.

Recipe

Serves 8

Time: 45 minutes (plus cooking time)

Ingredients

  • 1kg Potatoes, peeled and halved
  • 25g Butter
  • 20ml Milk

For the filling

  • 25g Butter
  • 25g Plain flour
  • 400ml Milk
  • 400g Cod
  • 1 tsp Dijon mustard
  • 100g Frozen peas
  • ½ Cauliflower
  • A handful of grated cheddar

Method

  1. Pre-heat the oven to 180˚C.
  2. Fill a pan with water and bring to the boil. Add the peeled potatoes and boil until soft and starting to flake.
  3. Drain them and then mash them. Add the milk, butter and some salt and pepper to season, and then mix until fully combined. Set aside for later.
  4. Now make the sauce. In another pan put the butter and leave to melt. Add the flour and mix until a paste forms. Then keep stirring the paste for 1-2 minutes to cook the flour.
  5. Then slowly add the milk, whisking constantly, until a smooth sauce forms. Continue to heat whilst whisking for 3-4 minutes until the mixture starts to thicken.
  6. Take the mixture off the heat and stir in the cod, mustard, peas, cauliflower and half the cheese. Spoon the mixture into an oven-proof dish. Top with the mash potato and sprinkle with the rest of the cheese.
  7. Put the pie into the oven and bake for 20-25 minutes until the topping starts to brown. Serve warm with a side salad!

Thanks for reading!

Emma x

Banana Maple Pain au Raisin

Banana Maple Pain au Raisin

I’d say that generally bananas are my fruit of choice. They’re easy to eat, with none of the effort that comes with peeling an orange, and they taste really good. There is always that problem though when you buy a bunch of them. To begin with they’re all rock solid, green, and basically inedible. Then they all hit perfect ripeness at the same time and you feel compelled to eat them all before they go bad. Inevitably though at least one will go brown, then black and just slowly worse as you pass it everyday thinking ‘I really should eat that’, but at the same time ‘I really don’t want to eat that’. This is exactly the process that happened in the lead up to these beauties. I had a couple of dying bananas next to the fruit bowl, but I really didn’t want to eat them, so I started brainstorming anything that I could put them in so they didn’t go to waste.

My first choice for old bananas would normally be a banana chocolate cake. However I made one of those for my blog already, and as I’m watching my weight I’ve decided to only bake things that appear on the blog, so another chocolate banana cake, whilst delicious, wasn’t the answer. Then, I’m not sure how, the idea of banana in crème patisserie, all rolled up into a Danish popped into my mind and these were born! It’s best to make these with really ripe, almost gone bananas as they have a really intense flavour. I found that this means you don’t have to use so much banana to get the flavour coming through in the crème pat, and therefore you don’t mess around with the consistency too much! I’ve used home-made pastry here as I love making it. I will warn you though that it does take a little time and tlc, so if you’re in a hurry you can use ready rolled croissant or puff pastry instead.

Recipe

Makes 12

Time: 2 hours plus lots of chilling, resting, and baking time

Ingredients

For the dough

  • 500g Strong white bread flour
  • 10g Salt
  • 80g Caster sugar
  • 10g Instant yeast
  • 300ml Cool water
  • 300g Unsalted block butter
  • 1 Egg, beaten

For the crème patisserie

  • 200ml Whole milk
  • 1 tbsp Vanilla bean paste
  • 45g Caster sugar
  • 3 Egg yolks
  • 10g Plain flour
  • 10g Cornflour
  • 1 tsp Cinnamon
  • 2 Very ripe bananas
  • 100g Raisins

For the topping

  • 3 tbsp Maple syrup
  • 100g Icing sugar

Method

  1. First make the dough. Put the flour, salt, sugar, yeast, and water into a big bowl and use a large spatula to mix it into a dough.
  2. Turn the dough out onto a lightly floured surface and knead for 8-10 minutes until smooth and elastic. Then tip it into a lightly oiled bowl, cover with clingfilm, and leave to chill in the fridge for an hour.
  3. Meanwhile, take the block butter and place it between two sheets of cling film. Using a rolling pin beat the butter out into a rectangle about 40 x 19 cm. Cover it in clingfilm and put back into the fridge to chill until needed.
  4. Lightly flour your surface and take the dough out of the fridge. Roll it out into a 60 x 20 cm rectangle, about the thickness of a pound coin. The dough will spring back and resist being shaped, but just persist and you will get there.
  5. Put the butter sheet onto the dough so that it covers two thirds, leaving the top third exposed.
  6. Fold the exposed dough onto the first third of the butter, and then fold the bottom third, covered in butter, up onto the dough you’ve just folded down. You should now have layers of dough, butter, dough, butter, dough. Loosely clingfilm the dough and put back into the fridge for an hour.
  7. Take the dough out of the fridge and put onto a floured surface with the short end facing you. Roll it out to a rectangle 60 x 20cm. Fold the top third down and then fold the bottom third up on top, as you did before. Turn the square block 90˚ and repeat the rolling and folding. Wrap the dough in clingfilm and chill the pastry in the fridge for 1 hour.
  8. Repeat step 7 two more times, leaving the dough to chill for an hour in between turns. After the last rolling and folding wrap the dough very loosely (wrapping tightly will stop the dough from rising) and leave in the fridge overnight (or for at least 8 hours).
  9. Meanwhile make the crème pat filling. Put the milk and vanilla into a pan and put over a medium heat. Bring the mixture to a simmer.
  10. In another bowl put the sugar, egg yolks, flour, cornflour, and cinnamon and whisk them all together to make a smooth paste. Pour the warm milk over the egg mix, whisking constantly. Once all combined pour the mixture back into the pan and heat whilst whisking until the mixture starts to thicken.
  11. Take the bananas and mash them with a fork to make a smooth puree. Stir this puree into the crème pat and then leave it to cool completely
  12. Once the dough has rested and you’re ready to start shaping. Line 3 baking trays with baking paper.
  13. Lightly flour a surface and roll out the dough to 50 x 30cm, trimming the edges so you have a neat rectangle. Spread the crème pat over the dough and then sprinkle over the raisins.
  14. Roll the dough up from the long edge like a swiss roll. Then leave the roll to chill in the freezer for 30 minutes – this will make it a lot easier to cut later.
  15. When ready slice the roll into 12 slices, about 2-3cm thick and lay them flat on the baking trays. Leave for a final time to rise for an hour.
  16. Pre-heat the oven to 180˚C. Brush the pain au raisin with the beaten egg to glaze and then bake in the oven for 30-40 minutes until golden brown and risen.
  17. Take the pastries out of the oven and brush with half the maple syrup whilst they’re still warm. Then leave them to cool.
  18. Mix the icing sugar and the rest of the syrup in a bowl and drizzle it over the cooled pastries, then serve!

Thanks for reading!

Emma x

Soufflé Pancakes with Almonds and Apricots

Soufflé Pancakes with Almonds and Apricots

Is there anything better than a good pancake I hear you ask? Well yes there is. These are pancakes made with whipped egg whites and baked in the oven so they puff up and go all fluffy like a soufflé. They will sink pretty quickly after coming out of the oven so it’s best to eat them as soon as they come out, but unlike normal soufflés they’ll stay light as clouds even after they’ve sunk, so even if you wait a bit before eating them they’ll taste insane!

I don’t use apricots that much in my cooking as they’re a bit too sharp when eaten raw, and a bit too sweet when dried. This one works with a combo of fresh apricots and apricot jam to give a perfect balance of sweet and sharp to go with the fluffy pancakes, almost like lemon juice and sugar on classic crepes. If apricots aren’t in season you can always work with plums, peaches, strawberries or raspberries instead.

Recipe

Serves 4

Time: 20 minutes

Ingredients

  • 30g Unsalted butter, plus extra for greasing
  • 3 Large eggs
  • 50ml Whole milk
  • 60g Caster sugar
  • 200ml Double cream
  • A few drops of Almond essence
  • 35g Plain flour
  • 200g Apricot jam
  • 2 Fresh apricots
  • A sprinkle of Flaked almonds to garnish
  • Vanilla ice cream to serve

Method

  1. Pre-heat the oven to 180˚C.
  2. Grease 4 bilini moulds with butter and leave them in the oven to warm up.
  3. Now make the batter. Take a pan and melt 20g of the butter over a medium heat.
  4. Separate two of the eggs. Put the two egg yolks in a bowl with the other whole egg. Add the melted butter, milk, half the sugar, cream, almond essence, and the flour. Then whisk until smooth.
  5. In another bowl whisk the egg whites until they form soft peaks. Then add the rest of the sugar and continue to whisk until the mixture become stiff enough to hold it’s shape.
  6. Fold the egg whites into the batter and mix until fully combined.
  7. Pour the mixture into the bilini moulds and put them back in the oven to bake for 8-10 minutes until golden brown and risen.
  8. Meanwhile prep the toppings. Put the rest of the butter (30g) into a small pan and leave to melt. In another pan gently warm the apricot jam until it begins to loosen and becomes runny. Then de-stone the apricots and cut them into thin slices.
  9. When the pancakes are ready work quickly. Using a palette knife take them out of the moulds. Brush the pancakes with butter and pour a little of the apricot jam over them. Repeat with the rest of the pancakes, stacking them up or sharing them out as you do. Top with the apricot slices and serve with vanilla ice cream!

Thanks for reading!

Emma x