Author: Emma Hawkins

Chocolate Malteaser Fridge-Cake

Chocolate Malteaser Fridge-Cake

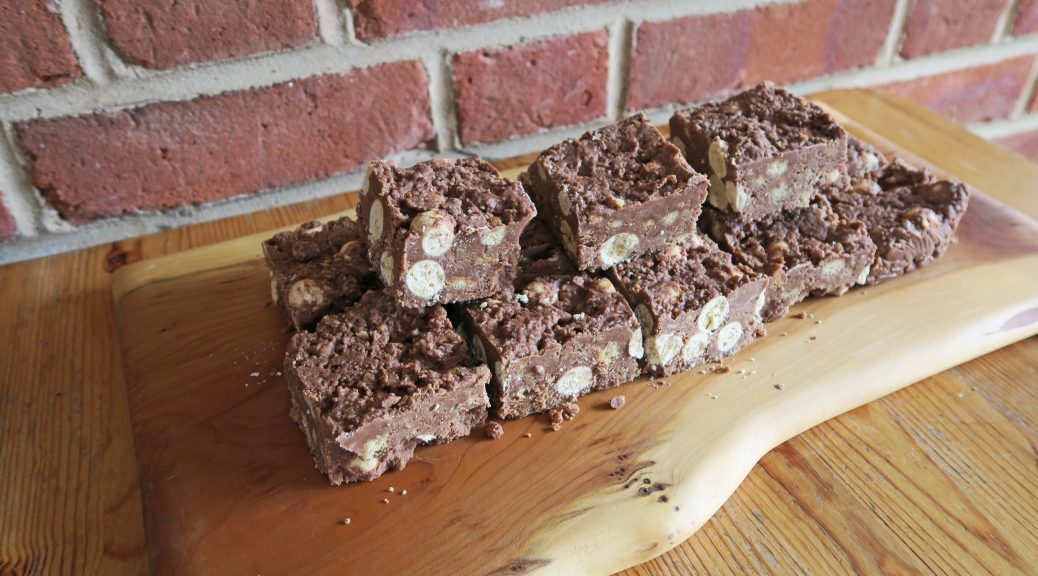
I’ve got to the point now where I’m cooking more than twice a week, so I have a fast growing store of recipes I’m waiting to post. This one, for example, I made way back at the start of March when I was craving a slice of this Malteaser fridge-cake bliss. It won’t do much for anyone on the nutritional front, but it’s a definite mood-booster. I feel everyone has that one thing that they make which is a hit from the first time they make it. For me this is one of those – it’s impossible to get wrong, tastes incredible, and is perfect for sharing, what’s not to like?

As it takes barely any time to make, and doesn’t need to be cooked, I often whip this up late at night when I’ve realised I’m meant to be taking some food to something the next day. I can whop everything together, bung it in the fridge and then it’s ready to be cut it into slices in the morning!

Recipe

Makes 12 squares

Time: 15 minutes, plus chilling

Ingredients

  • 150g Butter, plus extra for greasing
  • 300g Milk chocolate
  • 80g Golden syrup
  • 330g Digestive biscuits
  • 350g Malteasers

Method

  1. Put the butter, chocolate and syrup into a heatproof bowl over a pan of gently simmering water. Leave to melt, stirring occasionally to combine.
  2. Whilst waiting for the mixture to melt put the biscuits into a bowl and crush with the back of a rolling pin. You want it to be mostly crushed but if there’s a few lumps here and there that’s fine.
  3. Put the malteasers onto a chopping board and chop them roughly. Add them to the digestives.
  4. Pour the melted chocolate onto the biscuits and malteasers and mix until all combined.
  5. Line a small square tin with butter and cling film. Then pour the mixture into the tin and level out with the back of a spoon.
  6. Put the mix into the fridge to set for at least an hour, or better overnight.
  7. Once set chop the malteaser fridge cake into squares and then serve!

Thanks for reading!

Emma x
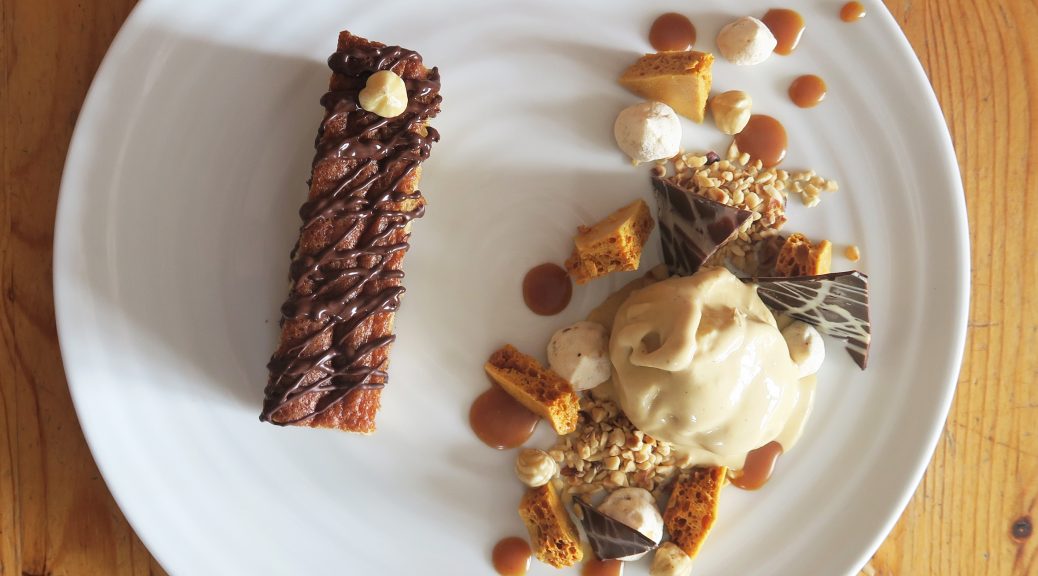
Hazelnut Cake with an Orange, Balsamic, Salted Caramel Ice cream, Honeycomb and Chocolate Shards

Hazelnut Cake with an Orange, Balsamic, Salted Caramel Ice cream, Honeycomb and Chocolate Shards

You probably recognise the elements of this dessert from my post last week on orange, balsamic and salted caramel chocolates. After I made them I had some of the caramel left over and so I was inspired to work it into a dessert somehow. I  decided to use the caramel to flavour an ice cream and to decorate the plate, and then I put it with chunks of honeycomb, a hazelnut cake and chocolate shards.

This combo of flavours, textures and temperatures makes for a really decadent dessert. It’s a bit complicated and will take some time to make, but it’s all well worth the effort. However, if you want a slightly unique pudding with as little effort as possible the ice cream is also very good on its own!

Recipe

Serves 4

Time: 2 1/2 hours

Ingredients

For the Caramel

  • 125ml Orange juice
  • 45ml Whipping cream
  • 1/2 tbsp Vanilla bean paste
  • 150g Caster sugar
  • 20g Liquid glucose
  • 100g Salted butter
  • 7 ml Balsamic vinegar

For the Ice cream

  • 2 tbsp Vanilla bean paste
  • 600ml Double cream
  • 80g Sugar
  • 3 Egg yolks

For the Cake

  • 100g Butter
  • 75ml Semi-skimmed milk
  • 300g Light brown sugar
  • 6 Large eggs
  • 2 tbsp Cornflour
  • 180g Plain flour
  • 200g Chopped hazelnuts

For the Honeycomb

  • 100g Caster sugar
  • 40g Golden syrup
  • 1 tsp Bicarbonate of soda

For the Shards

  • 100g White chocolate
  • 200g Dark chocolate

To decorate

  • Chopped Hazelnuts
  • 50g Dark chocolate

Method

  1. Begin by making the caramel for the ice cream. Put the orange juice into a pan with the vanilla and gently simmer over a medium heat until it’s reduced by half.
  2. Meanwhile put the cream in a pan over a low heat and start to warm through.
  3. Then put the sugar and glucose into a pan and heat gently whilst stirring until the sugar crystals dissolve. Then leave the mixture to boil until it becomes a deep amber caramel.
  4. Take the caramel off the heat and add the warmed cream, stand well back when you do this as the mixture will spit a LOT. Mix the cream in and then do the same with the reduced orange juice.
  5. Cut the butter into cubes and then stir them into the caramel, a few chunks at a time. Then leave the mixture to cool before stirring in the vinegar. Transfer the caramel to a pot and leave in the fridge for 2 hours to set a little.
  6. Then start making the ice cream base. Put the vanilla and cream into a pan and bring slowly to the boil.
  7. In a bowl put the sugar and egg yolks and whisk until pale. Then slowly pour in the hot cream mixture whilst continuously whisking. Keep whisking until the mixture starts to cool.
  8. Then put the mixture through a sieve before whisking in most of the caramel, keeping a little aside for plating later. Pour the mixture into an ice cream maker and leave to churn. Once starting to set pour the mixture into a freezer-proof container and leave in the freezer to set completely.
  9. Next make the hazelnut cake. Pre-heat the oven to 180˚C. Then grease a 20x20cm square tin with butter and baking paper.
  10. Put the butter and milk into a pan and heat gently until the butter has melted. Set to one side.
  11. Put the sugar and eggs into a large bowl and whisk with an electric whisk until thick, pale and fluffy.
  12. Sift the flour and cornflour and then fold them into the mix with a large metal spoon or spatula. Add the chopped hazelnuts and fold them into the mix. Finally pour the milk and butter mixture into the main bowl and fold this in until fully combined.
  13. Pour the mixture into the lined tin and then bake in the pre-heated oven until risen and springy to the touch, about 30 minutes. Check if it’s done by inserting a skewer, it should come out clean. Then turn the cake out onto a wire rack and leave to cool completely.
  14. Meanwhile move onto the honeycomb. Put the sugar and golden syrup into a pan. Put over a medium heat and cook, whilst stirring until the sugar has dissolved. Then stop stirring and leave to boil until it reaches a deep amber colour.
  15. Take the mixture off the heat and quickly tip in the bicarb. Stir quickly with a wooden spoon and then turn it out onto a baking sheet and leave to set completely.
  16. Then make the chocolate shards. Put the white and dark chocolates into separate heat-proof bowls over pans of simmering water. Leave to melt gently.
  17. Spoon the white chocolate into a pipping bag with a small nozzle and drizzle over a sheet of acetate, or if you don’t have acetate you can use baking paper, to make a doodle-pattern. Leave to set completely.
  18. Then take the slightly cooled, melted dark chocolate and pour it over the white chocolate. Smooth the layer over with a palette knife to make a smooth sheet of chocolate and then leave to set.
  19. Now plate up! Slice the hazelnut cake into rectangles. Place one of these onto your plate on an angle. Drizzle with a little melted chocolate and top with a hazelnut at one end.
  20. Take a scoop of your icecream and place it on the plate next to the cake. Then decorate the plate with your honeycomb and chopped hazelnuts. Then cut your chocolate sheet into triangles and gently peel them off and place them around the plate. Finish with a few blobs of the caramel!

Thanks for reading!

Emma x

Chocolate Cupcakes

Chocolate Cupcakes

When I was a lot younger I used to earn money by making and selling cupcakes at school fetes and bizarres. Most of my memories of these events are spending hours into the night before stressing out and piping onto hundreds of differently flavoured cakes. The picture below is of a very timid me at my first Christmas stall when I was 12. At this one I sold vanilla, lemon, coffee and walnut, ginger, chocolate, and caramel cakes.

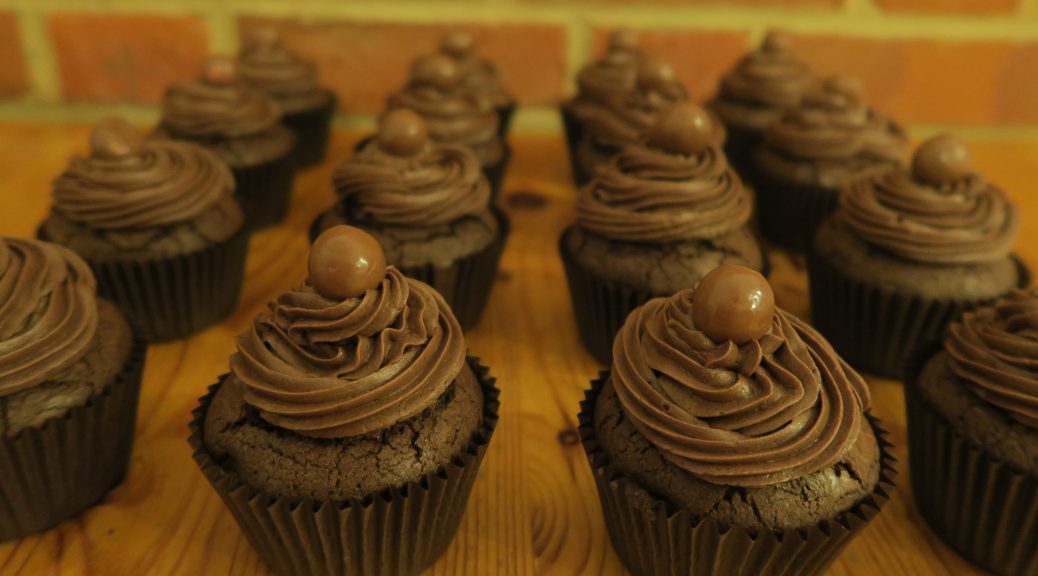
Without a doubt my best seller was my chocolate cupcakes topped with a Malteaser. I’d always have to make twice as many of them as any of my others as they’d sell out within the first half of the event.

Unfortunately, although I’ve made hundreds of these, I have no good photos of them. The two above photos are old ones from my cupcake selling days, before I learnt how to use a camera properly, and so they’re pretty blurry. Recently I made another batch (see below) for my Dad’s birthday, which inspired me to write a post on them. However, as I made them in the evening they have the unavoidable dark yellow tone that comes with artificial light. Nevertheless, they taste really good and by using a brownie-like mix they come out really squidgy and rich.

Recipe

Makes 12 Cupcakes

Time: 1 hour

Ingredients

  • 210ml Vegetable oil
  • 320g Light brown sugar
  • 1 tsp Vanilla extract
  • 4 Medium eggs
  • 80g Cocoa powder (not drinking chocolate, as it has added sugar and less cocoa, and so has much less flavour)
  • 130g Plain flour
  • 12 Malteasers

For the icing

  • 300g Unsalted butter
  • 265g Icing sugar
  • 50g Cocoa powder

Method

  1. Preheat the oven to 170˚C. Put 12 muffin cases into a muffin tin.
  2. In a large bowl whisk together the oil, sugar and vanilla. Add the eggs and whisk until fully combined. Add the cocoa and whisk again (go slowly here as the cocoa will go everywhere if whisked too fast). Add the flour and then whisk until fully mixed.
  3. Distribute the mixture between the cases using two table spoons, (I find about 1 1/2 tbsp for each cake works well). Put the cupcakes in the oven and bake for 20 minutes. Then reduce the oven temperature 150˚C and continue to bake until a skewer comes out clean when inserted into the middle of the cupcake (about 15 minutes more).
  4. Take the cakes out of the tins and leave to cool completely on wire racks.
  5. Meanwhile make the icing. Put the butter and icing sugar into a bowl and beat with a wooden spoon until smooth. Add the cocoa powder and continue to mix until it’s all combined.
  6. Put the icing into a piping bag fitted with a star shaped nozzle. Pipe the icing onto the cooled cakes in a spiral shape.
  7. Top each cake with a Malteser and serve!

Thanks for reading! Check out my social media pages (links on the side bar), and like/follow to stay updated.

Emma x

Orange, Balsamic, and Salted Caramel Chocolates with Honeycomb and Hazelnuts

Orange, Balsamic, and Salted Caramel Chocolates with Honeycomb and Hazelnuts

This is one of those rare occasions when my cooking coincides with my art practise. I’ve recently been inspired by multi-sensory art and the general stimulating of the other senses to enhance our perception of visual art. For this I made some photograms in response to a trip to Bristol I went on the other day. I then analysed these photograms and developed a chocolate to reflect them. WARNING: things are about to get seriously pretentious!

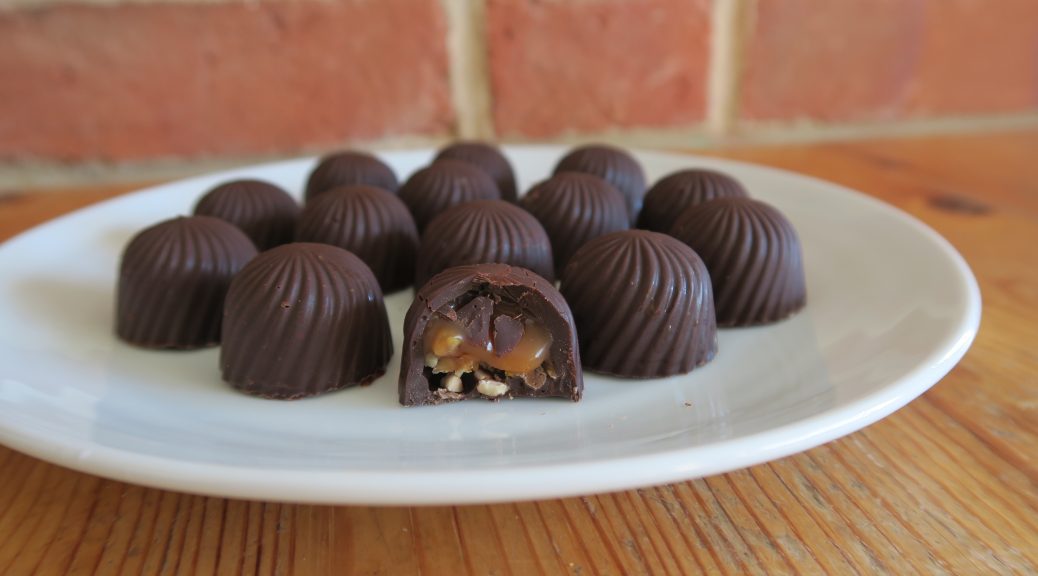
I decided to go for a dark chocolate shell to represent the deep dark tones in the image. I then filled it with a orange balsamic salted caramel – bitter, sharp, sweet and salty tastes to reflect the structural and mechanical elements of the photos, whilst being smooth and soft in texture to reflect the softer marks captured on the paper. Finally, honeycomb and hazelnuts to give some texture, as the images are also highly textured, and to provide a roasted, caramelised flavour. It sounds weird, but it kinda made sense when I was working through it. I then got my friends to eat the chocolates in front of the photograms (as demonstrated by the lovely Lisa above) and voila – multi-sensory art!

As with all good chocolate work, this does require some techy stuff to make it, so here’s a quick heads up of what you’ll need:

  • A plastic mould to construct the chocolates in – I’d recommend plastic over silicon. It’s harder to get them out but you’ll get a more defined shape and your chocolates will have a greater chance of keeping their shine if they’re made in a plastic mould.
  • A good digital thermometer. This is essential for properly tempered chocolate which will result in chocolates that are shiny and crisp to bite into. It will also prevent the chocolates from getting a ‘bloom’ which is when the chocolate sets with a white chalky finish, so if you want a professional finish tempering’s the way to go.
  • You should also use a chocolate with high cocoa solids (higher than about 75% is good). You can find this out by looking at the back of the packaging. A higher cocoa content means that the chocolate is higher quality and will therefore temper better.

Recipe

Makes 21

Time: 2 hours

Ingredients

  • 400g Dark chocolate
  • 100g Roasted, chopped hazelnuts

For the Honeycomb

  • 100g Caster sugar
  • 40g Golden syrup
  • 1 tsp Bicarb

For the Caramel

  • 125ml Orange juice
  • 45ml Whipping cream
  • 1/2 tbsp Vanilla bean paste
  • 150g Caster sugar
  • 20g Liquid glucose
  • 100g Salted butter
  • 7 ml Balsamic vinegar

Method

  1. Begin by tempering the chocolate. Finely chop the chocolate with a serrated knife. Then put 300g of this chocolate into a heatproof bowl and place over a pan of gently simmering water (aka a bain marie), making sure that the bottom of the bowl doesn’t touch the water.
  2. Melt the chocolate until it reaches 55-58°C on an electric thermometer and then take the chocolate off the heat. Put 100g of the melted chocolate into another heatproof bowl and put back over the bain marie to keep it warm.
  3. Meanwhile add the other 100g of chopped chocolate you set aside earlier to the remaining 200g of melted chocolate and stir constantly until the temperature decreases to 28-29°C.
  4. Pour the melted chocolate you’ve been keeping warm back into the main bowl of chocolate and combine to raise the temperature to 31°C. Your chocolate’s now ready to use!
  5. Pour the chocolate over your mould so every hole is fully filled to the top. Tap the mould on your worktop to get rid of any bubbles and then turn the mould 180° over a container and let the excess chocolate drip out.
  6. Once the chocolate has mostly stopped dripping you should have the mould coated with a thin layering of chocolate. Take a chocolate scraper or palette knife and move the blade over the top of the mould at a 45° angle to take all the excess chocolate off the surface. Keep the excess chocolate for later and leave the mould to set completely.
  7. Now move onto the fillings. To make the honeycomb begin by putting the sugar and golden syrup into a pan. Put over a medium heat and cook, whilst stirring until the sugar has dissolved. Then stop stirring and leave the mixture to boil until it reaches a deep amber colour.
  8. Take the mixture off the heat and quickly tip in the bicarb. Stir quickly with a wooden spoon and then turn it out onto a baking sheet and leave to set completely.
  9. Next make the caramel. Put the orange juice into a pan with the vanilla and gently simmer over a medium heat until it’s reduced by half.
  10. Meanwhile put the cream in another pan over a low heat and start to warm through.
  11. Then put the sugar and glucose into another pan and heat gently whilst stirring until the sugar crystals dissolve. Then leave the mixture to boil until it becomes a deep amber caramel.
  12. Take the caramel off the heat and add the warmed cream, stand well back when you do this as the mixture will spit a LOT. Mix the cream in and then do the same with the reduced orange juice.
  13. Cut the butter into cubes and then stir them into the caramel, a few chunks at a time. Then leave the mixture to cool before stirring in the vinegar. Transfer the caramel to a plastic piping bag and leave in the fridge for 2 hours to set a little.
  14. Once everything is ready you can start to fill your chocolates. Put the leftover chocolate from earlier back over a bain marie to re-melt gently.
  15. Cut a small bit off the end of the piping bag filled with caramel and pipe a little bit of caramel into each chocolate shell – you want about half the shell to be filled with the caramel.
  16. Break your honeycomb up into very small pieces and put one or two chunks into the chocolates, pushing them down into the caramel. Sprinkle over the roasted hazelnuts and then leave them to sit for a couple of minutes so the nuts sink into the caramel.
  17. Take your re-melted chocolate and like you did before pour it over the mould. Shake the mould to make sure the chocolate has no bubbles. Then take your palette knife or scraper and drag the blade along the top of the mould at a 45° angle to remove any excess chocolate from the top of the mould. You should now have 21 chocolates filled with your fillings and topped off with a layer of chocolate.
  18. Leave the chocolates to set at room temperature. It’s important not to put them into the fridge when they’re setting as this could cause the chocolate to ‘bloom’ and get a white sheen. Then, once they’re completely set, put them into the freezer for 10 minutes (this will make it a lot easier to de-mould them).
  19. Turn the mould over and bash it on a work top to get the chocolates out (if you have a silicon mould you can just pop them out).
  20. Share and enjoy!

Thanks for reading,

Emma x

Easter Simnel Bread

Easter Simnel Bread

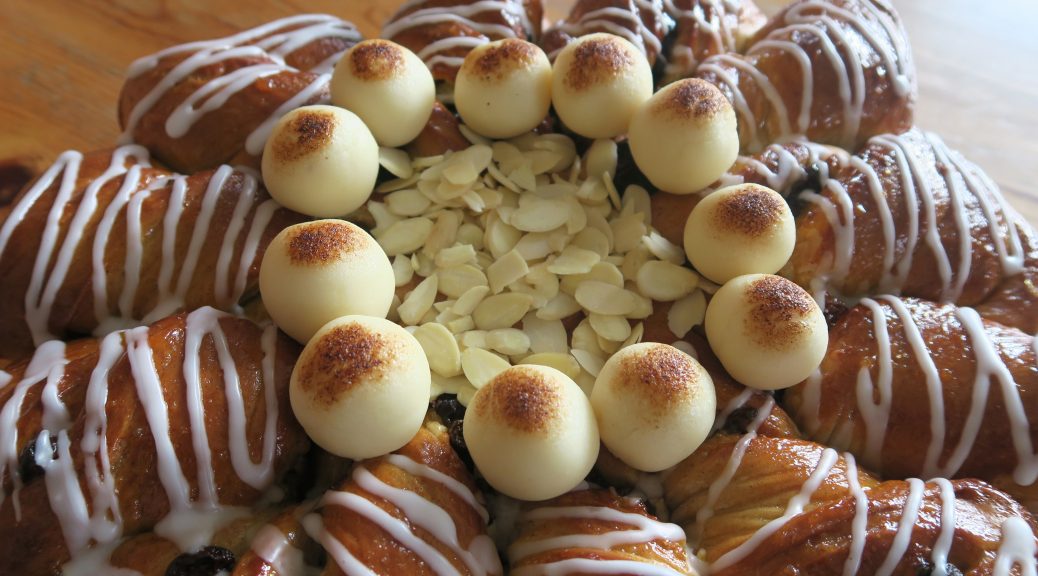
Simnel cake is to Easter what Christmas cake is to Christmas. Love it or hate it, it’s the embodiment of Easter in a bake. However, I have to admit I’ve never been much of a fan of fruit cake, and so I’ve decided to morph the flavours of simnel into a bread. It has all the classic almonds, spices and fruit found in a simnel cake, but it’s also light, soft and beautifully flavoured with a womph of rum. Easter in my family is a very social occasion and we tend to get the whole family together and have a nice meal. This bread is perfect for an event like this as the twirled fingers which make up the loaf can be torn off tear-and-share style, making it perfect for social occasions!

It may seem weird that there’s balls of marzipan on top of the loaf, but here’s a little simnel fact to get you in the Easter spirit. Traditionally simnel cake is topped with 11 balls of caramelised marzipan to represent the 12 disciples, minus Judas. I’ve honoured this tradition here, topping the loaf with marzipan to make it truly simnel and to give it a bit of a wow factor.

Recipe

Makes 1 loaf (serves about 13)

Time: 2 hours

Ingredients

  • 200g Raisins
  • Zest 1 Lemon
  • Zest 1 Orange
  • 2 tbsp Rum
  • 1 tbsp Orange juice
  • 520g Strong white bread flour
  • 12g Salt
  • 30g Caster sugar
  • 2 tsp Mixed spice
  • 3 tsp Ground cinnamon
  • 10g Fast-action dried yeast
  • 40g Butter
  • 50ml Milk
  • 2 Large eggs, beaten
  • 200g Marzipan

To Decorate:

  • 1 Egg, beaten
  • Apricot jam to glaze
  • 100g Icing sugar
  • 30g Flaked almonds

Method

  1. Put the raisins, lemon zest, orange zest, rum, and orange juice into a bowl. Mix together and then cover with clingfilm or a tea towel and leave to soak for at least an hour, or even better overnight.
  2. The next day start by putting the flour, salt, sugar, mixed spice and yeast into a bowl. Make sure the yeast and salt don’t come into direct contact as the salt will kill the yeast. Mix everything together with a wooden spoon.
  3. Next add the butter, milk, eggs and 135ml of water and mix together to form a soft dough.
  4. Turn the dough out onto a lightly oiled or floured worktop and knead for about 10 minutes until the mixture is smooth and elastic.
  5. Form the dough into a ball and then tip into a lightly oiled bowl. Cover with clingfilm and leave at room temperature to rise for about an hour, until doubled in size.
  6. When ready knock back the dough by kneading it for about 20 seconds on a lightly floured worktop. Then split the dough in half, wrap one of the halves in clingfilm and set it to one side.
  7. Take the other half and re-form it into a ball. Roll it out into a circle with a diameter of about 30cm – using a plate or large, round object as a guide can help with this. The dough will spring back and resist being stretched so just persevere until it stays in the shape you need it. Transfer this sheet of dough to a lined baking tray.
  8. Lightly dust your work top with icing sugar and roll out 50g of the marzipan to a circle with a diameter about 28cm, or generally a couple of cm less than your first bread circle. Place this marzipan disc on top of the disc of dough.
  9. Sprinkle over the raisins which have been soaking in the rum and zests to make an even layer.
  10. Roll out the second lump of dough into another circle with a diameter about 31cm wide. Brush the edge of the first circle with water and then lay the second dough circle on top of the first.
  11. Tuck the dough underneath itself around the edge to seal the two discs and make it into a neat circle. Next take a pair of kitchen scissors and cut 12, 10cm deep incisions into the circle to make a sun shape. Then take each strip and twist it twice clockwise to get a flower effect. Cover loosely with clingfilm and leave to rise for about an hour.
  12. Pre-heat the oven to 180˚C. Brush the loaf with the beaten egg to glaze and then put in the oven to bake for about 45 minutes until risen and golden brown. If it starts to burn cover it with tin foil to stop it browning too much.
  13. Put the apricot jam into a pan and heat gently to loosen it up. When the loaf is brought out of the oven brush with the warmed apricot jam to glaze.
  14. Roll the rest of the marzipan into 11 smooth balls, and then lightly brush with a blowtorch (or put under the grill) to caramelise. When the loaf is cool place balls in a circle on the top. Mix the icing sugar with 2 tbsp of water to make a just-pourable water icing. Drizzle this icing over the loaf, then sprinkle with flaked almonds and serve!

Thanks for reading!

Emma x