Category: Recipes

Chocolate Fondant Mug Cake

Chocolate Fondant Mug Cake

One of my favourite things to make is a chocolate fondant, but when you’re feeling low you don’t want to spend time baking – good thing this mug cake adaption only takes 5 minutes! For an added treat I’ve added dried cranberries and chocolate chips to this one, but you could leave them out or add something completely different if you’d like!

Recipe

Makes 1 large mug cake

Time: 5 minutes

Ingredients

  • 50g butter
  • 75g dark chocolate
  • 60g light brown sugar
  • 50g plain flour
  • 1 egg

Optional extras:

  • 25g milk chocolate chips
  • 25g dried cranberries
  • (You could also try nuts, other dried fruit, fresh berries and sweets)

Method

  1. Put the butter and chocolate into a bowl or mug and microwave for 20 seconds. Stir to combine the butter and chocolate as much as possible. If the chocolate hasn’t melted enough put it back into the microwave for another 20 seconds and then stir again until smooth.
  2. Add the sugar, flour, egg and any optional fillings you like. Mix until combined.
  3. Pour the mixture into a mug and microwave for 2 ½ minutes.
  4. Enjoy with fresh cream and berries!

Thanks for reading!

Emma x

Peach Melba Iced Fingers

Peach Melba Iced Fingers

Peaches are in their prime right now so it’s the perfect time to be using them in your baking! I love playing off classic flavour combinations, so peach melba (peach, raspberry and vanilla) was my instant go-to when thinking of making something seasonal. These use a homemade peach jam so you could (if making this outside of peach season) use a shop-bought jam if needed! Likewise if you’re short on time you could whip up 300ml of double cream with 1tsp of vanilla extract, then fold through a handful of fresh raspberries to replace the creme patisseries!

Recipe

Makes 12

Time: 3 hours

Ingredients

For the dough

  • 500g strong white flour
  • 50g caster sugar
  • 40g unsalted butter
  • 2 eggs
  • 14g fast action dried yeast
  • 2 tsp salt
  • 150ml warm milk
  • 140ml water

For the crème patisserie

  • 250ml whole milk
  • 1 tbsp vanilla bean paste
  • 50g caster sugar
  • 3 egg yolks
  • 10g plain flour
  • 10g cornflour

For the raspberry crème patisserie

  • 250ml raspberry puree
  • 50g caster sugar
  • 3 egg yolks
  • 10g plain flour
  • 10g cornflour

For the peach jam

  • 4 medium sized peaches (about 300g, peeled and de-stoned)
  • 220g caster sugar
  • 2 tbsp lemon juice

For the icing

  • 200g icing sugar
  • 4 tsp cold water
  • 2 drops orange food colouring
  • 2 drops pink food colouring

Method

  1. Pre-heat the oven to 220C.
  2. Place all the ingredients for the dough into a bowl and mix until it comes together to make a soft dough. (If it’s looking a little dry add a little more water, up to 40ml).
  3. Turn the dough out onto a worktop and knead until smooth and stretchy (about 10 minutes).
  4. Tip the dough into a lightly oiled bowl, cover with cling film and leave to rise for about 1 hour, until doubled in size.
  5. Take the dough out of the bowl and knead for 5 seconds to knock the excess air out.
  6. Divide the dough into 12 equally-sized pieces. Roll each piece into a ball and then shape them into fingers about 13cm long.
  7. Place the fingers on baking tray lined with baking paper, (making them spaced out enough to rise, but close enough that they’ll join together when risen – about 2cm between each should do). Cover loosely with clingfilm and leave to rise for another 40 minutes.
  8. Bake the buns in the oven for about 10 minutes until risen and just starting to turn golden brown. Set aside to cool.
  9. Now make the fillings. To make the crème patisserie begin by putting the milk and vanilla into a small saucepan and bring to just below the boil.
  10. Whilst waiting for the milk to warm up, put the sugar, egg yolks, flour and cornflour into a bowl and whisk to make a smooth paste.
  11. Pour the warm milk over the egg mixture in a steady stream, whisking constantly, until combined.
  12. Pour the mixture back into the pan and heat whilst whisking over a medium heat until the mixture thickens. Pour the crème patisserie into a bowl, cover with clingfilm and leave in the fridge to cool.
  13. Now make the raspberry crème patisserie. Put the raspberry puree into a pan and bring to just below the boil.
  14. Like with the traditional crème patisserie, put the sugar, egg yolks and flours into a bowl and whisk until they make a smooth paste.
  15. Pour the warm raspberry puree over the egg mixture, whisking constantly until combined. Place the mixture back over a medium heat and whisk until the mixture thickens.
  16. Pour the raspberry crème patisserie into a bowl, cover with clingfilm and leave in the fridge to cool.
  17. To make the jam take the peach flesh and chop it into small chunks.
  18. Put the peach, sugar and lemon juice into a pan and bring to the boil. Leave to boil for about 20 minutes until the mixture coats the back of a spoon. (You can also check the consistency by putting a plate in the freezer. When you think the jam is ready take the cooled plate, put ½ tsp of the jam onto the plate and put it in the fridge. It should set/wrinkle when prodded. If it doesn’t it needs a bit longer).
  19. Pour the jam into a sterilised jam jar and leave to cool until needed.
  20. Now make the icing. Put 150g of the icing sugar into one bowl with 3tsp of the water, and the other 50g icing sugar and 1tsp into another bowl. Mix each set of icing individually. Then add a few drops of orange food colouring to the large batch and a few drops of pink food colouring to the small batch. Mix until the colours are even through the icing.
  21. Pour the orange icing into a pipping bag with a 1cm round nozzle, and pour the pink icing into a pippin bag with a 1mm round nozzle.
  22. When the buns are cooled cut them in half, placing the tops next to the bases.
  23. Pipe a line of orange icing across the tops of the buns. (If needed you can take a palette knife, heat it by running it under some warm water for a few seconds, then run it along the icing to smooth it out). Then take the pink icing and pipe spots or lines across the top of the orange icing. (If you want you can then take a tooth pick and run it up and down the icing to feather it, but it’s up to you!). Leave for about an hour to set.
  24. Take the peach jam and spread about 1tsp over the base of each bun.
  25. Take the crème patisseries and put them into separate pipping bags with 1cm stared nozzles (or use disposable pipping bags and cut your own nozzles).
  26. Pipe alternating blobs of vanilla and raspberry crème patisserie over the peach jam (I get about 2 of each on each bun).
  27. Place one of the iced tops on top of the bun and enjoy!

Thanks for reading!

Emma x


Chocolate Hazelnut Cookies

Chocolate Hazelnut Cookies

Recipe

Makes 24

Time: 1 hour

Ingredients

  • 120g unsalted butter
  • 100g light brown sugar
  • 75g caster sugar
  • ½ tsp fine sea salt
  • 1 medium egg
  • 1 tsp vanilla extract
  • 200g plain flour
  • ¼ tsp bicarbonate of soda
  • 100g milk chocolate chips
  • 70g chopped hazelnuts
  • 120g Nutella (or other chocolate hazelnut spread)

Method

  1. Line two baking trays with baking paper. Pre-heat the oven to 180C.
  2. Put the butter and sugars into a bowl and beat with a wooden spoon until smooth and creamy.
  3. Add the salt, egg and vanilla and beat again until smooth.
  4. Add the flour, baking powder, chocolate chips, and chopped hazelnuts and mix again to make a smooth dough. (If the dough is looking soft you can place the dough in the fridge for 1 hour to firm up before the next step).
  5. Divide the mixture into 24 equal pieces (mine were about 30g each) and roll each bit into a ball. Place them on the lined baking trays, spaced apart enough so they have room to spread.
  6. Bake for 7-10 minutes until just starting to go golden brown. Allow to cool and then enjoy!

Thanks for reading!

Emma x

Bakewell Blondies

Bakewell Blondies

Bakewell (almond + cherry) is one of my favourite flavour combos to work into new bakes, especially as you can get so many different types of almonds and cherries! In these I use almond extract, ground almonds and blobs of marzipan, paired with frozen cherries in the mixture and glace cherries on top! All incased in a fudgy blondie cake, studded with chunks of white chocolate!

Recipe

Makes 12 blondies

Time: 1 hour

Ingredients

  • 170g butter
  • 220g light brown sugar
  • 1 tsp vanilla bean paste (or extract)
  • 1 large egg
  • 210g plain flour
  • 75g white chocolate
  • 75g marzipan, torn into small chunks
  • A few drops of almond essence
  • 50g cherries (I use frozen as it’s cheaper but you can use fresh if you prefer)

To decorate

  • 50g cherries
  • 200g icing sugar

Method

  1. Pre-heat the oven to 180C. Grease and line a 9” square tin with butter and baking paper.
  2. Melt the butter in a large bowl by putting it in the microwave for 20 second bursts. Add the sugar and vanilla and whisk until combined.
  3. Add the egg and whisk again to combine. Then add the flour and whisk again to make a smooth batter.
  4. Take the white chocolate and chop it into rough chunks. Then add this chopped chocolate to the blondie mixture. Add the marzipan bits, almond essence and cherries and mix it all together.
  5. Pour the batter into the lined tin. Bake the blondies for 25-30 minutes, until golden brown and still a little fudgy in the middle. Leave to cool and then cut into 12 slices and enjoy!

Thanks for reading!

Emma x

Chocolate and Salted Caramel Macaroons

Chocolate and Salted Caramel Macaroons

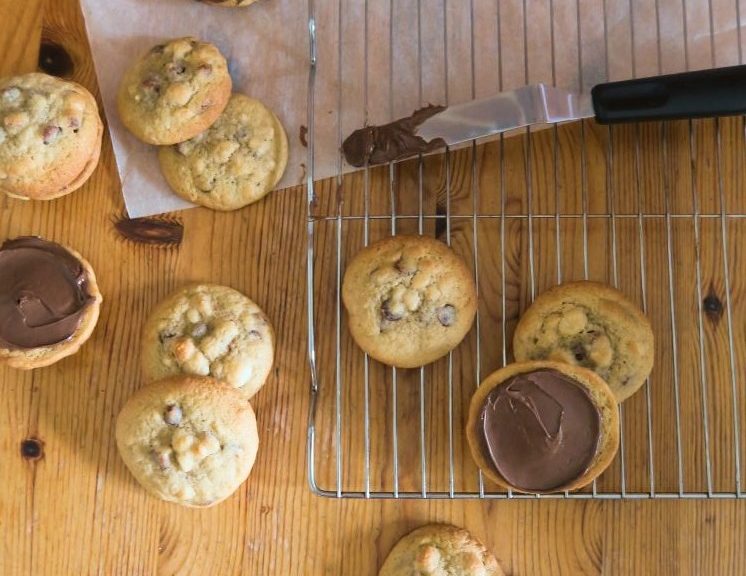
I’ve made macaroons for years but until now I’ve never been able to make them perfectly. They were my go-to bake to use up leftover egg whites and yet they’d always end up burnt, undercooked, lumpy, flat, crackly or dull. But I kept on going, kept on trying different recipes and have finally found one that has worked for me! The ratios of ingredients for the macaroon shells (as well as the design for these ones) came from The Cozy Plum so please do check out their social media and website as they create really amazing content!

So… how do you make the perfect macaroon? This is a question I have been asking myself for years and so here’s everything I did to make them turn out like this. I’m sure some steps are more crucial than others (these are a collation from all the different recipes I’ve tried and all researching I’ve done) but from my experience macaroons are very temperamental and so doing every one of these is worth it to make sure they turn out beautiful!

How to Make the Perfect Macaroons

  1. When learning how to make macaroons stick to  plain, simple shells before you start experimenting with things like colourings and flavourings. You can decorate these plain shells with exciting fillings and toppings once they’re out of the oven, but until you’ve mastered the basic macaroon shell don’t try anything that’s going to complicate the process!
  2.  Grind your icing sugar and ground almonds. I always used to ignore this step because I would just sieve my almonds and icing sugar and think that would be enough – they’re already ground after all. But no. Do this. Get a food processor and give them a good whiz before sieving them. This will help you get the super smooth shiny top to the macaroon; without it the shells will look mottled and lumpy.
    • In addition to this, when sieving the almonds and icing sugar don’t force anything through the sieve with a spoon etc, just tap the sieve on the side to get the finer bits through. Then discard any lumps left in the sieve. If you try to work these through you’ll see coarser chunks falling onto the finely ground bits. These are the bits you don’t want in the mixture.
  3.  Use super clean bowls and beaters. When making macaroons and meringues I always clean my bowls and electric whisk beaters with soap and warm water, and then dry them with a clean tea towel before beginning. If there’s any grease on any of these then when you whisk your egg whites you won’t get a stiff peak.
  4. Folding till you hit the ‘V’. I always thought macaroons were like meringues and were therefore meant to be handled as little as possible. This is true to some extent but when it comes to the folding you want the mixture to be just runny enough that once piped the macaroons will smooth themselves over. This will let you get a smooth, shiny top to the macaroon. So when folding the dry ingredients into the meringue keep folding until the mixture falls off the spatula in a V shape and so that the mixture landing back in the bowl holds its shape for about 5 seconds before disappearing.
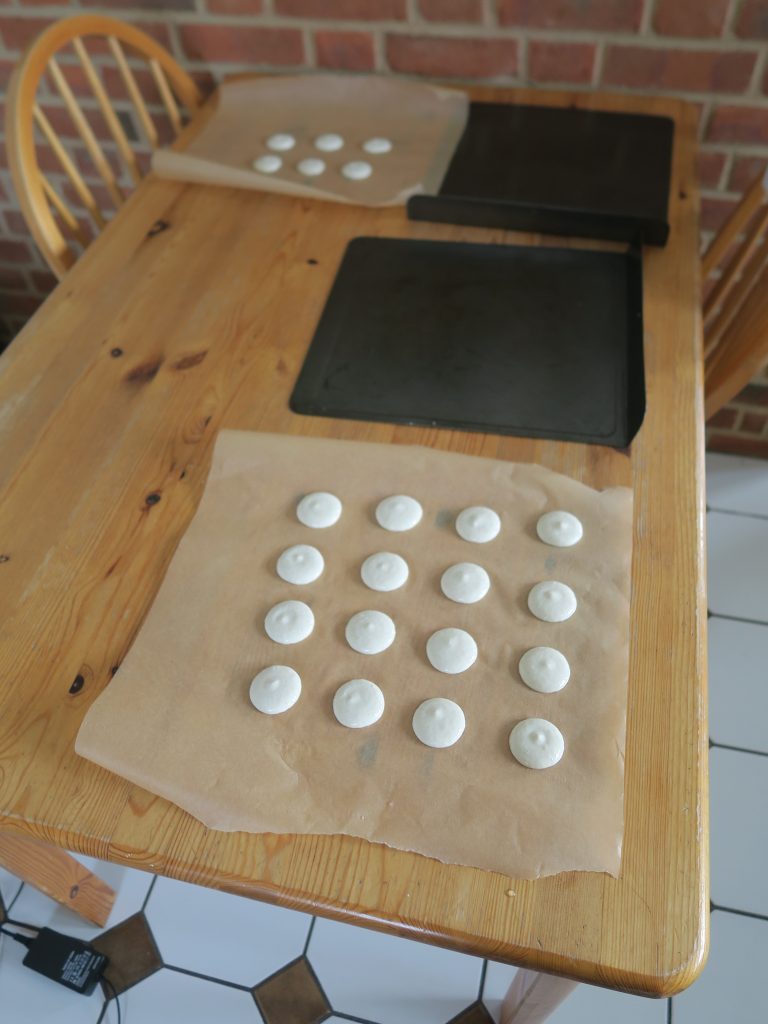
  5.  Pipe with guides. Draw some circles onto your baking paper before you pipe, this will help you make all your macaroons the same size so they fit together nicely when filled.
  6.  Pipe, Bang and Pop. This was another tip from The Cozy Plum – once pipped bang the trays on the worktop to burst any of the air bubbles in the macaroons and then go round with a tooth pick and gently pop any of the bubble that have risen to the surface. This will stop them from popping in the oven, which would give your macaroons a rough look.
  7. Rest! – there’s a big debate over whether you need to rest your macaroons or not before baking, in my opinion it doesn’t hurt to do it. By leaving the macaroons at room temperature for 20-30 minutes before baking you get a skin form over the macaroons which then helps to get that smooth shiny top with the bobbly foot round the edge – which is a must-have on any true macaroon!
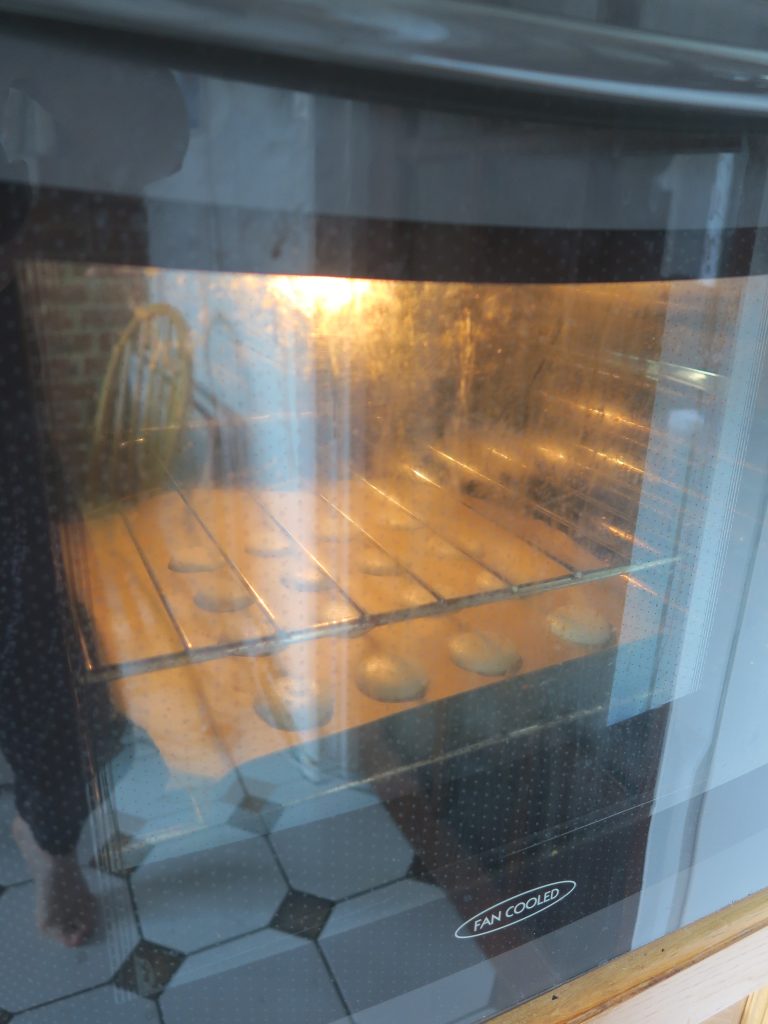
  8.  Bake to your oven, not to the recipe. Ovens vary massively and where some ovens will cook these to perfection, the same time and temperature in another oven could burn them to a crisp. Therefore it’s really important the first time you make these to keep a close eye on them and take them out when they look ready. This is another reason for making plain macaroon shells the first time you make them as it’s much easier to see when the macaroons are browning/burning and should therefore be taken out of the oven. As soon as they start getting a little colour they should be taken out as they’re close to going over.
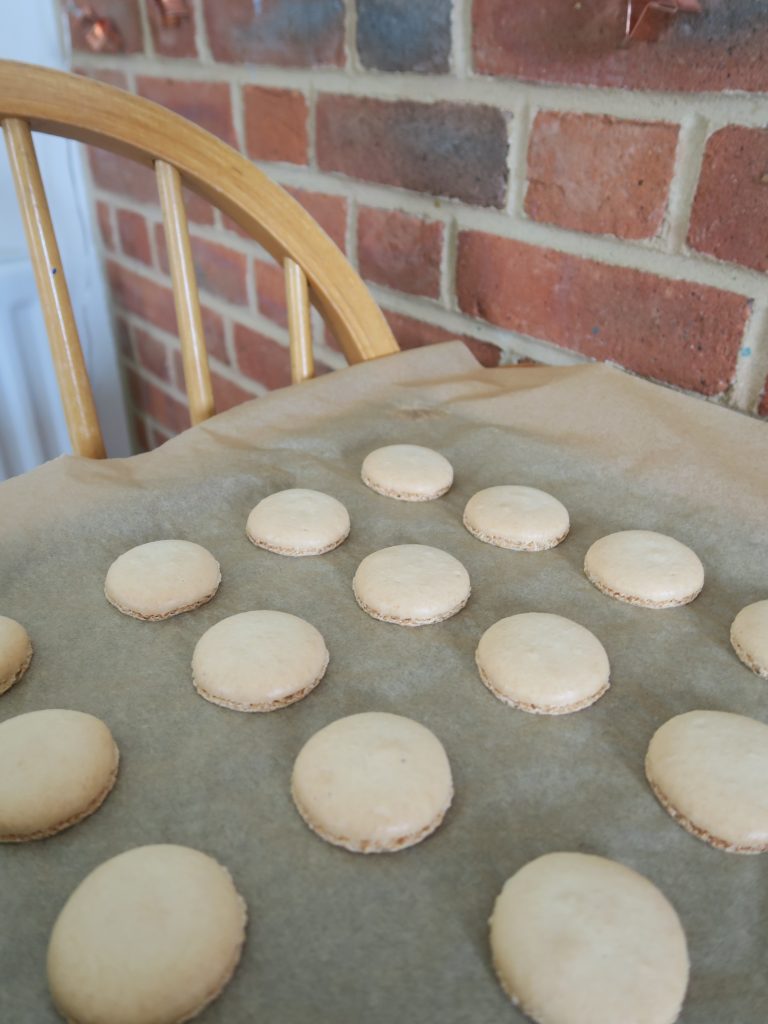
  9. Cool, cool, cool – make sure the macaroons are completely cool before you try to handle them or else the centre might stick to the baking paper and you’ll end up with hollow macaroons!

I hope these tips help! If you have any troubles don’t hesitate to drop me a message or email and I’ll do my best to help. Likewise, if you have any top tips that I’ve missed here that work for you  I’d love to hear them so please send them through!

Recipe

Makes 10 macaroons

Time: 1-2 hours

Ingredients

For the macaroon shells

  • 50g ground almonds
  • 50g icing sugar
  • 37g egg whites (about 1  medium eggs worth, but work to the weight rather than the number of eggs if you can)
  • 1/8 tsp cream of tartar
  • 35g caster sugar

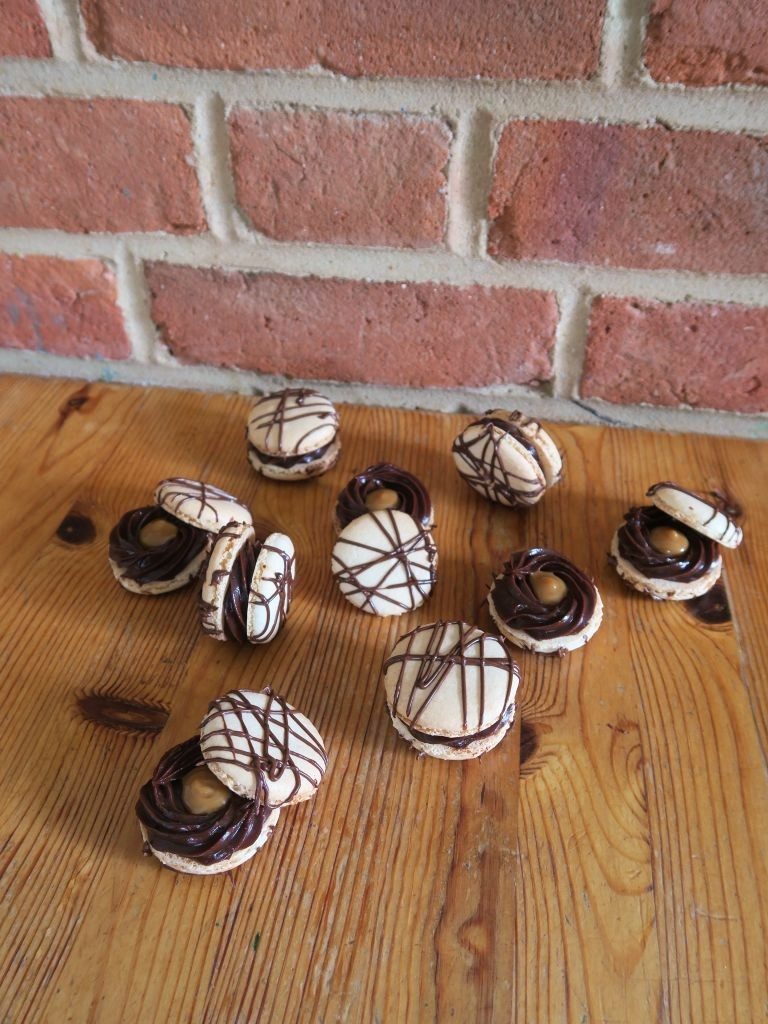
For the chocolate ganache
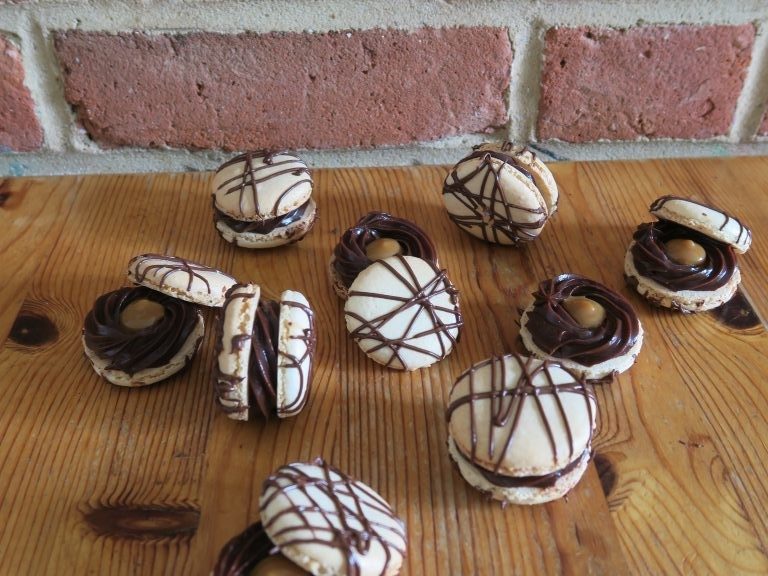
  • 100g dark chocolate
  • 100ml double cream

For the decoration

  • About 4 tbsp of salted caramel (I used Carnations caramel with a pinch of sea salt mixed in)
  • 50g dark chocolate

Method

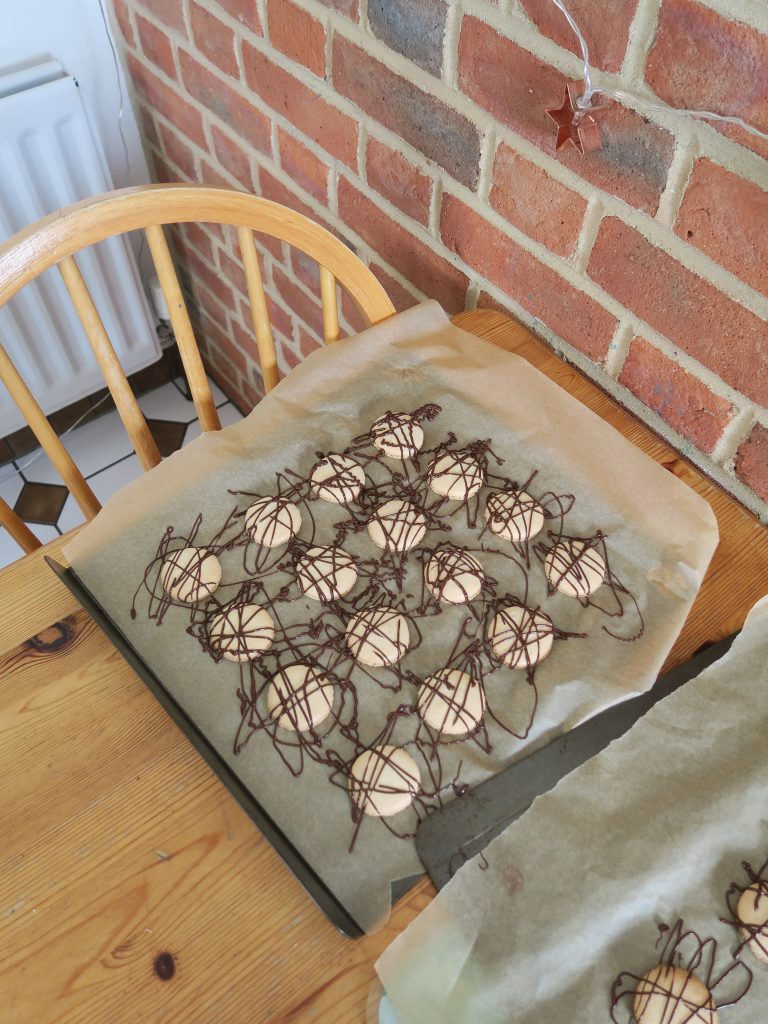
  1.  Pre-heat the oven to 160C. Line two baking trays with baking paper. Take a round cookie cutter about 4cm in diameter and draw circles onto the baking paper with a pencil, about 2cm apart, using the cutter as a stencil. Turn the baking paper over so the pencil marks are on the underside of the paper.
  2. Put the ground almonds and icing sugar into a food processor and whiz for about a minute until the mixture is ground super fine.
  3. Sieve this mixture into a bowl, throwing away any coarse bits left in the sieve (don’t push these through).
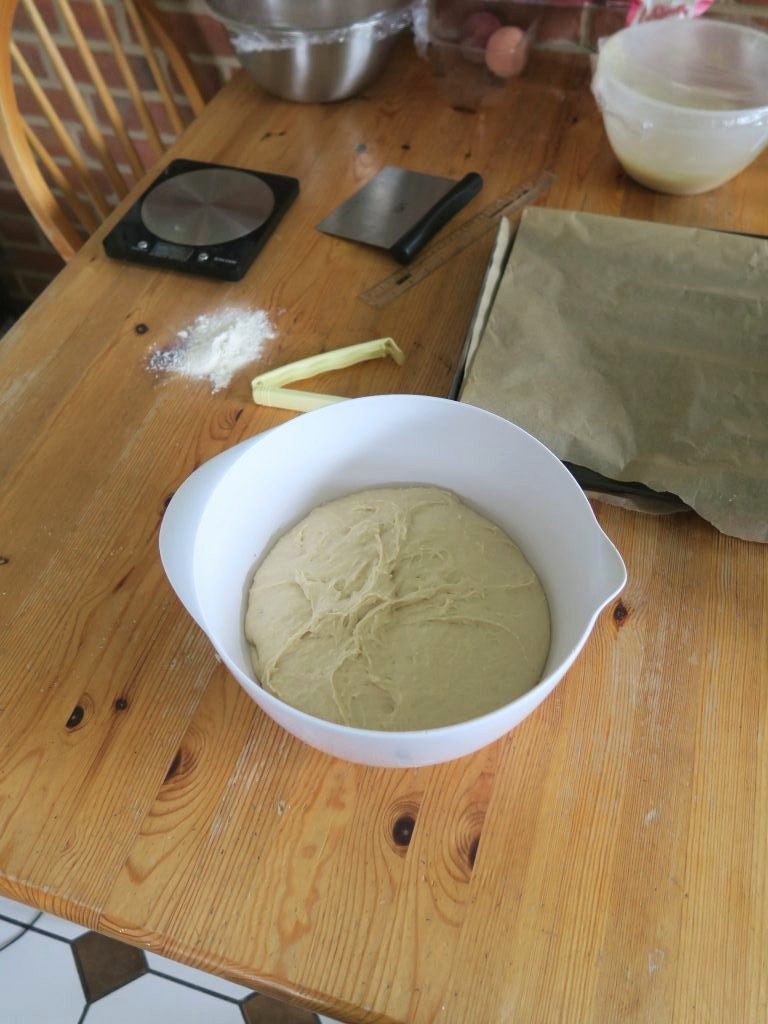
  4. Take a very clean metal (or glass bowl) and add the egg whites. (I always clean my bowl and beaters right before I make macaroons or meringues so I know they’re completely grease-free. Any grease on the utensils will prevent you getting volume in the egg whites). Whisk the egg whites with an electric whisk until foamy. Add the cream of tartar and continue to whisk until soft peaks form.
  5. Add the caster sugar to the egg whites 1tsp at a time, whisking constantly, until stiff peaks form (3-4 minutes should do it). If you want coloured meringues add the food colouring once you reach these stiff peaks and whisk for a little longer to mix it through.
  6. Fold half the ground dry ingredients into the meringue, using a spatula in big confident motions. The add the rest of the dry ingredients and keep folding until the mixture is smooth and leaves ribbons when the mixture is dripped of a spatula (the ribbons should last for about 5 seconds).
  7. Pour the macaroon mixture into a piping bag fitted with a small, round nozzle (about 1/2cm in diameter).
  8. Pipe the macaroons onto the baking paper, using the circles you drew earlier as a guide to make sure they’re all the same size.
  9. Pick up one of the baking trays and bang it on the work top a couple of times to pop any air bubbles in the macaroons. Then go around with a tooth pick and pop any of the bubbles that have risen to the surface. Leave the macaroons to rest for about 20 minutes to allow a skin to form over them.
  10. Bake the macaroons for 8-12 minutes until they’re smooth, shiny and a foot has formed around the base. Take them out of the oven and leave them to cool completely on the trays.
  11. Meanwhile make the ganache for the filling. Finely chop the chocolate and put it into a heatproof bowl. Put the cream into a small saucepan and heat until just below boiling.
  12. Pour the cream over the chocolate and stir until the chocolate has melted and the ganache is smooth.
  13. Pour the mixture into a pipping bag with a star shaped nozzle and leave in the fridge until it’s just firm enough to pipe smoothly. (Don’t leave it in the fridge for too long or else it’ll set too hard. If this happens try warming the bag with your hands or by placing it in some warm water (being careful not to allow the water into the pipping bag)).
  14. Take the salted caramel and put this into a piping bag and leave in the fridge until needed.
  15. Put the chocolate for the topping into a metal or glass bowl and place over a pan of gently simmering water. Allow to melt gently and then pour it into a pipping bag with a very small, round nozzle.
  16. Wait until the chocolate is cool enough to pipe in smooth lines (too warm and it’ll drizzle out in a wiggly line, too cold and it’ll have set too much to pipe) – you can check this by pipping a little bit over a sheet of baking paper to check how it’s doing. When it’s ready drizzle it over the macaroon shells in random lines. Leave to set completely.
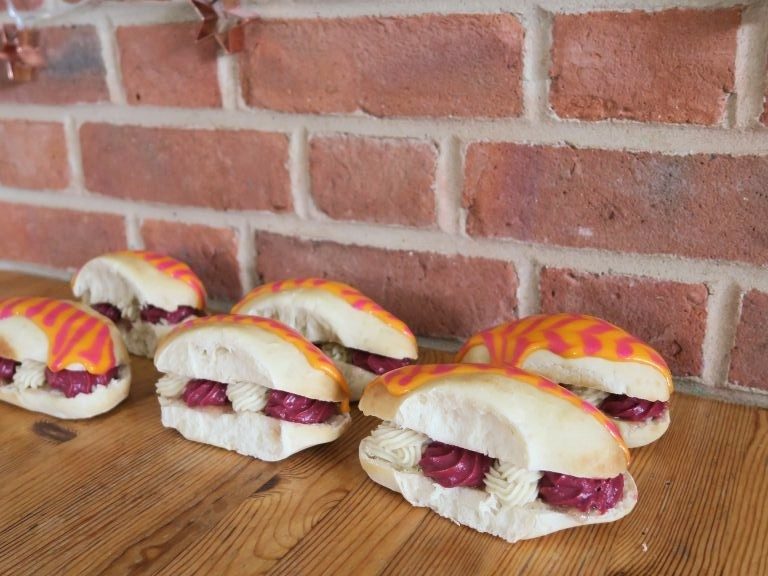
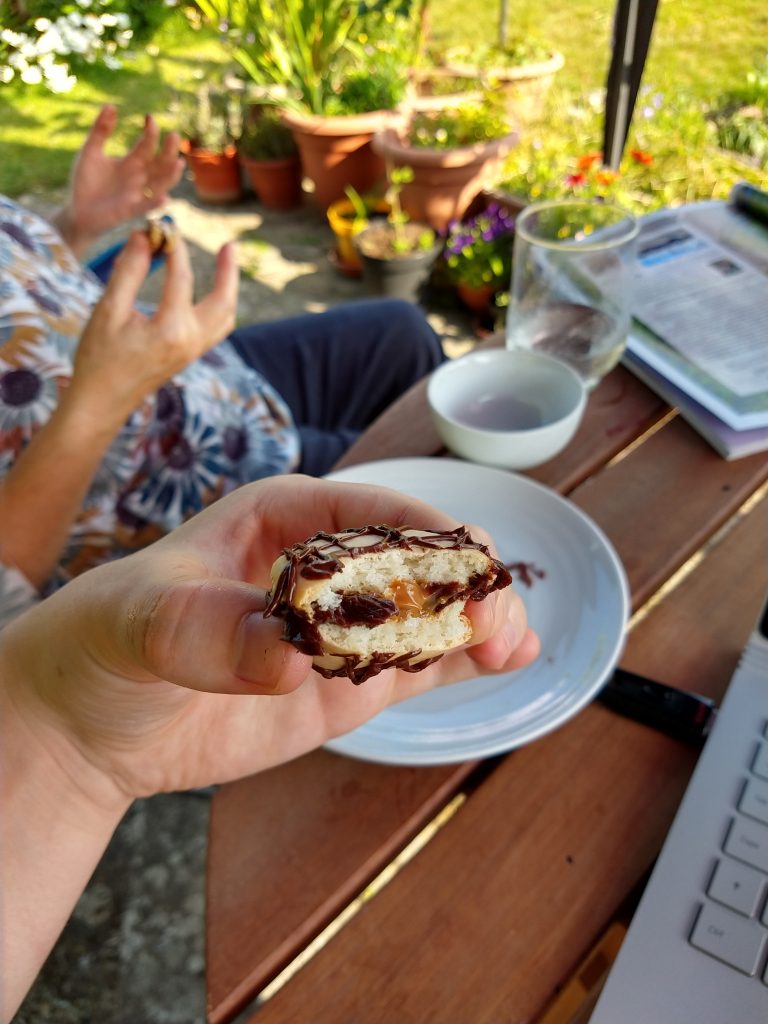
  17. When the chocolate has set, turn half the shells over. Pipe a ring of ganache over these shells and then pipe a blob of the caramel into the centre. Place a macaroon shell ontop of each filled macaroon shell and enjoy!

Thanks for reading!

Emma x