Tag: Snack

Orange, Balsamic, and Salted Caramel Chocolates with Honeycomb and Hazelnuts

Orange, Balsamic, and Salted Caramel Chocolates with Honeycomb and Hazelnuts

This is one of those rare occasions when my cooking coincides with my art practise. I’ve recently been inspired by multi-sensory art and the general stimulating of the other senses to enhance our perception of visual art. For this I made some photograms in response to a trip to Bristol I went on the other day. I then analysed these photograms and developed a chocolate to reflect them. WARNING: things are about to get seriously pretentious!

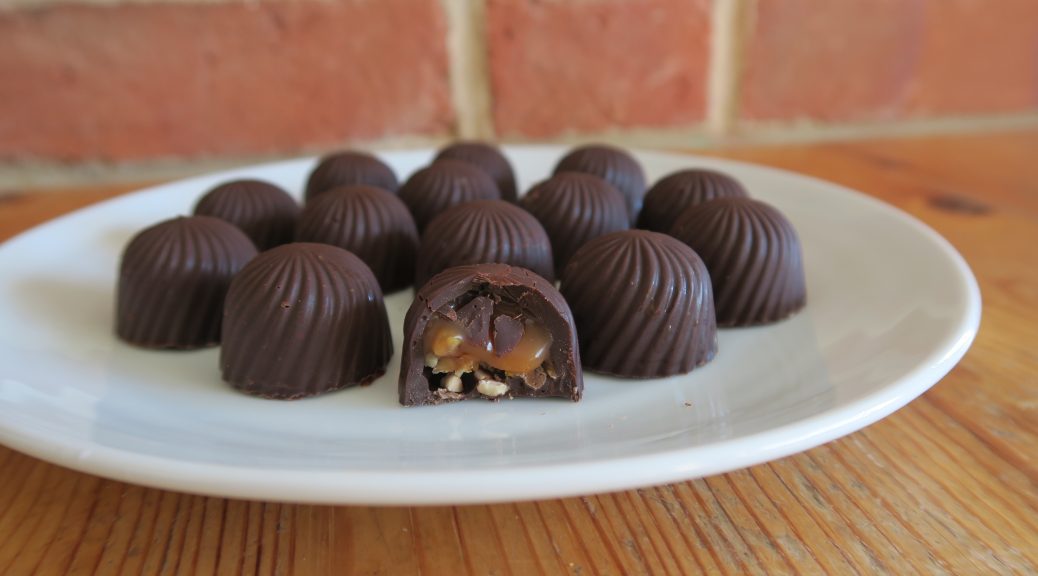
I decided to go for a dark chocolate shell to represent the deep dark tones in the image. I then filled it with a orange balsamic salted caramel – bitter, sharp, sweet and salty tastes to reflect the structural and mechanical elements of the photos, whilst being smooth and soft in texture to reflect the softer marks captured on the paper. Finally, honeycomb and hazelnuts to give some texture, as the images are also highly textured, and to provide a roasted, caramelised flavour. It sounds weird, but it kinda made sense when I was working through it. I then got my friends to eat the chocolates in front of the photograms (as demonstrated by the lovely Lisa above) and voila – multi-sensory art!

As with all good chocolate work, this does require some techy stuff to make it, so here’s a quick heads up of what you’ll need:

  • A plastic mould to construct the chocolates in – I’d recommend plastic over silicon. It’s harder to get them out but you’ll get a more defined shape and your chocolates will have a greater chance of keeping their shine if they’re made in a plastic mould.
  • A good digital thermometer. This is essential for properly tempered chocolate which will result in chocolates that are shiny and crisp to bite into. It will also prevent the chocolates from getting a ‘bloom’ which is when the chocolate sets with a white chalky finish, so if you want a professional finish tempering’s the way to go.
  • You should also use a chocolate with high cocoa solids (higher than about 75% is good). You can find this out by looking at the back of the packaging. A higher cocoa content means that the chocolate is higher quality and will therefore temper better.

Recipe

Makes 21

Time: 2 hours

Ingredients

  • 400g Dark chocolate
  • 100g Roasted, chopped hazelnuts

For the Honeycomb

  • 100g Caster sugar
  • 40g Golden syrup
  • 1 tsp Bicarb

For the Caramel

  • 125ml Orange juice
  • 45ml Whipping cream
  • 1/2 tbsp Vanilla bean paste
  • 150g Caster sugar
  • 20g Liquid glucose
  • 100g Salted butter
  • 7 ml Balsamic vinegar

Method

  1. Begin by tempering the chocolate. Finely chop the chocolate with a serrated knife. Then put 300g of this chocolate into a heatproof bowl and place over a pan of gently simmering water (aka a bain marie), making sure that the bottom of the bowl doesn’t touch the water.
  2. Melt the chocolate until it reaches 55-58°C on an electric thermometer and then take the chocolate off the heat. Put 100g of the melted chocolate into another heatproof bowl and put back over the bain marie to keep it warm.
  3. Meanwhile add the other 100g of chopped chocolate you set aside earlier to the remaining 200g of melted chocolate and stir constantly until the temperature decreases to 28-29°C.
  4. Pour the melted chocolate you’ve been keeping warm back into the main bowl of chocolate and combine to raise the temperature to 31°C. Your chocolate’s now ready to use!
  5. Pour the chocolate over your mould so every hole is fully filled to the top. Tap the mould on your worktop to get rid of any bubbles and then turn the mould 180° over a container and let the excess chocolate drip out.
  6. Once the chocolate has mostly stopped dripping you should have the mould coated with a thin layering of chocolate. Take a chocolate scraper or palette knife and move the blade over the top of the mould at a 45° angle to take all the excess chocolate off the surface. Keep the excess chocolate for later and leave the mould to set completely.
  7. Now move onto the fillings. To make the honeycomb begin by putting the sugar and golden syrup into a pan. Put over a medium heat and cook, whilst stirring until the sugar has dissolved. Then stop stirring and leave the mixture to boil until it reaches a deep amber colour.
  8. Take the mixture off the heat and quickly tip in the bicarb. Stir quickly with a wooden spoon and then turn it out onto a baking sheet and leave to set completely.
  9. Next make the caramel. Put the orange juice into a pan with the vanilla and gently simmer over a medium heat until it’s reduced by half.
  10. Meanwhile put the cream in another pan over a low heat and start to warm through.
  11. Then put the sugar and glucose into another pan and heat gently whilst stirring until the sugar crystals dissolve. Then leave the mixture to boil until it becomes a deep amber caramel.
  12. Take the caramel off the heat and add the warmed cream, stand well back when you do this as the mixture will spit a LOT. Mix the cream in and then do the same with the reduced orange juice.
  13. Cut the butter into cubes and then stir them into the caramel, a few chunks at a time. Then leave the mixture to cool before stirring in the vinegar. Transfer the caramel to a plastic piping bag and leave in the fridge for 2 hours to set a little.
  14. Once everything is ready you can start to fill your chocolates. Put the leftover chocolate from earlier back over a bain marie to re-melt gently.
  15. Cut a small bit off the end of the piping bag filled with caramel and pipe a little bit of caramel into each chocolate shell – you want about half the shell to be filled with the caramel.
  16. Break your honeycomb up into very small pieces and put one or two chunks into the chocolates, pushing them down into the caramel. Sprinkle over the roasted hazelnuts and then leave them to sit for a couple of minutes so the nuts sink into the caramel.
  17. Take your re-melted chocolate and like you did before pour it over the mould. Shake the mould to make sure the chocolate has no bubbles. Then take your palette knife or scraper and drag the blade along the top of the mould at a 45° angle to remove any excess chocolate from the top of the mould. You should now have 21 chocolates filled with your fillings and topped off with a layer of chocolate.
  18. Leave the chocolates to set at room temperature. It’s important not to put them into the fridge when they’re setting as this could cause the chocolate to ‘bloom’ and get a white sheen. Then, once they’re completely set, put them into the freezer for 10 minutes (this will make it a lot easier to de-mould them).
  19. Turn the mould over and bash it on a work top to get the chocolates out (if you have a silicon mould you can just pop them out).
  20. Share and enjoy!

Thanks for reading,

Emma x

Ultimate Hot Chocolate

Ultimate Hot Chocolate

Most people who know me know that I’m not a hot drinks person. Offer me a tea or coffee and I’m the one who goes  ‘have you got water?’ But I have to admit that a good hot chocolate at the right time is a great thing. This week I’ve been invidulating an art exhibition in an edgy, rustic, barn kind of a place. Whilst it’s great for the art, it’s major downside is that it’s FREEZING. Luckily a flask of this hot chocolate has been there to stop me from turning into an ice cube. When it’s made with milk, cream and chocolate, not just water and powder, it becomes a thick, sweet and nourishing, which is really needed for the current weather!

I love making confectionary and so I’ve included a recipe for marshmallows here. It does take a little time to do, and I’d recommend making them at least 2 hours before you use them, so if that’s too much to ask you can easily use shop-bought ones. I will say though that these little marshmallow blobs are really good in this, and making them is really worth it!

Recipe

Serves 2

Time: 10 minutes for the hot chocolate, 30 minutes plus setting time for the marshmallows

Ingredients

For the marshmallow

  • 150g Granulated sugar
  • 5g Liquid glucose
  • 1 Large egg white
  • 3 Gelatine sheets

For the hot chocolate

  • 450ml Whole milk
  • 50g Dark chocolate
  • 70g Milk chocolate
  • 80ml Single cream
  • 1/4 tsp Cinnamon
  • Pinch of salt
  • A few chilli flakes (optional)

To decorate

  • 100ml Double cream, whisked to soft peaks
  • Some chopped hazelnuts and raspberries (optional)

Method

  1. Begin by making the marshmallow. Put the sugar and 150ml water into a medium sized saucepan. Bring to the boil whilst stirring over a medium heat.
  2. Once the mixture starts to boil stop stirring and leave it until it reaches 127˚C. Whilst waiting for this to happen leave the gelatine to soak in 50ml water.
  3. Put the egg whites into a very clean metal or glass bowl and whisk up to firm peaks (a stand alone mixer is really useful for this as in a bit you’re going to have to whisk for a long time in a bit, but if you don’t have one (like me) an electric hand whisk will also work).
  4. When the sugar reaches the right temperature add the gelatine and the water it’s soaking in and stir to dissolve.
  5. Continue whisking the eggs and simultaneously pour the syrup into them in a slow stream until it’s all whisked in.
  6. Continue to whisk for another 15-20 minutes until the mix is thick and holds it’s shape – the mixture should also have mostly cooled to room temperature by then.
  7. Line a baking tray with clingfilm, and then sift a little cornflour and icing sugar in an even layer over it. Transfer the marshmallow mix into a piping bag with a round nozzle and pipe blobs of marshmallow onto the lined tray. (Alternatively you can line a small tin with clingfilm, icing sugar and cornflour and pour the mixture into it to set). Leave for at least an hour (or better over night) to set completely.
  8. When your marshmallows are ready it’s time to make the hot chocolate.
  9. Put the milk and chocolates into a medium sized saucepan and heat whilst whisking until the chocolate is completely melted.
  10. Then pour in the cream and add the cinnamon, salt and chilli flakes and whisk to combine. Continue to heat until it just reaches the boil and then serve…
  11. Pour this hot chocolate into a mug and serve with freshly whipped cream, raspberries, hazelnuts and your perfect marshmallow blobs!

Thanks for reading!

Emma x

Croque Monsieur

Croque Monsieur

I’m not gonna lie to you, this is essentially a glorified cheese and ham toastie – but man is it a good cheese and ham toastie! It’s a ‘I think I just heard the hallelujah chorus when I took a bite’ kinda good if you hear me.

Unlike most toasties this one is a) French and b) has a cool cheese sauce in it which makes it incredibly tasty. It may seem like a bit of an efffort to take out a pan and make a sauce for a sandwhich, but trust me, it’s 100% worth it. You’ll also probably have some of this sauce left over, in which case keep it – it’s great on leeks, cauliflower, or with pasta and will keep in the fridge for 2-3 days!

I should point out that it’s not strictly traditional to put tomatoes in a croque monsieur, but hey, this is a blog and I like a bit of a fruity/sharp tang in the middle of my toastie. But it’s totally optional, so if you’re not a fan of tomatoes don’t let it put you off.


Recipe

Serves 1

Time: 15 minutes

Ingredients

For the Cheese sauce

  • 13g Unsalted butter
  • 13g Plain flour
  • 125ml Milk
  • 1/2 tsp English mustard
  • 35g Strong cheddar cheese, grated

For everything else

  • 2 Thick slices of white bread
  • 2 Slices of honey smoked ham
  • 2 Cherry tomatoes, sliced thinly
  • 100g Gruyere Cheese, grated

Method

  1. Begin by making the cheese sauce. Put the butter into a small saucepan and melt over a medium heat.
  2. Add the flour and stir to form a paste. Cook this paste in the pan for 1-2 minutes.
  3. Slowly add the milk to the paste, stirring in between each addition to make a really smooth sauce. I find using a whisk really helpful here as it helps to break up the lumps, and make sure you pour the milk in slowly as otherwise your sauce will be lumpy.
  4. When all the milk in incorporated, continue to whisk over a medium heat until the sauce thickens enough to hold its shape a little. Then add the mustard and grated cheddar cheese and whisk until the cheese is melted and all combined. Set aside for later.
  5. Pre-heat the oven to 180C. Take your bread, butter it lightly and then put it, butter side up, into the oven to crisp up. Once just starting to brown take it out.
  6. Turn the bread slices over so you’re working on the non-crispy sides. Spread the slices with the cheese sauce (about 1 tsp on each). Then put a ham slice on each bit of bread. Arrange the tomato slices on one of the pieces of bread and then sprinkle half of the grated Gruyere over them.
  7. Put the bread slice without tomatoes ontop of the one with tomatoes, crisp side out, to make a sandwich. Sprinkle the rest of the gruyere over the top and then bake in the oven for 5 minutes, until the cheese is bubbling and starting to brown.
  8. Take out of the oven and serve warm with a side salad!

Thanks for reading!

Emma x

Chia Seed Breakfast Pots

Chia Seed Breakfast Pots

Chia seeds are the new super-food that is flooding cookbooks and blogs. They’re full of fibre, omega-3, calcium, protein, phosphorus and much more, and they can be used to help tackle diabetes, heart problems and obesity. So if you’re looking for a nutritious breakfast, simply bung some of these in.

These little pots can be put together the night before so you can gobble it down in the morning without any fuss or bother. I’ve used berries to make the compote and to decorate, but you could use any fruits you like (mango and passion fruit is a really good combo!) You can also present these differently if you want to. I went for jam jars as I think they pretty cool, but you could also just make up the individual elements and serve them up in a bowl if you want.


Recipe

Serves 2

Time 20 minutes, plus chilling time

Ingredients

  • 100g Frozen raspberries
  • 100g Frozen strawberries
  • 100g Frozen blackberries
  • 1 tbsp Honey
  • 80g Chia seeds
  • 450ml Almond milk
  • 1 tsp Vanilla bean paste
  • 300ml Greek yoghurt/fruit yoghurt of your choice
  • A few fresh berries to decorate (I went for cherries, raspberries and blackberries)
  • 2 tbsp Granola

Method

  1. Begin by making the fruit compote. Put the frozen fruits and honey into a small pan and heat gently until they’ve softened and pulpy. Set aside to cool and then put into the bottom of a jar.
  2. Now make the chia seed middle. Put the chia seeds, milk, and vanilla into a jug and stir with a fork. Let sit for 15 mins then stir again to break up the clumps. Put into fridge for at least 2 hours to set (overnight works well to).
  3. When the chia seed filling is ready spoon it over the fruit compote. Then take your yoghurt of choice and spoon it over the chia seed filling. Top with granola and fresh fruit and serve!

Thanks for reading!

Emma x

Baked Egg Pots

Baked Egg Pots

Now that it’s 2018 we’re into the new year and new years resolutions are flying all over the place. One that I’ve taken on along with thousands of others over the country is to eat more healthily. Whilst I can’t see this lasting long for the main reason that I write a bi-weekly food blog and I love patisserie, I thought a detox January would be a good way of exploring healthy food. So you can expect a month full of healthy (or healthy attempts) of recipes.

I first heard of baked eggs when I was on French exchange and loads of my friends were being served them by their host families. Since then I’ve wanted to give it a go and so now here we are! I instantly liked making these as I could just delve into my fridge and pull out the first things I could see which I thought would work well together. Whether you have some leftover roast chicken, or some about-to-go-off tomatoes, this is a great way of using it up. I’ve included three variations at the bottom of the post to get your imagination running as to how you could personalise your own baked egg pot.

As well as being really versatile in terms of ingredients, they also have loads of uses. As they’re so quick to make they’re a great little warm snack for a cold day, or you could serve them as simple starters at a dinner party. This is especially useful as they take very little preparation and can be easily altered to suit different dietary requirements! Alternatively you could do what I do and make one for lunch and serve it with a side salad to get a healthy, high-protein meal.

Recipe

Serves 4

Time: 10 minutes prep, 15 minutes to cook

Ingredients

  • 3 Plum tomatoes
  • 1 Small pepper (I went for yellow)
  • 12 tsp Light Cream cheese
  • 8 Large eggs
  • 2 Cherry tomatoes
  • Pinch of salt and pepper
  • Basil to garnish

Method

  1. Pre-heat the oven to 180C.
  2. Chop the plum tomatoes into chunks and put them into the bottoms of 4 ramekins.
  3. Chop the pepper up into chunks and again distribute them between the ramekins.
  4. Take a teaspoon and put three little blobs of cream cheese into each pot.
  5. Crack two eggs into each pot – you don’t need to whisk them up or anything, just pop them straight in.
  6. Chop the cherry tomatoes into quarters and put two quarters into each pot.
  7. Season with salt and pepper (a very important step so do not miss!)
  8. Bake in the oven for 15-20 minutes, the time will vary depending on how you like your eggs cooked.
  9.  Take out of the oven and garnish with fresh basil. Eat with bread and/or a side salad!

Variations-

Smoked salmon – Take out the plum tomatoes and instead add 1 handful of wilted spinach to each pot. Then put some smoked salmon in with the cream cheese before you put on the eggs. Serve with sour cream and chives!

Bacon and Cheese – If you’re not bothered about the whole healthy eating thing you can use full fat cream cheese, or even go two steps further and add bacon and cheddar cheese to make them really indulgent.

Chicken and Sweetcorn – Take some leftover roast chicken, or chopped up cooked chicken breast, and 4 tbsp cooked sweetcorn and divvy it up between the pots with the cream cheese, eggs and seasoning.

Thanks for reading!

Emma x