Tag: Main Course

Chilli Con Carne  

Chilli Con Carne  

I’m a big believer in eating when and what you’re body tells you to eat. By that I don’t mean stuffing your face every time you feel peckish or get a craving, which admittedly I do a lot anyway, but I also don’t believe in not eating when you’re body’s telling you you need to. A few months ago I was craving peanuts. Now, I had never had much of an interest in peanuts before this time and so I basically took this as a sign that my body was in need of whatever nutrients peanuts are particularly rich in. I’m not a nutritionist so I’m not saying this is something anyone else should necessarily live by, but it works for me. So, bringing this back to topic, this week I’ve turned into a carnivore and have been really craving meat.

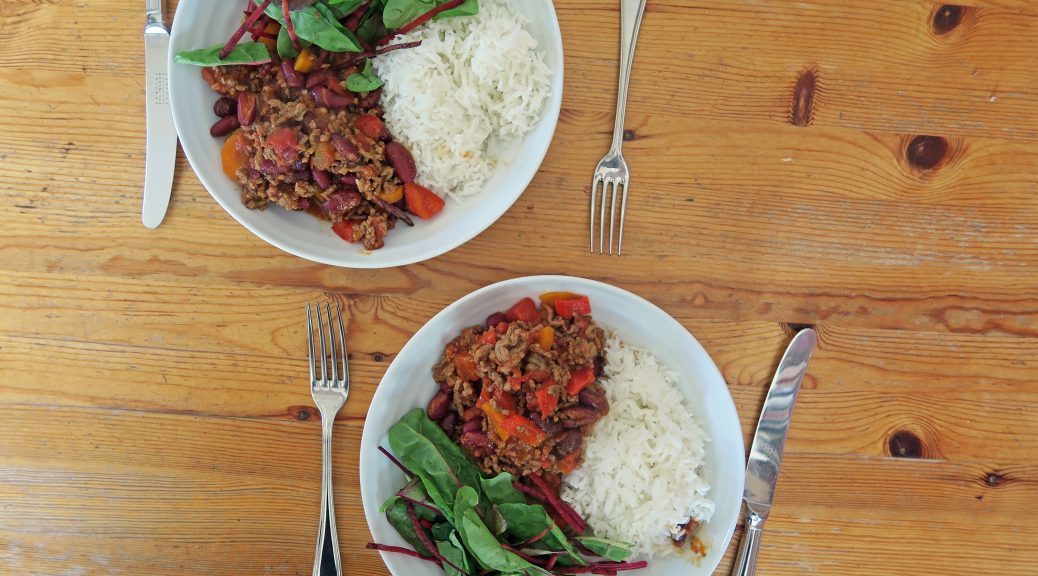
Unlike the rest of my family, I’m not normally a very meaty person. I used to be a vegetarian and as a result I often find myself slipping back into a veg-based diet. But this week I was in need of hard meat and so chilli con carne – the mothership of meat dishes – flew onto the menu pretty fast. Whilst I’m a food blogger and I a love trying new foods, I have to admit that I have the palette of a young child. I love gently spiced, relatively mild comfort food and anything with any oomph of chilli will blow my head off. Therefore I’ve spiced this ironically named chilli pretty gently, so if you’re cooking for kids or others with a palette like mine this will be perfect. If, however, you like your food hot you can add as much cayenne pepper as you like. I’d recommend adding another 1/2 tsp at a time once everything’s cooked, mixing it in and then tasting it. Don’t just triple the amount straight away as it might blow your head off and then you’re dinner will become a painful torture experience.

Recipe

Serves 6

Time: 20 minutes prep, 20 minutes cooking

Ingredients

  • 1 White onion
  • 1 Clove of garlic
  • 1 tbsp Sunflower oil
  • 2 Medium sized carrots
  • 1 Red pepper
  • ½ tsp Smoked paprika
  • ½ tsp Cayenne pepper
  • ½ tsp Medium curry powder
  • 500g Minced beef
  • 400g Chopped tomatoes
  • 1 tbsp Tomato puree
  • 1 Beef stock cube
  • 400g Kidney beans
  • Rice and salad to serve (optional)

Method

  1. Begin by peeling and then finely chopping the onion and garlic. Put the oil into a large pan and put over a medium heat. Add the chopped onion and garlic and fry gently until caramelised.
  2. Peel and dice the carrot and then de-seed and dice the red pepper. Add the vegetables to the pan and fry for another 2-3 minutes to soften.
  3. Add the mince to the pan and fry for 5-10 minutes until the meat is browned all over. Break up the meat with a wooden spoon as you stir the mixture.
  4. Add the paprika, cayenne pepper and curry powder and fry for another 2-3 minutes to cook off the spices.
  5. Then add the chopped tomatoes, tomato puree, stock cube and 150ml boiling water to the pan. Stir to combine and then leave to simmer for 10 minutes, until the sauce has reduced and the carrots are no longer crunchy.
  6. Drain the kidney beans through a sieve and rinse under cold water. Then add them to the chilli and stir them through. Season with lots of salt and pepper and leave to simmer for another 10 minutes.
  7. Serve the chilli with rice and fresh salad!


Why not try…

Adding a little dark chocolate to the top of the chilli. It sounds weird, but is actually becoming a pretty common addition to chilli. It’ll add a delicious bitter, roasted flavour to the dish!

Thanks for reading!

Emma x
Asparagus, New Potato and Serrano Ham Salad

Asparagus, New Potato and Serrano Ham Salad

To counter all the insanely indulgent patisserie and sweet bakes that I’ve been making the past few weeks, I thought it was about time for a salad. Especially when it’s this hot all the time, no one really wants to be eating anything warm and so salads are kinda my go-to thing. This salad can be served either hot or cold, so it’s a good one to have up your sleeve for all seasons.

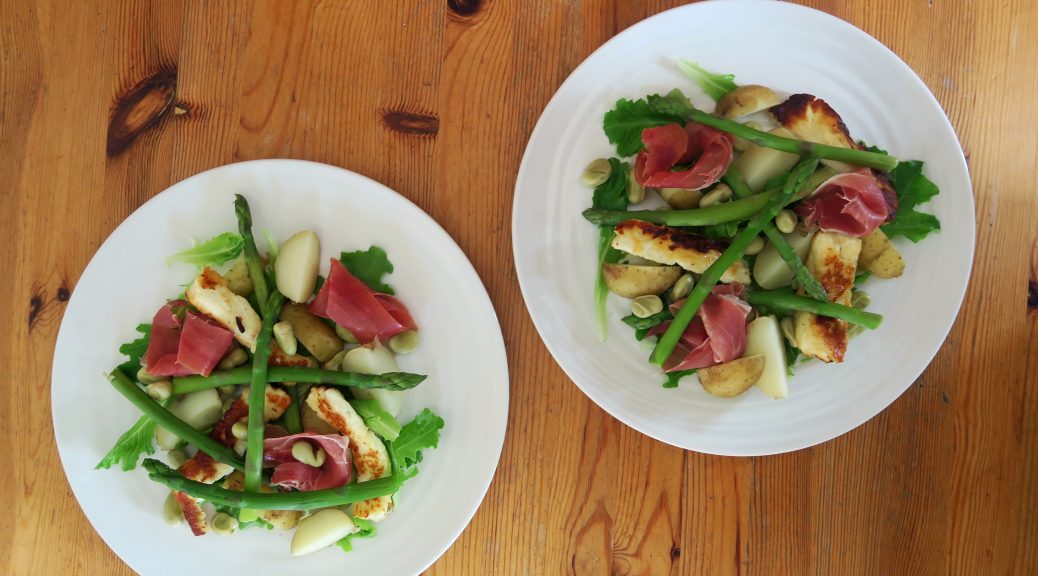
I think the key to a good salad is to have a mixture of cheese/meat, green veg and then something more carb-based. In this summery salad the saltiness of the ham and the halloumi works beautifully with the earthiness of the asparagus and the broad beans. If you haven’t had halloumi before, it’s this gorgeous cheese which is cooked to give a slightly crisp outside with a softer inside that squeaks as you eat it. It’s pretty salty, but in a salad like this it’s incredible! Because of the serano ham and asparagus this can be a bit of a pricey lunch to make, so if you’re working to a budget you can get the same effect by using normal ham and cooked courgette strips.

Recipe

Serves 2

Time: 20 minutes

Ingredients

  • 6 New Potatoes
  • 8 Spears of Asparagus
  • A handful of Broad beans
  • 1 tbsp Olive oil
  • 1 Block of Halloumi (about 225g)
  • A handful of Salad Leaves
  • 3 Pieces of Serrano ham
  • Black pepper to season

Method

  1. Put on a pan of water to boil. Then add the new potatoes and leave to boil for 10 minutes, until soft.
  2. Chop off the woody ends of the asparagus, about a thumbs length but this will vary depending on what kind you buy. Scoop the potatoes out of the water and then replace them with the asparagus, leaving them to boil for 5-8 minutes, until tender. Add the broad beans a few minutes before they asparagus is cooked to allow through to cook through.
  3. In another pan pop the oil and put over a medium heat. Slice the halloumi into pieces the thickness of a £1 coin. Then fry the halloumi for 2-3 minutes on each side so it goes golden brown.
  4. When ready start plating the salad. Scatter some of the salad leaves over the plate. Then cut the potatoes into wedges and scatter them around the plate. Then pop on the halloumi, asparagus and scatter over the broad beans. Finish with twirls of the Serrano ham, a drizzle of olive oil and a sprinkle of black pepper!

Thanks for reading!

Emma x

Mediterranean Lunch Bowl

Mediterranean Lunch Bowl

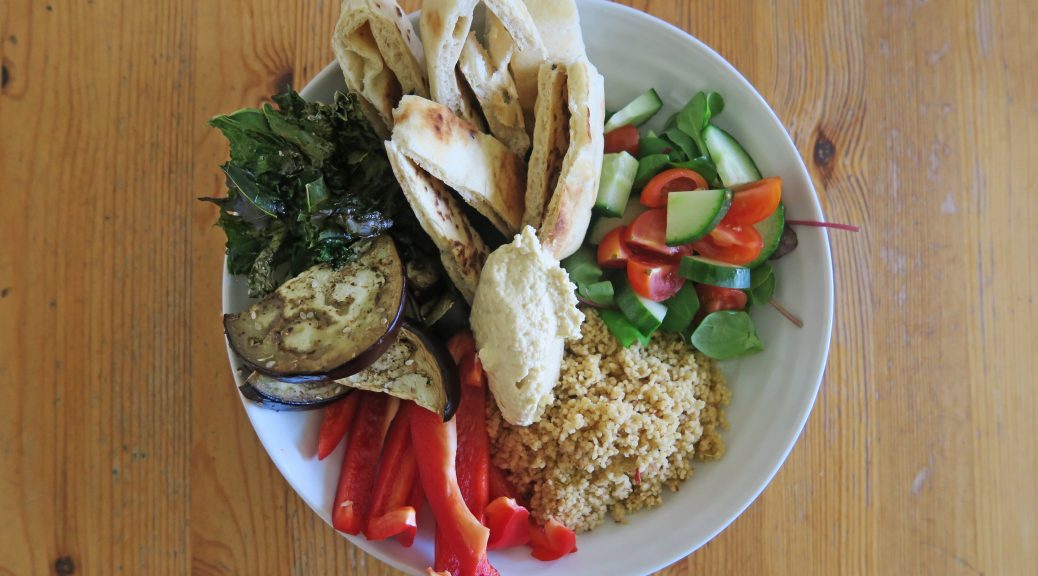
There’s this big vegan food trend at the moment in the food-sphere which is big bowls full of bits and bobs, making up a delish lunch. I think the key idea is that they create a balanced, interesting, healthy bowl of goodness which will also fill you up. As I’ve got really into Mediterranean cooking recently I thought I’d do a bowl full of med veg and bites! As with most things, all the items in here are easily mixed and matched, so anything you like/don’t like you can substitute in/out. In this one I’ve got some spicy couscous, aromatic roast aubergine, crispy kale, and hummus, all served with pita bread and salad to mix with everything. Portion wise this does make a hearty lunch for one, but you could always add in some more salad and it’d easily do a good lunch for two.

Recipe

Serves 1

Time: 20 minutes

Ingredients

  • 1 Aubergine
  • 2 tbsp Olive oil
  • 1/2 tsp Zaartar spice blend
  • 30g Couscous
  • 1/2 tsp Rasel Hanout spice blend
  • A handful of curly kale
  • 1/2 tsp sugar
  • A large pinch of salt
  • 1 Pita bread (or other flatbread)
  • 1/2 Red pepper
  • 2cm Cucumber
  • 3 Cherry tomatoes
  • A handful of salad leaves
  • 5g Feta cheese
  • 2 tbsp Hummus
  • A pinch of Smoked paprika

Method

  1. Pre-heat the oven to 180˚C.
  2. Slice the ends off the aubergine, then halve it and chop it into slices.
  3. Put the aubergine into a roasting tin, drizzle over 1 tbsp of the oil, sprinkle with the zaatar spices and season with a little salt. Then roast in the oven for 20-25 minutes until soft.
  4. Meanwhile prep the couscous. Put the couscous into a bowl with the rasel hanout spices and pour over boiling water according to the packet’s instructions. Leave to soak and then break up with a fork, season with salt, and set to one side.
  5. Now prep the kale. Put the kale into a roasting tin. Drizzle over the 1 tbsp of the oil, then sprinkle over the salt and sugar.
  6. Mix everything together and then put the kale into the oven to cook for 10-15 minutes until crispy. The kale will go from crisp to burnt really quickly so keep a close eye on it.
  7. Put the flatbread onto a tray and put it into the oven to warm up.
  8. Whilst waiting for everything to cook/warm up, prep the salad.
  9. Begin by de-seeding the pepper and then chop it into strips. Then halve and quarter the cucumber lengthways before chopping it into chunks. Then chop the tomatoes into quarters.
  10. Put the salad leaves, tomatoes, cucumber and feta into a bowl and mix together.
  11. Take the bread out of the oven and use kitchen scissors to chop it up into strips.
  12. When everything’s ready start to plate. Begin by spooning the couscous onto the bowl/plate in a mound. Then work clockwise round the bowl, piling up the salad leaves, bread strips, kale, aubergine and then the red pepper strips. Finish off with a dollop of the hummus in the centre and then sprinkle a little paprika over the hummus to add some extra heat. Serve and enjoy!

Thanks for reading!

Emma x
Cornish Pasties

Cornish Pasties

So back into the south for some inspiration this week. It’s kind of a necessity to eat a pasty at some point when you’re in the West-country, and though there’s dozens of kinds out there for the picking, a good old Cornish pasty will always be my favourite. When I think of pasties I think of wandering barefoot along the beach with a warm, slightly over-flowing pasty in hand. Flakes of buttery pastry flying into your face in the wind, and shooing off seagulls left, right and centre. This might not paint the most relaxing experience of dining there is, but it’s rough, rustic and nostalgic which is what I love most about it.

I know that quite often people hate pasties because they’re thought of being greasy and stodgy. These homemade ones are a lot cleaner than you’d think, and the rough-puff pastry is way lighter than the stuff you find on traditional pasties.  The key is to make sure you season the filling A LOT as it’ll totally transform the flavour of the pasty and make it really moreish. Traditionally beef skirt is used to fill a pasty as it releases gorgeous juices that taste amazing. That said, beef skirt is almost impossible to find in a local supermarket, so if you can’t find it I’d recommend using frying steak, escalopes or any cut of beef that’s relatively thin.

Recipe

Makes 6

Time: 90 minutes, plus chilling

Ingredients

For the pastry

  • 450g Strong bread flour
  • Large pinch of salt
  • 100g Cold, unsalted block butter
  • 100g Cold lard
  • 200ml Cold water

For the filling

  • 200g Potatoes
  • 1 Small onion
  • 100g Swede (1 small)
  • 200g Lean beef skirt (or frying steak if you can’t find beef skirt)
  • Salt and pepper to season
  • 1 Beaten egg

Method

  1. Begin by making the pastry. Put the flour and salt into a large bowl. Then take the chilled blocks of lard and butter and grate them into the butter. I’d recommend giving everything a little mix regularly as you do the grating so that the fats can be coated in flour, this will stop them all re-forming into a lump when you mix it all together.
  2. Then take a round-bladed knife and mix the fat into the flour so it’s all coated. Pour the cold water into the bowl and continue to mix to form a soft dough.
  3. Tip the dough out onto a surface and knead a little to bring the dough together into a ball. Wrap the pastry in cling film and chill in the fridge for at least 30 minutes.
  4. Now prep the filling. Peel the potatoes, onions and swede. Then chop the potato into chunks, about the thickness of a £1 coin. Then finely chop the onion, and chop the swede into chunks the same size as the potato.
  5. Now prep the meat. Using a sharp knife remove any gristle from the meat, but leave the fat as it’ll add great flavour to the pasty. Then chop the meat into chunks about the same size as the potato.
  6. Pre-heat the oven to 180˚C.
  7. Split the pastry into 6 and then roll each one out to a 14cm diameter circle. Using a plate as a stencil can be helpful here to get a neat circle.
  8. Distribute the onions between the pastry discs, spreading them in a semi-circle over one half of the dough, leaving a 1 cm boarder around the edge for sealing. Sprinkle over a little salt and pepper. Then top with a layer of swede, then meat and finally potato, seasoning a little between each layer.
  9. Take a cup of water and dip your finger into it. Then moisten the rim of the pastry circle with your finger. Fold the unfilled half of the pastry over the filling and use the edge of your hand to gently seal the pastry.
  10. Now it’s time for the crimping that’ll keep the pastry together. Working from right to left fold the pastry over itself and then press down. Repeat along the seam of the pasty to make a rope pattern until you reach the end.
  11. Put the pasties onto a baking tray and brush with the beaten egg. Bake for 15-20 minutes until golden brown, then reduce the oven temperature to 160˚C and continue to bake for 15 minutes. Then turn off the heat and leave the pasties to cool/keep cooking in the oven for another 30 minutes. Serve!

Thanks for reading!

Emma x

Cauliflower Cheese Fish Pie

Cauliflower Cheese Fish Pie

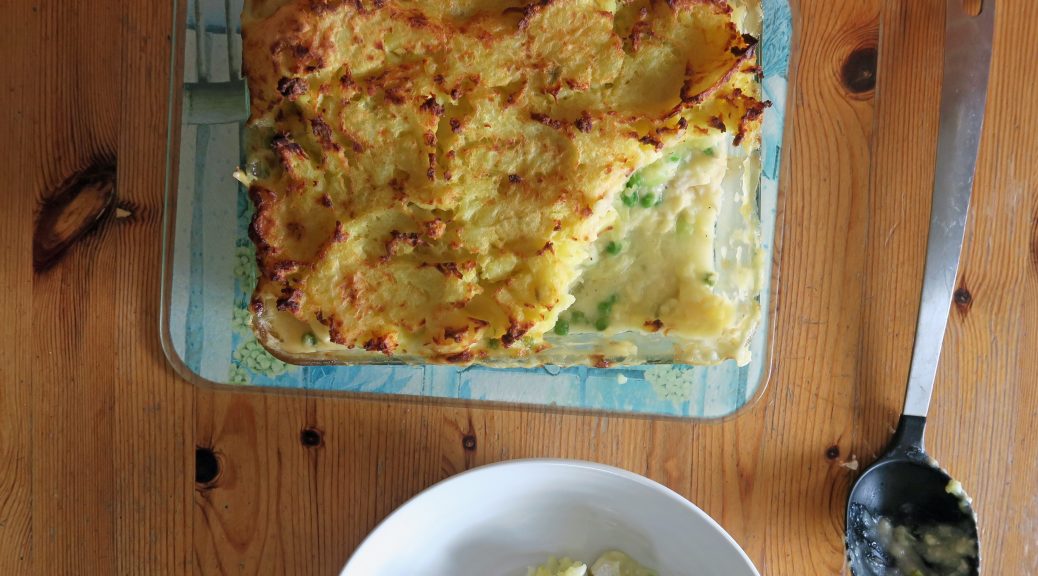
Recently my family have been really enjoying these supermarket cod fishcakes with a oozy cheddar centre. I’d never of thought of putting cheese and fish together, but like this it works insanely well. So, inspired by this as always, I decided to do something fishy on the blog. Then the other day we had cauliflower cheese for dinner as it’s my Dad’s favourite, and we ended up with a big tub of it leftover in the fridge. It then occurred to me that most fish pies have a white sauce base with vegetables and fish mixed in, kinda like the fishcakes we like. So rather than go to all the effort of re-making a cheese sauce for a new fish dish I just mixed a bit of cod into the cauliflower cheese, then added bit more veg, whopped some mash on the top and bunged it in the oven. Hey presto, quick, tasty cauliflower cheese fish pie!

So this is great if you have leftover cauliflower cheese, but I’m also aware that it’s not a staple food in everyone’s home, and in order to make it in the first place you’re gonna need a recipe. Therefore the recipe below starts from scratch with making the cheese sauce and prepping the cauliflower, so you could make this as a thing without the need to make it from leftovers. You could also add prawns or a more oily fish like salmon if you want a bit more fish variety in there, but I’ve gone for just cod as it’s pretty easy to cook in a pie and pairs really well with the cheesy sauce.

Recipe

Serves 8

Time: 45 minutes (plus cooking time)

Ingredients

  • 1kg Potatoes, peeled and halved
  • 25g Butter
  • 20ml Milk

For the filling

  • 25g Butter
  • 25g Plain flour
  • 400ml Milk
  • 400g Cod
  • 1 tsp Dijon mustard
  • 100g Frozen peas
  • ½ Cauliflower
  • A handful of grated cheddar

Method

  1. Pre-heat the oven to 180˚C.
  2. Fill a pan with water and bring to the boil. Add the peeled potatoes and boil until soft and starting to flake.
  3. Drain them and then mash them. Add the milk, butter and some salt and pepper to season, and then mix until fully combined. Set aside for later.
  4. Now make the sauce. In another pan put the butter and leave to melt. Add the flour and mix until a paste forms. Then keep stirring the paste for 1-2 minutes to cook the flour.
  5. Then slowly add the milk, whisking constantly, until a smooth sauce forms. Continue to heat whilst whisking for 3-4 minutes until the mixture starts to thicken.
  6. Take the mixture off the heat and stir in the cod, mustard, peas, cauliflower and half the cheese. Spoon the mixture into an oven-proof dish. Top with the mash potato and sprinkle with the rest of the cheese.
  7. Put the pie into the oven and bake for 20-25 minutes until the topping starts to brown. Serve warm with a side salad!

Thanks for reading!

Emma x