Tag: Main Course

Easy Sausage and Mushroom Pasta

Easy Sausage and Mushroom Pasta

I’m waiting another year before heading off to Uni, but with most of my friends flying the nest I thought it was about time that I made a comforting, easy main course for all the first years out there. This one is simple to make, won’t break the bank and is really tasty, which I think is the basic criteria for most student cooking. Plus it’s relatively healthy, so you can be confident that this one will override weeks of Pizza and beer, and pump some nutrients into your body.

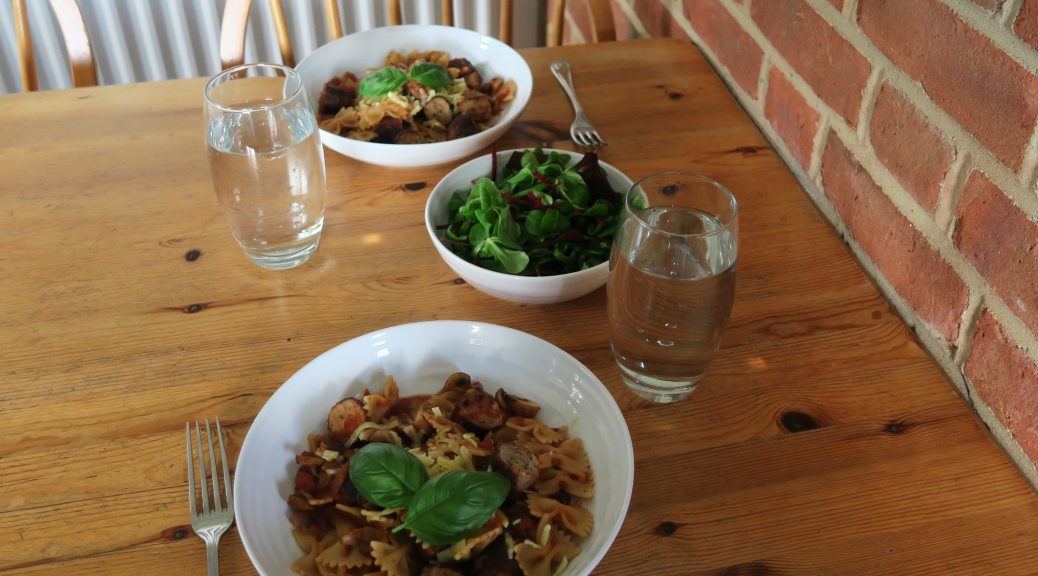
It may not be the most pretty dish in the world, but it’s a really good one to make when you’re tired, busy,  hungover or all three at once. If you want make it even healthier you can add fresh tomatoes, peppers or any other veg that takes your fancy, but I’ve stuck with what we’ve got here to keep it simple. The quantities for this serves two, so it’s kind of obvious, but if you’re only cooking for one you can either half the quantities, or put the rest in the fridge for a later date.

I’m going to leave the writing there for this one, as a simple recipe only needs a simple intro!

Recipe

Serves 2

Time: 20 minutes

Ingredients

  • 4 Sausages
  • 100g Pasta
  • 1 White onion
  • 1 Garlic clove
  • 1 tbsp Sunflower oil
  • 75g Mushrooms
  • 200g Chopped tomatoes (can or carton)
  • 100g Cheddar cheese (optional)
  • Fresh basil to serve (optional)

Method

  1. Pre-heat a grill on full heat. Put the sausages onto a grill pan and pierce slightly with a knife so that the skin is punctured. Put under the grill and leave to cook. Once they’ve browned on one side turn them over so that they cook evenly. This should take 5-10 minutes. (If you don’t have a grill, put 1tsp vegetable oil into a pan and gently fry the sausages until cooked).
  2. Fill a pan with water and bring to the boil. When boiling add the pasta, stir once to break the pasta up and then leave to boil according to packet instructions.
  3. Meanwhile, take the onion and garlic, remove the skins and then finely chop.
  4. Put the oil into a large pan and heat gently. Add the chopped onion and garlic and cook until just beginning to caramelise.
  5. Add the mushrooms and continue to fry until they begin to soften and the onions are caramelised. Pour in the chopped tomatoes and leave on a gentle simmer.
  6. Once the sausages are done (they won’t be pink in the middle anymore), remove them from the grill pan (or frying pan) and slice each one into four.
  7. Once the pasta is done, sieve to remove the water and then add the drained pasta to the tomato mixture.
  8. Add the chopped sausages and stir to combine. Season with salt and pepper to taste.
  9. Spoon into bowls, grate some cheese over and serve with fresh basil. Enjoy!

Thanks for reading! Look out for my next post on Wednesday – it’s going to be some good old comfort food.

Emma x

Ham-N-Pea Mac-N-Cheese

Ham-N-Pea Mac-N-Cheese

This is one of those rare occasions where I make something savoury. After all the puddings I’ve been making recently I decided to turn my hand to something different. This summer I became obsessed with mac n cheese, probably because pretty much every restaurant I went into had a variation of this dish. From the classic pasta and cheese combo to an… interesting version containing maple syrup and bacon, I can proudly say that I’ve tried lots of these.

When it came down to making my own I improvised a bit. Ham and peas are a beloved couple who work well together in most dishes, and are not strangers to a big bowl of pasta, so there’s no surprise that they also work really well in this. The first time I made this I was surprised that it actually worked – most dishes need a few nips and tucks. But this one was a first-time wonder, and was so easy to make that I’m sure even the most novice of chefs can make themselves a delicious meal with this.

Now many people are going off/ have gone off to uni now, and this is a great cheap one to make once you get there. It’s a classic taste of home, and so if you’re feeling homesick this one is a great comfort. It also freezes really well so if you make too much you can put the rest away for a rainy day, rather than having to throw it away. This also teaches you to make a white sauce, one of the most useful sauces to master as a home cook, and once you can make a white sauce you can make a cheese sauce by simply adding cheese, as in this recipe.

Recipe

Serves 4

Time: 1 hour 15 mins

Ingredients

  • 300g Macaroni
  • 100g Frozen peas
  • 50g Unsalted butter
  • 50g Plain flour
  • 500ml Milk
  • 1 tsp English mustard
  • 100g Strong cheddar cheese, grated
  • Pepper to season
  • 4 Thick slices of ham, cut into small pieces
  • 80g Bread crumbs (or bread crusts dried in the oven and then blitzed to crumbs)
  • 50g Parmesan, grated

Method

  1. Pre-heat the oven to 180˚C.
  2. Bring a large pan of water to the boil. Add the macaroni and cook it to the packets instructions. Leave the pasta in the pan with the water and then add the peas. Cover and leave until needed.
  3. Now make the cheese sauce. Firstly melt the butter in a pan. Then add the flour and mix until a paste forms – this is called a roux. Cook the paste out gently over a medium heat to cook out the flour. Slowly add some of the milk, whisking as you do so that the flour is fully incorporated. Slowly add the rest of the milk, whisking as you do so to make a lump-free sauce. If you feel as though it’s going lumpy and horrible, don’t worry, just persevere and beat the hell out of it with the whisk and everything should be fine.
  4. Whisk the sauce over a medium-high heat until it has thickened. Add the mustard and cheddar to the sauce and then season with pepper to taste. (You can also season the sauce with salt, but the cheese and ham are already quite salty, so you don’t really need to).
  5. Drain the pasta and peas and then add them to the sauce. Add the ham and mix to fully combine.
  6. Pour the pasta mix into an oven-proof container. Top with the breadcrumbs and then with the parmesan. Bake in the oven for 15-20 minutes, until golden brown and crisp.
  7. Serve warm with a leafy side salad.

Thanks for reading! Any questions or comments don’t hesitate to ask. Next post coming out on Wednesday as always, keep a look out!

Emma x

Roast Beef with Roasted Veg Salad and Onion Gravy

Roast Beef with Roasted Veg Salad and Onion Gravy

Autumn is here. It’s cold, the holidays are over and the days are shortening so it’s time for some good old comfort food. Roast beef is one of the best British Sunday lunches out there, and I find that this is a nice twist on the classic, as it doesn’t stray too far from the meal everyone knows and loves, but it’s different enough to be an ‘every day of the week’ dish.

You can make this with any type of beef. I went for a top-rump roasting steak as it’s a tender cut with a good amount of fat, which will base the meat when roasted. You can also use almost any other root vegetable in this dish – and there’s loads to choose from at this time of year. I’ve gone for onions, carrots and sweet potatoes as they work particularly well together and are the classic veggies we have in our Sunday roasts at home.

I’ve suggested adding feta cheese to the veg when serving. This is an unusual addition to a roast, but I think it works really well as an addition to a ‘roast veg salad’. If you do want to go more traditional though you can easily ditch the feta and add some delicious Yorkshire puddings and roast potatoes to pull it back to the classic we love. I’ve also included an onion gravy recipe which tastes great with the beef, but if you want to make the meal quickly and with little effort you can miss it out and it’ll still taste good.

Recipe

Serves 2

Time: 90 minutes

Ingredients:

  • 1 Top-rump beef joint (about 0.5kg)
  • 3 tbsp Olive oil
  • 3 sprigs of Thyme
  • Salt and Pepper to season
  • 1 Sweet potato, peeled and diced
  • 2 Carrots, peeled and sliced into rounds
  • 1 Red onion, peeled and sliced
  • 100g Chestnuts (ready to eat), roughly chopped
  • 50g Feta (optional)
  • A pinch of Chilli flakes

For the onion gravy:

  • 1 tbsp Vegetable oil
  • 1 tbsp Unsalted butter
  • 1 White onion
  • ½ tsp Sugar
  • ½ tsp Balsamic vinegar
  • 375ml Beef stock
  • 2 tsp Cornflour
  • 2 tsp Cold water
  • Salt and pepper to season

Method

  1. Pre-heat the oven to 200˚C. Brush the steak with 1tbsp of the oil and then rub the thyme into the meat. Season the beef with a good pinch of salt and pepper.
  2. Put the chopped sweet potato, carrots, onion and chestnuts into a roasting dish and add 2 tbsp of the oil. Season well with salt and pepper and then mix the veg around in the tin so everything’s covered in oil and the pieces are well spread out. Nestle the beef in the middle of the tin and roast in the oven for 45 minutes to 1 hour, depending on the size of beef you have.
  3. Stir the pan occasionally so that the vegetables crisp up all over. To test if the beef is done insert a skewer into the thickest part of the meat. If the juices run red then you’ll have rare meat, pink juices for medium and clear for well-done. Once you have the beef cooked how you prefer it, take it out of the oven and place it onto a board. The vegetables may take a little longer to cook than the beef, especially if your joint is small, so you can always put them back into the oven to crisp up more whilst the meat is resting. Cover the beef with tin foil and leave for at least 15 minutes before slicing.
  4. Whilst the vegetables are in the oven and the meat is resting make the gravy. Begin by melting the butter in a pan with the oil.
  5. Slice the onion thinly and add to the pan. Stir the mixture to coat the onions in the fats and then cover with a lid and cook on a medium-low heat until the onions have softened and become translucent.
  6. Add the sugar and balsamic to the onions, mix and then cover again and leave to cook for another 5 minutes.
  7. Make up the beef stock by adding 2 beef stock cubes to 375ml of boiling water. Mix with a fork until the cubes are completely dissolved. Add the stock to the onions and stir. Leave uncovered on a medium heat to boil for 5 minutes.
  8. Mix the cornflour with the cold water until you have a lump-free mixture. Pour a couple of tbsp of the gravy onto the cornflour mixture and stir until combined.
  9. Pour the cornflour mix back into the main gravy pan and boil on a high heat for 10 minutes so that the mixture reduces and begins to thicken. Season with salt and pepper to taste and then cover with a lid to keep warm until serving.
  10. Slice the rested beef into strips and arrange on the plates. Add spoonfuls of the roasted vegetables around the meat. Tear off chunks of the feta and crumble it over the vegetables. Top by spooning a little of the gravy onto the beef and putting the rest in a jug to serve. Garnish with chilli flakes and extra thyme!

Keep a look out for my next recipe coming on Wednesday! Any requests or comments don’t hesitate to ask.

Emma x

Summer Salads

Summer Salads

Here comes the remedy to sweet nachos! Whilst I’m normally a sweet tooth person, it’s unfortunately impossible to live off desserts alone. But I’ve found that a good way of justifying the occasional dessert is a nice leafy salad. They are easy, quick to make and are a great way of getting your 5-a-day. We’ve also hit this great time of year, between summer and autumn, when fresh local produce is in abundance. In the UK we’re so lucky to have the variety and quality of foods that we do, and this is the best time to use them raw, which means it’s time to start the salads. Below are my top three salad combos, which are perfect for these final summer days.

Chicken Pesto Salad

Chicken and pesto is one of the best flavour combinations out there and I think this salad is a great way to combine them. In my family we often have left over chicken from our Sunday roast and this salad is a really good way of using it up. Simply tear the chicken off the carcass and store in the fridge for up to 3 days, then use the shredded chilled chicken instead of the chicken breasts. This prevents waste, is cheaper and also gives the chicken that nice meaty taste that I find you only get from roasting. Alternatively, if you have a griddle pan or BBQ you can also cook the chicken on that instead of in a pan, which would give a nice smoky flavour and beautiful char lines to the meat.

Serves 2

Time: 20 minutes

Ingredients

  • 1 tbsp Vegetable oil
  • 2 Chicken breasts (thighs also work well)
  • 1 Red pepper, deseeded and sliced
  • 40g Pine nuts
  • 80g Baby spinach
  • 150g Cherry tomatoes, cut into halves
  • 25g Feta
  • 2 tbsp Basil pesto

Method

  1. Preheat the oven to 180˚C. Put ½ tbsp of the oil into a pan and put on a medium heat. Chop the chicken breast into pieces and then fry in the oil for 5-10 minutes. To check if the meat is cooked, cut into one of the larger pieces and see if the middle is still pink. If it is then leave to cook for a few more minutes before testing another piece. Remove from the heat and leave to cool.
  2. In another pan put the rest of the oil and place over a medium heat. Add the red pepper and pine nuts and heat until the peppers are softened and the nuts begin to brown. Set to one side.
  3. Take a large platter or 2 plates (whatever you want to serve the salad on) and lay out the spinach leaves. Top with the chicken, tomatoes, peppers and nuts. Crumble the feta over the salad and top with a swirl of the pesto. Serve and enjoy!

Chilli Salmon Salad

This salad is light and refreshing, but it also has a packs a good punch from the chilli, lemon and watercress. As salmon is a rich source of omega 3 it’s also great brain food – perfect for packed lunches, al-fresco dining and sharing with friends. To bulk it out some more I’d recommend serving it with lime leaf and lemon rice. Simply boil rice in water as you usually would, but add 2-3 kaffir limes leaves (found in the fresh herbs section in supermarkets) into the water. When serving remove the leaves and top the rice with some lemon zest. This can help turn this dish from a starter or side into a filling lunch or main meal.

Serves 2 as a main meal or 4 as a starter

Time: 30 minutes

Ingredients

  • 2 Salmon filets
  • 2 tbsp Vegetable oil
  • 1 Lemon
  • 150g Asparagus
  • 90g Green peas
  • ½ Red pepper, sliced
  • 80g Cashew nuts
  • 40g Watercress
  • 40g Rocket
  • 25ml Sweet chilli sauce

Method

  1. Preheat the oven to 180˚C. Place the salmon onto foil and drizzle with 1tbsp of the oil. Cut the lemon in half and squeeze half of it onto the salmon. Wrap the foil around the fish and put into the oven to cook for around 15 minutes, until the flesh is no longer translucent and flakes when prodded with a knife. Remove the skin from the back of the fish and set aside to cool.
  2. Take the asparagus and cut about a thumbs length off the bottom to remove the woody ends. Bring a pan of water to the boil and add a pinch of salt. Add the asparagus and the peas. Boil for 1 minute, until a sharp knife goes into the stem of the asparagus easily. Drain using a sieve and set to one side.
  3. In a small pan heat the rest of the oil and add the sliced red pepper. Add the cashew nuts and fry until the pepper has softened and the nuts begin to brown, it should less than 5 minutes.
  4. Take a large platter to serve the salad on and arrange the watercress and rocket. Lay the asparagus on the leaves and then scatter pieces of the salmon on top. Scatter the peas, nuts and peppers over the salad. Drizzle with the chilli sauce and serve with wedges of the lemon.

Parma Ham and Nectarine Salad

This salad is simple and easy to make, but still tastes incredible. If you want an impressive dinner party starter which takes little time, or just a quick tasty lunch, this is the one for you.

Serves 2

Time: 10 minutes

Ingredients

  • 80g Rocket
  • 1 Nectarine, stone removed and cut into slices
  • 4 slices of Parma ham
  • 50g Walnuts, roughly chopped
  • 50g Feta cheese
  • 50ml Balsamic vinegar

Method

  1. Lay the rocket onto a plate or platter (whatever you want to serve it on).
  2. Arrange the nectarine pieces on top of the rocket.
  3. Cut the slices of Parma ham in two and place between the nectarine pieces.
  4. Scatter the walnuts and then crumble the feta over the salad.
  5. Just before serving drizzle the vinegar over the salad.


The Ultimate Nacho Pyramid

The Ultimate Nacho Pyramid

This summer I spent some time in  Canada and I found that alongside snow, bears and lakes, Canada should also be famous for its incredible nachos. Tortilla chips piled high with mountains of cheese, peppers, jalapenos, and beef, served with tubs of guacamole and sour cream creates a pyramid of pure comfort. Whatever the weather, they can’t fail to put a smile on your face.

The following recipe is my ultimate nacho pyramid. I’ve added some personal touches to suit my taste preferences, however the great thing about nachos is that you can pretty much put anything with them and they’re still amazing. So if there’s any ingredient you love or hate you can easily swap it in or out to create your own perfect combination.

Recipe

Serves 6

Time: 1 hour

Ingredients

  • 4 tbsp Sunflower or vegetable oil
  • 8 small tortillas (no more than 14cm in diameter)
  • 2 rashers of smoked bacon
  • 1 Small red onion, finely chopped
  • ½ a small red, green and orange pepper, diced
  • 100g Mozerella, torn into pieces
  • 100g Cheddar cheese, grated
  • 1 jalapeno, chopped into discs
  • 1 beef tomato, diced
  • 80g Sweetcorn
  • 80g kidney beans, drained and rinsed
  • Sour cream and guacamole to serve

Method

  1. Preheat the oven to 180˚C. Put 2 tbsp of the oil into a small bowl.
  2. Place one tortilla onto a chopping board and brush lightly with oil, ensuring it’s covered all over. Place another tortilla on top of the oiled one and brush it with oil. Continue with the others until you have a stack of oiled tortillas.
  3. Take a large knife and cut the pile in half. Then cut each half in half again, and repeat twice more so you have 8 tortilla stacks.
  4. Line 3 trays with baking paper and brush each with oil. Separate the tortilla stacks so that each chip is a single layer. Place the chips on the oiled tray so that their non-oiled surface is in contact with the oiled tray. It’s best if the chips don’t overlap, but if they do just move them around on the tray half way through cooking so that they crisp up all over.
  5. Sprinkle the chips with a generous pinch of sea salt so that all the chips are seasoned. Then put the trays in the oven for 8-12 minutes.
  6. To check if the chips are done test the edges to see if they are crisp and dry. The middle may be slightly softer, but they’ll crisp up as they cool down. If the middles don’t crisp up once cool, place them back into the oven for 2-3 minutes. Leave the chips to cool.
  7. Meanwhile pre-heat the grill to a high heat. Place the bacon rashers on a grill pan and heat under the grill. Grill for around 5 minutes and then turn the rashers over and grill for a further 5 minutes on the other side so that they become crisp all over.
  8. Take the bacon off the grill pan and cut into strips with scissors. Place the strips to one side.
  9. Now prepare the veg. Put the remaining 2tbsp of oil into a pan and put on a medium-high heat. Put the chopped onion in the pan and stir to coat in the oil. Stirring occasionally, fry the onions until they start to caramelise (go brown and sticky).
  10. Then add the chopped up peppers and stir to mix and coat them in the oil. Place to one side.
  11. Line a baking tray with baking paper. To assemble the nachos, begin by loosely scattering a few of the tortilla chips on the lined tray. Top with some of the peppers, onions, bacon strips, mozzarella and cheddar. Layer up with more tortilla chips to make a pyramid shape. Top with the rest of the bacon, peppers and onions, as well as the jalapenos, tomatoes, sweetcorn, and kidney beans. Top with the rest of the mozzarella and cheddar and then place in the oven.
  12. Bake the nachos until the cheese is just melted, it should take around 10 minutes, but it may take longer for the mozzarella to melt. If the chips start to colour too much, loosely cover the pile in tin foil.
  13. Take the nachos out of the oven and leave to cool for a few minutes before eating. Serve with sour cream and guacamole. Enjoy!

Top tip – Lining the trays with baking paper can be hard as the paper inevitably roles back on itself. To prevent this just scrunch up the paper, as though you’re about to throw it away, and then unfold it. It’ll make it easier to work with.

Thanks for reading, more coming soon…

Emma x