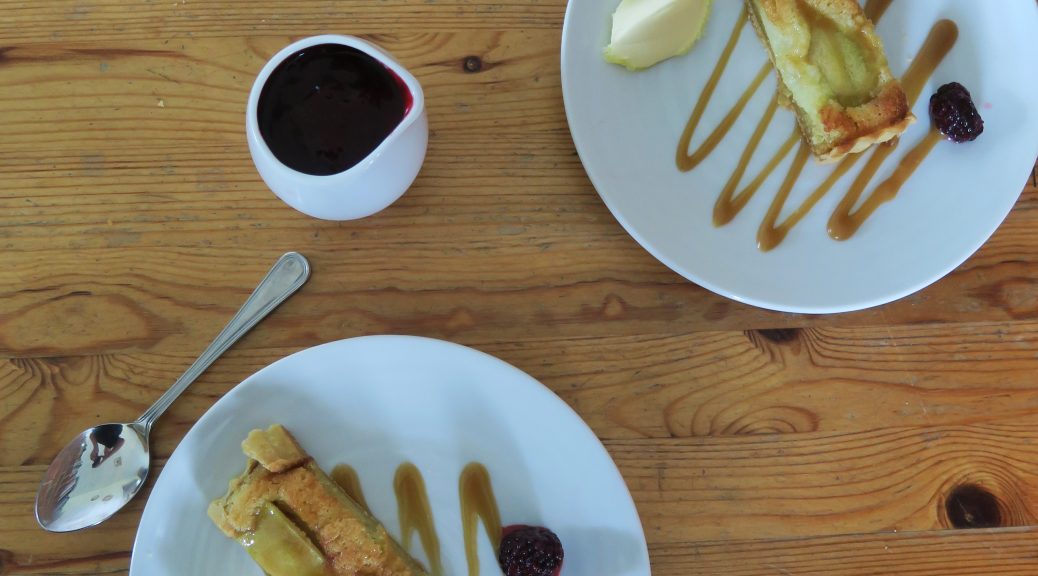
Butterscotch Pear Tart with Blackberry Sauce

In a few weeks’ time hedgerows across the UK will start to drip with plump blackberries, ripe for the picking. As most hedgerows are free-for-all it’s easy to go on a walk with some boxes and to come back with mountains of free berries. If you want to preserve them they make great jams, ice creams and curds, but I find they also work really well as a sauce for this little butterscotch pear tart recipe.

You can use any type of pears in this tart. I went for conference as they’re an attractive shape and a nice flavour against the frangipane. I’d recommend using ripe pears, as under-ripe and they don’t soften enough in the oven, and if they’re over-ripe and they become a mush once cooked. I’d also strongly recommend making the butterscotch sauce yourself. You can buy it in shops, but it doesn’t taste anywhere near as good, and it only takes 5 minutes to put together, so it’s worth giving it a go.
One last thing – I first made this dessert in Cornwall and I found that serving it with a good scoop of clotted cream is a great way to make it truly decadent. The thick cream with the sweet, sharp, juicyness of the other components just works really well, so I’d recommend giving that a go. Right, now on with the recipe…

Ingredients
Serves 8 (Makes one large tart)
Time – 90 minutes, plus time to chill the pastry
For the pastry
- 175g Plain flour
- 2 tbsp Caster sugar
- Pinch of salt
- 115g Butter
- 1 Egg yolk, beaten
- 2 tbsp Cold water
- 1 Egg white, slightly beaten
For the butterscotch sauce
- 100g Butter
- 100g Light muscovado
- 4 tbsp Golden syrup
- 8 tbsp Double cream
For the tart filling
- 100g Ground almonds
- 100g Caster sugar
- 100g Butter
- 2 Eggs
- A few drops of almond essence
- 2 Ripe pears, peeled, cored and quartered
For the Blackberry sauce
- 350g Blackberries (if they’re not in season when you make this, frozen ones also work)
- 30g Sugar
- 1 tsp Cinnamon
- 1 tsp Ginger
Serve with more fresh blackberries and clotted cream
Method
- Preheat the oven to 180˚C. To make the pastry put the flour, caster sugar and salt into a bowl and mix with a round bladed knife. Add the butter to the bowl and cut it up into small pieces with the knife, coating in the flour as you do.
- Once the butter is in small chunks put the knife to one side and go in with your fingers. Rub the butter into the flour to create a mixture with the texture of breadcrumbs. Shake the bowl from side to side a couple of times to bring the large lumps to the top, make sure these are rubbed into the flour.
- Mix the egg yolk with the cold water. Slowly add the egg yolk mixture to the flour/butter mixture and bring it all together with a round bladed knife until a dough forms. Use your hands to make the dough into a ball and then wrap the dough in cling film and chill for at least 1 hour.
- To make the butterscotch sauce, put the butter, sugar and syrup into a pan and bring slowly to the boil whilst stirring. Then stop stirring, reduce the heat, and leave to simmer for 3 minutes until the mixture has thickened and begins to hold its shape. Stir in the cream, remove from the heat, and leave to cool.
- Remove the pastry from the fridge and roll it out on a floured surface into the shape of your tin. You want it to be as thin as possible (no thicker than a pound coin). Make sure you move the pastry round frequently to stop it sticking to the table. Compare the size pastry sheet to the size of your tin. You want the pastry a couple of cm wider than the tin so that the pastry will go up the sides and have a little overhang.
- To easily get the large pastry sheet into the tin, put the rolling pin at the half-way point of the pastry. Then flip the pastry in half, over the rolling pin. You can then pick the rolling pin up and drag the pastry over the tin. Press the pastry into the flutes in the tin, sometimes using a piece of pastry to do this can be easier than using your fingers. Let the pastry hang over the edge, then use a rolling pin to trim off the excess by rolling over the edge of the tart. Chill the base in the fridge for another hour.
- Line the tart with baking paper and baking beans (or dry rice if you don’t have any) and put into the oven to bake for 10 minutes.
- Remove the baking parchment and the baking beans (careful, they’ll be very hot). Lightly brush the pastry with the beaten egg white and then return them to the oven for 5-10 minutes, until golden brown and crisp. Take out of the oven and leave to cool completely.
- To make the frangipane, mix the ground almonds, sugar, butter, egg and extract together until smooth. Spoon 2 tbsp of the butterscotch sauce into the case and smooth out with the back of a spoon to cover the base. Pour the rest of the sauce into a jug for serving. Spoon some of the frangipane into the case and smooth out over the sauce. Create a slight well in the centre by pushing more of the mixture up the sides of the case.
- Take the pear quarters and arrange on top of the frangipane so that the smooth outside of the pear is facing up. Press the pears down slightly, into the frangipane as you do this. Bake in the oven for around 15 minutes, until both the pear and frangipane are cooked.
- Whilst the tart bakes make the blackberry sauce. Put the blackberries into a medium size saucepan with 60ml water, the sugar and the spices. Stir to combine and then leave to simmer until the blackberries have become a mush. Use a hand blender to puree the mixture and then sieve to remove the seeds. Pour the sauce into another jug to serve.
- Once the tart is out of the oven leave it to cool slightly. Then take it out of the tin and place on a board. Serve with the blackebrry sauce, the leftover butterscotch sauce, fresh blackberries and plenty of clotted cream. Relax and enjoy!

Thanks for reading, I hope you enjoyed this one! New post is coming out on Sunday. Until then, any comments or questions just let me know.
Emma x