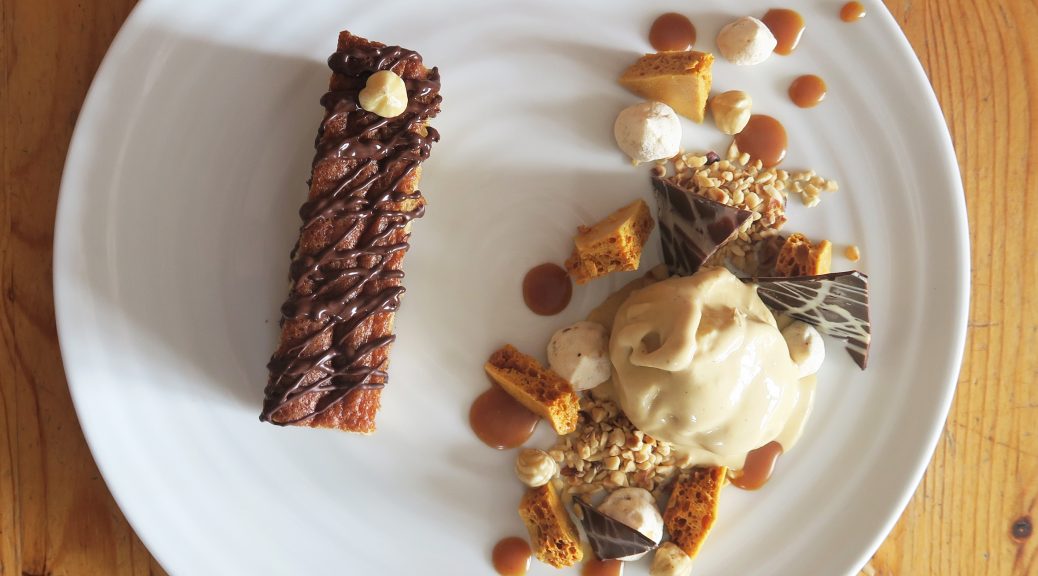
Hazelnut Cake with an Orange, Balsamic, Salted Caramel Ice cream, Honeycomb and Chocolate Shards
You probably recognise the elements of this dessert from my post last week on orange, balsamic and salted caramel chocolates. After I made them I had some of the caramel left over and so I was inspired to work it into a dessert somehow. I decided to use the caramel to flavour an ice cream and to decorate the plate, and then I put it with chunks of honeycomb, a hazelnut cake and chocolate shards.

This combo of flavours, textures and temperatures makes for a really decadent dessert. It’s a bit complicated and will take some time to make, but it’s all well worth the effort. However, if you want a slightly unique pudding with as little effort as possible the ice cream is also very good on its own!

Recipe
Serves 4
Time: 2 1/2 hours
Ingredients
For the Caramel
- 125ml Orange juice
- 45ml Whipping cream
- 1/2 tbsp Vanilla bean paste
- 150g Caster sugar
- 20g Liquid glucose
- 100g Salted butter
- 7 ml Balsamic vinegar
For the Ice cream
- 2 tbsp Vanilla bean paste
- 600ml Double cream
- 80g Sugar
- 3 Egg yolks
For the Cake
- 100g Butter
- 75ml Semi-skimmed milk
- 300g Light brown sugar
- 6 Large eggs
- 2 tbsp Cornflour
- 180g Plain flour
- 200g Chopped hazelnuts
For the Honeycomb
- 100g Caster sugar
- 40g Golden syrup
- 1 tsp Bicarbonate of soda
For the Shards
- 100g White chocolate
- 200g Dark chocolate
To decorate
- Chopped Hazelnuts
- 50g Dark chocolate
Method
- Begin by making the caramel for the ice cream. Put the orange juice into a pan with the vanilla and gently simmer over a medium heat until it’s reduced by half.
- Meanwhile put the cream in a pan over a low heat and start to warm through.
- Then put the sugar and glucose into a pan and heat gently whilst stirring until the sugar crystals dissolve. Then leave the mixture to boil until it becomes a deep amber caramel.
- Take the caramel off the heat and add the warmed cream, stand well back when you do this as the mixture will spit a LOT. Mix the cream in and then do the same with the reduced orange juice.
- Cut the butter into cubes and then stir them into the caramel, a few chunks at a time. Then leave the mixture to cool before stirring in the vinegar. Transfer the caramel to a pot and leave in the fridge for 2 hours to set a little.
- Then start making the ice cream base. Put the vanilla and cream into a pan and bring slowly to the boil.
- In a bowl put the sugar and egg yolks and whisk until pale. Then slowly pour in the hot cream mixture whilst continuously whisking. Keep whisking until the mixture starts to cool.
- Then put the mixture through a sieve before whisking in most of the caramel, keeping a little aside for plating later. Pour the mixture into an ice cream maker and leave to churn. Once starting to set pour the mixture into a freezer-proof container and leave in the freezer to set completely.
- Next make the hazelnut cake. Pre-heat the oven to 180˚C. Then grease a 20x20cm square tin with butter and baking paper.
- Put the butter and milk into a pan and heat gently until the butter has melted. Set to one side.
- Put the sugar and eggs into a large bowl and whisk with an electric whisk until thick, pale and fluffy.
- Sift the flour and cornflour and then fold them into the mix with a large metal spoon or spatula. Add the chopped hazelnuts and fold them into the mix. Finally pour the milk and butter mixture into the main bowl and fold this in until fully combined.
- Pour the mixture into the lined tin and then bake in the pre-heated oven until risen and springy to the touch, about 30 minutes. Check if it’s done by inserting a skewer, it should come out clean. Then turn the cake out onto a wire rack and leave to cool completely.
- Meanwhile move onto the honeycomb. Put the sugar and golden syrup into a pan. Put over a medium heat and cook, whilst stirring until the sugar has dissolved. Then stop stirring and leave to boil until it reaches a deep amber colour.
- Take the mixture off the heat and quickly tip in the bicarb. Stir quickly with a wooden spoon and then turn it out onto a baking sheet and leave to set completely.
- Then make the chocolate shards. Put the white and dark chocolates into separate heat-proof bowls over pans of simmering water. Leave to melt gently.
- Spoon the white chocolate into a pipping bag with a small nozzle and drizzle over a sheet of acetate, or if you don’t have acetate you can use baking paper, to make a doodle-pattern. Leave to set completely.
- Then take the slightly cooled, melted dark chocolate and pour it over the white chocolate. Smooth the layer over with a palette knife to make a smooth sheet of chocolate and then leave to set.
- Now plate up! Slice the hazelnut cake into rectangles. Place one of these onto your plate on an angle. Drizzle with a little melted chocolate and top with a hazelnut at one end.
- Take a scoop of your icecream and place it on the plate next to the cake. Then decorate the plate with your honeycomb and chopped hazelnuts. Then cut your chocolate sheet into triangles and gently peel them off and place them around the plate. Finish with a few blobs of the caramel!

Thanks for reading!
Emma x