Category: Fun

For the times when you just want to get in the kitchen and get hands on.

Kanellangd – Cinnamon Buns

Kanellangd – Cinnamon Buns

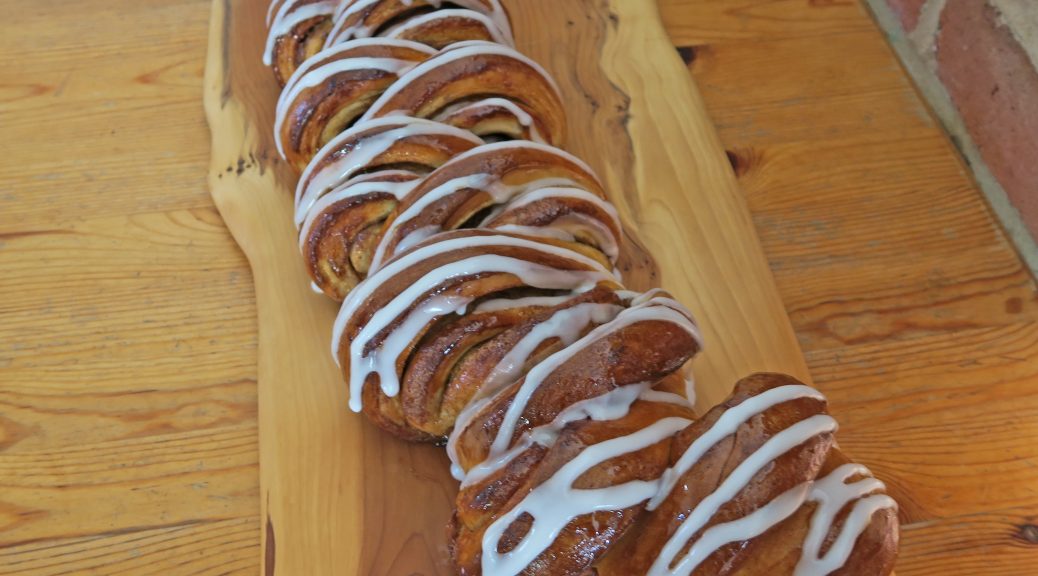
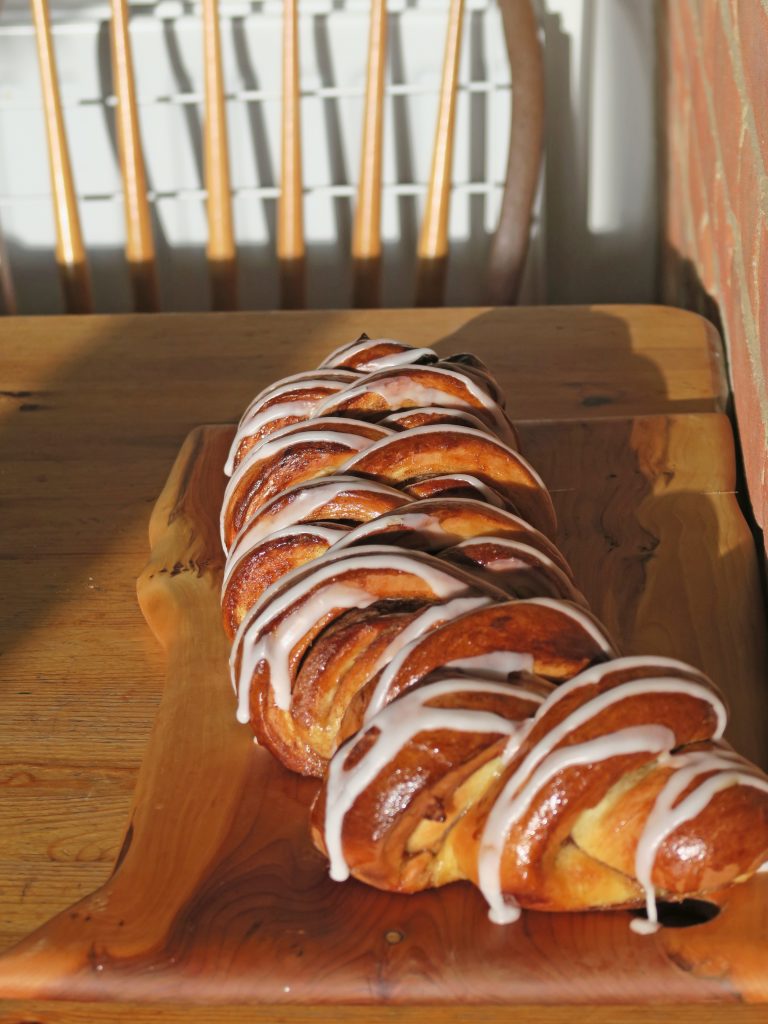
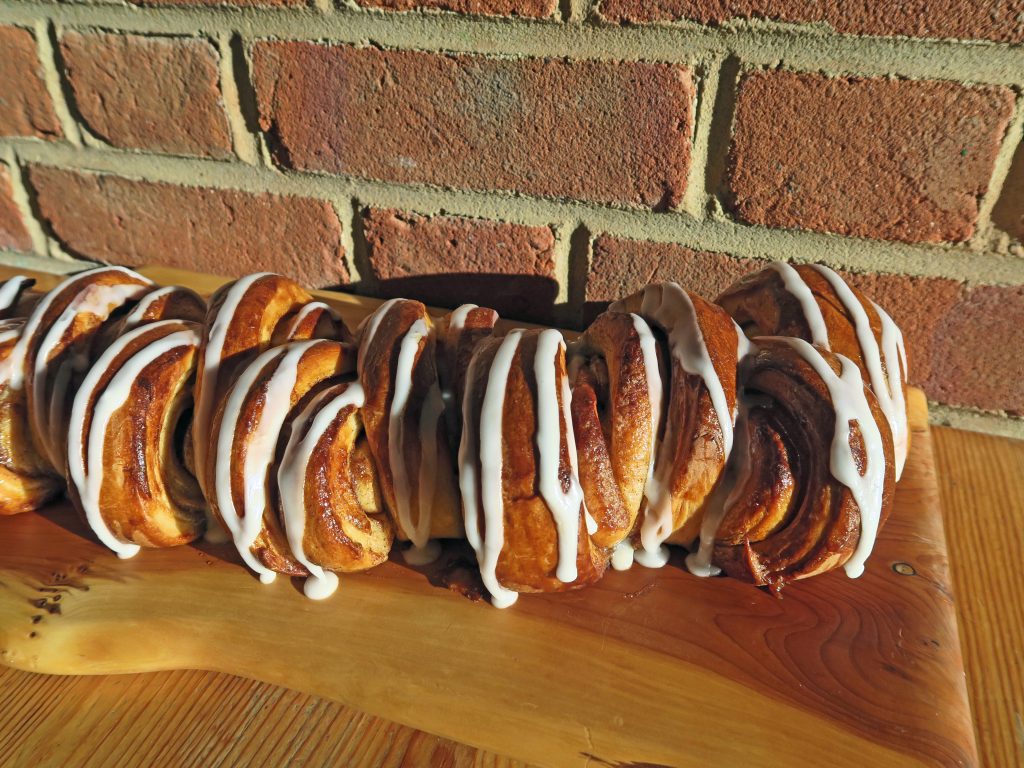
It’s December and so Christmas bakes are officially allowed! This means we have a month of sugar, spice and all things nice coming up. I’m carrying on with the theme of foreign baking, from last week’s kaiserschmarrn to kanellangd this week. Now you might be asking am I becoming obsessed with weirdly named dishes no one’s ever heard of before? Well yes, but bare with me. This one is a Swedish version of cinnamon buns, where it’s pretty much the same except for the beautiful shaping. All the buns are baked attached together as a loaf, rather than as a batch bake in a tin, and so you end up with this really cool shaped bake. Essentially though you still get the sweet cinnamony fluffy buns smothered in icing which we all love.

This takes a bit of time to make, but as with lots of my recipes recently, it’s not time you have to spend working on it, you just need to leave it a lot to rise and bake so that you get the perfectly light texture. On the one hand this can be really annoying as you just want to tuck into this delish loaf, but then again, if you have little pockets of time in a day this can be the bake for you. When making anything remotely bready I tend to do a step and then when leaving it to prove I’ll do some work before coming back to it later on, so don’t let the long resting times put you off as you can get stuff done in those times.

Recipe

Makes 1 loaf

Time 1 hour, plus time for proving

Ingredients

For the dough

  • 80g Unsalted butter
  • 260ml Full fat milk
  • 480g Strong plain bread flour, extra for dusting
  • ½ tsp Mixed spice
  • 6g Salt
  • 7g Instant yeast
  • 40g Caster sugar
  • 1 Egg (10g for dough and the rest for glazing)

For the filling

  • 75g Unsalted butter
  • 1 tsp Vanilla bean paste
  • 1 tbsp Ground cinnamon
  • 80g Caster sugar

For the glaze

  • 50g Caster sugar
  • 50ml Water

For the icing

  • 125g Icing sugar
  • 1 tbsp Water

Method

  1. Firstly make the dough by putting the butter and milk into a saucepan and melt gently.
  2. Put the flour and mixed spice into a bowl. Then add the salt and yeast on separate sides of the bowl (putting them in direct contact of each other will kill the yeast). Then add the butter, milk, sugar and 10g of the egg (keep the rest for glazing).
  3. Using a spatula at first, mix everything together. When it starts to come together go in with your fingers until a dough forms.
  4. Lightly flour a work surface, tip out the dough and then knead for around 10 minutes until smooth, elastic, and soft. Form the dough into a ball and put into a lightly oiled bowl. Cover with clingfilm and then leave to rise for about an hour, until doubled in size.
  5. Meanwhile make the filling. Put the butter and vanilla into a bowl and beat until smooth and spreadable.
  6. Put the sugar and cinnamon into another bowl and mix until fully combined.
  7. Pre-heat the oven to 200˚C and line a long baking tray with baking paper.
  8. Tip the dough out onto a lightly floured surface and knead a little to knock back.
  9. Roll the dough out to a 25x35cm rectangle, making sure the long edge is facing you. The dough will resist being rolled and will spring back into shape but persevere. Tack the far edge down onto the work surface by pushing the dough into the worktop.
  10. Spread the butter mix over the dough and then sprinkle the cinnamon sugar evenly over the top. Roll the dough up like a swiss roll from the edge nearest to you to the tacked down edge. Transfer to the lined tray.
  11. Take a pair of sharp scissors and cut 15 slices into the roll, making sure you don’t cut all the way through. Pull the slices to alternative sides to make the cool shape. Loosely clingfilm the dough and leave to prove again for 20-25 minutes, until the dough springs back when pressed lightly.
  12. Meanwhile make the sugar syrup. Put the sugar and water into a small pan and bring to the boil. Leave to reduce by half and then set to one side (it’ll thicken up even more once cooled down).
  13. Brush the loaf with the rest of the beaten egg and bake for 20-25 minutes until golden brown and soft. If it starts to brown too much cover with foil to stop it burning.
  14. Now make the icing. Put the icing sugar and 1 tbsp water into a bowl and mix to make a semi-thick icing. If it’s too thick add more water a little dribble at a time until you have a pourable mixture which still holds its shape.
  15. Take the loaf out of the oven and leave on a wire rack to cool. Brush with sugar syrup whilst it’s still warm, and then, once completely cool, drizzle with the icing. Serve and enjoy!

Thanks for reading! More Christmas bakes coming very soon…

Emma x

Firework Bark

Firework Bark

It’s bonfire night this Saturday, and I can’t wait for the fireworks, wrapping up warm, and hot chocolate which comes with it all. This is a really tasty snack, which can easily be wrapped in clingfilm and popped in a bag- perfect for taking to the bonfires as a little treat. This is also really good for dunking in hot chocolate, giving as gifts, or even as a decoration for the top of a cake, so you can let your imagination run wild!

When I was little, my sister and I would make chocolates full of our favourite sweets. We used to wander around Sainsburys, trying to decide which ones to put into the mix, and then once we got home we’d smoother them all in some melted milk chocolate, and then dollop it onto baking paper to set. Whilst this is shards, and not blobs of chocolate, the same idea applies. You can use any type of chocolate as your base and then top it with any decorations you wish. Here I’ve gone bonfire theme, so I’ve added marshmallows, popping candy, popcorn, and lots of sweets – but you could go much more simple, for example cranberry and pistachio is very good! You’re essentially making your own chocolate bar, so you can stick to my suggestions or improvise your own, it’ s completely your choice!

Recipe

Ingredients 

  • 200g Dark chocolate
  • 200g Milk chocolate
  • 150g White chocolate
  • Edible glitter
  • Popping candy
  • Marshmallows
  • Smarties
  • Sprinkles
  • Haribos
  • Pistachios
  • Pecans
  • Cranberries
  • Raisins
  • Popcorn

Method

  1. Break the milk and dark chocolate and put into a heatproof bowl. In another heatproof bowl put the white chocolate. Put each bowl over a pan of simmering water and melt gently.
  2. Line a shallow tin with cling-film. Put your nuts, berries, sweets and toppings of choice into bowls ready to decorate your bark.

3. Pour the dark and milk chocolate mix into the lined tin and smooth out with a palette knife. Spoon the white chocolate in circles onto the dark chocolate. Using a cocktail stick, or the tip of a knife, spiral the chocolate around the tin to make a firework pattern.

4. Cover the chocolate with your chosen toppings, chopping up any large nuts or sweets into bite sized pieces before putting it into the chocolate.

5. Leave to set before breaking up into shards and serving.

Thanks for reading! Look out for my next post on Sunday…

Emma x

Sweet and Savoury Bagels

Sweet and Savoury Bagels

It may be surprising, but the first time I had a bagel was just this summer when I was travelling around Canada. Since then I’ve been wanting to try different as many flavours as possible and, most of all, to make my own. When I got back I started experimenting, and these are the results. I’ve come up with two bagel recipes, one savoury (cheese and red onion)  and one sweet (cherry, pistachio and chocolate). Whilst they may not be the prettiest things to look at, they taste really good and are perfect for packed lunches. They’re also a really nice bread to make as you can get really hands on and they’re not too tricky.

When I was in Canmore, Alberta I went to a shop called the Rocky Mountain Bagel Co (I’d highly recommend going there if you ever end up near Canmore). There they sold a whole variety of flavoured bagels, with toppings and fillings to go with them. Whilst the following recipes produce bagels which taste great on their own, and don’t really need fillings, if you do want a bagel sandwich you can use these, or you can easily make plain bagels. To make these plain, simply leave out the extra ingredients (such as the cheese and onions) and then fill them with whatever you want once they’re baked (smoked salmon, cream cheese and watercress is really good).

Red Onion and Cheddar Bagels

Recipe

Ingredients 

  • ½ tbsp Sunflower oil
  • ½ Red onion, finely chopped
  • 300g Strong white flour, plus extra for dusting
  • 250g Wholemeal flour
  • 1 ½ tsp Salt
  • 1 tbsp Runny honey
  • 1 tbsp Olive oil
  • 7g Instant yeast
  • 240ml Warm water
  • 2 Medium eggs
  • 50g Strong cheddar cheese, grated

Method

  1. Put the oil into a small pan and add the chopped onion. Heat gently until the onion begins to caramelise. Set to one side.
  2. To make the bagel dough put the flours, salt, honey, olive oil, yeast, water, cooled red onion and one of the eggs into a large bowl. Mix the ingredients together to make a dough (using your hand works well) and then tip the mixture onto a worktop.
  3. Knead the dough for 10 minutes until the dough is smooth and stretchy.
  4. Oil a chopping board with olive oil. Divide and roll the dough into 12 equally sized tight balls and arrange on the board. Cover the balls with oiled cling film and set aside to prove for around 40 minutes, or until doubled in size.
  5. Make a hole in the centre of each ball by punching a finger into the middle. Widen the hole with your finger so that it doesn’t close during cooking.
  6. Cover the bagels with oiled cling film again and prove for 45 minutes.
  7. Preheat the oven to 200˚C. Take a large saucepan and fill with water. Bring the pan to the boil and add the bagels in batches of two. Boil the bagels for 75 seconds on each side and then scoop them out with a slotted spoon and place on a wire rack to dry.
  8. Once all the bagels have been poached arrange them on two lined baking trays, making sure they’re well spread out. Take the second egg and beat in a bowl with a fork. Brush the bagels with the egg and top with the grated cheese.
  9. Bake in the oven for 15 minutes, or until golden brown and with a skin-like crust. Take the bagels out of the oven, leave to cool on a wire rack and then serve!


Now, the sweet ones…

Cherry, Pistachio and Dark Chocolate Bagels


Recipe

Ingredients 

  • 500g Strong white flour, plus extra for dusting
  • 1 ½ tsp Salt
  • 1 tbsp Runny honey
  • 1 tbsp Olive oil
  • 7g Instant yeast
  • 240ml Warm water
  • 75g Dried cherries
  • 50g Morello cherries
  • 60g Pistachios, chopped
  • 2 Medium eggs
  • 100g Dark chocolate

Method

  1. To make the bagel dough put the flours, salt, honey, olive oil, yeast, water, cherries, pistachios and one of the eggs into a large bowl. Mix the ingredients together to make a dough (using your hand works well) and then tip the mixture onto a worktop.
  2. Knead the dough for 10 minutes until the dough is smooth and stretchy.
  3. Oil a chopping board with olive oil. Divide and roll the dough into 12 equally sized tight balls and arrange on the board. Cover the balls with oiled cling film and set aside to prove for around 40 minutes, or until doubled in size.
  4. Make a hole in the centre of each ball by punching a finger into the middle. Widen the hole with your finger so that it doesn’t close during cooking.
  5. Cover the bagels with oiled cling film again and prove for 45 minutes.
  6. Preheat the oven to 200˚C. Take a large saucepan and fill with water. Bring the pan to the boil and add the bagels in batches of two. Boil the bagels for 75 seconds on each side and then scoop them out with a slotted spoon and place on a wire rack to dry.
  7. Once all the bagels have been poached arrange them on two lined baking trays, making sure they’re well spread out. Take the second egg and beat in a bowl with a fork. Brush the bagels with the egg.
  8. Bake in the oven for 15 minutes, or until golden brown and with a skin-like crust. Take the bagels out of the oven, leave to cool on a wire rack.
  9. Meanwhile put the dark chocolate into a heatproof bowl and melt over a pan of simmering water. Drizzle the chocolate over the bagels, leave to set and then serve!

Thanks so much for reading! The next post is coming out on Sunday and it’s a good’n, so keep a look out for it!

Emma x

Bakewell Roly-Poly Pudding

Bakewell Roly-Poly Pudding

I think this might just be the most British pudding that has ever existed. Not only is it a roly-poly pudding – the Lord of quintessentially British desserts – but it’s a bakewell roly-poly pudding.  For years this steamed suet roll has been gracing our tables in the UK, whether it be in the school canteen or at a humble family meal, and so it’s naturally become synonymous with warmth and comfort. Thus, if you need a little comfort food, all you need to do is rustle up one of these –  it’s bound to bring back memories of cosy autumn evenings and home baking, even if you never had this as a kid.

The flavours of a bakewell pudding can be summarised as almonds + raspberry. In this case I’m going to use plums instead as they’re in season and also work really well with the almonds. I’m also not going to use traditional animal suet as it isn’t vegetarian and vegetable suet is just as readily accessible. You could use it if you want the true ‘authentic’ version, but it’s completely your choice. I must warn you that suet is weird. If you’ve never worked with it before, imagine those pellets that you feed rabbits, then imagine them made out of wax. That’s the kind of stuff we’re dealing with here. But, that said, it does make really good puddings, so we’re going to use it.

I should probably write more for this post, but a simple pudding only needs a simple write-up. So, in summary, this tastes good and it’s comforting, perfect for now!

Recipe

Serves 8

Time:  1 hour plus extra time for cooking

Ingredients

  • 50g Slightly salted butter
  • 200g Self raising flour
  • 50g Ground almonds
  • ½ tsp Almond essence
  • ½ tbsp Vanilla bean paste
  • 50g Vegetable suet, shredded
  • 150ml Milk
  • 150g Plum jam

For the custard

  • 250ml Whole milk
  • 1 tbsp Vanilla bean paste
  • 50g Caster sugar
  • 3 Egg yolks
  • 10g Plain flour
  • 10g Cornflour

To serve

  • 2 Plums
  • 75g Plum jam
  • 25g Flaked almonds


Method

  1. Preheat the oven to 180˚C. Take a deep roasting tin and fill it with water about 2/3 full. Put this onto the bottom shelf, or base of the oven and leave in the oven.
  2. Take a sheet of foil and another of greaseproof paper and lay the paper on top of the foil. Grease the paper lightly with butter, and set aside for later.
  3. Now it’s time make the roly-poly. Put the butter, flour, ground almonds, almond essence and vanilla into a bowl. Cut into the butter with a round bladed knife to chop it into small lumps. Once you can’t chop the butter any further, go in with your fingers and rub the butter into the flour until you have a bread-crumb texture. Shake the bowl from side to side every now and then to get the lumps to the top so you can rub them in.
  4. Stir the suet into the mixture. Then pour in the milk and bring together with a round-bladed knife until a dough forms. If the dough is dry add some more milk, you want the dough to be a little sticky.
  5. Flour a surface (a lot) and tip out the dough. Shape into a rough square and then roll out to around 25x25cm. Don’t roll it as thin as you would pastry, and this dough is very soft and will tear easily.
  6. Spread the jam over the sheet of dough, leaving a 1cm strip at one end. Roll the dough up from the other end into a tight spiral. Pinch the non-jammy dough into the roll to seal it.
  7. Lift the roll onto the greased baking paper, making sure that the join is on the paper and not facing up. I know this part is much harder than you would expect, I found that it’s true to it’s name, and so literally rolling it onto the greaseproof was the best way to get the roll off the work surface.
  8. Bring the foil and paper up around the roly-poly and fold over the top and scrunch the ends to seal the parcel. Don’t wrap the dough too tightly as it’ll need to stretch when cooking.
  9. Make sure a rack is above the tin of water in the oven and place the parcel onto the rack. Steam in the oven for at least 1 hour.
  10. Meanwhile make the custard. Put the milk and vanilla into a saucepan and bring to the boil.
  11. Mix the sugar, egg yolks and two flours until fully combined. Once the milk is heated, remove the pan from the heat and mix 1/3 of the milk into the egg mixture.
  12. Whisk the mixture quickly and then pour the egg mixture into the milk. Put the pan back over a heat and whisk on a medium heat until the mixture boils and thickens. Pour into a jug and cover with cling-film to prevent a skin from forming. Set aside for later.
  13. Once the pudding is ready take it out of the oven and let it sit for a few minutes before unwrapping. When this is going on you can prep the decorations.
  14. Put the almonds into a small roasting tin and roast in the oven for 3-5 minutes, or until starting to brown. Set aside for now. Then halve, stone and thinly slice the plums. Take the extra plum jam and put into a pan. Heat gently for around 2 minutes, until it’s thinned out slightly. Put into a pipping bag with a small round nozzle.
  15. Unwrap the roly-poly and put it onto a serving plate. Arrange the plum slices on top of the pudding. Pipe the thinned jam on top of the plum slices in a zig-zag and top with the flaked almonds. Serve with the custard and enjoy!

Thanks so much for reading. I hope this one brings you a little warmth and comfort for the cold days ahead. Next post coming out on Sunday!

Emma x

Sweet Nachos

Sweet Nachos

Now, it’s never possible to have too much of a good thing, so why stop at savoury nachos? The following is my version of sweet nachos. They’re particularly good for BBQs, a great share plate for a movie night, and perfect for bonfire night. Just like the savoury version, these can also be adapted to your personal taste. I’ve also included 3 alternative sweet-nacho combos below, which make equally good dessert pyramids. 

Recipe

Serves 6

Time: 1 hour

Ingredients

  • 6 Small flour tortillas (no more than 14cm diameter)
  • 2 tbsp Butter, melted
  • 1 ½ tsp Cinnamon
  • 100g Caster sugar
  • 50g Mini marshmallows
  • 50g Chilli chocolate
  • 50g White chocolate
  • 35g Chopped hazelnuts
  • 200g Double cream, with 1 tsp vanilla bean paste, whisked to soft peaks
  • 50g Salted caramel sauce
  • 200g Strawberries, hulled and chopped into chunks
  • 100g Raspberries
  • 20g Coco nibs
  • 20g Popping candy

For the coulis

  • 200g Strawberries
  • 30g Caster sugar

Serve with raspberry compote and mango sorbet

Method

  1. Preheat the oven to 180˚C. Brush a baking tray lightly with the melted butter.
  2. Place one tortilla onto a chopping board and brush lightly with the melted butter, ensuring it’s covered all over. Place another tortilla on top of the buttered one and brush it with butter. Continue with the others until you have a stack of buttered tortillas.
  3. Take a large knife and cut the pile in half. Then cut each half in half again, and repeat twice more so you have 8 tortilla stacks.
  4. In a bowl mix the cinnamon and sugar. Separate the tortilla stacks so that each chip is a single layer and arrange the chips on the buttered tray. Sprinkle the chips with the cinnamon sugar so each one is evenly coated
  5. Put the chips in the oven for 6-10 minutes, until they’re crisp and slightly brown.
  6. To check if the chips are done test the edges to see if they are crisp and dry. The middle may be slightly softer, but they’ll crisp up as they dry. If the middles don’t crisp up once out of the oven, place back into the oven for 2-3 minutes. Once the crisps are done place them to one side and leave them to cool.
  7. Meanwhile, break up the two chocolates into chunks and put into two separate heatproof bowls. Place each over a pan of water on a medium, heat and leave to melt gently.
  8. Whilst waiting for the chocolates to melt, make the strawberry coulis. Place the strawberries and the sugar in a pan over a medium heat with 25ml water. Heat gently until the strawberries have collapsed and have released their juice. Blend the mixture with a hand blender to create a smooth mixture (you can also sieve the mixture if you want to remove the pips, but it’s not essential). Pour the coulis into a small jug and place to one side.
  9. Begin to assemble the nachos by scattering half the chips on a plate or baking tray lined with baking paper (whatever you want to serve it on). Drizzle with a little of the chocolate, and scatter with nuts, strawberries, caramel sauce and marshmallows. Pile the rest of the chips on top in a pyramid shaped pile. Top with the rest of the marshmallows and strawberries. (If you have a blow torch you can now quickly blast the marshmallows to caramelise them). Dollop the cream in blobs around the stack, drizzle with the rest of the caramel and chocolate and top with the rest of the hazelnuts, the cocoa nibs and popping candy. Serve immediately with the coulis and any ice cream or sorbet you wish.

Alternatives

  1. Tropical – Make the nacho chips the same way as above, but without the cinnamon. Then top with chopped mango, pineapple, coconut chips, whisked vanilla cream, dark chocolate and passion fruit.
  2. Banoffee – Top the cinnamon chips with maple syrup, whipped cream, chopped banana, chocolate chips and pecan praline (made by mixing pecans with caramel and adding a pinch of salt. Leave to cool on baking paper and then break up into small pieces).
  3. Caramel apple – Top the cinnamon chips with chopped up apples ( a mix of granny smith and royal gala is particularly good), salted caramel sauce, chopped up snicker bars, peanuts, and vanilla ice cream.

Thanks for reading, I hope you enjoy the recipe. Any questions or comments dont hesitate to contact me. Look out for my next post!

Emma x