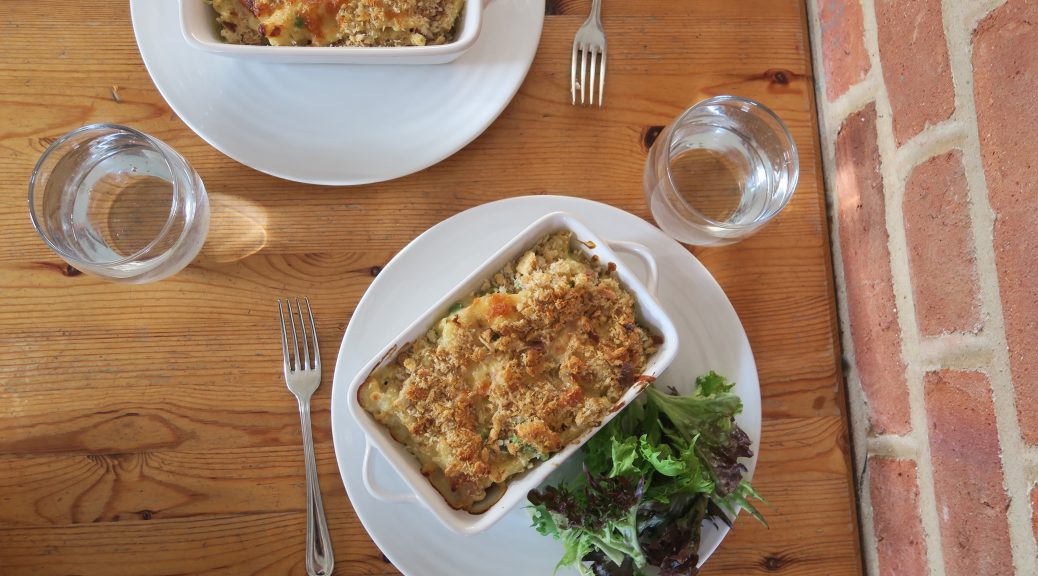
This is one of those rare occasions where I make something savoury. After all the puddings I’ve been making recently I decided to turn my hand to something different. This summer I became obsessed with mac n cheese, probably because pretty much every restaurant I went into had a variation of this dish. From the classic pasta and cheese combo to an… interesting version containing maple syrup and bacon, I can proudly say that I’ve tried lots of these.
When it came down to making my own I improvised a bit. Ham and peas are a beloved couple who work well together in most dishes, and are not strangers to a big bowl of pasta, so there’s no surprise that they also work really well in this. The first time I made this I was surprised that it actually worked – most dishes need a few nips and tucks. But this one was a first-time wonder, and was so easy to make that I’m sure even the most novice of chefs can make themselves a delicious meal with this.
Now many people are going off/ have gone off to uni now, and this is a great cheap one to make once you get there. It’s a classic taste of home, and so if you’re feeling homesick this one is a great comfort. It also freezes really well so if you make too much you can put the rest away for a rainy day, rather than having to throw it away. This also teaches you to make a white sauce, one of the most useful sauces to master as a home cook, and once you can make a white sauce you can make a cheese sauce by simply adding cheese, as in this recipe.
Recipe
Serves 4
Time: 1 hour 15 mins
Ingredients
300g Macaroni
100g Frozen peas
50g Unsalted butter
50g Plain flour
500ml Milk
1 tsp English mustard
100g Strong cheddar cheese, grated
Pepper to season
4 Thick slices of ham, cut into small pieces
80g Bread crumbs (or bread crusts dried in the oven and then blitzed to crumbs)
50g Parmesan, grated
Method
Pre-heat the oven to 180˚C.
Bring a large pan of water to the boil. Add the macaroni and cook it to the packets instructions. Leave the pasta in the pan with the water and then add the peas. Cover and leave until needed.
Now make the cheese sauce. Firstly melt the butter in a pan. Then add the flour and mix until a paste forms – this is called a roux. Cook the paste out gently over a medium heat to cook out the flour. Slowly add some of the milk, whisking as you do so that the flour is fully incorporated. Slowly add the rest of the milk, whisking as you do so to make a lump-free sauce. If you feel as though it’s going lumpy and horrible, don’t worry, just persevere and beat the hell out of it with the whisk and everything should be fine.
Whisk the sauce over a medium-high heat until it has thickened. Add the mustard and cheddar to the sauce and then season with pepper to taste. (You can also season the sauce with salt, but the cheese and ham are already quite salty, so you don’t really need to).
Drain the pasta and peas and then add them to the sauce. Add the ham and mix to fully combine.
Pour the pasta mix into an oven-proof container. Top with the breadcrumbs and then with the parmesan. Bake in the oven for 15-20 minutes, until golden brown and crisp.
Serve warm with a leafy side salad.
Thanks for reading! Any questions or comments don’t hesitate to ask. Next post coming out on Wednesday as always, keep a look out!
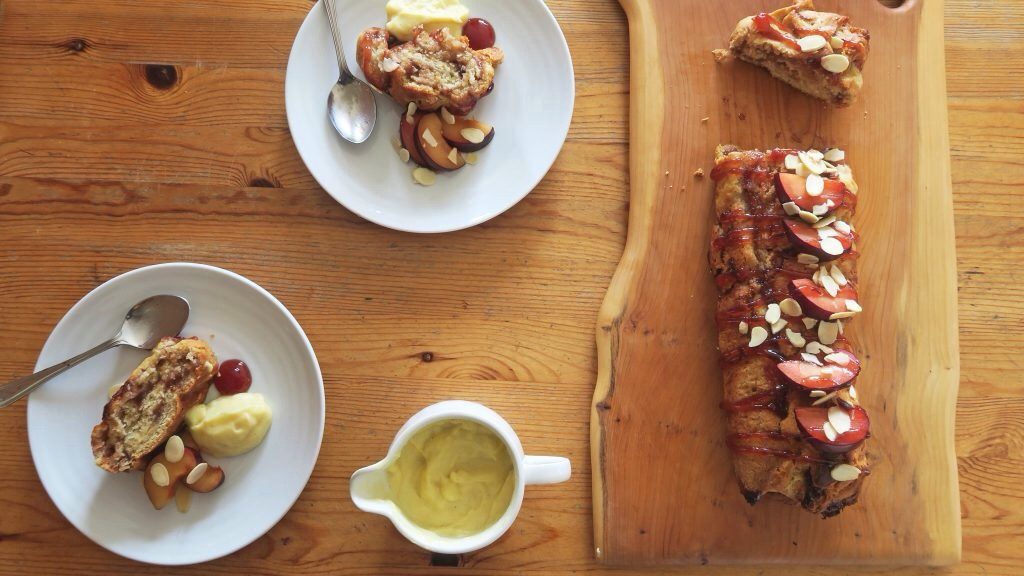
I think this might just be the most British pudding that has ever existed. Not only is it a roly-poly pudding – the Lord of quintessentially British desserts – but it’s a bakewell roly-poly pudding. For years this steamed suet roll has been gracing our tables in the UK, whether it be in the school canteen or at a humble family meal, and so it’s naturally become synonymous with warmth and comfort. Thus, if you need a little comfort food, all you need to do is rustle up one of these – it’s bound to bring back memories of cosy autumn evenings and home baking, even if you never had this as a kid.
The flavours of a bakewell pudding can be summarised as almonds + raspberry. In this case I’m going to use plums instead as they’re in season and also work really well with the almonds. I’m also not going to use traditional animal suet as it isn’t vegetarian and vegetable suet is just as readily accessible. You could use it if you want the true ‘authentic’ version, but it’s completely your choice. I must warn you that suet is weird. If you’ve never worked with it before, imagine those pellets that you feed rabbits, then imagine them made out of wax. That’s the kind of stuff we’re dealing with here. But, that said, it does make really good puddings, so we’re going to use it.
I should probably write more for this post, but a simple pudding only needs a simple write-up. So, in summary, this tastes good and it’s comforting, perfect for now!
Recipe
Serves8
Time: 1 hour plus extra time for cooking
Ingredients
50g Slightly salted butter
200g Self raising flour
50g Ground almonds
½ tsp Almond essence
½ tbsp Vanilla bean paste
50g Vegetable suet, shredded
150ml Milk
150g Plum jam
For the custard
250ml Whole milk
1 tbsp Vanilla bean paste
50g Caster sugar
3 Egg yolks
10g Plain flour
10g Cornflour
To serve
2 Plums
75g Plum jam
25g Flaked almonds
Method
Preheat the oven to 180˚C. Take a deep roasting tin and fill it with water about 2/3 full. Put this onto the bottom shelf, or base of the oven and leave in the oven.
Take a sheet of foil and another of greaseproof paper and lay the paper on top of the foil. Grease the paper lightly with butter, and set aside for later.
Now it’s time make the roly-poly. Put the butter, flour, ground almonds, almond essence and vanilla into a bowl. Cut into the butter with a round bladed knife to chop it into small lumps. Once you can’t chop the butter any further, go in with your fingers and rub the butter into the flour until you have a bread-crumb texture. Shake the bowl from side to side every now and then to get the lumps to the top so you can rub them in.
Stir the suet into the mixture. Then pour in the milk and bring together with a round-bladed knife until a dough forms. If the dough is dry add some more milk, you want the dough to be a little sticky.
Flour a surface (a lot) and tip out the dough. Shape into a rough square and then roll out to around 25x25cm. Don’t roll it as thin as you would pastry, and this dough is very soft and will tear easily.
Spread the jam over the sheet of dough, leaving a 1cm strip at one end. Roll the dough up from the other end into a tight spiral. Pinch the non-jammy dough into the roll to seal it.
Lift the roll onto the greased baking paper, making sure that the join is on the paper and not facing up. I know this part is much harder than you would expect, I found that it’s true to it’s name, and so literally rolling it onto the greaseproof was the best way to get the roll off the work surface.
Bring the foil and paper up around the roly-poly and fold over the top and scrunch the ends to seal the parcel. Don’t wrap the dough too tightly as it’ll need to stretch when cooking.
Make sure a rack is above the tin of water in the oven and place the parcel onto the rack. Steam in the oven for at least 1 hour.
Meanwhile make the custard. Put the milk and vanilla into a saucepan and bring to the boil.
Mix the sugar, egg yolks and two flours until fully combined. Once the milk is heated, remove the pan from the heat and mix 1/3 of the milk into the egg mixture.
Whisk the mixture quickly and then pour the egg mixture into the milk. Put the pan back over a heat and whisk on a medium heat until the mixture boils and thickens. Pour into a jug and cover with cling-film to prevent a skin from forming. Set aside for later.
Once the pudding is ready take it out of the oven and let it sit for a few minutes before unwrapping. When this is going on you can prep the decorations.
Put the almonds into a small roasting tin and roast in the oven for 3-5 minutes, or until starting to brown. Set aside for now. Then halve, stone and thinly slice the plums. Take the extra plum jam and put into a pan. Heat gently for around 2 minutes, until it’s thinned out slightly. Put into a pipping bag with a small round nozzle.
Unwrap the roly-poly and put it onto a serving plate. Arrange the plum slices on top of the pudding. Pipe the thinned jam on top of the plum slices in a zig-zag and top with the flaked almonds. Serve with the custard and enjoy!
Thanks so much for reading. I hope this one brings you a little warmth and comfort for the cold days ahead. Next post coming out on Sunday!
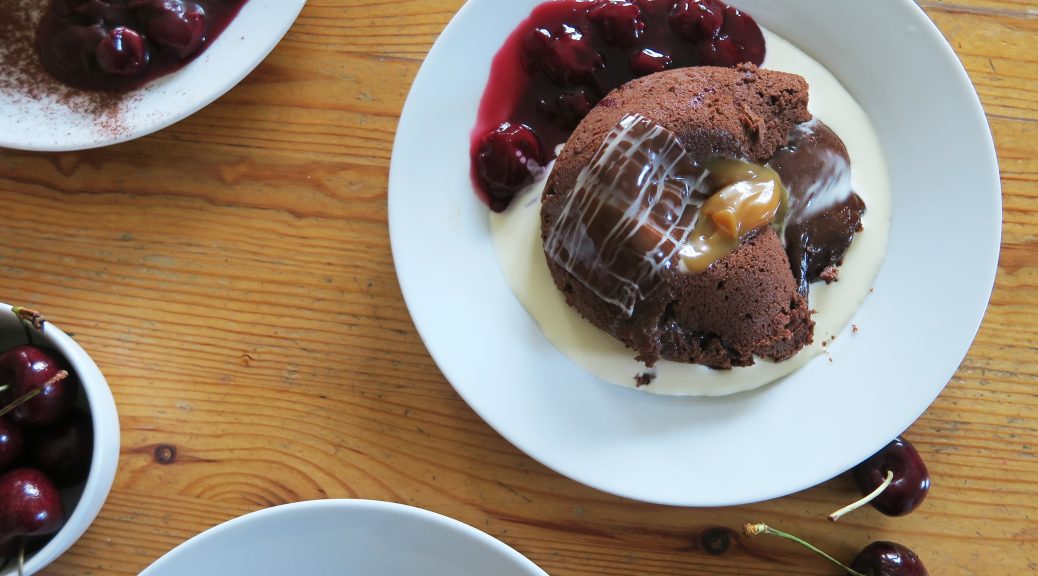
Be ready for a long post – these are amazing and I have a lot to say about them! I first made these fondants for a cookery competition 6 years ago, and I’ve been regularly making them ever since. There’s something highly addictive about the taste-texture combination of these little puddings which will have you making them again and again.
They take a little bit of time to master due to the precision needed in the cooking time, and as ovens vary so much you really have to find the perfect time for your particular oven. Cook them for too long and there will be no fondant, too short and there’s no sponge. Instead of using a skewer, like you would for a cake, you have to go on instinct of what the surface texture should look like, in order to know when to take them out the oven. But apart from the baking bit, they’re really easy to make so I’d recommend giving them a go. Even if they’re under or over baked (and believe me, mine have been both many times) they taste good, so you can’t really lose.
This dessert also looks and sounds impressive, so I’ve found that it works really well as a dinner party dessert. You can make the mixture, and put it into the moulds, up to 48 hours before the party. Chill them in the fridge, then bring them out at least an hour before they go in the oven, to bring them back up to room temperature. This doesn’t affect the quality of the finished dessert and it will give you more time on the day to make everything else. It’s also really easy to make these dairy-free. Simply use soya margarine instead of butter, and make sure the dark chocolate you use has no milk in it. They taste identical to the normal versions, so if you have anyone dairy-free to cook for, instead of making a different or altered dessert for them, you can make these for everyone and no one will notice the difference.
Fondants I made for a dinner party (above)
That said, whilst these are good for parties and for sharing, my favourite time to make them is for a good night in. There’s something truly comforting about a quick-to-make cake which has a soft exterior and then a puddle of velvety sauce in the middle. So, if you’ve been looking for a quick dessert which exudes chocolately gooeyness, and is perfect for a quiet evening, you’ve just found it.
Recipe
Serves 4
Time – 45 minutes
Ingredients
100g Unsalted butter
150g Dark chocolate, chopped roughly
2 Eggs
2 Egg yolks (see below for what to do with the egg whites)
120g Sugar
100g Plain flour
A pinch of salt (this really brings out the chocolate flavour)
Method
Pre-heat the oven to 180˚C. Grease four small pudding basins with butter and put onto a baking tray.
In a heat-proof bowl put the butter and the chocolate. Place over a pan of gently simmering water and leave to melt, stirring occasionally.
In a separate bowl whisk the eggs, egg yolks and sugar together until pale a fluffy. An electric whisk is quicker and easier, but a hand whisk also works.
Slowly pour the chocolate mixture into the egg mixture, whisking continuously until smooth.
Add the flour and salt to the mixture and whisk again until fully combined.
Pour the mixture into the four pudding moulds. At this point you can cover the moulds in cling film and chill in the fridge for up to two days, just make sure they return to room temperature before cooking.
Put the fondants into the oven and bake for 8-10 minutes. This time works for me, but as all ovens can vary I’d recommend going on the texture rather than a specific time. You want the surface of the fondants to be just skinning over, so that the edges are cooked but the middle is very soft. If anything bring them out a little too early than too late. If they are too liquid when tipped out, you can quickly microwave them for 20 seconds to cook more of the batter.
Take the fondants out of the oven and use a knife to loosen them from the edge of the moulds. Carefully turn them out onto plates and serve immediately. Enjoy!
These are really good with…
Fruit sorbet (raspberry and mango are particularly good ones to try)
Any flavour ice cream
Salted caramel sauce
Fresh fruit (e.g raspberries or strawberries)
Clotted, double or squirty cream
Fruit sauce (e.g coulis)
Chocolate chips or chocolate decorations
How to use up leftover egg whites…
This recipe, like so many others I come across, results in leftover egg whites. You separate the eggs, put the yolks into the batter and are left with two perfectly good, unused whites. They keep in the fridge for up to two days, and can be used for so many things, so rather than throwing them away, here’s some ways of using them up….
Meringues – about 80% of the time I have left over egg whites I turn them into meringues. A simple combo of caster sugar and egg white, meringues are surprisingly simple to make and can be used in so many ways (such as daquoise, pavalova, or meringue kisses – made by pipping the meringue into peaks on a baking tray). If you are going to make meringues though, or any of the following which involve a meringue base (they have a * next to them) it’s better to use the egg whites on the same day as you separate the eggs, as you’ll get a stiffer peak from the mixture, resulting in a better meringue.
Lining pastry – When making pastry brush the whites onto the pastry after taking the beans out for a blind bake. Put the pastry back in the oven for a further 5 minutes after brushing to firm up the base even more. This will act as a barrier between the pastry and the filling, keeping the base crisp.
Marshmallows* – these start off as swiss meringue, and then use gelatin to give that incredible pillowy texture. Like meringues, these can be customised with fruit, nuts and chocolate to make them even more special, and they last for up to two weeks.
They’re still eggs– the eggs may have lost their yolks, but they can still be cooked in the ways you would normally cook an egg. You can fry, scramble or poach the whites as you would normally.
Mousse* – whilst many mousse recipes require the whole egg, some are egg whites only, and thus can be a good thing to make when left over whites are hanging around. Whilst these don’t technically have a meringue base, it’s still important to use the egg whites fresh, as it will allow more air to be trapped, and so will result in a better mixture.
Icing – egg whites can be used to make royal icing for anything in need of some icing, including Christmas cakes, so if you happen to have one lying around that you need to ice…
Macaroons* – another meringue based delight. Add almonds and a bit of flourish and you’ve got these great little biscuits.
Bread glazes – if you’re into bread making you can use the whites to glaze bagels, buns and loaves. Brush them over with the whites after their second prove, or just before putting them into the oven. If you want a golden crust you’ll be better off using egg yolks, but the whites can still give a beautiful shine.
Cakes – Some cakes, such as angel food cake, use only egg whites, so why not make a lighter-than air cake with some of the leftover egg whites?
Soufflés – These are really fun to make! You can make them in almost any flavours and they taste amazing. They maybe aren’t so great to make on the same day as cooking the fondants, as they’re best with fresh egg whites, and need to be baked and eaten immediately after being made. However, if you’re chilling your fondant mixture for another day, these are great for a decadent dinner dessert.
I hope you enjoyed this post! More coming soon so keep a look out. Any requests, comments or questions don’t hesitate to ask.
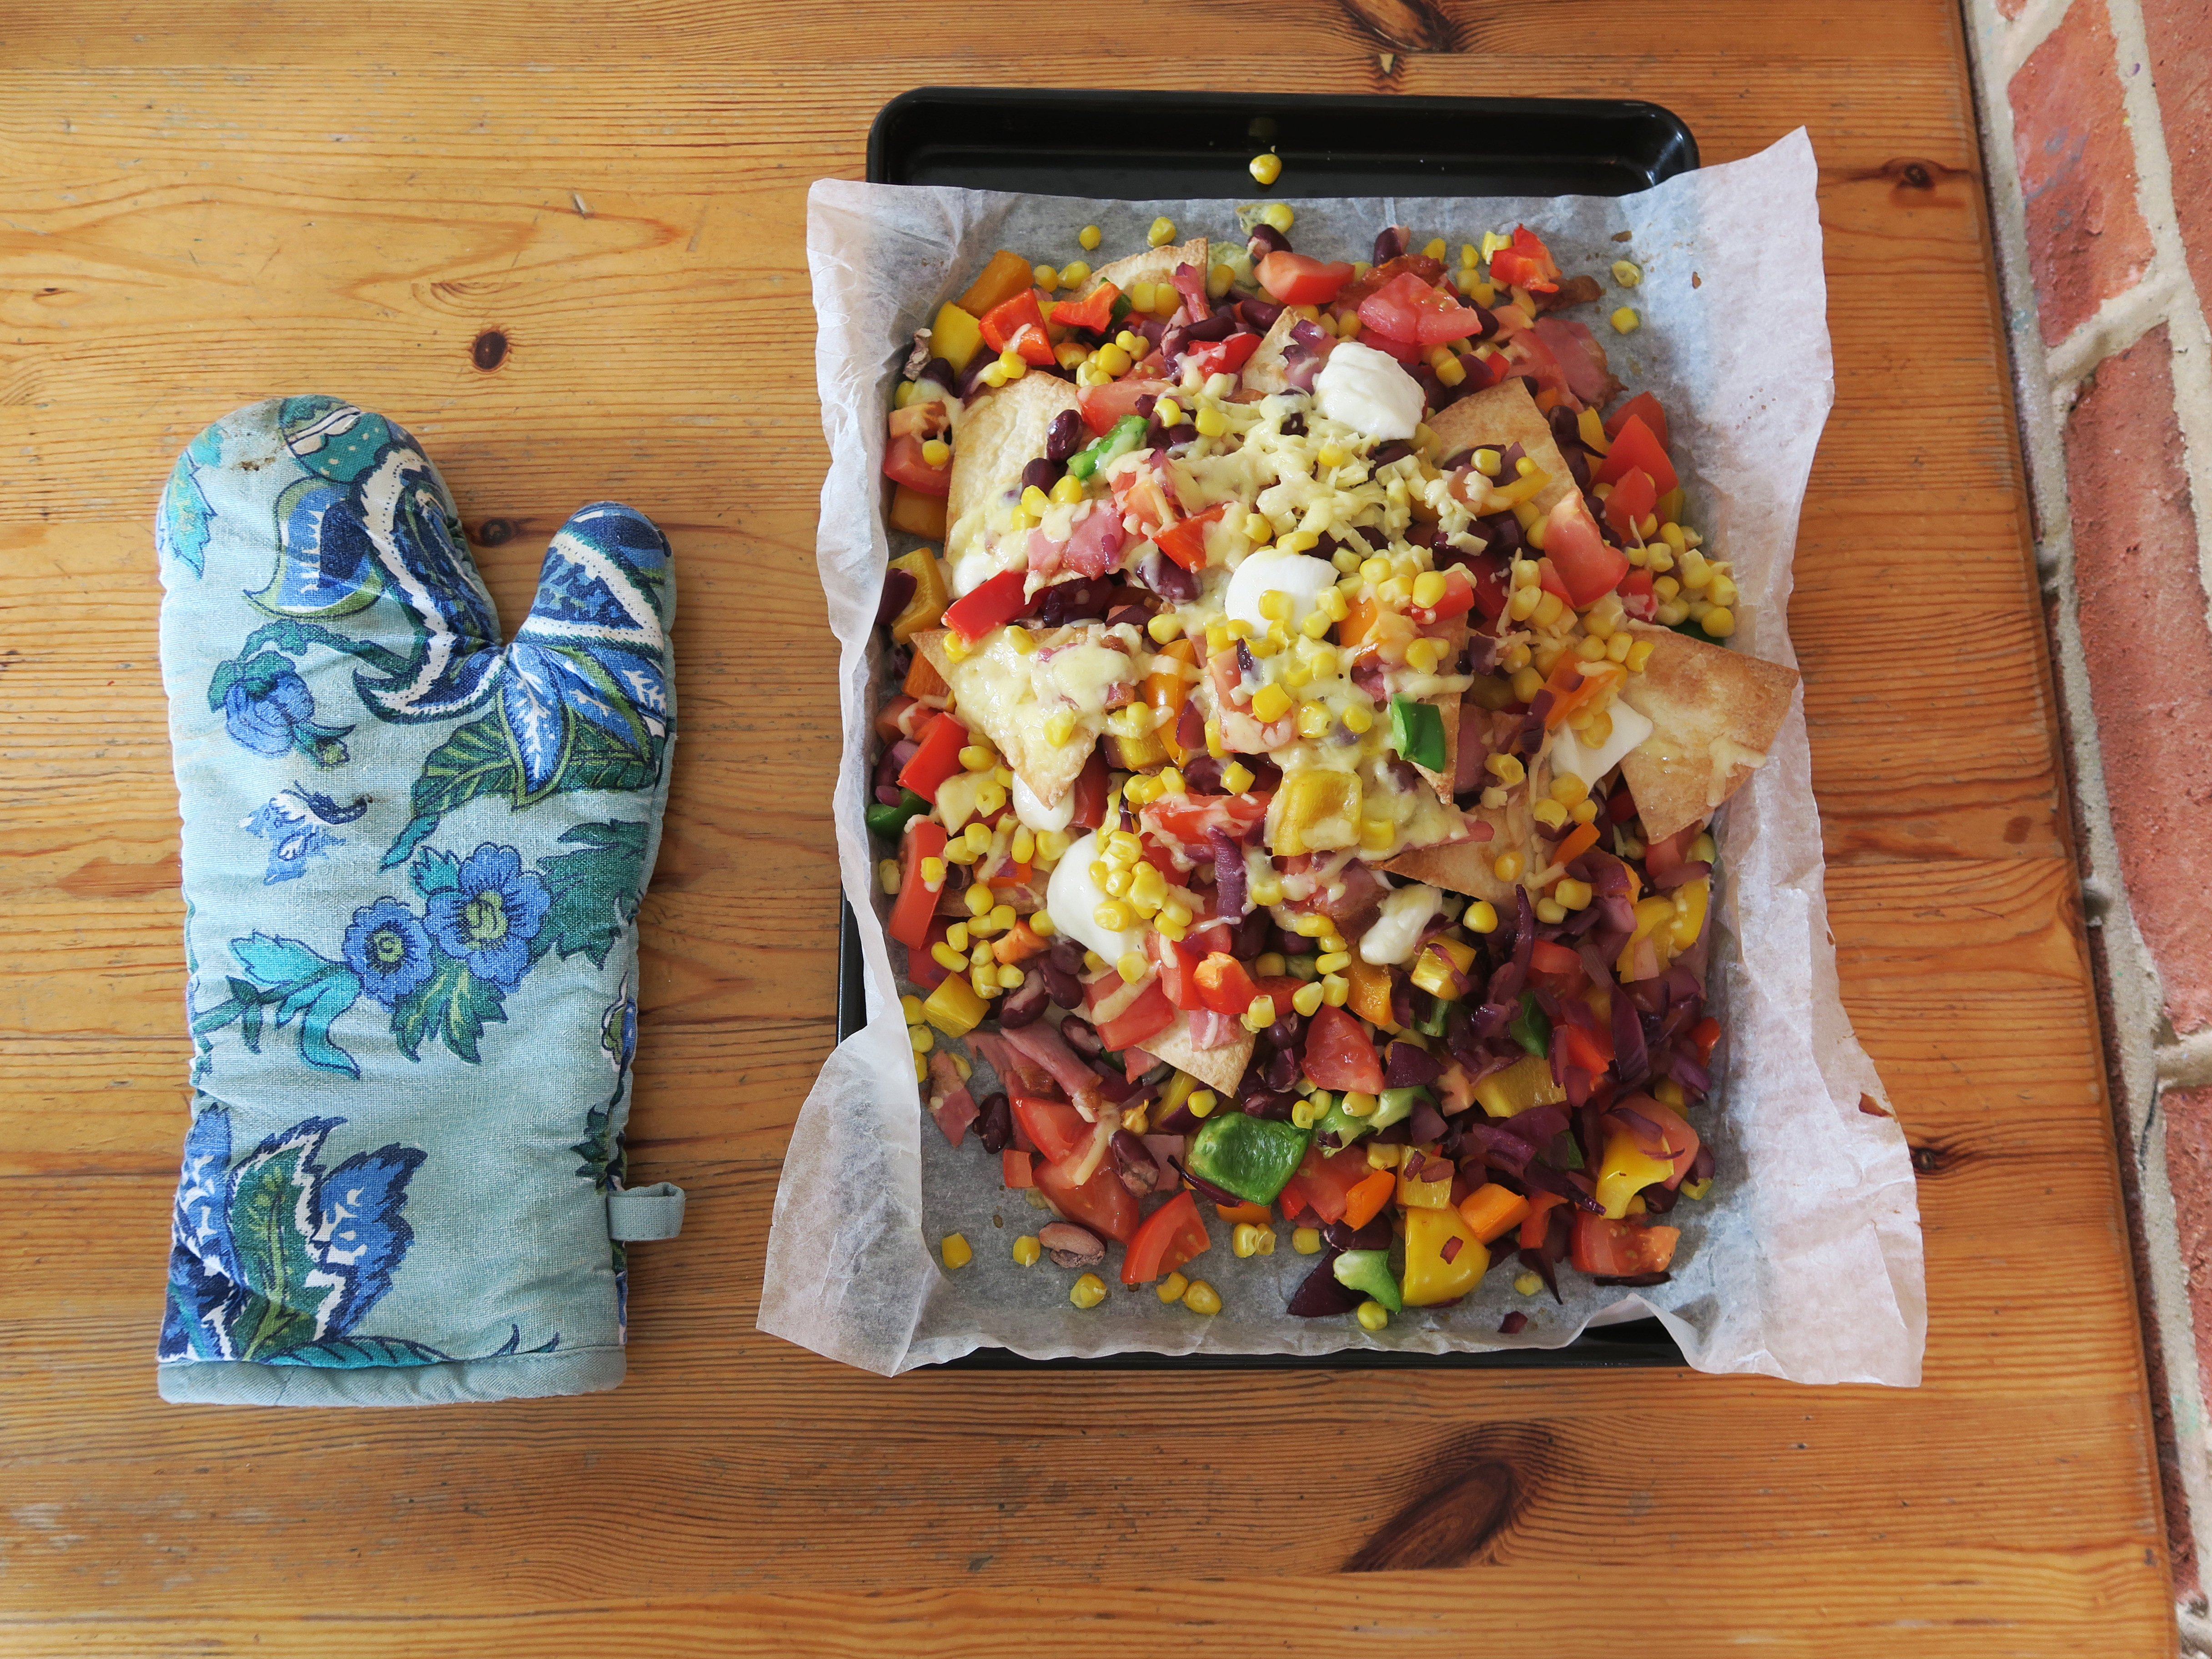
This summer I spent some time in Canada and I found that alongside snow, bears and lakes, Canada should also be famous for its incredible nachos. Tortilla chips piled high with mountains of cheese, peppers, jalapenos, and beef, served with tubs of guacamole and sour cream creates a pyramid of pure comfort. Whatever the weather, they can’t fail to put a smile on your face.
The following recipe is my ultimate nacho pyramid. I’ve added some personal touches to suit my taste preferences, however the great thing about nachos is that you can pretty much put anything with them and they’re still amazing. So if there’s any ingredient you love or hate you can easily swap it in or out to create your own perfect combination.
Recipe
Serves 6
Time: 1 hour
Ingredients
4 tbsp Sunflower or vegetable oil
8 small tortillas (no more than 14cm in diameter)
2 rashers of smoked bacon
1 Small red onion, finely chopped
½ a small red, green and orange pepper, diced
100g Mozerella, torn into pieces
100g Cheddar cheese, grated
1 jalapeno, chopped into discs
1 beef tomato, diced
80g Sweetcorn
80g kidney beans, drained and rinsed
Sour cream and guacamole to serve
Method
Preheat the oven to 180˚C. Put 2 tbsp of the oil into a small bowl.
Place one tortilla onto a chopping board and brush lightly with oil, ensuring it’s covered all over. Place another tortilla on top of the oiled one and brush it with oil. Continue with the others until you have a stack of oiled tortillas.
Take a large knife and cut the pile in half. Then cut each half in half again, and repeat twice more so you have 8 tortilla stacks.
Line 3 trays with baking paper and brush each with oil. Separate the tortilla stacks so that each chip is a single layer. Place the chips on the oiled tray so that their non-oiled surface is in contact with the oiled tray. It’s best if the chips don’t overlap, but if they do just move them around on the tray half way through cooking so that they crisp up all over.
Sprinkle the chips with a generous pinch of sea salt so that all the chips are seasoned. Then put the trays in the oven for 8-12 minutes.
To check if the chips are done test the edges to see if they are crisp and dry. The middle may be slightly softer, but they’ll crisp up as they cool down. If the middles don’t crisp up once cool, place them back into the oven for 2-3 minutes. Leave the chips to cool.
Meanwhile pre-heat the grill to a high heat. Place the bacon rashers on a grill pan and heat under the grill. Grill for around 5 minutes and then turn the rashers over and grill for a further 5 minutes on the other side so that they become crisp all over.
Take the bacon off the grill pan and cut into strips with scissors. Place the strips to one side.
Now prepare the veg. Put the remaining 2tbsp of oil into a pan and put on a medium-high heat. Put the chopped onion in the pan and stir to coat in the oil. Stirring occasionally, fry the onions until they start to caramelise (go brown and sticky).
Then add the chopped up peppers and stir to mix and coat them in the oil. Place to one side.
Line a baking tray with baking paper. To assemble the nachos, begin by loosely scattering a few of the tortilla chips on the lined tray. Top with some of the peppers, onions, bacon strips, mozzarella and cheddar. Layer up with more tortilla chips to make a pyramid shape. Top with the rest of the bacon, peppers and onions, as well as the jalapenos, tomatoes, sweetcorn, and kidney beans. Top with the rest of the mozzarella and cheddar and then place in the oven.
Bake the nachos until the cheese is just melted, it should take around 10 minutes, but it may take longer for the mozzarella to melt. If the chips start to colour too much, loosely cover the pile in tin foil.
Take the nachos out of the oven and leave to cool for a few minutes before eating. Serve with sour cream and guacamole. Enjoy!
Top tip – Lining the trays with baking paper can be hard as the paper inevitably roles back on itself. To prevent this just scrunch up the paper, as though you’re about to throw it away, and then unfold it. It’ll make it easier to work with.