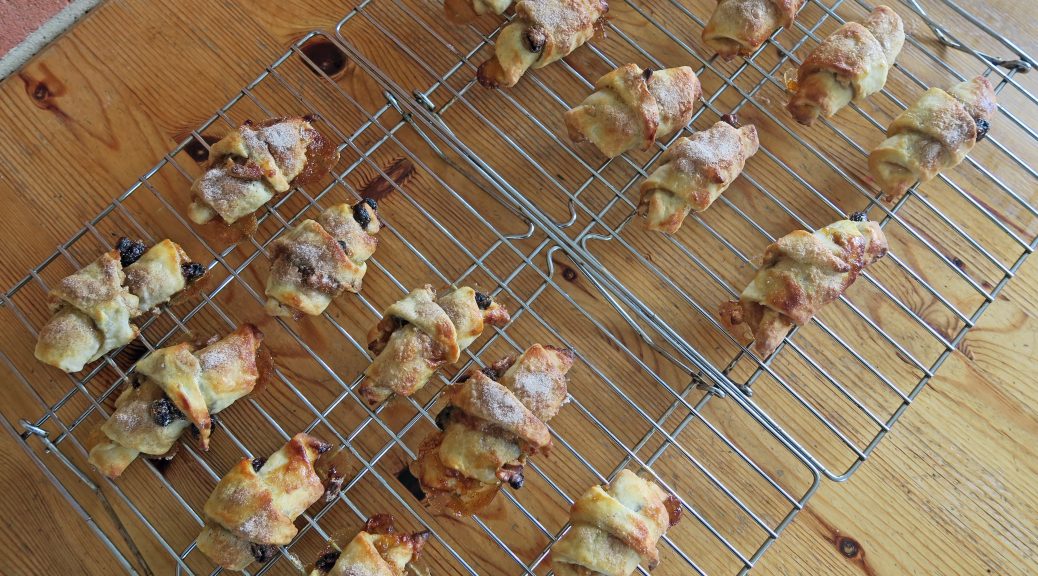
Category: Biscuits

Rugelach

Rugelach

What is this? Another unusual bake that no one’s ever heard of before? Well you’d be right there. As you can probably tell I’m pretty obsessed with foreign baking, and over the course of the year I’ve been really pushing that side of my cooking. In my town there’s this really old bookshop that has a massive cookbook section, full of every style, theme, and cuisine of cookbook you could imagine. I love flicking through the books there, making mental notes of any unusual flavours, techniques, and ideas to give a go.

I first came across these in a Nordic recipe book and I immediately knew they’d be something I’d want to work on myself. Despite finding them in a Nordic cookbook though, these are actually a Jewish pastry, mainly found in the middle east. The dough is made with cream cheese which creates a really interesting, soft texture. These are then stuffed with apricot jam, nuts, raisins and cinnamon which makes them super moreish.

I quite like these as small, one-mouthful bites, but if you want to make them chunkier you can easily do this by cutting your circle into 6 or 8 triangles, rather than 12 like I have. I also haven’t tried this, but I wouldn’t be surprised if this filling works really well with shortcrust, puff, or even filo pastry, so you can really play around with these to suit your personal taste.

Recipe

Makes 24

Time: 45 minutes plus chilling and baking

Ingredients

  • 230g Cream cheese
  • 250g Unsalted butter
  • 155g Caster sugar, plus 3 tbsp for dusting
  • ½ tsp Salt
  • 1 tsp Vanilla extract
  • 300g Plain flour
  • 40g Light brown sugar
  • 1 ½ tsp Ground cinnamon
  • 140g Raisins
  • 140g Walnuts, finely chopped
  • ½ cup Apricot jam
  • 1 Large egg, beaten

Method

  1. Put the cream cheese and butter into a bowl and whisk until light and pale. Add 55g of the caster sugar, salt and vanilla and mix again to combine. Slowly add the flour and mix slowly until a dough forms.
  2. Roll the dough into a ball. Then cut the ball into quarters, roll each quarter into a ball and wrap in cling film. Leave in the fridge for an hour.
  3. Meanwhile make the filling. Put the 100g of the caster sugar, the brown sugar, ½ tsp cinnamon, raisins and chopped walnuts into a bowl and mix together.
  4. Lightly flour a surface and roll each dough ball out into a 9 inch circle. Spread the apricot jam over the circles and sprinkle with some of the filling mix, pressing it into the dough slightly.
  5. Cut the dough circle into 12 wedges. Then, starting at the wide end of the wedge roll the dough up like a croissant.
  6. Line a baking tray with baking paper and put the rolled up cookies on the tray, making sure the point where the folded bit of pastry ends is underneath. Chill for 30 minutes.
  7. Pre-heat the oven to 180˚C. Lightly brush each biscuit with the beaten egg. Then combine the rest of the caster sugar and cinnamon in a bowl and sprinkle over the biscuits.
  8. Bake the rugelach in the oven for 15-20 minutes until golden brown and crisp.
  9. Leave to cool on a wire rack and then serve!

Thanks for reading!

Emma x

Anzac Biscuits

Anzac Biscuits

Back in the time when I was small, cute, and at primary school I came across this incredible recipe for Anzac biscuits. There was this lovely Australian teacher there who taught me in year three, and at a school fete one year she sold bags of them which were so delicious I had to ask for the recipe. A couple of days later she gave me an A4 hand-typed recipe which I still have to this day in a recipe folder on the shelf. I loved making them when I was little as they were so simple and quick to put together, and of course tasted delicious!

That said, for some reason I  haven’t made these in a  really long while. So, as it’s Anzac day today, I thought it’d be a good time to re-discover the recipe. Sure enough, they’re just as delicious as I remember them – sweet, chewy and with a slight nutty, caramelised flavour.

Recipe

Makes 16

Time: 30 minutes

Ingredients

  • 135g Plain flour
  • 200g Sugar
  • 100g Rolled oats
  • 100g Desiccated coconut
  • 150g Butter
  • 40g Golden syrup
  • 2 tbsp Boiling water
  • 1 tsp Bicarbonate of soda

Method

  1. Pre-heat the oven to 180˚C. Then line two baking trays with greaseproof paper.
  2. Put the flour, sugar, oats and coconut into a bowl and mix together.
  3. Next take a pan and melt together the butter and syrup. When fully melted add the water and bicarb and mix together.
  4. Mix the wet into the dry ingredients until completely combined.
  5. Take a table spoon and drop blobs of the mixture onto your lined tray. Make sure to leave space between the biscuits as they will spread a little.
  6. Bake in the oven for 10-15 minutes until golden brown and just starting to colour.
  7. Take the biscuits out of the oven and leave to cool for a few minutes so they harden, before transferring them to a cooling rack to cool completely.

Thanks for reading!

Emma x

Florentines

Florentines

It’s less than 24 hours till Christmas day and I’ve got a one more quick festive recipe for you. For as long as I can remember I’ve made florentines as gifts for friends and family, and this year was no exception. Somewhere amongst the art, drama rehearsals, and work I found time to make 50 florentines which I’ll be giving out over the next couple of days.

If you’ve never had one of these before they’re little orangey, almondy biscuits coated in chocolate, which are really delicious and moreish.  I’m not a huge fan of almonds or oranges, but somehow I really love these and just the smell of them baking brings back memories of Christmas. They’re also really easy to make – essentially just bung everything in a pan and then bake them in little mounds!

You can then serve them as a snack, nibble or even bag them up as I do and give them as gifts. I find 4 or 5 in a little cellophane bag, with a ribbon and tag makes perfect presents for anyone and everyone.

Recipe

Makes 30

Time: 1 hour

Ingredients

  • 225g Butter
  • 375g light brown sugar
  • 375g Flaked almonds, chopped roughly
  • 200g Raisins, chopped roughly
  • 2 Oranges, rind only
  • 150g White chocolate
  • 150g Milk chocolate
  • 150g Dark chocolate

Method

  1. Preheat the oven to 180˚C and line 3 baking trays with baking paper.
  2. Put the butter into a pan and melt on a medium heat. Add the sugar and heat slowly until the sugar dissolves in the butter and the mixture starts to bubble.
  3. Take the pan off the heat and stir in the chopped almonds, raisins and orange zest.
  4. Put blobs of mixture onto the lined baking trays, making sure they’re well-spaced apart as the mixture will spread (about 4 per-tray).
  5. Bake in the oven for 12-15 minutes until starting to turn golden. Take out of the oven and after a couple of minutes use two spoons to reshape the biscuits if they’ve spread too much and then leave them to harden completely.
  6. Transfer the biscuits to a cooling rack and then continue with spooning and baking the rest of the mixture.
  7. Once all your biscuits are baked take the chocolates and put them into three separate heat-proof bowls – one for each chocolate. Put these over pans of gently simmering water and leave to melt.
  8. Take one of the biscuits and spread a little of the chocolate over the back, flat side of them. Then use a fork to make zig-zag marks through the chocolate and then leave to set. Repeat with the rest of the biscuits, making 1/3 white, 1/3 milk and 1/3 dark chocolate. Serve!

Thanks for reading and Merry Christmas! This is my last post for this year, but I’ll be back on in January with plenty more recipes for 2018…

Emma x

Chocolate Chip Cookies

Chocolate Chip Cookies

Can anything truly top a good chocolate chip cookie? Especially when they’re warm from the oven and the chocolate is just melted when you bite into them. It’s always hard with classics like these to  know which recipes will work and which won’t. The expanse of the internet means that there’s thousands of variations out there, and unfortunately too many of them result in burnt, tasteless disappointments. After some research, though, I think I’ve found the perfect combination which’ll, fingers crossed, work without fail.

I do have a couple of top tips though to make sure that they end up the best they can be. Firstly, it’s important to make sure the dough is as cold as possible before going into the oven. Why I hear you ask? Well this means that they’ll keep their shape more in the oven, which will stop them from spreading too thinly. This makes it easier to get a soft, chewy bake, rather than a crisp, burnt one. It’s also kinda obvious, but when buying your ingredients make sure you buy chocolate you like the taste of. Sometimes it can be tempting to buy super cheap chocolate to bake with, but when you have chunks of chocolate, like in this, you can really taste it. My general rule is go for a chocolate you’d be happy to eat on it’s own, that way your cookies will be super delicious.

Recipe

Makes 20

Time 25 minutes, plus time for chilling

Ingredients

  • 220g Unsalted butter, softened
  • 170g Light brown sugar
  • 150g Caster sugar
  • 1 tsp Vanilla extract
  • 2 Large eggs
  • 330g Plain flour
  • 3/4 tsp Baking powder
  • Pinch of Salt
  • 100g White chocolate, roughly chopped into chunks
  • 100g Milk chocolate, roughly chopped into chunks
  • 1 tsp Sea salt to top (it’s really worth it)


Method

  1. In a bowl put the butter, sugars and vanilla, and beat together until pale and fluffy. Using an electric mixer can help with this.
  2. Add the eggs, one at a time, to the mix and whisk together after each addition to combine.
  3. Sift the flour, baking powder and salt into the main bowl and stir to combine.
  4. Stir the chocolate chunks into the mix so that they’re evenly distributed.
  5. Turn the dough out onto some clingfilm, wrap it up and then put it into the fridge to chill for at least 2 hours. (If you’re short on time or just can’t wait put it into the freezer for 30 minutes).
  6. 20 minutes before the dough finishes chilling, pre-heat the oven to 170˚C.
  7. Line 4 baking trays with baking paper.
  8. Roll the dough out between two sheets of clingfilm (I find this easier than using a floured surface). You want the dough to be the thickness of about 2 pound coins.
  9. Using a round cookie cutter, cut out circles of the dough. Put the circles onto the baking sheets, making sure they’re well spaced out as they will spread. I put about 5-6 on each of mine. Put them back into the fridge for 30 minutes to re-chill.
  10. Take the baking trays out of the fridge and sprinkle the dough circles with the sea salt. You only want a little on each cookie, but it works wonders in bringing out the flavour.
  11. Bake in the oven for 15-20 minutes until just starting to brown at the edges and puffed up. They will feel fairly soft, but they’ll firm up some more once they’ve cooled down. Eat as soon as you can!

Thanks for reading!

Emma x