Author: Emma Hawkins

Chilli Con Carne  

Chilli Con Carne  

I’m a big believer in eating when and what you’re body tells you to eat. By that I don’t mean stuffing your face every time you feel peckish or get a craving, which admittedly I do a lot anyway, but I also don’t believe in not eating when you’re body’s telling you you need to. A few months ago I was craving peanuts. Now, I had never had much of an interest in peanuts before this time and so I basically took this as a sign that my body was in need of whatever nutrients peanuts are particularly rich in. I’m not a nutritionist so I’m not saying this is something anyone else should necessarily live by, but it works for me. So, bringing this back to topic, this week I’ve turned into a carnivore and have been really craving meat.

Unlike the rest of my family, I’m not normally a very meaty person. I used to be a vegetarian and as a result I often find myself slipping back into a veg-based diet. But this week I was in need of hard meat and so chilli con carne – the mothership of meat dishes – flew onto the menu pretty fast. Whilst I’m a food blogger and I a love trying new foods, I have to admit that I have the palette of a young child. I love gently spiced, relatively mild comfort food and anything with any oomph of chilli will blow my head off. Therefore I’ve spiced this ironically named chilli pretty gently, so if you’re cooking for kids or others with a palette like mine this will be perfect. If, however, you like your food hot you can add as much cayenne pepper as you like. I’d recommend adding another 1/2 tsp at a time once everything’s cooked, mixing it in and then tasting it. Don’t just triple the amount straight away as it might blow your head off and then you’re dinner will become a painful torture experience.

Recipe

Serves 6

Time: 20 minutes prep, 20 minutes cooking

Ingredients

  • 1 White onion
  • 1 Clove of garlic
  • 1 tbsp Sunflower oil
  • 2 Medium sized carrots
  • 1 Red pepper
  • ½ tsp Smoked paprika
  • ½ tsp Cayenne pepper
  • ½ tsp Medium curry powder
  • 500g Minced beef
  • 400g Chopped tomatoes
  • 1 tbsp Tomato puree
  • 1 Beef stock cube
  • 400g Kidney beans
  • Rice and salad to serve (optional)

Method

  1. Begin by peeling and then finely chopping the onion and garlic. Put the oil into a large pan and put over a medium heat. Add the chopped onion and garlic and fry gently until caramelised.
  2. Peel and dice the carrot and then de-seed and dice the red pepper. Add the vegetables to the pan and fry for another 2-3 minutes to soften.
  3. Add the mince to the pan and fry for 5-10 minutes until the meat is browned all over. Break up the meat with a wooden spoon as you stir the mixture.
  4. Add the paprika, cayenne pepper and curry powder and fry for another 2-3 minutes to cook off the spices.
  5. Then add the chopped tomatoes, tomato puree, stock cube and 150ml boiling water to the pan. Stir to combine and then leave to simmer for 10 minutes, until the sauce has reduced and the carrots are no longer crunchy.
  6. Drain the kidney beans through a sieve and rinse under cold water. Then add them to the chilli and stir them through. Season with lots of salt and pepper and leave to simmer for another 10 minutes.
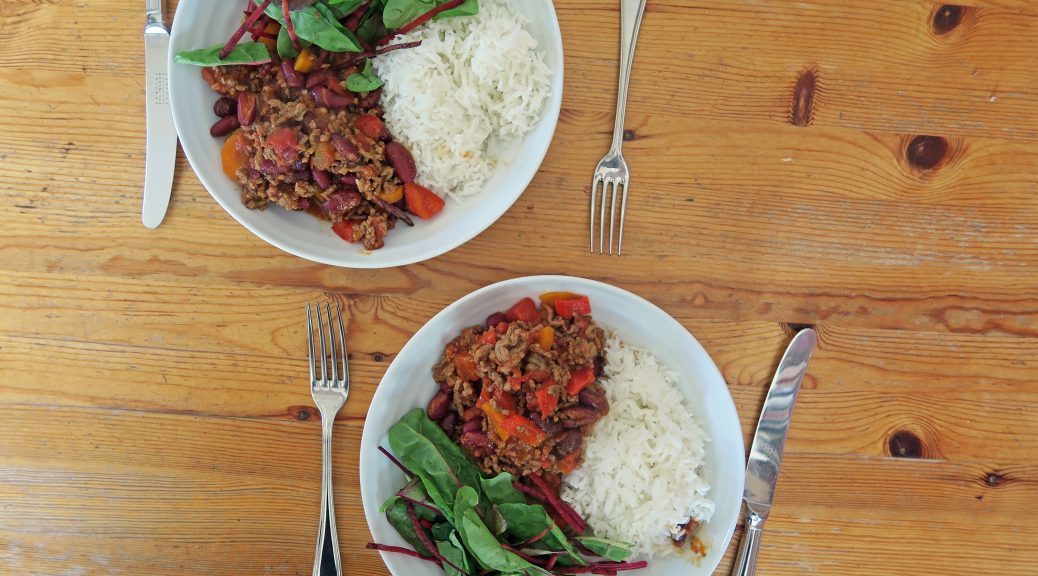
  7. Serve the chilli with rice and fresh salad!


Why not try…

Adding a little dark chocolate to the top of the chilli. It sounds weird, but is actually becoming a pretty common addition to chilli. It’ll add a delicious bitter, roasted flavour to the dish!

Thanks for reading!

Emma x

Cheesy Garlic Focaccia

Cheesy Garlic Focaccia

I’ve always had this unhealthy obsession with garlic bread. When I was at Primary School, every year they’d have this hot-rods competition where you’d be given a block of wood and four wheels and you’d have to make them into something that could be raced down a ramp. One year I basically baked and varnished a loaf of garlic bread and stuck it on top of the wood. It was very weird, but hey, I did win the originality prize that year!

With my bread racing days behind me, now I just eat my garlic bread, and this is one of the best! Focaccia is a very soft Italian bread which is a perfect base for garlic bread as it’s soft and easy to share. The dough requires a lot of water to get this soft, open structure to it, so it can be petty hard to work with. Rather than kneading the dough on a work top I’ve found that kneading it in a bowl makes everything a lot easier, and also means that you don’t waste as much dough from it being suck on the table!

In most garlic breads the garlic isn’t actually in the bread, but is rather a garlic butter that’s sandwiched in between slices of the bread, or is spread on the top. In this one I’ve put a little garlic into the dough itself, but to give it more of a garlic hit I’ve also spread it with garlic butter when it’s warm out of the oven! You also don’t have to use cheese if you don’t want it, it’s completely personal preference, but I find that it gives the whole thing a delicious tang on the top!

Recipe

Makes 1 loaf

Time: 1 hour, plus proving time

Ingredients

  • 500g Strong white bread flour
  • 10g Salt
  • 14g Yeast
  • 2tbsp Olive oil
  • 1 tbsp Garlic paste
  • 400ml Warm (but not hot!) water
  • 1 Large egg, beaten
  • 50g Strong cheddar cheese, grated
  • 3 cloves of garlic
  • 50g Unsalted butter

Method

  1. Put the flour into a bowl. Then add the salt and yeast on opposite sides of the bowl, followed by the oil, garlic paste and the water. Mix everything together with your fingers until a dough starts to form. Then knead/stretch the dough in the bowl for 10 minutes until smooth and stretchy.
  2. Tip the dough into another, lightly oiled bowl and cover with cling film. Leave to rise for about an hour until doubled in size.
  3. Line a baking tray with baking paper. Punch the risen dough down in the bowl to knock it back. Then pour/tip the dough onto the lined tin and shape it into a rough rectangle. Oil a piece of cling film and then cover the loaf, oil side down, and leave to rise for another hour.
  4. Pre-heat the oven to 180˚C. Use your fingers to punch holes into the loaf and then brush the bread with the beaten egg. Bake the loaf in the oven for 15-20 minutes, until a soft crust has formed.
  5. Take the bread out of the oven and then sprinkle with the grated cheese. Then pop the loaf back into the oven to bake for 5-10 minutes, until golden brown and baked through.
  6. To make the garlic butter crush or finely chop the garlic. Then add it to the butter and mix until the butter is soft and the garlic is mixed through.
  7. Whilst the bread is still warm, slice the loaf into strips and brush each strip on both sides with the butter. Enjoy!


Why not try…

If you love cheese, and really love cheesy garlic bread, you can take this to the next level by adding mozzarella. About 5 minutes before the bread’s done, when you put on the cheddar in step 5, slice the bread into strips almost all the way through, but leave a little space at the end so it’s still all joined together. Then slice the bread the other way so you get criss-cross squares of bread. Take a ball of mozzarella and tear it up, and then push the cheese into the gaps between the bread slices. Top with the cheddar and put back in the oven until melted!

Thanks for reading!

Emma x

Asparagus, New Potato and Serrano Ham Salad

Asparagus, New Potato and Serrano Ham Salad

To counter all the insanely indulgent patisserie and sweet bakes that I’ve been making the past few weeks, I thought it was about time for a salad. Especially when it’s this hot all the time, no one really wants to be eating anything warm and so salads are kinda my go-to thing. This salad can be served either hot or cold, so it’s a good one to have up your sleeve for all seasons.

I think the key to a good salad is to have a mixture of cheese/meat, green veg and then something more carb-based. In this summery salad the saltiness of the ham and the halloumi works beautifully with the earthiness of the asparagus and the broad beans. If you haven’t had halloumi before, it’s this gorgeous cheese which is cooked to give a slightly crisp outside with a softer inside that squeaks as you eat it. It’s pretty salty, but in a salad like this it’s incredible! Because of the serano ham and asparagus this can be a bit of a pricey lunch to make, so if you’re working to a budget you can get the same effect by using normal ham and cooked courgette strips.

Recipe

Serves 2

Time: 20 minutes

Ingredients

  • 6 New Potatoes
  • 8 Spears of Asparagus
  • A handful of Broad beans
  • 1 tbsp Olive oil
  • 1 Block of Halloumi (about 225g)
  • A handful of Salad Leaves
  • 3 Pieces of Serrano ham
  • Black pepper to season

Method

  1. Put on a pan of water to boil. Then add the new potatoes and leave to boil for 10 minutes, until soft.
  2. Chop off the woody ends of the asparagus, about a thumbs length but this will vary depending on what kind you buy. Scoop the potatoes out of the water and then replace them with the asparagus, leaving them to boil for 5-8 minutes, until tender. Add the broad beans a few minutes before they asparagus is cooked to allow through to cook through.
  3. In another pan pop the oil and put over a medium heat. Slice the halloumi into pieces the thickness of a £1 coin. Then fry the halloumi for 2-3 minutes on each side so it goes golden brown.
  4. When ready start plating the salad. Scatter some of the salad leaves over the plate. Then cut the potatoes into wedges and scatter them around the plate. Then pop on the halloumi, asparagus and scatter over the broad beans. Finish with twirls of the Serrano ham, a drizzle of olive oil and a sprinkle of black pepper!

Thanks for reading!

Emma x

Mirror Glaze Chocolate Gateau  

Mirror Glaze Chocolate Gateau  

I’m back to what I really love making – complex patisserie! Being the massive baking nerd that I am I love making things like this that take ages but look really cool once finished. This gateau is mirror glazed, which is a kind of icing that has a gorgeous reflective finish. I always find something really elegant about mirror glazed things and when done right they can look really professional. They also have this deceptive, exterior simplicity to them which is broken when they’re cut into and all the layers, colour and textures pour out, like the doors being opened to a vibrant party.

The trick when making something like this is just to take your time and to not rush any of the steps. I actually made this one over three days, partly because I was a bit busy and so I was making elements whenever I had some free time. This meant that I could leave each element to set completely which was really useful for when it came to assembling, although it would also be possible to make this in a single day if you wanted to.

Recipe

Serves 10

Time: 3 1/2 hours plus lots of chilling

Ingredients

For the Brownie

  • 55g Butter
  • 70g Dark chocolate
  • 1 Medium egg
  • 70g Caster sugar
  • 15g Plain flour

For the Jelly

  • 200g Frozen Strawberries
  • 1 tbsp Lemon Juice
  • 50g Caster sugar
  • 2 1/2 Leaves of Gelatine

For the Crispy layer

  • 100g Cornflakes
  • 50g Milk chocolate

For the Mousse

  • 3 1/2 Leaves of Gelatine
  • 175g Milk chocolate
  • 175g Dark chocolate
  • 220ml Milk
  • 350ml Double cream

For the Glaze

  • 150ml Double cream
  • 135g Caster sugar
  • 60g Cocoa powder
  • 3 Leaves of Gelatine

To Decorate

  • 2 Fresh strawberries

Method

  1. Begin by making the brownie. Pre-heat the oven to 180˚C. Grease and line a 12.5 cm round tin with butter and baking paper.
  2. Put the butter and chocolate into a glass bowl over a pan of gently simmering water and leave to melt.
  3. In another bowl whisk the eggs and sugar together until pale and fluffy. Pour in the chocolate mixture and stir together until smooth. Add the flour and mix it in until everything is combined.
  4. Pour the brownie mixture into the lined tin and bake in the oven for 10-15 minutes until a crispy top has formed and the cake is still a little gooey. Take the cake out of the tin and then leave it to cool until needed.
  5. To make the jelly put the strawberries, lemon juice and sugar into a pan and bring to the boil. Then leave to simmer until the sugar has dissolved and the strawberries have become a mush (about 15 minutes).
  6. In another bowl leave the gelatine to soak in some cold water for 5 minutes, until it’s soft and flexible.
  7. Blend the strawberry mix into a puree with a hand blender and then add the gelatine to the warm mixture. Stir until the gelatine is completely dissolved and then leave to cool.
  8. Line a 12.5 cm round tin with cling film and then pour the cooled jelly mix into the tin. Leave to set in the fridge for at least 3 hours or until needed.
  9. Next make the crispy layer. Melt the chocolate in a heatproof bowl over a pan of simmering water.
  10. Pour the melted chocolate into a bowl with the cornflakes and mix everything together until the flakes are completely coated in the chocolate.
  11. Line a 12.5 cm round tin with clingfilm again like you did with the jelly, and then tip the cornflake mixture into the tin. Even the layer out with a spoon so that it’s relatively flat. Then leave to cool/set and leave to one side until needed.
  12. When everything’s ready (the brownie, jelly and crispy layer) you’re ready to make the mousse. Put the gelatine into a bowl with some cold water and leave to soak.
  13. Finely chop the chocolate until it’s the texture of a broken up ice cream flake. Then transfer the chocolate to a bowl.
  14. Heat the milk in a pan until it reaches a boil. Take the pan off the heat, squeeze the gelatine to remove excess water and then stir it into the milk until dissolved. Then pour the warm milk over the chocolate to melt it and stir to make sure it’s smooth. Set aside to cool.
  15. Pour the cream into a bowl and whisk until soft peaks form. When the chocolate mix is completely cool, fold the whipped cream into the mixture until the colour is even and the mixture is smooth.
  16. Line a 17.5 cm tin with clingfilm. Pour a little of the mousse mixture into the lined tin so that it just covers the base. Leave the tin in the fridge for 30 minutes to set this layer.
  17. Once set, carefully place the jelly layer in the centre of the entremet. Then top the jelly layer with the brownie and then the crispy layer. Pour the rest of the mousse over the layers so that they’re completely covered. Then leave everything in the fridge to set for at least 4 hours, or better overnight.
  18. When ready make the glaze. Put the cream, sugar, cocoa and 150ml water into a pan and heat gently until the sugar dissolves. Bring the mixture to the boil and then leave for 2 minutes. Remove the pan from the heat and leave to cool slightly.
  19. Soak the gelatine in a bowl of cold water for about 5 minutes, until flexible. Squeeze out the excess water and then add the gelatine to the glaze and stir to dissolve.
  20. Cool the glaze down to 38˚C and then it’s ready to use. This can take a while so I’ve found that transferring it into another bowl and whisking it every so often will help! Sieve the glaze to make it super smooth.
  21. Unmould your gateau and place it on a wire rack with a large roasting tin underneath to catch the excess glaze that will drip off. Then pour the glaze over the cake so it evenly covers the gateau. Leave the gateau for 30 minutes to allow the glaze to set slightly.
  22. Quarter your strawberries and then place them around the top of the gateau. Serve!

Thanks for reading!

Emma x

Mint Choc Chip Ice Cream

Mint Choc Chip Ice Cream

If you’re in the UK right now you’ll be aware that it’s really hot, and it doesn’t look like it’s going to change anytime soon! Whilst I’m all for a sunny day or two, I’m actually one of those weirdos who love storms and the rain, so I can’t wait for this heat wave to move on and for a good storm to come rolling in. In the meantime though it’s ice cream and shorts all the way! My favourite ice cream has to be a good mint choc chip. The kind that’s refreshing, tickles the tongue and has big, bittersweet nuggets of chocolate floating through it. Unfortunately where I live they don’t sell mint choc chip (shock horror!) The only place that I found something resembling mint ice cream was in the Aldi near where I work, and whilst I’m a normally big Aldi fan, their mint choc chip ice cream could do with some serious tlc. So, desperate times call for desperate measures, time to make my own!

Loads of people say they hate mint choc chip as a flavour because it reminds them of toothpaste, but to me that’s really glass-half-empty kind of thinking. To me toothpaste tastes of mint ice cream! A bit weird, I know, but it makes some sense. By using fresh mint in this ice cream the whole thing tastes a lot more deep and rounded than the shop bought stuff. You get a really strong, authentic mint flavour and none of the synthetic, weak mint you come across in cheap ice cream. If you’re one of the above people who hates mint ice cream you can easily make this vanilla or plain choc chip by just not infusing the milk with the mint. You can also vary how much chocolate goes in depending on your preference. Personally I like a mixture of flakes and hearty chunks, but you can chop the chocolate however you want to suit your style.

Recipe

Makes 1 tub

Time: 30 minutes, plus chilling time

Ingredients

  • 215g Dark chocolate
  • 450ml Whole milk
  • 250ml Double cream
  • 1 tbsp Vanilla bean paste
  • 30g Fresh mint
  • 4 Large egg yolks
  • 140g Caster sugar
  • Ice cream cones to serve (optional)
  • Flakes and sprinkle to decorate (optional)

Method

  1. Chop the chocolate into small chunks. Then put them into a container and leave in the freezer until needed.
  2. Pop the milk, cream, vanilla and mint into a pan and bring to the boil.
  3. Reduce the heat to the lowest temperature and leave to simmer/infuse for 20 minutes.
  4. Meanwhile put the egg yolks and sugar into a bowl and whisk together until pale and smooth.
  5. Strain the milk mixture through a sieve to remove the mint, then pour the warm milk over the egg mixture, whisking constantly to combine.
  6. Then pour this mixture back into the pan and place over a medium heat, whisking constantly until the mixture thickens.
  7. When the mixture thickens, remove it from the heat and leave to cool completely.
  8. Once the mixture is at room temperature pour the mixture into an ice cream maker, working to the device’s instructions. If you don’t have an ice cream maker see note below.
  9. When the ice cream is ready, add the chocolate chunks to the ice cream and mix them through. Then pour the ice cream into a freezer-proof tub, smooth over and leave in the freezer to freeze completely.
  10. Once frozen serve with sprinkles and flakes in cones or in bowls!


Note: If you don’t have an ice cream maker, add the chocolate chunks to the ice cream mix and stir them in. Then pour the mixture into a freezer-proof tub with a lid and leave in the freezer for 2 hours. Every 10-15 minutes take the ice cream out and give it a stir. This will help with the crystal formation and will make the ice cream smooth as it sets. After the two hours leave the ice cream to set completely in the freezer.

Thanks for reading!

Emma x