Tag: Snack

Homemade Hummus

Homemade Hummus

I’ll admit to you now that I am one of those hummus freaks who gets inexplicably excited when hummus is out at a party. Until a few weeks ago I didn’t touch the stuff for reasons I’m not quite sure why, but when it came to this idea of doing a Greek meze thing it had to go on the menu, and now I can’t get enough of it! Hummus is also insanely easy to make as you just whop everything into a food processor and blend until smooth, and whilst it may seem easier to buy a tub from a shop, the best thing with making your own is that you can alter the amounts of stuff you put in for your own personal preference. If you prefer your hummus more sharp, add more lemon, more spicy, and more paprika, more salty, well…you get the gist.

Recipe

Makes 1 meze dish

Time: 10 minutes

Ingredients

  • 200g Canned chickpeas
  • 2 tbsp Lemon juice
  • 2 Garlic cloves, skinned and crushed
  • 1 tbsp Tahini
  • 4 tbsp Water
  • 1/2 tsp Paprika, plus extra to dust
  • Salt and Pepper to season
  • 2 tbsp Olive oil
  • A few Pomegranate seeds
  • A few coriander leaves

Method

  1. Drain the chickpeas into a sieve and then rinse them under cold water.
  2. Put the chickpeas, lemon juice, garlic, cumin, salt, tahini, water, and paprika into a food processor and blend to a smooth paste.
  3. Taste the mixture and then season to taste with the salt, pepper, lemon juice and cumin. Spoon the mix into a bowl and then garnish with olive oil, pomegranate seeds and coriander. Finish with  a sprinkle of paprika and serve with lots of pita bread!

Thanks for reading!

Emma x

Falafels

Falafels

It’s time for these lil’ chickpea balls of happiness to enter the meze-sphere. These are made with chickpeas, cumin and lots of other lovely stuff, which all come together to make some very tasty kinda non-meat meatballs. These can be a little dry on their own, so they’re best served with something juicy like the roasted aubergine dish I posted yesterday, or some delicious homemade hummus!

Recipe

Makes 8

Time: 10 minutes

Ingredients

  • 1 tbsp Vegetable oil
  • 1 Shallot
  • 1 Garlic clove
  • 250g Chickpeas
  • ½ tsp Ground cumin
  • 1 tsp Mixed herbs
  • Zest of 1 Lemon
  • 1 Small chilli
  • Salt and Pepper to season
  • 1 Medium egg
  • 1 tbsp Olive oil

Method

  1. Pre-heat the oven to 200˚C.
  2. Put the vegetable oil into a small pan and put over a medium heat. Finely chop the shallot and then add this to the pan and fry for 2-3 minutes until starting to caramelise. Add the garlic and fry for another couple of minutes before taking off the heat.
  3. Drain the chickpeas into a sieve and then rinse and dry them. Tip the chickpeas into a bowl and add the onion and garlic. Mash the mixture so the chickpeas are all broken down and then add the cumin, herbs, lemon zest, and chilli. Mix together and then season with salt and pepper.
  4. Add the egg to the mix and then stir to make a sort of dough. Divide the mixture into 10 small balls. Place these onto a lined baking tray and then leave in the fridge to chill for half an hour.
  5. When ready take the falafels out of the fridge, drizzle with the olive oil and then put into the oven to bake for 20 minutes, until golden brown and crisp.
  6. Transfer to a serving dish and serve warm with lots of hummus and salad!

Thanks for reading!

Emma x

Mint Choc Chip Ice Cream

Mint Choc Chip Ice Cream

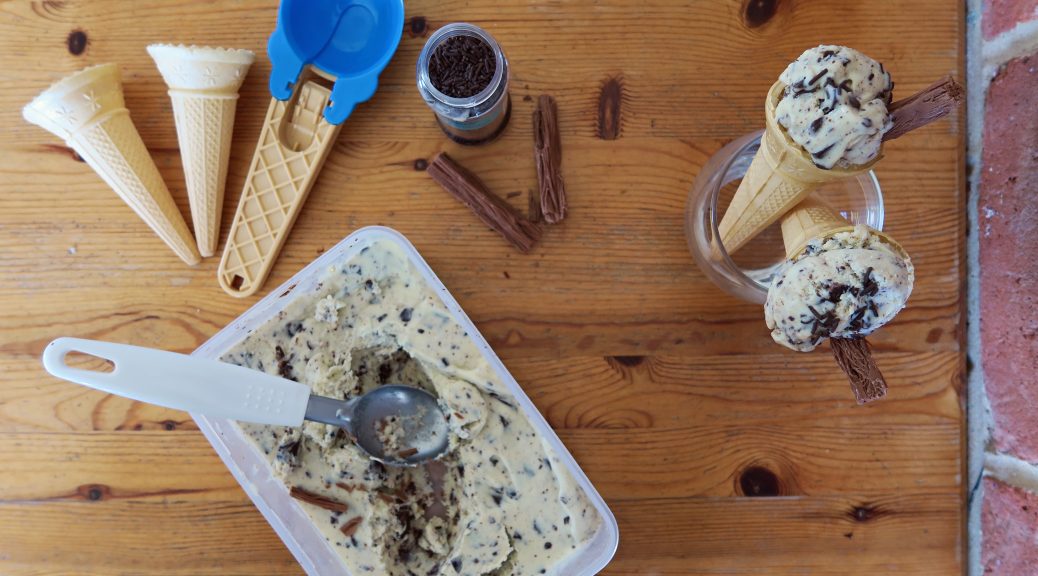
If you’re in the UK right now you’ll be aware that it’s really hot, and it doesn’t look like it’s going to change anytime soon! Whilst I’m all for a sunny day or two, I’m actually one of those weirdos who love storms and the rain, so I can’t wait for this heat wave to move on and for a good storm to come rolling in. In the meantime though it’s ice cream and shorts all the way! My favourite ice cream has to be a good mint choc chip. The kind that’s refreshing, tickles the tongue and has big, bittersweet nuggets of chocolate floating through it. Unfortunately where I live they don’t sell mint choc chip (shock horror!) The only place that I found something resembling mint ice cream was in the Aldi near where I work, and whilst I’m a normally big Aldi fan, their mint choc chip ice cream could do with some serious tlc. So, desperate times call for desperate measures, time to make my own!

Loads of people say they hate mint choc chip as a flavour because it reminds them of toothpaste, but to me that’s really glass-half-empty kind of thinking. To me toothpaste tastes of mint ice cream! A bit weird, I know, but it makes some sense. By using fresh mint in this ice cream the whole thing tastes a lot more deep and rounded than the shop bought stuff. You get a really strong, authentic mint flavour and none of the synthetic, weak mint you come across in cheap ice cream. If you’re one of the above people who hates mint ice cream you can easily make this vanilla or plain choc chip by just not infusing the milk with the mint. You can also vary how much chocolate goes in depending on your preference. Personally I like a mixture of flakes and hearty chunks, but you can chop the chocolate however you want to suit your style.

Recipe

Makes 1 tub

Time: 30 minutes, plus chilling time

Ingredients

  • 215g Dark chocolate
  • 450ml Whole milk
  • 250ml Double cream
  • 1 tbsp Vanilla bean paste
  • 30g Fresh mint
  • 4 Large egg yolks
  • 140g Caster sugar
  • Ice cream cones to serve (optional)
  • Flakes and sprinkle to decorate (optional)

Method

  1. Chop the chocolate into small chunks. Then put them into a container and leave in the freezer until needed.
  2. Pop the milk, cream, vanilla and mint into a pan and bring to the boil.
  3. Reduce the heat to the lowest temperature and leave to simmer/infuse for 20 minutes.
  4. Meanwhile put the egg yolks and sugar into a bowl and whisk together until pale and smooth.
  5. Strain the milk mixture through a sieve to remove the mint, then pour the warm milk over the egg mixture, whisking constantly to combine.
  6. Then pour this mixture back into the pan and place over a medium heat, whisking constantly until the mixture thickens.
  7. When the mixture thickens, remove it from the heat and leave to cool completely.
  8. Once the mixture is at room temperature pour the mixture into an ice cream maker, working to the device’s instructions. If you don’t have an ice cream maker see note below.
  9. When the ice cream is ready, add the chocolate chunks to the ice cream and mix them through. Then pour the ice cream into a freezer-proof tub, smooth over and leave in the freezer to freeze completely.
  10. Once frozen serve with sprinkles and flakes in cones or in bowls!


Note: If you don’t have an ice cream maker, add the chocolate chunks to the ice cream mix and stir them in. Then pour the mixture into a freezer-proof tub with a lid and leave in the freezer for 2 hours. Every 10-15 minutes take the ice cream out and give it a stir. This will help with the crystal formation and will make the ice cream smooth as it sets. After the two hours leave the ice cream to set completely in the freezer.

Thanks for reading!

Emma x

Smoothies

Smoothies

Oki so, it’s officially summer which means that it’s definitely peak smoothie time. I’ve just started a new job so I’m a bit short on time at the moment, so refreshing, quick treats like these are perfect for now. Unlike a lot of shop-bought smoothies these ones are free of added sugars and colourings, and what goes in them can be totally controlled. The thing I really love about smoothies is how easy it is to mix and match in them. Dietary requirements? No problem, just use soya milk or fruit juice instead of milk. Wanna to boost your iron intake? Just add a handful of spinach. Have some fruit you need to use up? Just chuck it in!

I’ve got three combos here that I like, but you can of course substitute and experiement to your hearts content, so these can be seen as more guidelines! They’re all super quick and easy to make, if you have a bit more time you can try sieving the finished smoothie to get a really smooth result.

Berry Bonanza

 Recipe

Makes 1 Large glass

Time: 5 minutes

Ingredients

  • 1 Medium banana
  • A handful of strawberries
  • 200ml Milk
  • A handful of blueberries, plus extra to garnish

Method

  1. Peel and roughly slice the banana, and then hull and halve the strawberries.
  2. Pop all the ingredients into a blender and whiz it all together until the mixture is smooth.
  3. Pour the smoothie into a glass. Garnish with the left over blueberries.


Pretty-in-pink smoothie

Recipe

Makes 1 Large glass

Time: 5 minutes

Ingredients

  • 2 Large peaches
  • A handful of strawberries
  • 200ml Grapefruit juice
  • Mint to garnish

Method

  1. De-stone and roughly chop the peaches and then hull and halve the strawberries.
  2. Pop everything but the mint in to a blender and whizz up until smooth.
  3. Pour the smoothie into a glass and garnish with the mint.

Sunset smoothie

Recipes

Makes 1 Large glass

Time: 5 minutes

Ingredients

  • 1 Banana
  • ½ Mango
  • 1 Peach
  • 200ml Apple juice

Method

  1. Peel and roughly slice the banana and mango. Then de-stone and roughly chop the peach.
  2. Put everything into a blender and whiz together until smooth.
  3. Pour the smoothie into a glass and serve!

Thanks for reading!

Emma x

Chocolate Malteaser Fridge-Cake

Chocolate Malteaser Fridge-Cake

I’ve got to the point now where I’m cooking more than twice a week, so I have a fast growing store of recipes I’m waiting to post. This one, for example, I made way back at the start of March when I was craving a slice of this Malteaser fridge-cake bliss. It won’t do much for anyone on the nutritional front, but it’s a definite mood-booster. I feel everyone has that one thing that they make which is a hit from the first time they make it. For me this is one of those – it’s impossible to get wrong, tastes incredible, and is perfect for sharing, what’s not to like?

As it takes barely any time to make, and doesn’t need to be cooked, I often whip this up late at night when I’ve realised I’m meant to be taking some food to something the next day. I can whop everything together, bung it in the fridge and then it’s ready to be cut it into slices in the morning!

Recipe

Makes 12 squares

Time: 15 minutes, plus chilling

Ingredients

  • 150g Butter, plus extra for greasing
  • 300g Milk chocolate
  • 80g Golden syrup
  • 330g Digestive biscuits
  • 350g Malteasers

Method

  1. Put the butter, chocolate and syrup into a heatproof bowl over a pan of gently simmering water. Leave to melt, stirring occasionally to combine.
  2. Whilst waiting for the mixture to melt put the biscuits into a bowl and crush with the back of a rolling pin. You want it to be mostly crushed but if there’s a few lumps here and there that’s fine.
  3. Put the malteasers onto a chopping board and chop them roughly. Add them to the digestives.
  4. Pour the melted chocolate onto the biscuits and malteasers and mix until all combined.
  5. Line a small square tin with butter and cling film. Then pour the mixture into the tin and level out with the back of a spoon.
  6. Put the mix into the fridge to set for at least an hour, or better overnight.
  7. Once set chop the malteaser fridge cake into squares and then serve!

Thanks for reading!

Emma x