Blackforest Daquoise Gateau
One of the most stunning retro desserts out there is the black forest gateau – and it has three of my favourite things: chocolate, cherries and a woodland association. Over the years I’ve become a bit addicted to taking these delicious flavours and have put them into almost anything and everything – but nothing beats a classic cake based gateau.

 That said I have adapted this slightly by adding a daquoise, aka a nutty meringue, which adds a bit of texture and brings some sweetness to contrast the rich chocolate cake and creamy filling. Whilst I think this is as good as it gets, if you’re short on time or want to go for a more traditional gateau you could leave out the meringue layers and you’d still end up with something delicious. On the other hand, you could leave out the cake and then you’d end up with a derlish layered, hazelnut and cherry pavalova!


(Note: before starting make sure you have 2 cakes tins 21cm in diameter, and an electric or stand-free mixer!)
Recipe
Serves 12
Time: 2 1/2 hours
Ingredients
For the Daquoise
- 170g Chopped hazelnuts
- 200g Caster sugar
- 18g Cornflour
- 4 Large egg whites
- Pinch salt
For the Chocolate cake
- Butter for greasing
- 200g Golden caster sugar
- 7 Large eggs, separated
- 3tbsp Cocoa powder
- 2 tbsp Morello cherries (with juice)
- 200g Dark chocolate
For the Filling
- 600ml Double cream
- 1 tbsp Vanilla bean paste
- 4 tbsp Kirsch
- 200g Morello cherries
To Decorate
- 200g Dark chocolate
- 2 tsp Dried raspberries
- A handful of fresh Cherries
Method
- Pre-heat the oven to 180˚C.
- Begin by making the daquoise. Put the hazelnuts into a small roasting tin and roast in the oven for 5-10 minutes, until just starting to colour. (This is an important step as it’ll massively increase the flavour of the nuts).
- Leave to cool and then mix with 75g of the sugar and the cornflour. Set to one side for later.
- Lower the oven temperature to 150˚C for the meringues. Line 2 baking trays with baking paper. Take a 21cm diameter tin and draw round it onto the sheets of baking paper to act as a guide for pipping later. Turn these sheets over so that the pencil line is on the other side of the paper to that which you’ll pipe on.
- Take a super clean metal or glass bowl and put the egg whites into it.
- Add the salt and then whisk with an electric hand whisk (or a stand-free mixer) until it forms soft peaks (can just hold it’s shape).
- Continue whisking and add the other 125g caster sugar, one 1 tbsp at a time until it’s all incorporated.
- Keep whisking until the mixture becomes glossy and forms a stiff peak.
- Then take a large, stiff spatula and gently fold the hazelnuts into the meringue. From here you’ll need to work quickly as the oils in the nuts will start to deflate the meringue.
- Take a pipping bag with a round nozzle and fill it with the meringue. Then pipe onto the lined baking trays in a spiral, starting from the edge of the circles you drew to the centre.
- Bake in the oven for about 40 minutes, until crisp to the touch. Then turn the oven off and leave the meringues to cool in the ovens.
- When completely cool take out of the oven and set to one side for later.
- Now move onto the chocolate sponge. Increase the oven temperature to 180˚C. Line two cake tins, the same ones you used to draw round rings for meringue, with butter and baking paper.
- Put the sugar and egg yolks into a bowl and whisk until pale, fluffy and thick. You can test if it’s ready by taking the whisk out of the mixture, and if the trail it leaves is visible for 3 seconds or more it’s thick enough. Add the cocoa powder and cherries and then whisk to combine.
- Put the chocolate into a heatproof bowl over a pan of simmering water. Leave to melt and then fold into the sugar mixture.
- In metal or glass bowl whisk the egg whites to soft peaks.
- Add 1/3 of the egg whites to the chocolate mixture and mix in. Then fold in the rest of the egg whites with a large spatual until the batter is uniform in colour, with no flecks.
- Pour the batter into the two tins, making sure each has the same amount of mix. Spread the mixture around the tins so it’s an even thickness and then bake for 12-14 minutes, until risen, and just firm to the touch.
- Take out of the tins and leave on wire racks to cool completely.
- Whilst waiting for the cakes to cool move onto the fillings and decorations. Pour the cream into a bowl and add the vanilla. Then whisk it up until soft peaks start to form – be careful not to over whisk or it won’t pipe smoothly. Transfer this cream to a piping bag with a round nozzle and leave in the fridge until needed.
- Then take the chocolate and melt it in a heatproof bowl over a pan of simmering water. Take a piping bag with a small round nozzle and pour the melted chocolate into it.
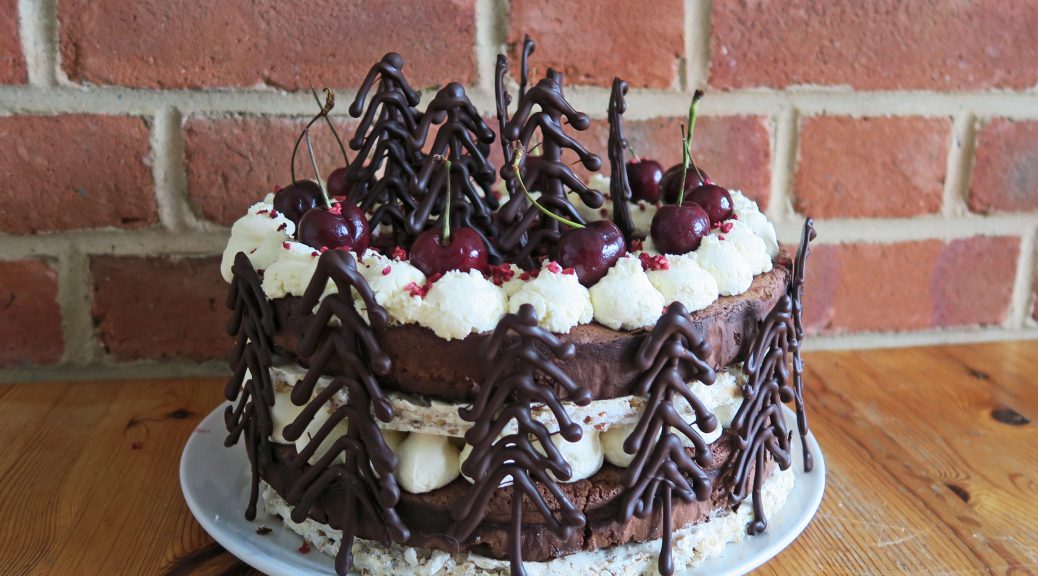
- Line a baking tray with greaseproof paper. Take a pencil and draw some trees about 10cm maximum in height. Turn the paper over and then pipe over your designs with the chocolate. It’s worth piping more than you think you’ll need in case some break. Leave these to set at room temperature. When completely set, transfer them to the freezer to make them easier to work with when it comes to decorating the gateau.
- When all the elements are ready you can start assembling the gateau. Put one of the meringue layers on the plate or board you want to display it on. Top with one of the chocolate sponges, and brush the sponge with ½ of the kirsch. Scatter the cherries over the sponge and then pipe blobs of the cream over the cherries. Then put the second meringue layer onto the cream and repeat the layering of the cake, cherries and cream, although this time only pipe two rings of cream on the top of the cake.
- Take a sharp knife and make small incisions in the top of the gateau where you want to position your chocolate trees. Gently peel the trees off the baking paper (a palette knife is useful for this) and stick them into the top of the gateau in the gaps you just made. Decorate with the fresh cherries and freeze-dried raspberries, and then finish with a dusting of cocoa powder!

Thanks for reading! Any comments, requests or queries don’t hesitate to ask…
Emma x