Tag: Comfort

Peanut Butter Blondies

Peanut Butter Blondies

Blooondieeeeeees! Here comes the insanely underrated cousin of the brownie. These have the crisp top and chewy texture of the best brownie imaginable, but instead are flavoured with peanuts and little chunks of sweet white chocolate. I made these a while ago, and then realised I forgot to write down the recipe. So when it came round to doing a blog post on them I was like ‘ah man, how the hell did I make these before??’ Luckily though I think I’ve worked out what I did to get this amazing texture, and they’re now better than ever – but I guess the only way to know for yourself is to make a batch!

Recipe

Makes 16 squares

Time: 45 minutes

Ingredients

  • 50g Butter, plus extra for greasing
  • 175g Peanut Butter
  • 200g White chocolate, chopped roughly
  • 190g Plain flour
  • ½ tsp Baking powder
  • A pinch of Salt
  • 200g Light brown sugar
  • 100g Golden caster sugar
  • 3 Large eggs
  • 1 tbsp Vanilla bean paste

Method

  1. Preheat the oven to 180˚C.
  2. Take a 21 x 21cm tin and line with butter and baking paper.
  3. Put the butter, peanut butter and ½ the white chocolate into a heatproof bowl over a pan of simmering water and leave to melt. Take off the heat and leave to cool until needed.
  4. Then put the flour, baking powder and a pinch of salt into a bowl and stir to combine.
  5. Take another bowl and put in the sugars and the eggs. Whisk with an electric hand whisk until the mixture is thick and pale, about 2-3 minutes.
  6. Pour the chocolate mixture and vanilla into the egg mix and fold together. Sieve in the flour and then add the chunks of white chocolate. Fold everything together again until fully combined.
  7. Pour the mixture into your lined tin and smooth it over with a spatula so it’s an even thickness.
  8. Bake in the oven for 30-35 minutes until a skewer inserted into the centre of the blondies comes out clean.
  9. Leave to cool in the tin and then cut into 16 squares. Enjoy!

Thanks for reading!

Emma x

Chocolate Malteaser Fridge-Cake

Chocolate Malteaser Fridge-Cake

I’ve got to the point now where I’m cooking more than twice a week, so I have a fast growing store of recipes I’m waiting to post. This one, for example, I made way back at the start of March when I was craving a slice of this Malteaser fridge-cake bliss. It won’t do much for anyone on the nutritional front, but it’s a definite mood-booster. I feel everyone has that one thing that they make which is a hit from the first time they make it. For me this is one of those – it’s impossible to get wrong, tastes incredible, and is perfect for sharing, what’s not to like?

As it takes barely any time to make, and doesn’t need to be cooked, I often whip this up late at night when I’ve realised I’m meant to be taking some food to something the next day. I can whop everything together, bung it in the fridge and then it’s ready to be cut it into slices in the morning!

Recipe

Makes 12 squares

Time: 15 minutes, plus chilling

Ingredients

  • 150g Butter, plus extra for greasing
  • 300g Milk chocolate
  • 80g Golden syrup
  • 330g Digestive biscuits
  • 350g Malteasers

Method

  1. Put the butter, chocolate and syrup into a heatproof bowl over a pan of gently simmering water. Leave to melt, stirring occasionally to combine.
  2. Whilst waiting for the mixture to melt put the biscuits into a bowl and crush with the back of a rolling pin. You want it to be mostly crushed but if there’s a few lumps here and there that’s fine.
  3. Put the malteasers onto a chopping board and chop them roughly. Add them to the digestives.
  4. Pour the melted chocolate onto the biscuits and malteasers and mix until all combined.
  5. Line a small square tin with butter and cling film. Then pour the mixture into the tin and level out with the back of a spoon.
  6. Put the mix into the fridge to set for at least an hour, or better overnight.
  7. Once set chop the malteaser fridge cake into squares and then serve!

Thanks for reading!

Emma x

Stuffed Roast Loin of Pork with Apple Sauce, Roast Potatoes, Savoy Cabbage and Honey Glazed Carrots

Stuffed Roast Loin of Pork with Apple Sauce, Roast Potatoes, Savoy Cabbage and Honey Glazed Carrots

For several years now I’ve catered for dinner parties and yesterday I did another, this time for a close family friend’s 18th birthday. The menu consisted of:

Starter – Mixed Tomato and Puy Lentil Salad with Mozerella and Basil

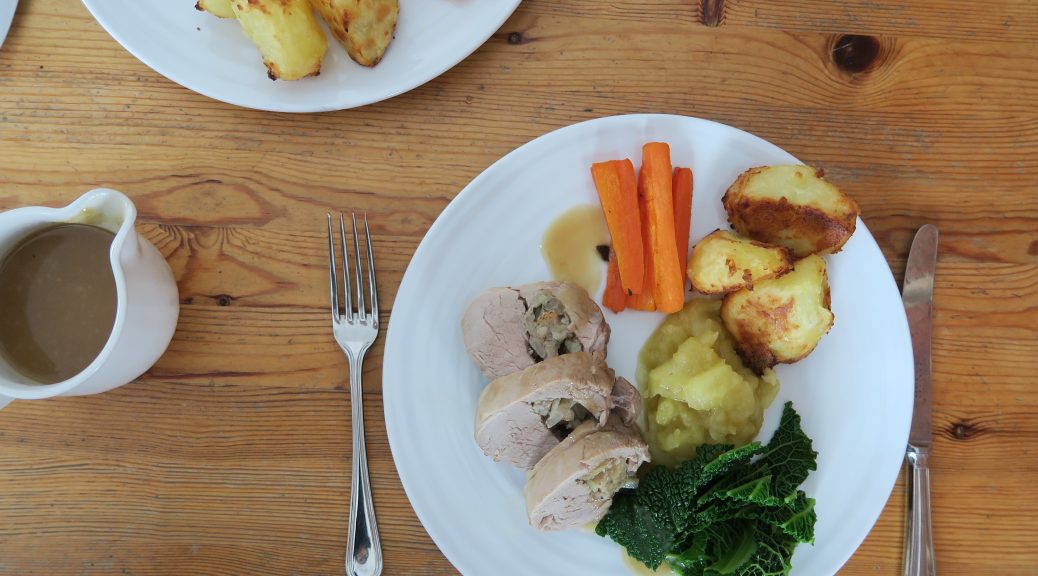
Main course – Stuffed Roasted Pork with Apple Sauce, Roast Potatoes, Savoy Cabbage, and Honey Glazed Carrots

Dessert – Chocolate Fondants with Vanilla Ice Cream and Fresh Berries

I’ve already done a post on the fondants back in September (which you can find in the recipe index), and the next post is going to be on the tomato and puy lentil salad so keep an eye out for that! But yeah, this was the main course, and if I say so myself, it’s a darn good one. All the classical elements of a good roast pork dinner are there with a few fancy touches added in to make it super special and tasty. This one’s great all year round, for special occasions, large gatherings or cosy Sunday lunches.

Recipe

Serves 4

Time: 2 hours

Ingredients

For the Pork

  • 1 tbsp Vegetable oil
  • 1 White onion, finely chopped
  • 3 Sage leaves, finely chopped
  • 25g Fresh breadcrumbs
  • 4 Thick herb pork sausages
  • 2 Pork loins (about 0.5kg each)

For the Roast potatoes

  • 3 Large Baking potatoes
  • 2 tbsp Vegetable oil

For the Cabbage

  • 1 Savoy cabbage
  • 25g Butter

For the Carrots

  • 4 Large Carrots, cut into batons
  • 25g Butter
  • 1 tbsp Honey
  • 2 Thyme sprigs

For the Apple sauce

  • 3 Large Bramley apples
  • 45g Brown sugar
  • 30g Butter

For the Gravy

  • 2 tbsp Plain flour
  • 400ml Beef stock
  • 100ml Cider

Method

  1. Heat the oil in a saucepan and add the onions. Fry whilst stirring occasionally until the onions begin to caramelise. Transfer to a bowl to cool.
  2. Mix the onions with the sage, breadcrumbs, sausage and seasoning to make the stuffing.
  3. Put the pork onto a chopping board and cut it in half lengthways, making sure not to cut all the way through the meat.
  4. Using a spoon or your hands stuff the stuffing into the tenderloin. Close the loin back up to make it into it’s original shape. Tie the pork up with string in four places along the loin to keep it in place. Then put the pork onto some clingfilm and wrap it tightly. Leave to chill in the fridge for at least an hour before using.
  5. Now prep the roast potatoes. Pre-heat the oven to 200˚C. Bring a large pan of water to the boil. Peel the potatoes and chop them into halves or quarters depending on the size of the potatoes. Tip the potatoes into the water and leave to boil until they start to flake.
  6. Drain the potatoes and then put them back into the pan, add the oil and season with salt and pepper. Cover with a lid and shake the pan to coat the potatoes in the oil and to bash them up a bit – these flakes on the surface of the potatoes will help the, to crisp up.
  7. Tip the potatoes into a roasting tin and roast in the oven for half an hour, flipping them over occasionally so they crisp up evenly. Leave them to keep cooking whilst you move back to the pork.
  8. Rub the meat with salt a pepper and then place in a roasting tin. Roast in the oven for about 40 minutes until cooked through, the juices should run clear.
  9. Whilst the pork is cooking prepare the cabbage. Put the water into a pan and bring to the boil. Peel the leaves off the cabbage and then bunch them together and chop finely to shred. Add these to the boiling water and then leave to boil for 5-10 minutes until tender.
  10. Sieve the cabbage to remove the water. Then in the same pan melt the butter and then toss the cabbage leaves in it. Cover with a lid to keep warm and set aside for later.
  11. Now glaze the carrots. Boil a pan of water and add the carrot batons. Boil them until they are tender and a knife goes into them easily. Put the butter, thyme and honey into a pan and add the carrots. Heat gently over a medium heat until the sauce bubbles and glazes the carrots. Tip the mixture into a roasting tin and leave in the oven for the last few minutes of roasting the potatoes and pork.
  12. Next make the apple sauce. Peel, core and roughly chop the apples. Then put these apple chunks, the butter and sugar into a pan and cook for about 15 minutes until the apples break down and it becomes a sauce. Keep warm until needed.
  13. Transfer the pork to a plate to rest and then make the gravy. Spoon the meat juices into a pan and then add the flour and cook until the flour has absorbed all the juice – I find using a whisk is a good way to remove the lumps.
  14. Slowly add the stock and the cider until you have a smooth sauce. Leave to boil for about 5 minutes, whisking occasionally, until the mixture starts to thicken. Strain the gravy into a jug and serve with the pork, apple sauce, potatoes, carrots and cabbage!

Thanks for reading, and if anyone needs a dinner party caterer just hmu!

Emma x

Irish Stew with Dumplings

Irish Stew with Dumplings

One day I’ll stop doing a themed dish for every post, but today’s not that day. Apparently it’s St Patrick’s day on Saturday so it’s time to start digging out the shamrocks and leprechauns to celebrate. Alongside that a good lamb and potato stew should definitely be on the menu. This one is full of nourishing veg and tender lamb shoulder, which goes really well with the light herby dumplings and warming broth to make a hearty meal all in one pot!

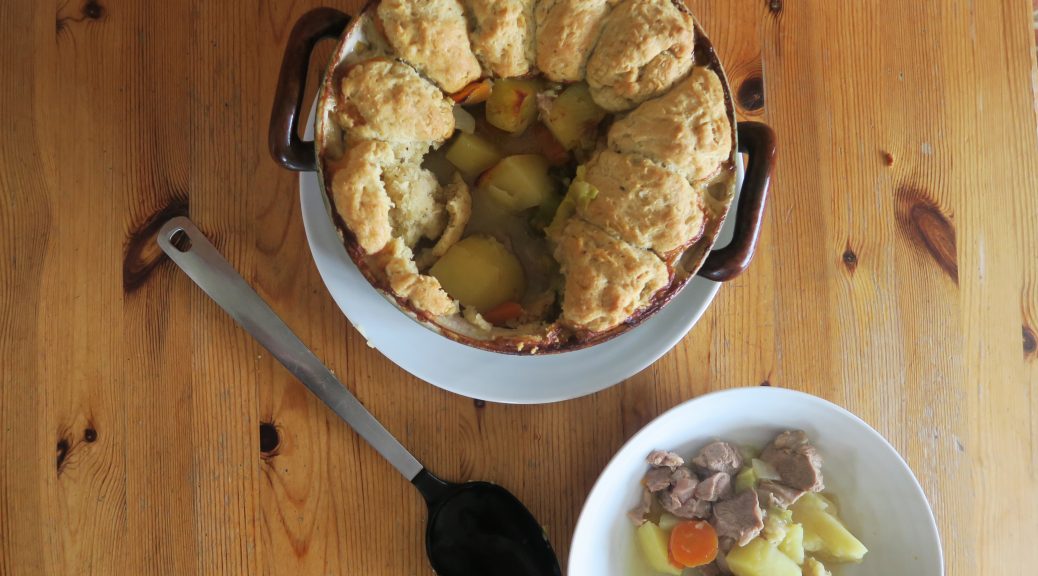
Stews also always taste better a few days after they’re made, so you can make this up to two days in advance without the dumplings, leave it in the fridge and then carry on the recipe from step 7 when you need it.

Recipe

Serves 6

Time: 30 minutes prep, 2 hours cooking

Ingredients

For the Stew

  • 2 tbsp Vegetable oil
  • 1 White onion, roughly chopped
  • 450g Lamb shoulder pieces
  • 2 Large baking potatoes, peeled and cut into quarters
  • 1 Leek, Finely sliced
  • 2 Large carrots, peeled an roughly chopped
  • 2 tbsp Plain flour
  • 750ml Beef stock
  • Salt and pepper to season

For the Dumplings

  • 150g Butter
  • 250g Self-raising flour
  • 2 tbsp Chopped mixed herbs

Method

  1. Pre-heat the oven to 180˚C.
  2. Put the oil into a large frying pan and put over a medium heat. Add the chopped onion and fry gently until it starts to caramelise. Tip this into an oven-proof casserole dish.
  3. Add the lamb pieces to the pan you cooked the onions in and fry until the pieces have browned all over. Season the meat and then add the lamb to the dish with the onions.
  4. Cover the lamb and onions with the chopped potatoes, leeks and carrots, and then mix it all together.
  5. Add the flour to the pan you cooked the lamb in and cook it on a gentle heat for about 3 minutes so it soaks up all the juices. Then slowly add the beef stock whilst stirring until you have a smooth, lump-free sauce.
  6. Pour this sauce over the meat and vegetables. Cover the casserole with a lid and then put it into the oven to cook for 90 minutes. Check on this several times to make sure the sauce hasn’t reduced too much, if the meat or vegetables are exposed cover with more water.
  7. Now make the dumplings. Put the butter and flour into a large bowl. Using a knife cut the butter into little pieces in the flour, and then go in with you fingers and rub the butter into the flours to make a mixture like breadcrumbs.
  8. Stir in the herbs, salt and pepper to season. Pour in 150ml water and stir with a round bladed knife to form a dough. Flour your hands and roll the dough into small balls.
  9. Put the dumplings around the edge of the stew and put back into the oven uncovered to bake for another 25-30 minutes.
  10. Serve!

Thanks for reading!

Emma x

Lemon Swiss Roll

Lemon Swiss Roll

So today’s Mother’s day and I don’t know about you but my Mum does so much for me she deserves a good treat on a day like today! Whilst cards and flowers are the more traditional prezzie I tend to give people bakes for special occasions – I actually first made this for my friend Lisa’s birthday back in October, but I’ve been saving it to post until now as I think it’s perfect for Mother’s day.

The cake is insanely light as it’s essentially a meringue with a bit of flour folded into it, which makes it really refreshing and delicate when eaten with the chantilly cream and lemon curd filling. It’s shape also makes it perfect for sharing, and as it’s easily transportable it’s the perfect Mother’s day bake/gift!

Recipe

Serves 8

Time: 1 hour

Ingredients

For the cake

  • 3 Large eggs
  • 115g Caster sugar, plus extra for dusting
  • Zest of 1 Lemon
  • 115g Plain flour

For the filling

  • 350ml Double cream
  • 1 tbsp Vanilla bean paste
  • 40g Icing sugar
  • 3 tbsp Lemon curd, plus extra to garnish
  • Icing sugar for dusting
  • Mint to garnish (optional)

Method

  1. Pre-heat the oven to 180˚C.
  2. Line a 30×25 cm Swiss roll tin with butter and baking paper.
  3. Put the eggs, sugar, and zest into a heatproof bowl over a pan of simmering water.
  4. Whisk the mixture with an electric whisk until the mixture is pale and thick enough to leave a trail when the prongs are lifted out of the mixture.
  5. Take the bowl off the heat and keep whisking for another 5 minutes until the mixture is really thick.
  6. Sift in the flour and fold it in with a large spatula or metal spoon until it’s fully combined.
  7. Pour the mixture into the lined tin and bake in the oven for about 12 minutes, until risen and springy.
  8. Put a sheet of baking paper onto the worktop and dust it with caster sugar.
  9. Tip the cake out of the tin and onto the paper. Take a knife and score a line about 1cm from the short edge. Roll the Swiss roll up, with the paper inside the roll, until it’s as tight as possible. Leave the cake to cool like this.
  10. Meanwhile prepare the filling. Put the cream, vanilla and icing sugar into a bowl and whisk it up to soft peaks – until it just holds its shape.
  11. Once the cake is completely cool unroll it and smooth it flat. Spread the lemon curd over the sponge and then spread the cream over the top in a smooth layer (make sure it reaches all corners of the sponge).
  12. Re-roll the sponge up, this time without the baking paper inside, to make a tight roll.
  13. To make it look neater you could slice the ends off either side of the roll before serving, or you could just leave it as it is. Put a little more curd into a piping bag and drizzle it over the cake. Then sprinkle with icing sugar and garnish with fresh mint!

Thanks for reading!

Emma x