Category: Pastry

Strawberry Croissants

Strawberry Croissants

With veganuary over now I’m in that weird period where I’m still adapting to the fact that I can eat pretty much anything I want! I’m also super looking forward to going back to unrestricted baking and being able to get experimental again. Even though I don’t have the equipment at Uni to be able to make everything I’d like to, or even the time for that matter, making super complex, tasty treats is so so satisfying and a great way to de-stress!

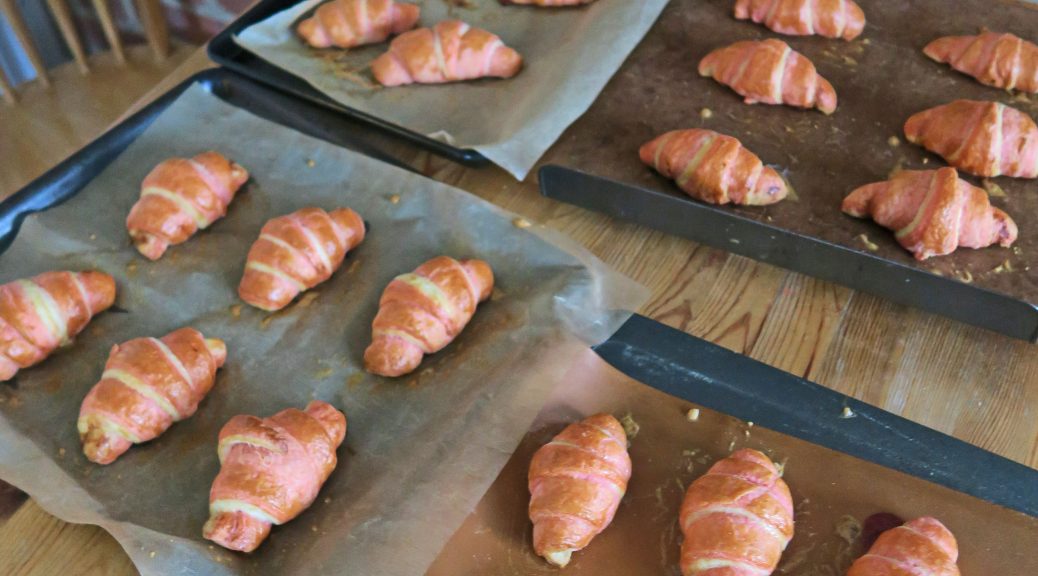
I made these over Christmas break when the only two things I was focusing on was cooking and catching up on my art course.  As holidays are the only time I have access to a sizeable kitchen I go a little crazy whenever I’m home and just cook non-stop, finally able to make all the things I’ve wanted to make over the past term! Recently in the food-sphere coloured croissants have started to become everyday (we even have pinstriped ones like these in college for breakfast now!) and as I’m a complete nut for food crazes I knew this was something I’d have to try myself. It does make the dough a little longer to put together as you have to work with two doughs instead of one, but as it’s a flipping long process anyway it’s worth it just to get the extra jazz hands moment when they’re made.

To get the pink colour in these I used some amazing gel food colourings that I got for Christmas. You can of course get normal ones from supermarkets, but I’d really recommend getting some of these if you want to get good results. They’re way more concentrated than the cheap stuff, meaning you can add less and still get a bright colour without affecting the consistency of your mixture! You can buy them in specialist food shops or on Amazon as I did, and you can get so many colours for a fairly low price (also as you’re only using a little bit at a time they’ll last you a long time!) You can even use the colours to paint on the outside of the dough once it’s rolled up so you could make rainbow croissants (I’m thinking Pride week) or paint them with specific colours (for a match or party etc)!

Recipe

Makes 25

Time: 3 hours plus chilling and baking time

Ingredients

For the white dough

  • 250g Strong white bread flour
  • 100g Plain flour
  • 30g Unsalted butter
  • 25g Caster sugar
  • 5g Salt
  • 8g Fast-action dried yeast
  • 1/2 Egg
  • 55ml Milk
  • 100ml Cold water
  • 200g Unsalted block butter

For the red/pink dough

  • 250g Strong white bread flour
  • 100g Plain flour
  • 30g Unsalted butter
  • 25g Caster sugar
  • 5g Salt
  • 8g Fast-action dried yeast
  • 1/2 Egg
  • 55ml Milk
  • 100ml Cold water
  • A few drops of red gel food colouring
  • 200g Unsalted block butter

To Decorate/Fill

  • 75g Strawberry jam
  • 1 Egg, beaten

Method

  1. Begin by making the white dough. Put the flours and butter into a large bowl. Rub the butter into the flours until crumbly.
  2. Mix in the sugar, salt and yeast and then add the egg, milk and water and stir together until a smooth dough forms.
  3. Turn the dough out onto a worktop and knead for about 10 minutes until smooth and stretchy.  Wrap the dough really loosely in cling film and then leave to rise in the fridge for 24 hours.
  4. Do the same for the red dough, this time adding the food colouring in at the end. Then rest it the same as the white dough.
  5. Now  you’re ready to laminate the dough. Take one of the blocks of butter out of the fridge and place it between two sheets of cling film. Bash it into a 12cm square and then place it back into the fridge to firm up. Do the same for the other block.
  6. Take one of the doughs out of the fridge. Roll it into a 25cm square that’s 1 cm thick. Place the butter in the middle so it’s corners hit the centre of the sides of the dough square (a diamond in a square).
  7. Fold the dough up around the butter like an envelope and then roll the dough out into a 22 x 40cm rectangle.
  8. Fold over one third of the dough, and then the top third down to cover it. Wrap the dough in cling film and then chill in the fridge for 30 minutes. Do the same with the butter and the folding for the other dough.
  9. Once the dough has chilled take it out of the fridge and roll it out again to make a rectangle again. Repeat the folding and chilling process and then repeat this twice more. Do the same for the other dough.
  10. Wrap the two doughs very loosely in clingfilm (so they have room to rise) and then leave in the fridge overnight.
  11. Now shape the dough. On a lightly floured surface roll one of the doughs out to a 31 x 41 cm rectangle. The dough will resist being shaped but just keep going and you’ll get there. Put the dough sheet to one side and then repeat with the other coloured dough.
  12. Place the red dough on a lightly floured work top and brush it lightly with some water. Then put the white dough on top and roll the sheet out into a rectangle 31 x 81 cm.  Trim the rectangle down to make a neat 30 x 80 cm rectangle.
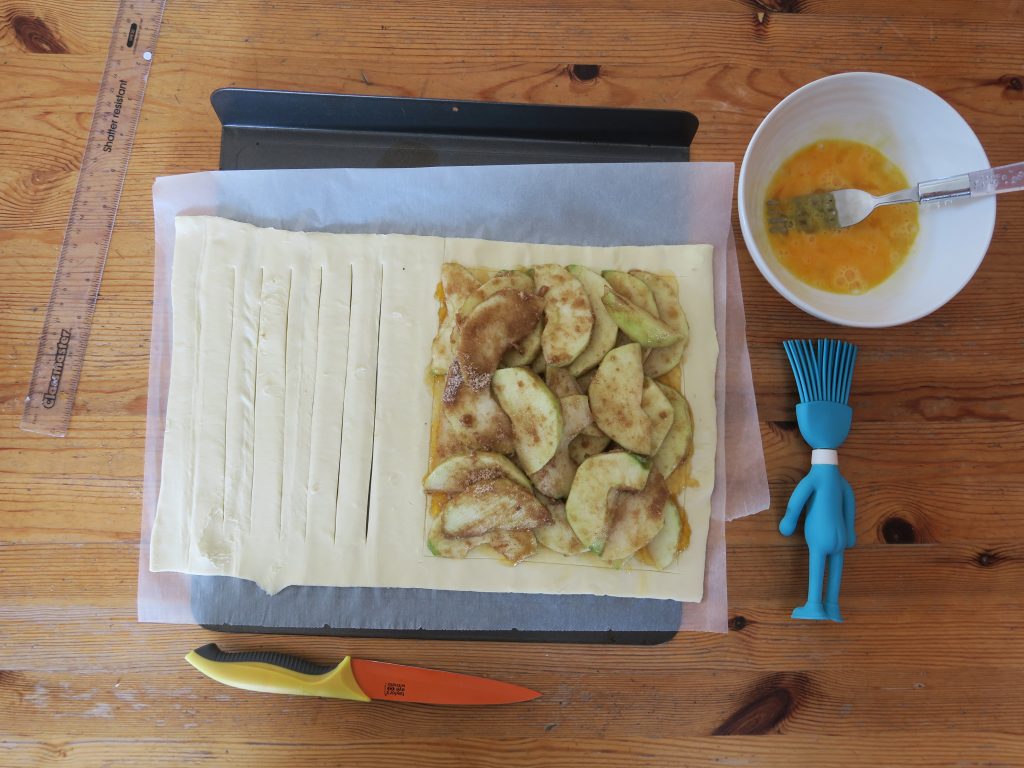
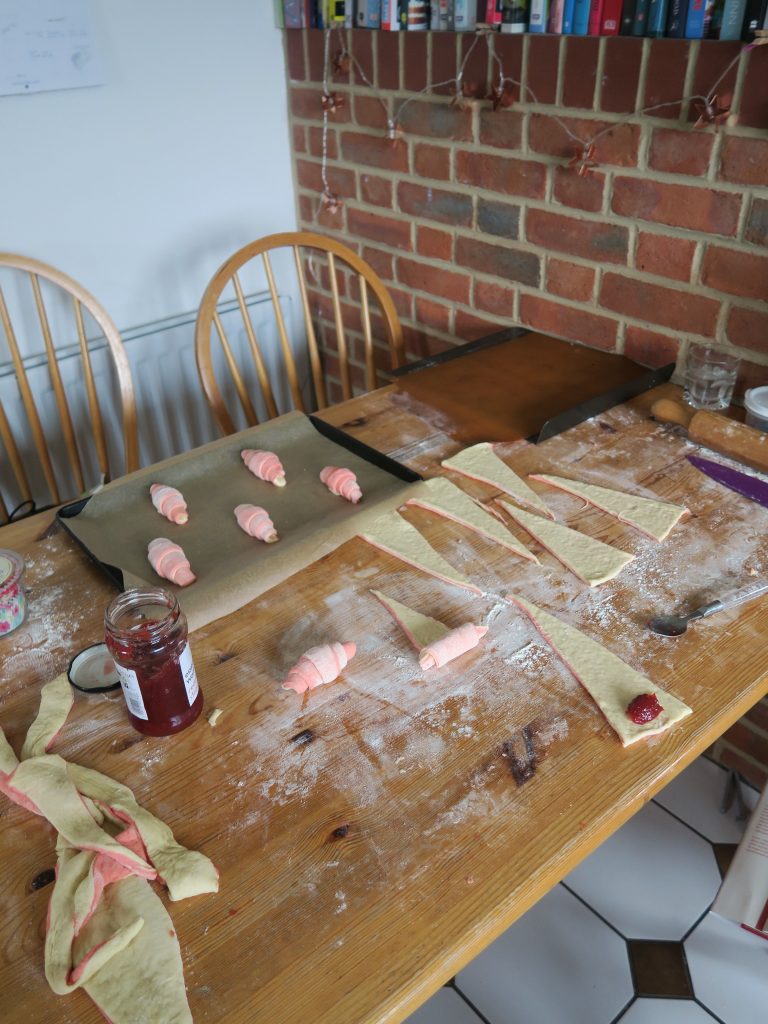
  13. Cut the rectangle in two to make 2 rectangles 15 x 40 cm. Take one of the rectangles and cut a little notch every 10cm along one edge. Then measure the other edge: cut one notch at the first 5cm, and then cut a little notch every 10cm.
  14. Take a knife or a pizza cutter and cut diagonally between the notches to make a series of triangles 10cm at the base and 20cm high. Repeat with the other rectangle of dough.
  15. Take one triangle and stretch it a little to make the dough taught. Then put a little blob of jam at the wide base before rolling up the croissant from the wide base to the point. Place the croissant onto a lined baking tray with the join underneath. Repeat until you’ve used all the dough to make some croissants.
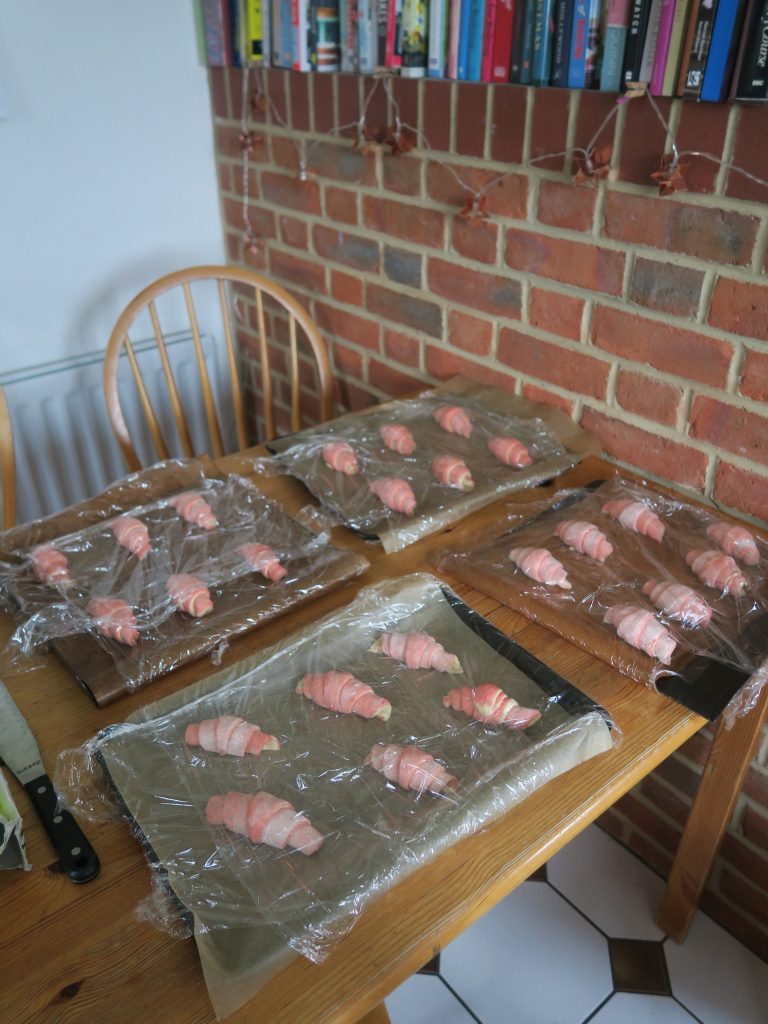
  16. Cover loosely in clingfilm and then leave for 2 hours to rise and double in size.
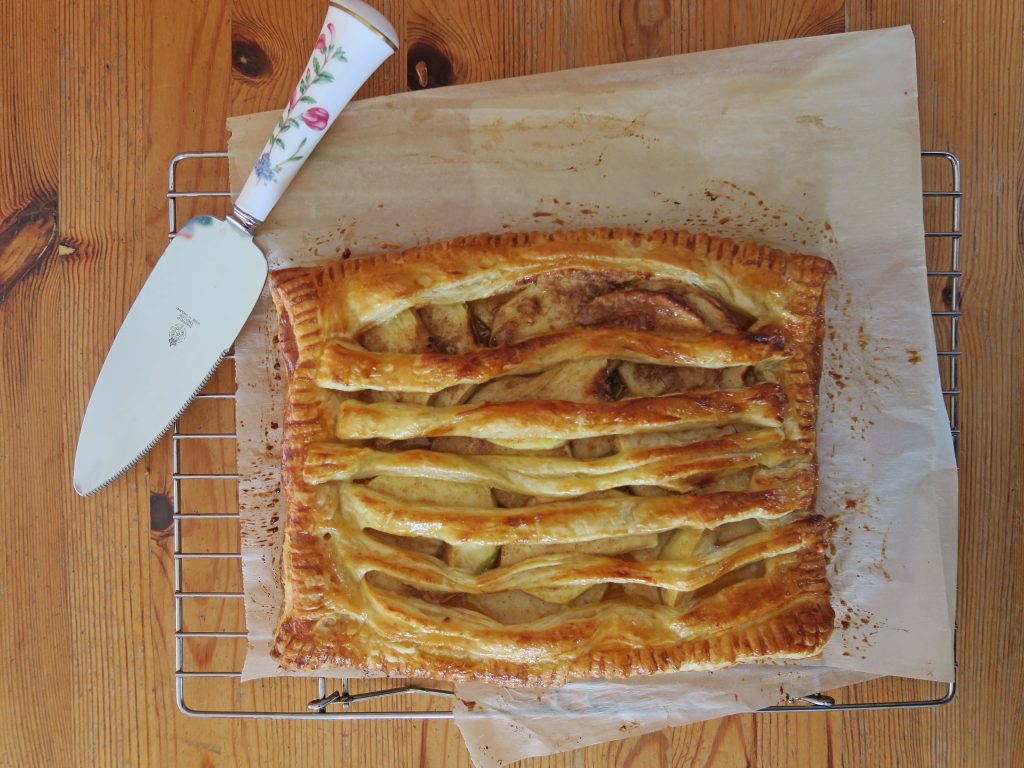
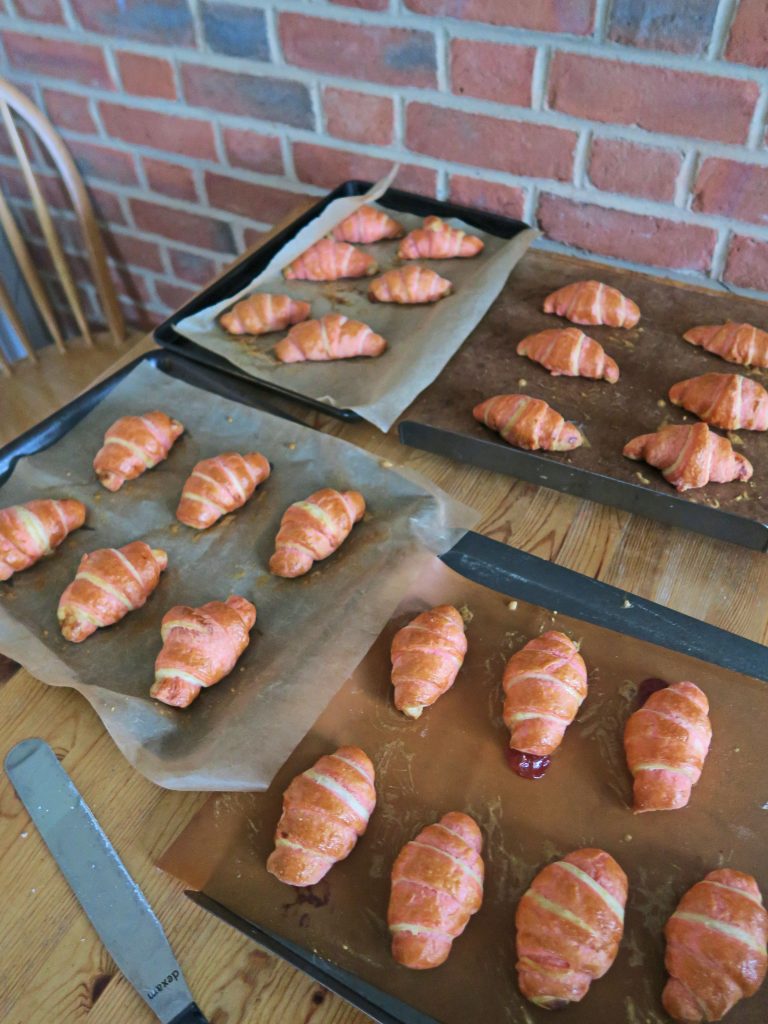
  17. Pre-heat the oven to 180˚C. Take the beaten egg for the decoration and lightly brush it over the pastries. Then bake the croissants in the oven for 15-20 minutes until golden brown and risen. Leave to cool a little before eating!

Thanks for reading!

Emma x


Blood Orange Chocolate Meringue Pie

Blood Orange Chocolate Meringue Pie

Having just moved to a new place I’m meeting loads of new people and I’m going through that classic process of making friends. The classic what’s your name? Where are you from? What subject do you do? And so on.  Then once your past the go-to questions things get a little more creative, and sooner or later things seem to move onto ‘hobbies and interests’ at which point I inevitably get asked ‘what is your favourite thing to cook?’ It’s taken a while to work out what actually is my favourite thing to cook, and, whilst I don’t have a firm fave, the best answer I have at the moment is fruity meringue pies. This is somewhat ironic as I don’t really like them, but they’re fun to make for two reasons i) they’re my Grandad’s favourite so every time we see him I make a lemon meringue pie, and ii) they involve three really fun elements to make: pastry, curd and meringue.

I normally make traditional lemon meringue pies, but as I’m not a big fan of lemons I thought I’d try making a chocolate orange variation instead. However, the general concept of a meringue pie is that the curd is really sharp and that balances the super sweet meringue, so I’ve added some lemon juice in the curd of this one, not so much for the lemon flavour but more to give the filling a sharp kick. Since I made that almond and blood orange cake a little while ago I’ve been obsessed by blood oranges, and they work so well in this! They’re a little more floral and fruity than normal oranges, so you can think of this as orange-pie-plus!

(If you’ve never made pastry before and the thought of doing so makes you tremble, check out my last post on everything you need to know about making a pastry base!)

Recipe

Serves 12

Time: 2 hours

Ingredients

For the Pastry

  • 285g Plain flour
  • 30g Cocoa powder
  • 90g Icing sugar
  • Pinch of salt
  • 225g Unsalted butter
  • 1 Large egg
  • 1 tbsp Cold water

For the Blood orange curd

  • 3 Blood oranges
  • 3 tbsp Lemon juice
  • 65g Cornflour
  • 300ml Water
  • 110g Caster sugar
  • 85g Unsalted butter
  • 4 Egg yolks

For the meringue

  • 50g Dark chocolate
  • 5 Egg whites
  • 250g Caster sugar
  • 2 tsp Cocoa powder

Method

  1. Pre-heat the oven to 180˚C. Then grease a 9 or 10 inch fluted tart tin.
  2. Put the flour, cocoa, sugar and salt into a large bowl and mix together. Add the butter and cut it up into chunks with a round bladed knife.
  3. Then go in with your fingers and rub the butter into the flour to make a bread-crumb texture.
  4. Add the egg yolk and the vanilla to the mixture and then mix everything together with a round bladed knife until a ball forms. (You might need to go in with your hands again and squish the dough into a ball).
  5. Wrap the dough in cling film and then leave it to chill in the fridge for at least an hour.
  6. Lightly flour a surface and turn the dough out onto it. Roll the pastry into a circle at least 12inch in diameter. Flip the pastry into the tart case and then gently ease it into the flutes of the tin. Then use a rolling pin to trim off the excess by rolling it over the edge. Chill in the fridge for another 30 minutes.
  7. Line the pastry case with baking paper and baking beans. The easiest way to do this is to scrunch up a square of baking paper and then un-crumple it – this will make it super easy to line the tin with!
  8. Put the base in the oven and bake for roughly 15 minutes, until the base is cooked through but not necessarily crisp. Then take the case out of the oven, remove the beans and bake for another 5-10 minutes, until crisp.
  9. Next make the curd. Put the zest and the juice of the blood oranges into a heatproof bowl. Add the lemon juice, cornflour and mix together to form a paste.
  10. Put the water into a pan and bring to the boil. Then pour the hot water over the orange mixture, stirring constantly. When combined pour the mixture back into the pan and place over a medium heat. Stir constantly until the mixture starts to thicken. Then leave to boil for a minute.
  11. Take the mixture off the heat and stir in the sugar, butter and the egg yolks. Set aside until needed.
  12. When the pastry case is ready, pour the curd into the case and smooth over with a spatula . Lower the oven temperature to 140˚C.
  13. Now make the meringue. Put the chocolate into a heatproof bowl over a pan over simmering water (make sure the bottom of the bowl doesn’t touch the water!). Melt gently and then take the bowl off the heat and leave to cool a little.
  14. Next clean a metal or glass bowl and some electric beakers with hot soapy water. (You need them to be really clean so that the meringue will hold its shape).
  15. Put the egg whites into the clean, dry bowl and whisk until soft peaks form.
  16. Slowly add the sugar, one tbsp at a time, whisking constantly until stiff peaks form.
  17. Stir together the cocoa powder and the melted chocolate and fold it into the meringue to get a swirl effect.
  18. Spoon the mixture into a piping bag with a star shaped nozzle and then pipe swirls over the curd (or just dollop the meringue on top if you don’t want to pipe).
  19. Put the whole thing back in the oven for 10-15 minutes until it’s crisp but not brown. Then leave to cool slightly in the oven before serving!

Thanks for reading!

Emma x


Making a Pastry Case

Making a Pastry Case

Lots of people have been telling me that they love m’ blog but that everything looks too hard to actually make. Whist I’m perfectly happy to keep generating eye candy I thought I’d start some step-by-step posts on how to do relatively complicated but really useful things, like making a pastry case.

For years I couldn’t make these and I’d just buy the ready made ones from Sainsbury’s to avoid the disappointment of another soggy bottom or another crust that has shrunk, but alas years of practice has finally paid off and now these are one of my favourite things to make.

So here’s a step-by-step guide of how to make a pastry case, from making the pastry and lining the tin to baking blind and using your new found skill in actual recipes. Here I’m using a chocolate pastry as the recipe I’m posting next uses a chocolate crust, but feel free to use whatever flavour pastry you want.

How to make a pastry case

1. Make the pastry

This is a seemingly simple step but it is a very important one. How you make the pastry will vary between specific recipes but here’s a few top tips:

  • If the recipe says to rub the butter into the flour, begin this process by taking a table knife and cutting the butter up into the flour until it’s too small to keep cutting up. Then go in with your fingers. The warmer the pastry gets the softer it gets and the harder it is to work with, so you want to keep the pastry as cool as possible.
  • On a similar note, add your liquid to the dough gradually. If you add too much your dough will be super soft and hard to work with so you could end up over working the dough which would make the pastry undesirably chewy.
  • Finally make sure you chill the dough. Personally I’d chill it for at least 90 minutes, maybe more. This will help prevent the dough from shrinking and will also harden up any butter than may have melted during the making of the pastry, making it easier to work with.

2. Shape the dough

Take the dough out of the fridge and form into a ball. Sandwich the ball between two sheets of cling film and then squash slightly to make a flattened circle. Most people roll their pastry out onto a floured worktop but I find using cling film quicker, less messy and it saves on flour so why not?

3. Rolling out the pastry

Roll the pastry out between the cling film with large rolling pin into a large circle. Use the tin to see how much wider you need the dough to be and in what direction. The pastry should be about 2 cm wider all the way around (to be able to fit up the sides of the tin with some overhang), and be about the thickness of a 10p piece.

4. Putting the pastry into the tin

Now you’re going to have to get physical. Take the top layer of cling film off the pastry and discard it. Then ease the forearm of your less dominant hand under the pastry sheet and lift it up as shown above. (You could also do this with a rolling pin if you’d prefer). Then place the tin underneath where your arm is and roll the pastry off you arm and into the tin, making sure that the cling film is on top of the pastry. It’s a good idea to work from one side of the tin to the other, making sure there’s some good overhang.

5. Fit the pastry into the tin

Gently ease the pastry into the shape of the tin so that is has contact with the whole of the tin. This will help it to bake evenly. Then take the layer of cling film off the pastry.

6. Trim off the excess

Some people prefer to do this once the case has baked as it helps stop the pastry from shrinking away from the edges too much, but for tarts I think the best way to do it is like this. Make sure all your pastry is fitting snugly into the tin. Then take your rolling pin and roll it around the top of the tin so that the excess pastry is rolled off.

7. Using the excess pastry

Bundle up your excess pastry. You can use this to fill in any gaps in your base at this stage, or if any cracks appear after the first bake, so don’t throw it away! You could also use it to make pastry decorations, or even make cute little biscuits!

8. Blind baking

Blind baking is where you pre-bake the pastry case before adding the filling. This helps to make sure the base is cooked all the way through and stops you getting a soggy bottom! Some pies and tarts don’t need to be blind baked (pies with tops and bakewell tarts are two that come to mind) but it’s a useful skill to learn anyway.

Take a piece of baking paper wider than your tin and scrunch it into a ball like you were going to throw it away. Then un-crumple the paper and line the inside of the pastry case with it. Scrunching it up first should make it easier to make the pastry fit the shape, but still be careful when doing this as you could pull the pastry down from the sides of the tin.

9. Adding the beans

If you bake the pastry case without any filling or weight on it then the base will rise up and leave no room for any fillings. To stop this you can use ceramic beans like these which are re-usable and weigh the pastry down. Alternatively you could use rice, lentils or any other dried pulse to weigh the pastry down, but I prefer using beans as then I don’t feel like I’m wasting food.

Bake the pastry in the oven for 15-20 minutes. This will vary depending on the size and type of tart you’re making but you generally want the pastry to look cooked all the way through (see photo below), even if it’s not crispy yet.

10. Second bake

Once the pastry has cooked all the way through, take it out of the oven and take the beans or whatever’s weighing the pastry down out. Also take out and discard the baking paper. Then bake the pastry for a further 5-10 minutes until crispy but not burnt.

11. Be creative!

Hopefully you should have a perfect crisp pastry case to work with now. You can either stop the baking here and fill the case with things that need to be chilled to set, or you could fill it with mixtures and fillings that need to be baked. Here’s a few of my faves to try…


Baked fillings

Frangipane – This is a cake-type mixture made with almonds. It’s traditionally used for bakewell tarts but it’s also a great base for other types of baked tarts!

Custard – Whilst some custard fillings will just set naturally, some need to be baked, like Portuguese custard tarts. You can really experiment with this type of filling as the custard can be flavoured and customised a lot.

Fruit – Mainly for pies, but also for tarts. Peel and de-stone whatever fruit you like and then either stew it first or pop it into a pastry case raw.

Cold fillings

Jams – This works really well in the bottom of a tart with a baked frangipane or a light mousse over the top as it packs great flavour!

Ganache – The first tarts I made were just chocolate tarts made by pouring warm cream over an equal amount of chopped dark chocolate and leaving it to set. You can also add liqueurs to your ganache if you want to make a boozy tart.

Mousse – It’s slightly untraditional to put mousse in a tart,  but I think a soft fruit mousse can work really well in a pastry case, especially if layered with a jam or jelly.

Creme pattisserie – On the other side of our baked custard tarts are the tarts filled with creme patisserie – a custard that doesn’t need to be baked. This is really good when topped with fresh fruit and berries! (See recipe below).

Recipe suggestions…

Vegan Woodland Pie

Devils Fruit Pie

Bakewell Tartlets

Butterscotch Pear Tart with Blackberry Sauce

Fruit Tartlets

Thanks for reading! If you have any other pastry queries I haven’t talked about here please let me know by leaving a comment below.

Emma x

Devils Fruit Pie

Devils Fruit Pie

I’ve always loved a good bit of folklore and when I was down in Devon the other day I came across something I’d never heard before, so here’s some storytime for your day. We were on a coastal walk with some friends, winding our way through sandy dunes and forest paths, when we started walking past isles of blackberry bushes laden with tones of juicy fruit ripe for the plucking. My mum is a keen forager and at this time of year always carries bags and Tupperware on walks in case we pass anything edible that can be picked (if we hit Armageddon I’m sticking close to her!). So we pulled out the bags and started picking off the biggest blackberries we could find, eating a few, then bagging a few for later.

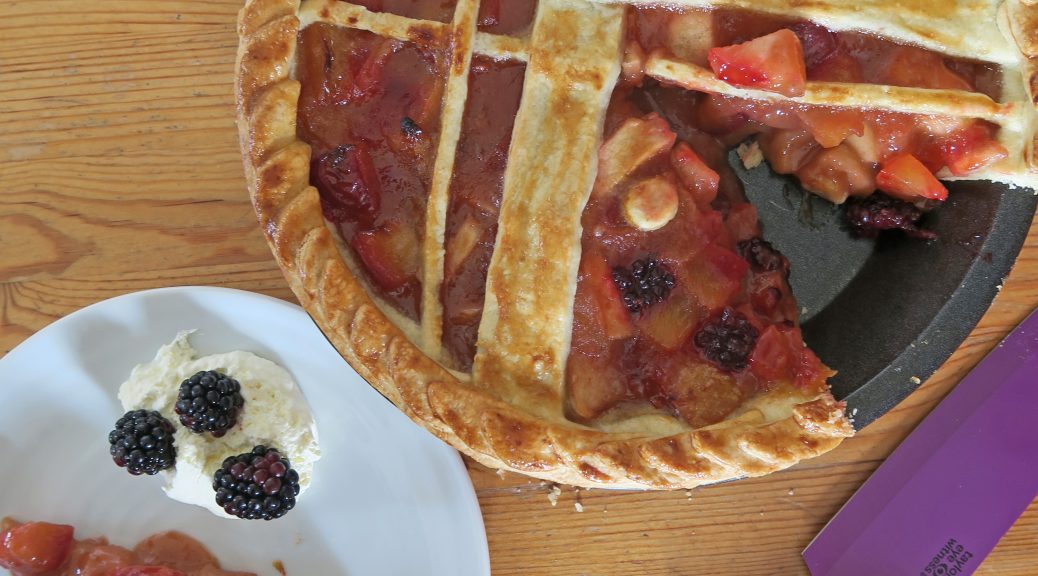
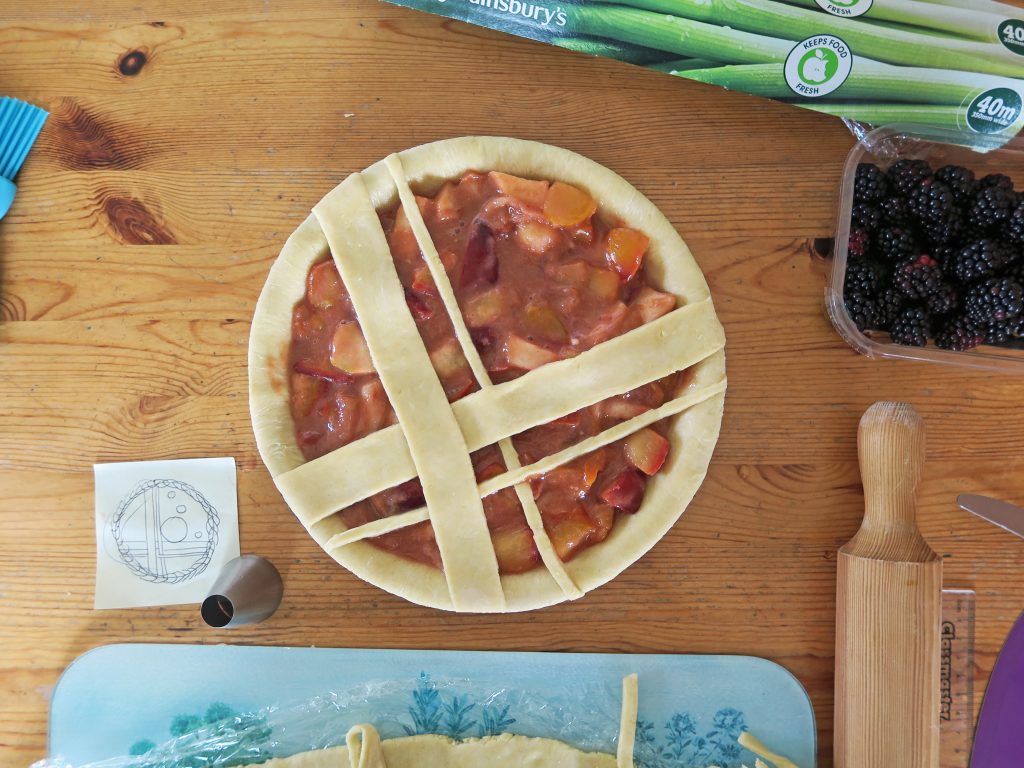
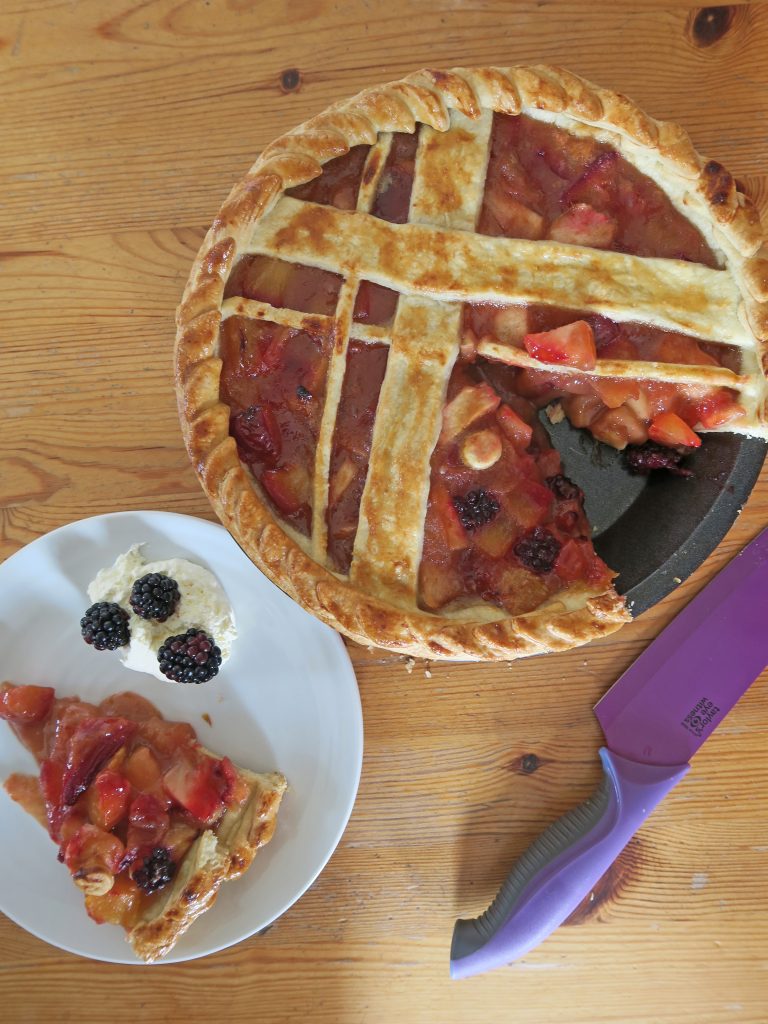
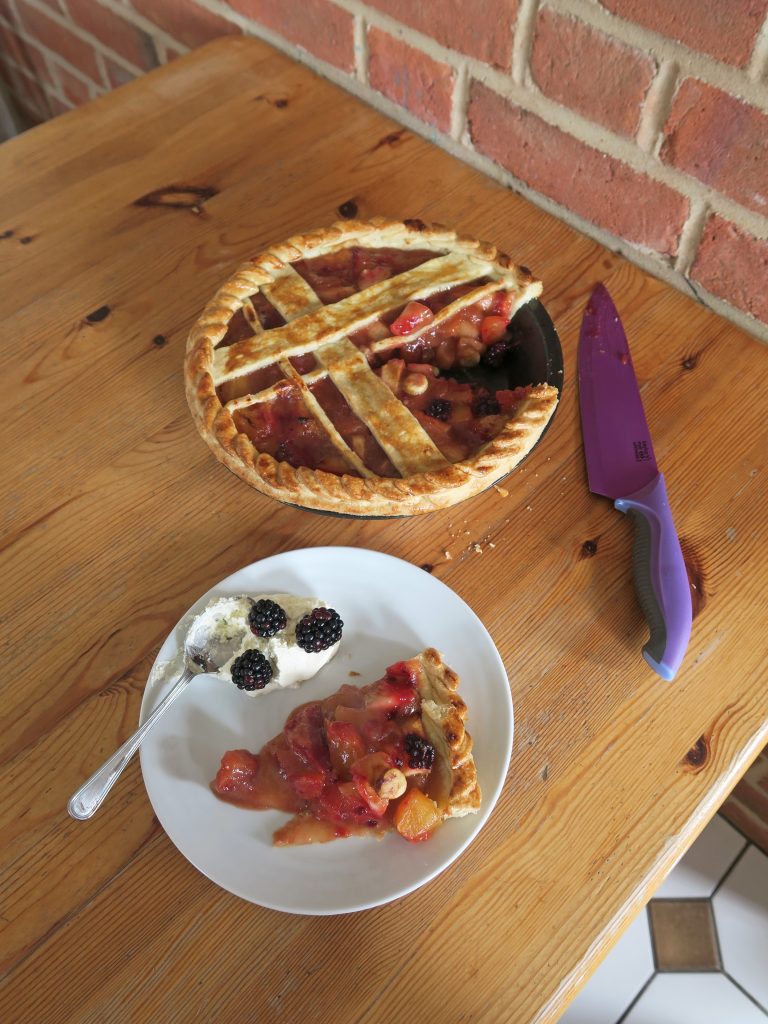
 Then, I can’t quite remember how, Simon began talking about the Devil spitting on blackberries and impending doom awaiting those who’d eat blackberries after 11th October, as you do. Being me I missed half the story through drifting in and out of the conversation, so when I got home I looked it up and to find out what the blazes he was on about. Apparently when Lucifer fell from heaven, on the 11th October (who knew!), he fell on a thorny blackberry bush. As a result he now spits on all the blackberries on 11th October and so anyone who eats them after this time is doomed . What a cheery story right?  You learn something new every day.

Luckily you have another week or so to forage for all the blackberries you can find and stuff them into as many pies, scones or tarts as you can before they get spat on by the devil! This pie is made up of a whole load of fruit we foraged for and just shows that pretty much anything can go in a pie (within reason – don’t go all Sweeney Tod on me). Here I’ve used apples, plums, damson and blackberries. I’ve also done a decorative top because I wanted to get a little creative, but you could also cover the whole thing in pastry to get the traditional look, or do something wacky yourself.

Recipe

Serves 12

Time: 1 hour, plus chilling time

Ingredients

For the pastry

  • 340g Plain flour
  • 150g Unsalted butter
  • 1 tbsp Caster sugar
  • A pinch of salt
  • 3 tbsp Water

For the filling

  • 1 Large cooking apple ( I used Bramley)
  • 4 Plums
  • A handful of Blackberries
  • 6 Small damsons (or 2 more plums)
  • 3 tsp Brown sugar
  • 1 tsp Ground cinnamon
  • 1 tsp Ground ginger
  • 1 tbsp Plain flour
  • 1 tsp Cornflour

Method

  1. Begin by making the pastry. Put the flour and butter into a large bowl. Rub the butter into the flour with your fingers until the mixture resembles breadcrumbs.
  2. Stir the sugar and the salt into the flour with a round bladed knife and then keep mixing as you add the water until a smooth dough forms. Bring the dough together with your hands to make a ball and then wrap the dough in cling film and leave in the fridge to chill for at least 1 hour.
  3. Meanwhile prepare the filling. Peel, core and dice the apple. Then de-stone and dice the plums and damsons into similarly sized chunks to the apples.
  4. Put all the fruit into a large pan with the sugar, cinnamon, and ginger. Place over a medium heat and bring to a gentle simmer, stirring occasionally until the fruit is starting to soften and let out its juices. Add the flour and the cornflour to the pan, stir to combine and then set aside to cool.
  5. Pre-heat the oven to 180˚C. When the pastry is ready take it out of the fridge and place on a lightly floured worktop. If you’re going to make a full pastry top cut the pastry into two, if not cut 1/3 of the pastry off and leave to one side for later. Shape the larger block of pastry into a ball and then roll it out into a circle slightly wider than the pie tin (so you’ll have some over hang).
  6. Transfer the pastry disc into the pie tin, making sure it fits into any flutes or creases in the tin. Allow any excess pastry to hang over the edge for now. Pour the fruit filling into the pie and level it off so it’s an even layer.
  7. Now shape the topping. For this pie I cut 4 pastry strips to make a small lattice on top and then cut out some leaves for the boarder, but you could shape the pastry for the top in any way you like. Alternatively you could roll out the pastry into a disc to cover the whole top like an original pie.
  8. Once you’ve added any lids, pastry strips or the like, but before you add any decorations to the rim of the pie you’ll need to trim the excess pastry. Hold the pie in one hand and take a knife with the other. Cut around the edge of the pie at a 45˚ angle against the tin to cleanly cut off the excess.
  9. When the pie is ready brush with the beaten egg or milk to glaze and then bake in the oven for 20-30 minutes until golden brown and crisp. Serve with cream or custard!

Thanks for reading!

Emma x


Apple Jalousie

Apple Jalousie

It’s taken a while for me to get my head around the new direction of this blog, specifically how on earth am I going to combine food with mental health awareness? As food is such a social and communal thing you’d think it’d be the perfect medium through which to spark conversations, and that’s what I thought, but sitting here at my laptop typing away I’m stumped as to how to make this work from my end. I’m generally one of those people who thinks out loud so I’ve decided that’s what I’m going to do now. As always the hardest things is to know how to start. How do you introduce such a sensitive topic and how do you even begin to open up about your own problems? Y’ see, I don’t think of myself as a writer and yet I thought I could write a food blog because I feel like I know about food, but when it comes to writing about something more serious than puff pastry I get a little tongue tied.

As this is a food blog I wouldn’t be surprised if most of you clicked onto this post expecting to see lots lengthy descriptions of beautiful autumn apples or to find out what the hell a jalousie actually is – that’s what you’d expect to read and that’s what I still want to deliver.  So my challenge is to find a way to write mouth-watering food themed paragraphs, glossy recipes, and at the same time talk about what needs to be talked about without being way too long and boring. The question is how?

I’m afraid I haven’t come to a conclusion on that yet, but I promise I’ll keep working on it! My high school yearbook quote was “I have no idea what I’m doing, but I’m doing it”, which I think is pretty applicable. I have no idea how I’m going to do what I’m planning on doing, but it’ll work out in some way, shape or form. In the meantime (talk about not giving you mountains to read!) let me introduce you to a little fun pastry called jalousie. I first made one of these way back in school when I was young and could burn water. This is a super easy and quick way of using up any apples you’ve got lying around and is a perfect dessert for autumn!

Recipe

Serves about 9

Time: 15 minutes, plus baking time

Ingredients

  • 1 Pack of puff pastry
  • 2 tbsp Apricot jam
  • 1 Large cooking apple (I went for Bramley)
  • 1 tbsp Brown sugar, plus extra for sprinkling
  • 2 tsp Plain flour
  • ½ tsp Ground cinnamon
  • 1 Small egg, beaten

Method

  1. Pre-heat the oven to 180˚C and line a baking tray with baking paper.
  2. On a lightly floured surface roll the pastry out into a rectangle about half the thickness of a £1 coin (or just buy ready rolled pastry to make your life easier). Using a knife score a 2cm boarder around the edge of the rectangle and then score a line down the middle. Transfer the pastry sheet to your lined baking tray.
  3. Spread the apricot jam over one half of the rectangle, leaving the 2cm boarder around the edge.
  4. Peel, core and thinly slice the apples. Bung them in a bowl with the sugar, flour, and cinnamon, and then mix together until combined. Arrange the apples over the pastry with the apricot jam so they cover the area evenly.
  5. Take a sharp knife and cut 1cm thick lines into the other half of the pastry, again leaving the 2cm boarder that you scored earlier around the edge.
  6. Crack the egg into a bowl and beat with a fork. Then brush a little of the egg around the 2cm boarder (this will help the pastry to stick).
  7. Fold the pastry top over the apples, separating the strips slightly so they’re separate. Then take a fork and press around the edge of the pastry to seal the top and the bottom together.
  8. Brush more of the egg over the pastry to glaze. Finish with  sprinkle of brown sugar and then bake in the oven for 10-15 minutes until puffed up and golden brown.
  9. Serve warm with ice cream, whipped cream and/or custard!

Thanks for reading! You can now follow/subscribe to The Mindfulness Kitchen on all kinds of social media – links in the side bar!

Emma x